Category: Savoury Dishes

  • Spring Lentil Wild Rice Soup

    Spring Lentil Wild Rice Soup

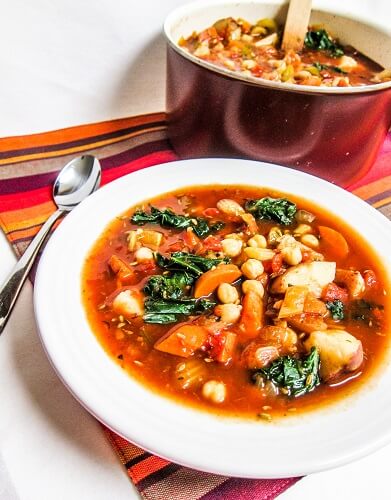
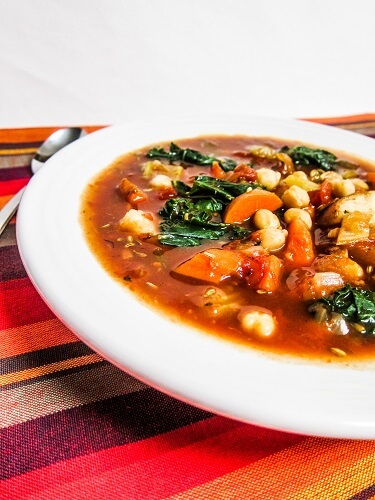
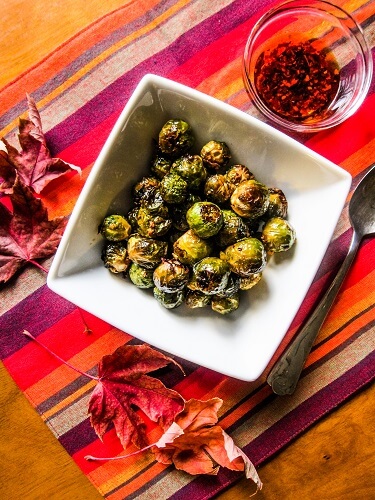
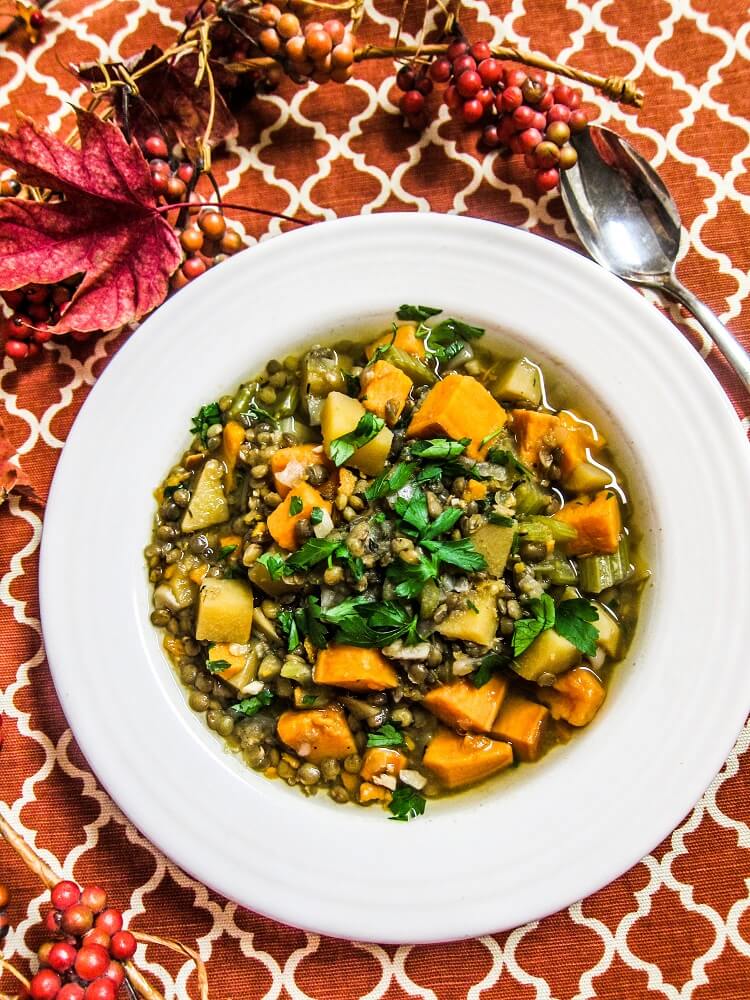
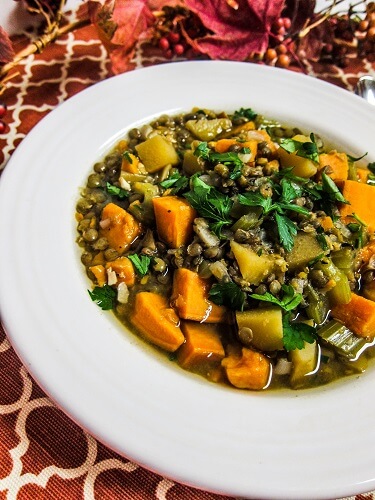
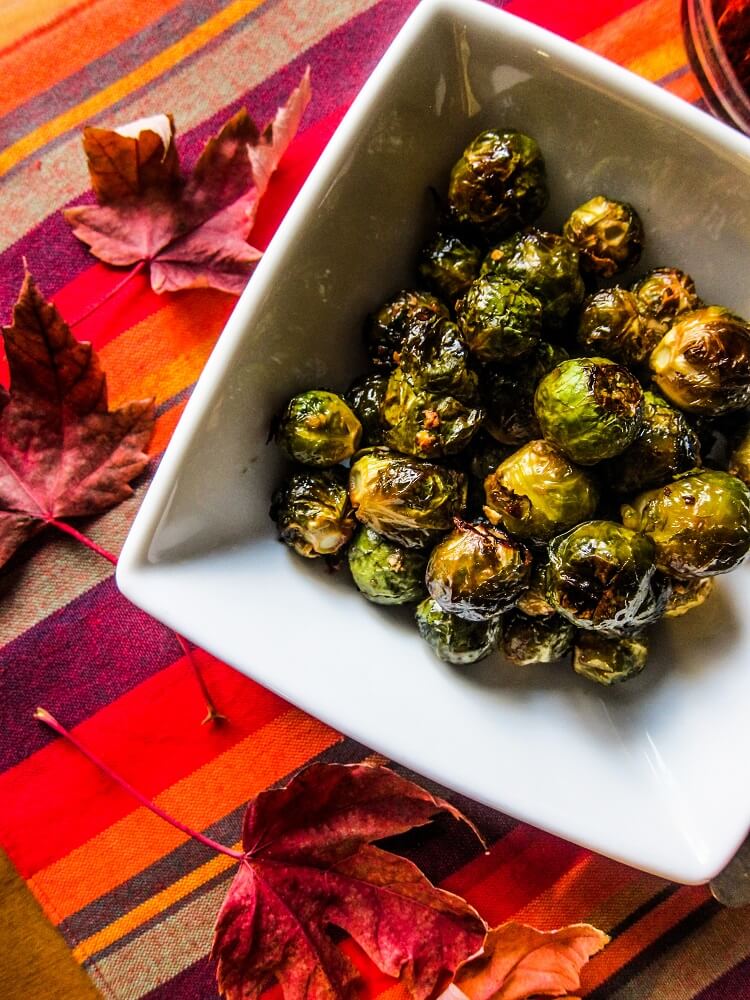
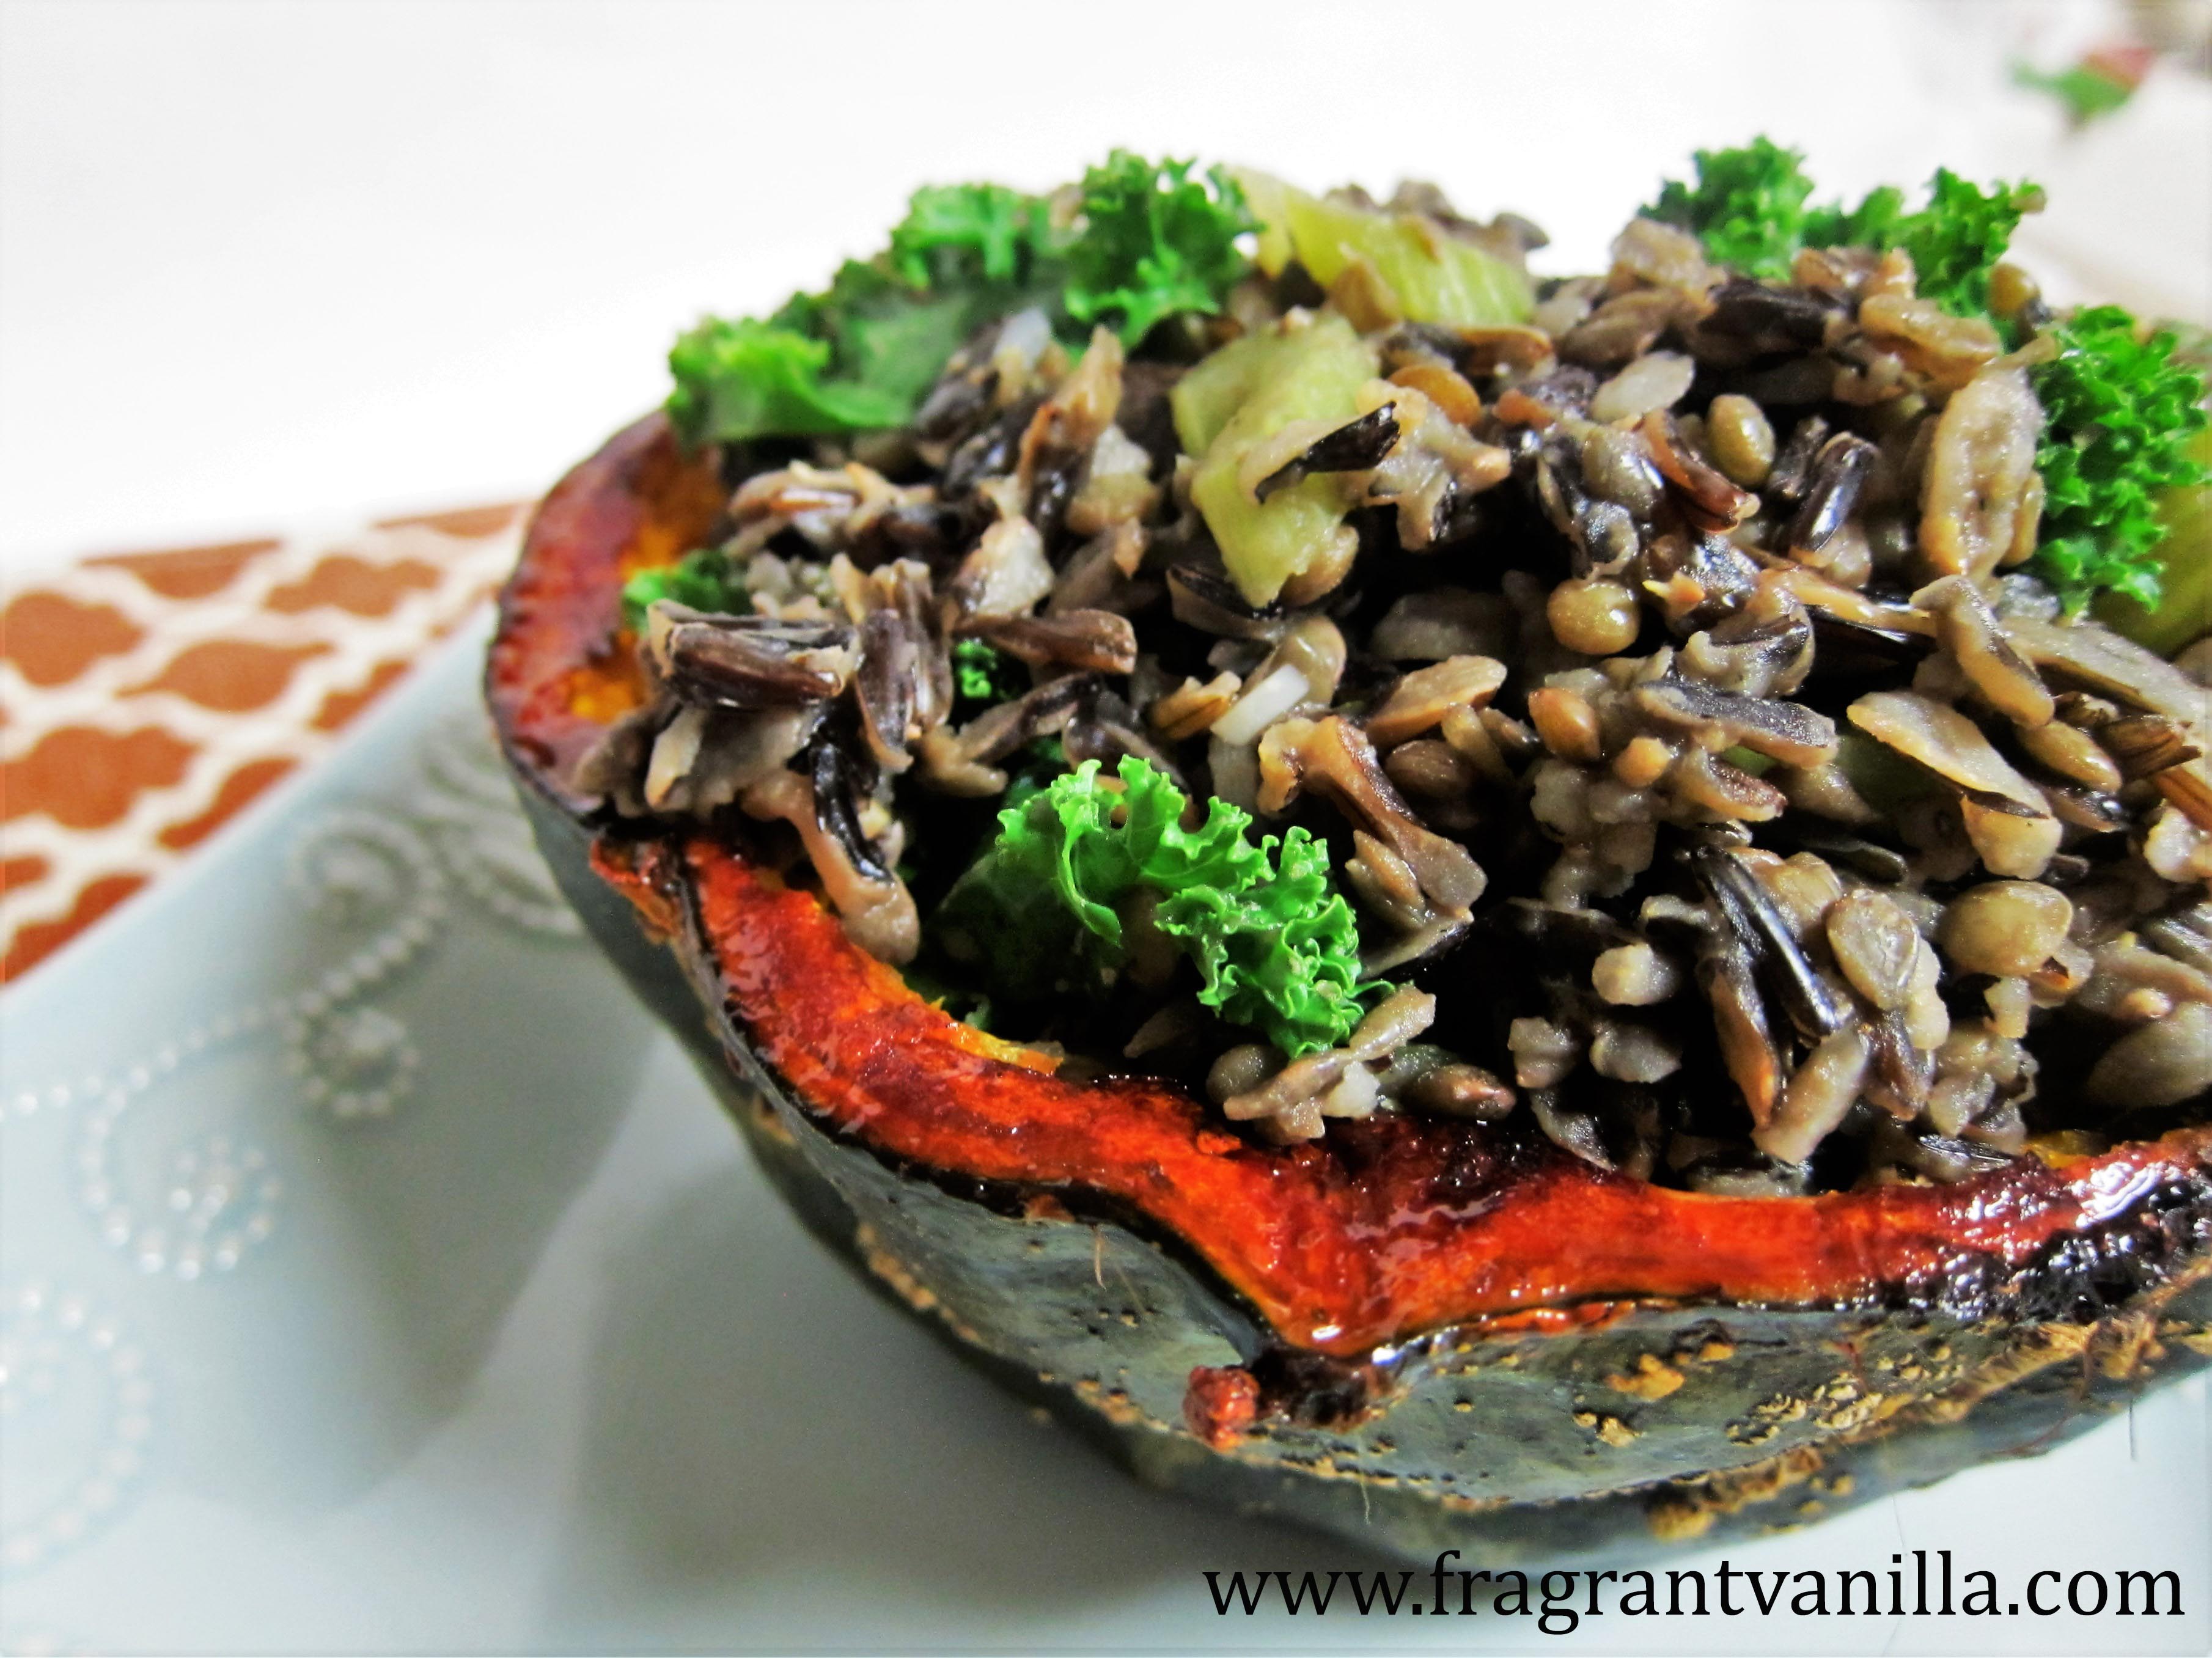
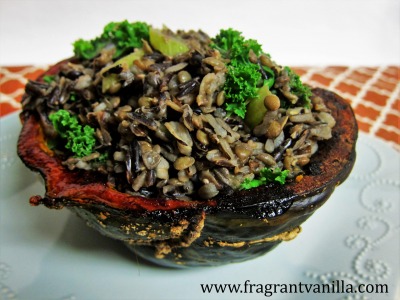
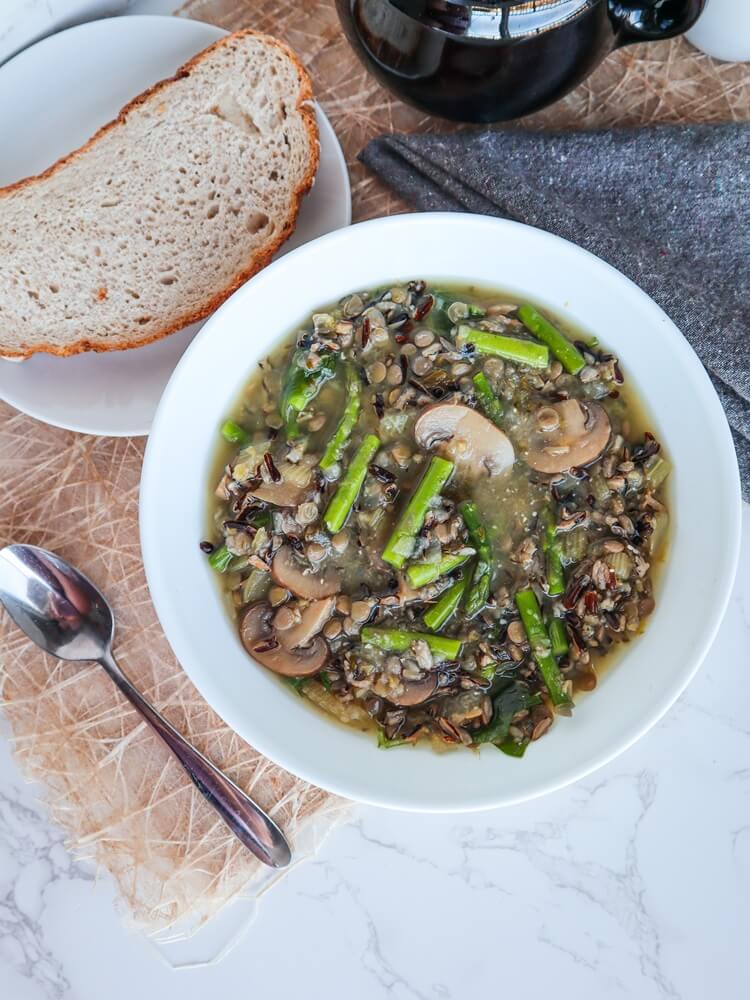
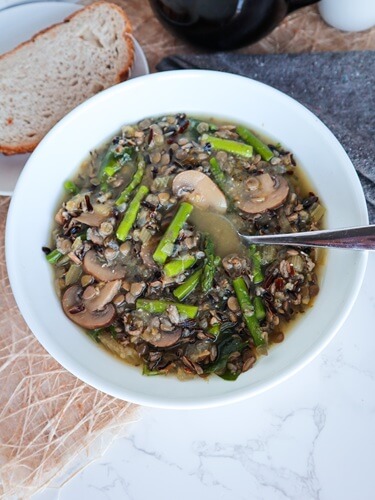
    Spring may be technically here, but it was snowing most of the day today, so I am still into warming hearty soups at the moment. It’s the perfect weather lately for staying inside, being cozy and cooking something delicious!  Like this Spring Lentil Wild Rice Soup I recently made!  It was so good I had to share the recipe!

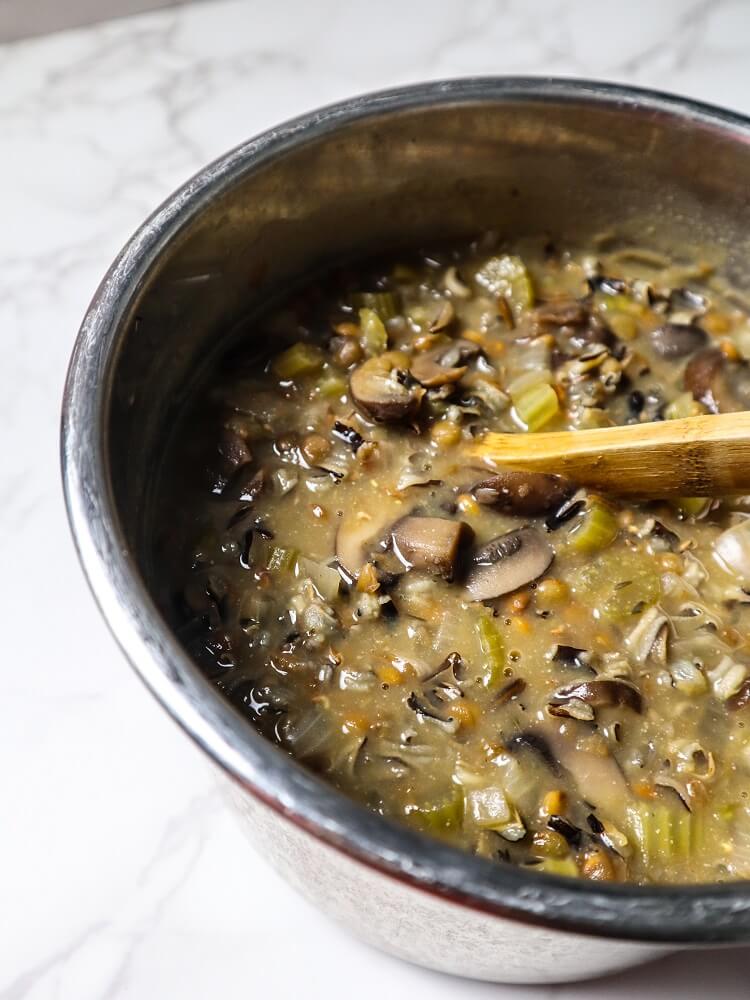
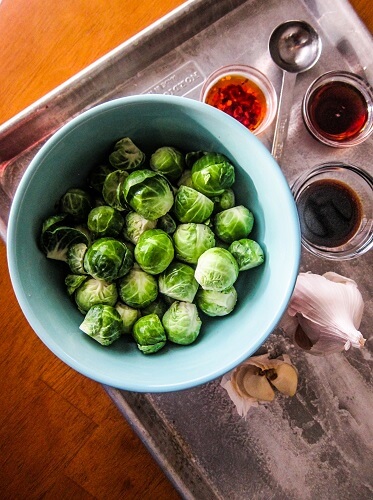
    I love wild rice in soups, it is so hearty and earthy and delicious!  I think it is perfect paired with lentils like in this soup, and they both add fiber and protein!  For the veggies, I added celery, onions and garlic to to start.  These are the main 3 vegetables I like to always add to my soups because they give it a good flavor base.  I don’t normally have vegetable broth on hand so I rely a lot on the vegetables I put into my soups for flavor.

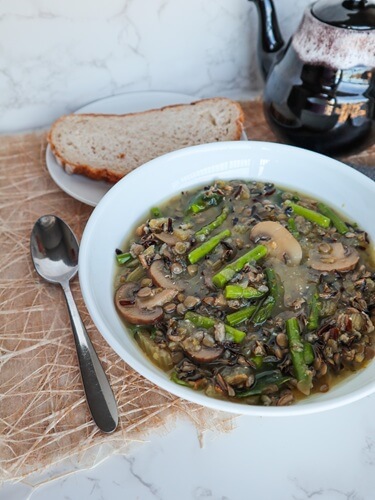
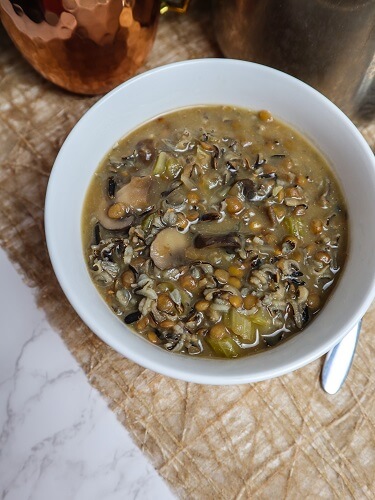
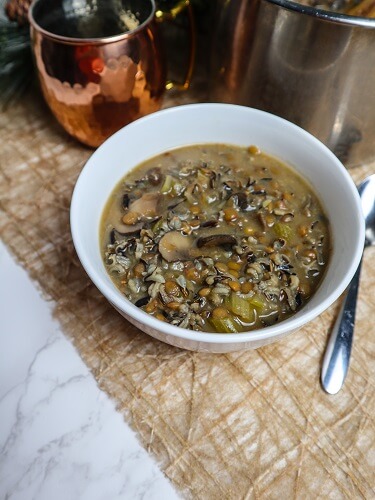
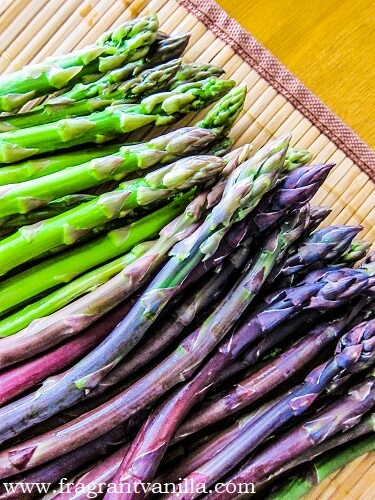
    Since this is a Spring soup, I added asparagus, greens and crimini mushrooms.  This combination is so delicious in soup, and it is the perfect time of the year to enjoy asparagus!  I also added miso, tamari and nutritional yeast into the base of this soup to give it a delicious savory flavor!  The instructions for this soup are to make it on the stove, but you can also make it in the Instant Pot if you prefer that.  Just cook the wild rice separately but add everything else to the Instant Pot except the asparagus, miso, and greens.  Cook it in soup mode on the Instant Pot, and at the end, as soon as it finishes cooking add in the asparagus, miso, wild rice and greens.

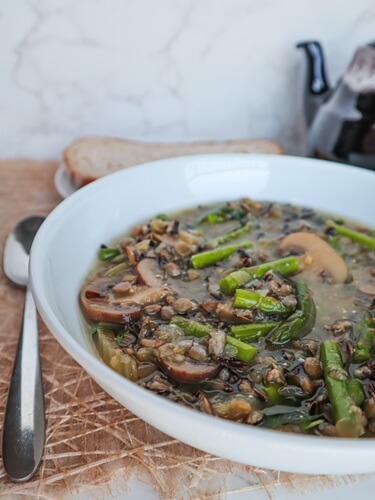
    This soup was so delicious!  I served it with some crusty bread and it was a wonderful hearty meal for a chilly day!  If you are in the mood for something warming and delicious but still spring appropriate, definitely give this Spring Lentil Wild Rice Soup a try!


    Spring Lentil Wild Rice Soup
    Serves2-3

    Ingredients:

    • 2/3 cup uncooked wild rice
    • 2 1/2 cups filtered water
    • 4 large celery stalks, sliced
    • 1 small onion, diced
    • 1/2 cup sliced green onions
    • 2 garlic cloves, minced
    • 2 cups sliced crimini mushrooms
    • 1/3 tsp sea salt or to taste
    • 1/2 tsp dried thyme
    • 1/2 tsp dried oregano
    • 2/3 cup French lentils
    • 2 cups filtered water
    • 2 Tbsp nutritional yeast
    • 1 Tbsp tamari
    • 1 cup asparagus, cut into 1 inch pieces
    • 1 Tbsp white miso whisked into 1 Tbsp water
    • 1 large handful greens


    Directions:

    1. Place the wild rice in a pot, cover with filtered water by at least 3 inches and bring to a boil. Lower to a simmer and cook until the rice has “bloomed”, about an hour to an hour and 15 minutes depending on your rice. Drain the rice and set aside.
    2. Combine the 2 1/2 cups filtered water, nutritional yeast, tamari, celery, onion, garlic, mushrooms, sea salt, thyme, and lentils in a pot and bring to a boil.  Lower to a simmer and cook for about 40-45 minutes until the lentils have are tender.  Add the asparagus and cook a few minutes until bright green. Stir in the wild rice.  Add the nutritional yeast, miso mixture and greens cook until greens have wilted.
    3. Serve!
  • Vegan Double Chocolate Banana Bread

    Vegan Double Chocolate Banana Bread

    I have always loved banana bread.  It is something that my Mom and Grandma always made when I was little (the same shared recipe) and it was always so good no matter the variation of it that was baked that day.  Sometimes it had nuts or chocolate chips but the chocolate chip version was my favorite. I have since veganized that recipe and that is the one that I currently make when I feel like I need to get rid of a few over ripe bananas.  Last weekend I was in the mood for something rich and chocolaty so I decided to make Vegan Double Chocolate Banana Bread!  It turned out so good I had to share the recipe!

    For the flour, I used whole wheat pastry flour because it is what I have on hand and prefer most of the time, but you could use all purpose flour. Or if you would like to make a gluten free version of this bread, swap the whole wheat flour for Bob’s Red Mill gluten free all purpose baking flour (I have tried this brand and know it works well for recipes like this).  I used brown sugar because I like the little bit of caramelly flavor it gives to things, but instead of the brown sugar you could also use maple sugar or coconut sugar or even granulated sugar if you prefer those.

    For the milk, I used oat milk, but you can use any type of unsweetened plant based milk in this recipe, such as soy, almond or coconut instead of the oat if that is what you have on hand. For the oil in this I used avocado because I like the flavor but if you would like to make this oil free, use 1/4 cup almond butter ( or your favorite nut or seed butter) instead of the oil.  I have done this before and it is delicious also.  The batter for this bread has plenty of chocolate flavor in the form of cacao powder as well as dark chocolate chunks and it is so delicious!

    It smells amazing while baking, like the best chocolate cake ever!  I could not wait to try it and when I did I was not disappointed!  It is rich and delicious, soft and sweet with decadent dark chocolate chunks throughout, and a hint of vanilla!  It is wonderful with a cup of coffee!  Everyone I shared this with enjoyed it!  If you are in the mood for something rich and chocolaty, definitely give this Vegan Double Chocolate Banana Bread a try!

    Vegan Double Chocolate Banana Bread

    Makes 1 loaf

    Ingredients:

    • 1 cup brown sugar or maple sugar
    • 1 Tbsp ground flax seed mixed with 3 Tbsp filtered water (allowed to sit 15 min. before using)
    • 1/2 cup oat milk
    • 2/3 cup mashed ripe bananas
    • 1/4 cup avocado oil
    • 1 tsp pure vanilla extract
    • 1 1/2 cups organic whole wheat pastry flour
    • 1/4 cup unsweetened cocoa powder
    • 1 tsp baking soda
    • 2 tsp cider vinegar
    • 1 cup vegan dark chocolate chips


    Instructions:

    1. Preheat the oven to 350F degrees, and oil an 8×4 inch loaf pan.
    2. In a large bowl, whisk together the sugar, flax mixture, oat milk, bananas, oil, and vanilla until smooth.
    3. Whisk in the flour and baking soda, then the vinegar until combined.
    4. Fold in the walnuts and dark chocolate chips until evenly distributed.
    5. Pour the batter into the prepared pan, place in the oven and bake for about 1 hour until a toothpick inserted into the center comes out almost clean with a few crumbs attached.
    6. Remove from the oven and let cool before removing from the pan.


    Bread keeps at room temperature for up to 3 days in an airtight container or wrapped, in the refrigerator for up to 1 week, or frozen for up to 4 months.


  • Strawberry Basil Foccacia

    Strawberry Basil Foccacia

    I love foccacia bread!  It is always so delicious and it is fairly easy to make.  I love it served with soup, salad or just for snacking!  Although I have only ever made simple foccacia usually just with herbs and garlic or just plain, I see lots of them made topped with veggies, so I decided that I would try making a Strawberry Basil Foccacia!  Why not?  Strawberries are in season and I have loads of fresh basil growing in my herb pots.

    A long time ago I was actually afraid to make my own yeast bread but now that I have made a bunch of it, the process really isn’t that bad, and it is the perfect weekend morning activity!  And nothing compares to freshly baked bread!  This one is pretty simple to make.  I use rapid rise yeast so that the process is even faster as well than regular yeast (about half the time).  I just used AP flour for this, because it is something that I always have on hand. This bread uses plenty of olive oil which makes it nice and rich, which is what I love about foccacia other than the good flavor.

    I wasn’t quite sure how the fresh strawberries would bake up on top, since they have moisture, but they actually baked into it beautifully creating jammy little flavorful bursts of strawberry on top along with the savory basil.  I also sprinkled it with some flaked sea salt before baking to make it extra delicious! It smelled so delicious while baking I could not wait to try some!

    This bread turned out super delicious and honestly I ate a bunch of it just as a snack because it was so good!  It was soft and savory, so good with the jammy strawberries and the fragrant basil a delicious combo on top!  If you are in a bread baking mood, definitely give this Strawberry Basil Foccacia a try!

    Strawberry Basil Foccacia

    Serves 16

    • 1 3/4 cups warm water (110F degrees)
    • 1 package rapid rise instant yeast (1/4 oz package)
    • 1 tsp granulated sugar
    • 4 cups all purpose flour
    • 2 tsp sea salt
    • 3 Tbsp olive oil, divided
    • 1/4 cup chopped basil, plus more for topping
    • 1/2 cup sliced strawberries
    • flaked sea salt for topping
    1. In small glass measuring cup, combine the yeast, water and sugar and let sit 5 minutes.
    2. Add to a large mixing bowl, and add the sea salt and flour.  Mix well, until completely combined then turn out onto the counter and knead for about 5 minutes.
    3. Add 1 Tbsp olive oil to a glass bowl, and place the dough in it, rolling to coat it. Cover in plastic wrap and let double in bulk (about 30 minutes with the rapid rise yeast).
    4. Place 1 Tbsp olive oil in the bottom of a 9×13 inch pan.  Place the dough in it, rolling it over to coat it, then spread it out in the pan to the sides. Cover with plastic and set aside to rise (for about 30 minutes with the rapid rise yeast).
    5. Preheat oven to 425F degrees.
    6. Once the dough has risen, make divets into it with your fingers and brush with olive oil.
    7. Scatter the strawberries and basil over it and sprinkle with the flaked salt.
    8. Place in the oven and bake for 20-30 minutes until golden brown.
    9. Remove from the oven and let cool before cutting and serving!
  • Winter Vegetable Lentil Pie

    Winter Vegetable Lentil Pie

    Christmas snuck up so fast this year, I can’t believe I am already posting my Christmas food!  I hope you all are having a wonderful holiday season so far! Normally I make lasagna for Christmas but I decided to make something different this year.  I have always wanted to make a savory pie for Christmas and this year I finally got around to making one! I wanted it to be filled with veggies, and some protein so I came up with a Winter Vegetable Lentil Pie! It turned out so delicious I had to share the recipe with you all!

    For the filling I included my favorite veggies, sweet potatoes, squash, and mushrooms with sautéed onions, celery and garlic. I wanted to include some protein and I thought lentils would be perfect! I love them in a vegan shepherds pie, so I thought why not add them this kind of pie as well? I added in a touch of thyme, nutritional yeast and tamari and the filling was delicious!

    Now normally I make my own pie crust but I haven’t had a lot of time lately with the holidays and work so I thought I would use a store bought vegan pie crust this time.  I bought a Dufour pastry crust from Whole Foods Market.  I haven’t bought a store bought crust since before I went vegan so I wasn’t sure how it would be, but it was so delicious!  It made the perfect flakey and delicious crust!  I definitely recommend if you are in need of a store bought crust!  It rolled out nicely, as well!

    This pie turned out soooo good!  The filling was savory and packed with veggies, all of my favorites in one pie, it was filling hearty and that flakey crust was the perfect package for them!  My Mom complimented the pie as well, saying it was very delicious which meant a lot to me.  It was the perfect thing to make for Christmas, but I think this will be a great meal throughout the winter as well!  If you want a switch up from pot pie, give this Vegan Winter Vegetable Pie a try!

    Winter Vegetable Lentil Pie

    Makes 1 9 inch pie

    Ingredients:

    • 2/3 cup green lentils
    • filtered water
    • 2 cups squash cut into 1 inch dice
    • 2 cups sweet potatoes cut into 1 inch dice
    • 2 tsp avocado oil
    • 1 cup celery, diced
    • 1 cup yellow onions, diced
    • 2 cups sliced crimini mushrooms
    • 3 garlic cloves, minced
    • 1/2 tsp sea salt
    • 1/4 tsp black pepper
    • 1 Tbsp tamari
    • 1/2 tsp dried thyme
    • 3 Tbsp nutritional yeast
    • 1 store bought vegan pastry crust (double crust, you need a top and bottom, I used Dufour which can be found at Whole Foods Market)
    • unsweetened plant based milk

    Instructions:

    1. In a pot, combine the lentils and water and bring to a boil. Lower to a simmer and cook for about 30 minutes until the lentils are soft.  Remove from heat and drain well.  Set aside.
    2. Place the squash and sweet potatoes in a steamer basket, and steam for about 10 minutes until tender.  Set aside.
    3. Heat the avocado oil in a non-stick skillet over medium and add the celery, onions, mushrooms and garlic and sautee until they are tender, about 10-15 minutes.  Remove from heat and add to a bowl, along with the lentils, squash and sweet potatoes.  Add the sea salt, pepper, tamari, thyme and nutritional yeast to the bowl also, and mix everything well until everything is evenly distributed.  Set aside in the refrigerator to cool completely.
    4. When the filling has cooled.  Preheat the oven to 375F degrees.
    5. Roll out one of the pie crusts into a 10 inch circle and fit it into the bottom of a 9 inch pie plate.  Spoon the filling over it and spread it out evenly.
    6. Roll out the other pie crust into a 10 inch circle, place it on top of the filling, and crimp the edge of the top crust and bottom crust together.  Cut vents into the top crust, brush with the plant based milk, and place in the oven.
    7. Bake the pie for about 1 hour until it is bubbling the the center and lightly browned.  Remove from the oven and let cool for 15 minutes before serving.
  • Creamy Vegan Mushroom Wild Rice Soup

    Creamy Vegan Mushroom Wild Rice Soup

    At pretty much every restaurant in Minnesota you will find some version or other of creamy wild rice soup, usually with chicken, and everyone claims that theirs is “famous” and the “best”.  I tried a few growing up, and I never thought any of them were that great, except for the version that my Mom made, which was pretty good.  I now make my own version, Creamy Vegan Mushroom Wild Rice Soup and I think it is pretty darn delicious!  I always cook off some wild rice ahead of time because it takes a while, so it doesn’t take a super long time to make.  Some people complain about the smell of wild rice, but I actually like it.  It is an earthy delicious smell.  Something that reminds me of special salads and soups when I was little because wild rice is also considered kind of gourmet.  Or at least it was when I was little.  It is a bit more spendy than regular rice (and is actually not rice at all, it is a grain producing grass), but if you buy it in the bulk section at your health food store (which is what I do), it is cheaper.

    For the protein source in my soup, I use French lentils.  They happen to be my favorite, and they are honestly a staple in my kitchen.  I admit when I was younger I used to be intimidated by them and I thought that they were inferior to beans, but that was before I went vegan and began to discover what a great source of protein they are and how deliciously savory they are! They go awesome with the wild rice too, since they both have that sort of earthy flavor.  I keep the rest of the ingredients pretty simple, mushrooms, celery, onions, and garlic.  Thyme is my herb of choice, and actually my favorite cold weather herb.  It goes beautifully with the wild rice. At the end, I add  a bit of thickened oat milk to make this creamy and crave worthy.

    The soup is sooo good!  It was way better than any of those soups I had as a kid, and my Mom has tried this soup as well and approved!  If you are looking for a delicious soup to make for a cool day, this Creamy Vegan Mushroom Wild Rice Soup is a winner. It makes me think of chilly nights warming up by the fireplace in warm sweaters in some Northern Minnesota café.

    Creamy Vegan Mushroom Wild Rice Soup
    Serves2-3

    Ingredients:

    • 2/3 cup uncooked wild rice
    • 2 1/2 cups filtered water
    • 4 large celery stalks, sliced
    • 1 small onion, diced
    • 2 garlic cloves, minced
    • 2 cups sliced crimini mushrooms
    • 1/3 tsp sea salt or to taste
    • 1/2 tsp dried thyme
    • 2/3 cup French lentils
    • 1 Tbsp nutritional yeast
    • 1 1/2 cups plant based unsweetened milk (I used Oatly oat milk, you want to use something thicker, coconut milk would also work or soy milk)
    • 1 Tbsp arrowroot starch dissolved in 1 Tbsp filtered water


    Directions:

    1. Place the wild rice in a pot, cover with filtered water by at least 3 inches and bring to a boil. Lower to a simmer and cook until the rice has “bloomed”, about an hour to an hour and 15 minutes depending on your rice. Drain the rice and set aside.
    2. Combine the 2 1/2 cups filtered water, celery, onion, garlic, mushrooms, sea salt, thyme, and lentils in a pot and bring to a boil.  Lower to a simmer and cook for about 40-45 minutes until the lentils have are tender.  Stir in the wild rice.  Add the nutritional yeast, milk, and arrowroot mixture and cook until thickened.
    3. Serve!


  • Vegan Pumpkin Cornbread

    Vegan Pumpkin Cornbread

    I make chili almost every week.  It is usually with rice on top and avocado, but last time I made it Eric told me that he prefers his with cornbread, so I said I would make some soon.  I used to always make cornbread with my chili back in the day, and serve it topped with sour cream and cheese before I went vegan.  But I didn’t always want to make bread and rice was an easier option, and now I add avocado instead of the cheese and sour cream and like it just as much.  For Eric though, I made the cornbread.  It is not that difficult to make after all, not like you have to knead it and let it rise like you would a yeast bread and that is the beauty of it.

    This time I decided to make it with pumpkin because I had an open can of pumpkin on hand and needed to use it in something.  Why not?  It is pumpkin season after all, and I love adding sneaky veggies to things.  Also, I wanted this cornbread to be fairly healthy too, so I wanted it free of refined oils and sugars.  I know some people like their cornbread super sweet and almost cake like but that is not at all how I like mine.  If I am serving it with chili especially I want it savory.  So 1 Tbsp of maple syrup for a hint of sweetness is all I needed to add.

    The pumpkin helps to keep the bread moist, so I didn’t add any oil to it.  Just full fat coconut milk for richness, and it did the trick! I made this with a combination of cornmeal and whole wheat pastry flour, because I prefer whole grain flours but if you wanted to make this gluten free, you could sub Bob’s Red Mill gluten free all purpose baking flour 1:1 for the whole wheat pastry flour.  I have had good results with this brand.

    The corn bread smelled wonderful while baking!  I haven’t made it in ages and I had forgotten about how amazing it smells.  I could not wait to try it!  But I had to wait for it to cool enough to cut and for my chili to finish cooking as well. It was perfect! Moist and fluffy, the perfect thing to break into pieces on top of your chili or dip into it (as I prefer).  I think this would even be a good thing to make to go with your Thanksgiving meal instead of rolls if you want an easy home made bread.  Either way, give it a try next time you have leftover canned pumpkin or mashed pumpkin!

    Vegan Pumpkin Cornbread

    Makes 1 loaf

    Ingredients:

    • 1 cup organic medium grind cornmeal
    • 1 cup organic whole wheat pastry flour
    • 1 1/2 tsp baking soda
    • 1 tsp baking powder
    • 1 tsp sea salt
    • 1 cup plus 2 Tbsp full fat coconut milk
    • 1/2 cup pumpkin puree
    • 1 Tbsp maple syrup
    • 1 Tbsp cider vinegar


    Instructions:

    1. Preheat the oven to 375F degrees. Oil an 8×8 inch square pan.
    2. In a large bowl, whisk together cornmeal, flour, baking soda, baking powder, sea salt.
    3. Whisk in coconut milk, squash, and maple syrup until well combined.
    4. Whisk in cider vinegar quickly until just combined, then pour into prepared pan.
    5. Bake for 15-20 minutes until lightly golden on top and a toothpick inserted into the center comes out clean. Cool a few minutes before turning out from pan.
  • Roasted Veggie Burrito Bowl

    Roasted Veggie Burrito Bowl

    Many people think that vegan food consists of just salads, and that we go hungry a lot of the time, but that couldn’t be further from the truth.  Every meal I make, I create things that will satisfy me and fill me up, especially dinner because I have more time to cook in the evening (lunches are usually stuff I make ahead of time).  One of my favorite things to make is hearty bowls.  Bowls filled with lots of veggies, grains and beans, and whatever I happen to have on hand. One specific bowl I have been making however on the days I have longer runs and I am really hungry though is this Roasted Veggie Burrito Bowl!

    I started making it because I was craving fajita veggies from my favorite Mexican restaurant but I decided to just roast them and add them to my bowl.  This current bowl has all of my favorite veggies.  Roasted bell peppers, mushrooms, and zuccchini.  Plus avocado and jalapenos from my garden and local sweet corn.  As a side note, the corn is so freaking amazing this time of year, how could I not include it?! I also like to include a good amount of greens at the bottom. I pretty much add a bunch of greens to every lunch and dinner.

    For the beans I used pinto seasoned with chili powder, cumin, garlic, lime, sea salt and cilantro and they are so good and flavorful!  If you are one of those people who hates cilantro feel free to leave it out or add a little oregano instead.  Lastly cooked brown rice is at the center of the bowl. This meal is so good and so satisfying I am not going to lie, I have made it at least once a week for a few months now.  I know you could just go to Chipotle and get a bowl, but home made is sooo much better!  If you love Mexican inspired flavors, definitely give this Roasted Vegetable Burrito Bowl a try!

    Roasted Veggie Burrito Bowl

    Makes 2

    Ingredients:

    • 1 large red bell pepper, cut into 2 inch chunks
    • 1 medium zucchini, cut in half and sliced
    • 1 small onion, cut in half, then cut into wedges
    • 1 large portabello mushroom, sliced 1/4 inch thick
    • olive oil or avocado oil spray
    • sea salt
    • 1 ear organic sweet corn (alternatively you can use 3/4 cup frozen kernels)
    • 1 1/2 cups cooked pinto beans (canned is fine, just rinse and drain them first)
    • 1 garlic clove, minced
    • 1/2 tsp cumin
    • 1/2 tsp chili powder
    • 1/4 tsp sea salt (or to taste)
    • juice of one lime
    • 2 Tbsp chopped cilantro
    • 1 cup cooked brown rice
    • 4 large handfuls greens (romaine, spinach or arugula are my favorite)
    • 1 sliced jalapeno (optional)
    • 1 sliced avocado
    • 1/2 cup salsa
    • hot sauce for serving (optional)


    Instructions:

    1. Preheat the oven to 375F and line a large sheet pan.
    2. Spread out the peppers, zucchini, onions, mushrooms and corn (you can keep it on the cob if using a cob) on a sheet pan, and spritz with a little olive oil or avocado oil. Sprinkle with sea salt, and place in the oven.  Roast until the veggies are just tender and starting to brown at the edges, about 30 minutes.
    3. Meanwhile, in a pan on the stove, add the beans, garlic, cumin, chili powder, sea salt, lime juice and cilantro and cook over low heat until heated through.
    4. When the veggies are done roasting and the beans are hot, to assemble the bowls, add some greens to the bottom of each bowl, then add half the rice to each bowl, followed by the beans, roasted vegetables (cut the corn off of the cob first before adding it), avocado, sliced jalapenos, salsa, and then sprinkle with hot sauce if desired.
    5. Serve!


  • Vegan Instant Pot Chickpea Chili

    Vegan Instant Pot Chickpea Chili

    I have always loved chili.  My family didn’t really make it, they just made regular soup and stew usually.  But my friend’s Dad that lived next door to us made the best chili, and the ingredients in it were grown in their garden.  It was spicy, since they grew hot peppers, but it was so good! Now, as an adult I make my own vegan chili and I enjoy it so much I make it every week for a few meals.  I vary the recipe somewhat, but this is my latest version which I discovered by using what I had on hand.  Vegan Instant Pot Chickpea Chili!  Yes, I always use my Instant pot since it makes it super easy and that way I can walk away and do other things while it is cooking and not burn it.

    I start off with celery, onions, jalapenos and garlic in my chili.  I am not a big fan of carrots in my soup, since I feel like they flavor it too sweet in a weird way, but I like the savory celery and onions.  I like jalapeno in the chili to add a little kick.  But sometimes I will use even hotter peppers like habaneros if I have those.  I use plenty of canned tomatoes in my chili as well, and I like the combination of oregano and cilantro for my herbs.

    I like to add plenty of spices as well.  Cumin, coriander, and chili powder are always staples in my chili, but I have begun to add turmeric recently and I really enjoy it in there!  I have mostly made my chili with black beans or pinto beans in the past, but I had chickpeas on hand when I came up with this recipe so that is what I used, and I really loved them in here! Lastly, a splash of apple cider vinegar and some sea salt and the combination of flavors in this are really delicious!

    I have always enjoyed topping my chili with things too, it used to be cheese and sour cream, but I now like to do brown rice, avocado and green onions.  It is so delicious and this is my favorite savory meal as of lately.  If you are looking for something to make for dinner, this Vegan Instant Pot Chickpea Chili is delicious! I have also included directions below if you want to make it the old fashioned way not in an instant pot as well.

    Vegan Instant Pot Chickpea Chili
    Serves 2-3

    Chili:

    • 1 yellow onion, diced
    • 1 jalapeno, minced
    • 1 small bunch celery, sliced
    • 2 garlic cloves, minced
    • 1 small bunch cilantro, chopped
    • 3 cups diced tomatoes (canned are fine)
    • 1/2 tsp sea salt or to taste
    • 1 tsp chili powder
    • 1/2 tsp ground coriander
    • 1 tsp ground cumin
    • 1 tsp dried oregano
    • 1/2 tsp turmeric
    • 1 Tbsp cider vinegar
    • 1 1/2 cups cooked chickpeas
    • cooked brown rice for serving (I used jasmine rice)
    • Sliced avocado for serving
    • sliced green onions for serving


    Instructions:

    1. In an Instant Pot, combine all ingredients but the beans.
    2. Put on the lid, and set to the soup/broth setting for 40 minutes with the keep warm setting turned off. (Alternatively, if you are not using an Instant pot and are cooking on the stove, add to a regular pot, bring to a boil, and lower to a simmer with the lid on.  Cook on low heat for about 20 minutes or until the veggies are getting tender.)
    3. When the Instant Pot is done cooking, let it set until the pressure valve goes down by itself, then open it and add the beans and stir in.
    4. Remove from heat, and serve with the rice in bowls topped off with the avocado slices and green onions.


  • Vegan Chili Verde

    Vegan Chili Verde

    I love any kind of chili.  In fact, I make chili at least once a week, usually my Vegan Chili Mole with Rice  because it is my favorite.  But sometimes I like to switch it up, like last weekend when I decided to make some Vegan Chili Verde! I have made it before, and enjoyed it, but this time I made it to share with Eric, and type up the recipe to share it with you all! It isn’t quite as spicy as my other chili in my opinion.  But then again I eat habanero hot sauce and ghost pepper flakes a lot so maybe I am not the best judge of spicy, especially in Minnesota where some consider black pepper spicy.  This chili had just enough spice so you could taste all the flavors, but with a little kick!

    What gave it a kick you might be wondering?  Well I included jalapenos and hot green chilies.  Which I consider to be medium on the hot scale but they have so much good flavor!  Since this was green chili, I also added both poblanos and green bell peppers, both of which are mild, but give good flavor!  Can you tell I love peppers? I wanted more veggies in the chili so I also added some sweet corn and zucchini because I had them both on hand.  One can never have too many veggie add ins with a soup!

    I flavored the broth with garlic and onions, cumin, coriander, lime juice and cilantro and it was so delicious! If you happen to have an Instant Pot by the way, this can be made in there if you don’t want to have to keep an eye on it on the stove.  Just add everything but the beans, corn, cilantro and lime juice to it, then cook it as soup/broth on the settings. Then add the remaining ingredients, stir in and let sit until they are heated through.

    This soup is good served with some brown rice and avocado on top, or with some fresh corn bread or just crusty bread for dunking!  I have tried it with all of them and they all pair well with it. If you are in need of a warming soup while we are still in the chilly season, give Vegan Chili Verde a try!  Eric, who was the other taste tester besides me said it was awesome, so I will be making it again soon!

    Vegan Chili Verde

    Serves 3-4

    Ingredients:

    • 2 yellow onions, diced
    • 2 cloves organic garlic, minced
    • 1  jalapeno chili, minced
    • 2 poblano chilies, seeded and diced
    • 2 organic green bell peppers, diced
    • 1 medium zucchini, cut in half and sliced thickly
    • 1 tsp cumin
    • 1/4 tsp coriander
    • 1/2 tsp sea salt or to taste
    • 2 4 oz cans hot or mild green chilies
    • 1 1/2 cups vegetable broth
    • 1 15 oz can great northern beans, rinsed and drained
    • 1 cup sweet corn
    • 1/4 cup lime juice
    • 1/4 cup chopped fresh organic cilantro
    • 1/2 cup full fat coconut milk or other unsweetened plant based milk


    Instructions:

    1. In a pot, combine the onions, garlic, peppers, spices, salt, chilies, vegetable broth, and bring to a boil.  Lower to a simmer and cook for about 20 minutes until everything is tender.
    2. Add the beans, corn, lime juice, and cilantro and cook until heated through.
  • Savory Mushroom Vegetable Stew

    Savory Mushroom Vegetable Stew

    Last weekend in Minnesota it was a bit chilly with only highs in the single digits (F), and snow showers happening frequently. I don’t let the cold stop me from enjoying the outdoors though, I feel that fresh air is important to enjoy year round and the snow is actually really beautiful!  It beats staring at brown grass and dead trees.  On Sunday we grabbed some hot coffee at our favorite shop, then visited a snow sculpting competition, and went for a walk outside despite the temps wearing multiple layers.   We enjoyed our time outside, since we both hate being cooped up indoors, but coming home to a warming meal was needed.  It was a good time to have something cozy for dinner, so luckily, I had whipped up a batch of Savory Mushroom Vegetable Stew the night before.  It tastes even better the next day, so it is something I like to make ahead and this time it was sooo good!  Everything tastes better when you are hungry and cold though lol.

    When I was little, my Mom used to make a beef stew that I really enjoyed in the cooler months, and this is loosely based off of that, the beef being replaced with mushrooms. It has a savory base with broth, tomato paste, thyme and rosemary plus a touch of red wine, and some miso and nutritional yeast to give it that umami flavor.  I used a vegetable base of celery, carrots, onions and garlic the classic combo that my Mom always used, and it actually tasted really similar to hers!  Minus of course the Lipton French onion soup packet she used to use.  I think I replicated the flavor well though and my Mom would approve of this, since she doesn’t eat a lot of beef now either and more veggies.

    I used a mixture of crimini mushrooms, and some dried hen of the woods mushrooms that Eric and I foraged last Fall while we were on our honeymoon while visiting his Dad along the way in Michigan.  His Dad was nice enough to dehydrate them for us for later use.  We picked 3 giant ones, that probably weighed at least 10 lbs each!  So we had quite a bit of mushrooms, and I am enjoying using them in recipes like this one!  If you wanted to make this soup in the Instant Pot instead of on the stove, that is possible as well for an easier option, I have done that before.  You just throw everything in except the nutritional yeast and miso, and cook on the soup/broth setting for 40 minutes and everything cooks just right. When it has finished cooking in the Instant Pot, then add the nutritional yeast and miso mixture and voila! Soup is ready to go!  I admit I use my Instant Pot a lot during the week because I don’t want to sit and watch the stove so I figured I would give you guys both options in case that is your case too!

    This soup turned out so yummy!  I served it with some crusty sourdough bread for dunking I was gifted by a talented coworker (she seriously makes the best bread I have ever had), and it was the perfect meal for a chilly day! I hope you are all staying warm this winter, and if you want something delicious, healthy and warming for dinner, give this Savory Mushroom Vegetable Stew a try!

    Savory Mushroom Vegetable Stew

    Serves 4

    Ingredients:

    • 1 yellow onion, diced
    • 4 stalks celery, sliced
    • 2 garlic cloves, minced
    • 4 medium sized carrots, sliced
    • 3 cups sliced mixed mushrooms (I used hen of the woods and crimini)
    • 4 cups vegetable broth
    • 1 6 oz can tomato paste
    • 2 Tbsp red wine
    • 1/2 tsp sea salt (or to taste)
    • 1/4 tsp black pepper
    • 1/2 tsp dried thyme
    • 1/2 tsp dried rosemary
    • 4 large yukon gold potatoes, cubed
    • 1 Tbsp miso dissolved in 1 Tbsp filtered water
    • 3 Tbsp nutritional yeast


    Instructions:

    1. In a large pot, combine the onion, celery, garlic, carrots, mushrooms, vegetable broth, tomato paste, red wine, salt, pepper, thyme, rosemary, and bring to a boil.  Lower to a simmer and cook for about 15 minutes.
    2. Add the potatoes and cook until they are tender, about 10-15 minutes more.
    3. Add the miso mixture and yeast and cook until incorporated into the soup.
    4. Serve!
  • Chipotle Sweet Potato and Chickpea Soup

    Chipotle Sweet Potato and Chickpea Soup

    Happy 2022!  I know new years was a few days back, but I am getting around to typing up a post now so Happy New Year!  I decided to take a few weeks off of making recipes over the holidays because it was just too hectic and I wanted to enjoy them.  But now I am ready to get back into new recipes!  It is the time of year when everyone is trying to be more healthy, and although I try to eat healthy all year round, I decided to make something more healthy and savory too to start the year off!  I am a big soup fan in the winter and this Chipotle Sweet Potato and Chickpea Soup that I made last weekend was so delicious I had to share!

    I make huge batches of soup at work, so you would think I wouldn’t enjoy making them at home, but actually creating a new one is exciting!  Eric loves anything with chipotle peppers in it, and I thought they would pair well with sweet potatoes in a warming soup.  We definitely need some warmth here right now as it has been pretty chilly in MN.  So I wanted a warming soup to serve with some crusty bread that we could enjoy after being outside.

    For the base, I used tomatoes, veggie broth and the chipotle peppers, along with plenty of veggies to give the soup lots of flavor.  I cooked the first part, then added in the sweet potatoes so they did not get too mushy.  At work we actually steam them separately so they don’t get mushy, but I find that adding them the last 15 minutes works fine. If you wanted to make this soup in an instant pot, I would suggest cooking it the first half in the pot (up until you add the sweet potatoes chickpeas and coconut milk), then remove it from the pot and cook it on the stove for the sweet potato part. I have done this before.

    The Chipotle Sweet Potato and Chickpea Soup turned out super delicious!  It is packed with flavor, a little spicy, but just the right amount and the sweet sweet potatoes are the perfect partner for the chipotles!  This is so good served with crusty bread or corn bread!  I hope you all are staying warm this winter!

    Chipotle Sweet Potato and Chickpea Soup

    Serves 3

    Ingredients:

    • 1 large onion, diced
    • 2 garlic cloves, minced
    • 1 red bell pepper, diced
    • 2 stalks celery, sliced
    • 1/4 cup fresh cilantro
    • 1 15 oz can fire roasted diced tomatoes
    • 3 Tbsp chopped canned chipotle peppers in adobo
    • 1 tsp ground cumin
    • 1 tsp chili powder
    • 1 1/2 cups veggie broth or filtered water
    • 1 large yam, cut into cubes (about 3 cups)
    • 1 1/2 cups cooked chickpeas (canned and drained well is fine)
    • 1/3 cup coconut cream (not sweetened)
    • 2 Tbsp cornstarch mixed with 1/4 cup filtered water

    Instructions:

    1. In a large pot, combine the onions, garlic, bell pepper, celery, cilantro, tomatoes, chipotle peppers, cumin, chili powder and veggie broth and bring to a boil.  Lower to a simmer and cook for 20 minutes.
    2. Add the sweet potatoes and chickpeas and cook until the sweet potatoes are softened, about 15 minutes more.
    3. Add the coconut cream, and cornstarch mixture and cook until the soup has thickened and the coconut cream is mixed in.
    4. Remove from heat, and serve!
  • Vegan Creamy Wild Mushroom Soup 

    Vegan Creamy Wild Mushroom Soup 


    Wild mushroom foraging season is now over in the upper midwest, but a few weeks back while we were on our honeymoon to the upper peninsula of Michigan it was a great time to go foraging for mushrooms! I honestly have never seen so many varieties of wild mushrooms in my life at one time.  We live in Minnesota and there are plenty here, but while we were hiking there it seemed like the perfect mushroom growing conditions because it had just rained a lot and was fairly warm so they were popping up all over. Eric’s Dad, who lives in Michigan took us mushroom hunting to the places he typically goes to pick them and we found a good haul. 

    I hadn’t previously done anything like this before and although I can recognize some mushrooms as edible (like oyster, puffball and chicken of the woods) I didn’t really want to pick them and bring them home without a guide who could verify them as edible since some mushrooms look alike and some have to be picked at a certain point to be edible.  Also you wouldn’t want to end up with something poison.  So if you are going to go mushroom hunting, bring someone who knows for sure what they are!  But I highly recommend it, it is so satisfying to pick your own and enjoy them later! 

    Our stash included 3 large hen of the woods mushrooms, oyster mushrooms, gem-studded puffballs, some lion’s mane and bricktop mushrooms. We took the hen of the woods and dried them for later use, and vacuum packed  the rest to freeze and use later.  If you can’t go mushroom hunting it seems like you can get a pretty good variety at a lot of farmer’s markets lately from growers at least where I live in Minnesota. So not to worry if you want to make a dish like this Creamy Vegan Wild Mushroom Soup I am going to share the recipe for in a minute! As a side note, did you know you can make a delicious lion’s mane coffee, or tea?  I found this recipe  for a lion’s man coffee and tea made with dried lion’s mane, and I am going to have to try with plant based milk it because I am always looking for new ways to enjoy warm drinks when the cooler weather hits! You can find it on this website: Benefits of Adding Lion’s Mane Mushroom.

    So back to that soup recipe, a couple weeks after we got back, I finally got around to making something with the mushrooms.  I wanted them to be the star, so I thought a creamy soup would be perfect!  People use a lot of cream of mushroom soup here in Minnesota for casseroles and whatnot and I have always liked it but to be honest, home made mushroom soup is best!  This one is substantial enough to be a meal alongside some crusty bread, which is what I served it with! 

    First, I sauteed some leeks, onions and garlic for the base, then added the mushrooms, stock, some thyme to make It savory (I love thyme and mushrooms together), and it made a lovely flavorful stock!  To make it substantial, I added potatoes, and of course the creamy elements, which were coconut milk, and cashew butter.  To give it a more savory flavor I added some nutritional yeast and miso.  The broth was soooo good and so flavorful!  I loved how it turned out, and me and Eric both ate large bowls of it, and there were no leftovers for the next day.  If you are a mushroom lover, give this Creamy Vegan Mushroom Soup a try!

    Vegan Creamy Wild Mushroom Soup 

    Serves 2-4

    Ingredients:

    • 2 tsp avocado oil
    • 2 large leeks, sliced
    • 1 small yellow or white onion, diced
    • 1 stalk celery, sliced
    • 2 garlic cloves, minced
    • 1/2 tsp dried thyme
    • 4 cups sliced mixed wild mushrooms (if you can’t get wild, just use what you can find at the store)
    • 3 cups yukon gold potatoes, cubed
    • 1 15 oz can full fat or lite coconut milk
    • 1 1/2 cups veggie broth (or as needed)
    • 1/2 tsp sea salt (or to taste)
    • 1/4 tsp black pepper (or to taste)
    • 1/4 cup raw cashew butter
    • 1/4 cup nutritional yeast
    • 2 tsp white miso dissolved in 1 Tbsp filtered water (optional)


      Instructions:

    1. Heat the oil in a medium soup pot with a lid, and add the leeks, onions, celery, and garlic.  Sautee for a few minutes until starting to turn translucent, and add the thyme, potatoes, mushrooms, coconut milk, water, salt and pepper.
    2. Bring to a boil, then lower to a simmer and let cook about 15-20 minutes or until the veggies are tender.
    3. Add the cashew butter and nutritional yeast, and cook until they are well blended into the soup.
    4. If it is too thick, add a little more broth. Enjoy!
  • Vegan Lasagna Roll Ups

    Vegan Lasagna Roll Ups

    When I was in middle school and I ate school lunch, one of my favorite things were the lasagna roll ups. When I saw that they were on the menu, I looked forward to lunch time.  Oddly enough though, I haven’t actually ever had lasagna roll ups since I left middle school, because most people, myself included make lasagna the old school way.  I had a coworker at the deli who made them and they always smelled good and I told myself I would eventually make a vegan version (since hers weren’t vegan) but I never got around to making them.  Until now that is!

    Last week I decided to make some because I had bought some lasagna noodles that I wanted to use up in my cupboard.  It was the perfect excuse to make the lasagna and I had the time to make the rolled version.  To be honest, I don’t usually even make my lasagna with traditional noodles, I make it with short noodles and make a “lasagna” casserole, so this would be much more fancy!

    For the “ricotta” filling, I used a tofu base, because that is what my Mom used to use when she made lasagna when I was little and I loved it!  The texture comes out perfect and you don’t even miss the cheese! I mixed in a little cashew butter to give it a little richness and it was perfect!  I wanted to keep this lasagna fairly simple, so I just added spinach instead of sauteeing a bunch of other veggies.  Plus I figured it would roll better.

    Once it was all assembled and I put it in the oven, it smelled so wonderful while baking! I could not wait to try it! When it was dinner time, it was sooo good!  This tastes every bit as delicious as those lasagna roll ups I enjoyed growing up, with none of the dairy!  If you are looking for some delicious comfort food, give these a try!

    Vegan Lasagna Roll Ups

    Serves 4

    Sauce:

    • 2 tsp olive oil
    • 1 small red onion, diced
    • 2 garlic cloves, minced
    • 2 tsp balsamic vinegar
    • 1 tsp dried basil
    • 1 tsp dried oregano
    • 1 28 oz can crushed tomatoes or tomato sauce
    • 1/2 tsp sea salt


    Ricotta:

    • 1 16 oz package extra firm tofu
    • 1/3 cup raw cashew butter
    • 1/4 cup chopped red onion
    • 2 tsp white miso
    • 1/4 cup nutritional yeast
    • 2 garlic cloves
    • 2 tsp lemon juice
    • 1/2 tsp sea salt
    • 1/2 cup chopped spinach


    Pasta and assembly:

    • 1 12 sheet package lasagna noodles
    • spinach
    • vegan mozzarella cheese


    Instructions:

    1. To make the sauce, heat the oil in a pot, and add the onions and garlic. Sautee over medium heat until the onions have softened, about 5 minutes.
    2. Add the vinegar, herbs, tomatoes and sea salt and bring to a boil. Lower to a simmer and cook for about 20 minutes until the flavors have blended and the tomatoes are more softened. Remove from heat.
    3. Meanwhile, to make the ricotta, combine the tofu, cashew butter, miso, nutritional yeast, garlic, lemon juice, and sea salt in a food processor and process until blended.  Add the chopped spinach and pulse until distributed.  Set aside.
    4. Cook the noodles according to package directions, and drain well. Set aside (not stacked on top of each other, spread them out, as they may stick).
    5. Oil a 2 quart casserole dish.
    6. To assemble, spread about 2 Tbsp of the ricotta over each noodle, place a few spinach leaves on top, and roll up.  Place in the prepared pan.  Repeat with remaining noodles, ricotta and spinach.  Pour the pasta sauce over the rolls in the pan evenly, and sprinkle the vegan mozzarella over it.
    7. Place in the oven and bake until bubbling and the cheese is melted, about 20 minutes.
  • Vegan Winter Lentil Shepherd’s Pie

    Vegan Winter Lentil Shepherd’s Pie

    I made shepherd’s pie for Thanksgiving this year, and I might make it again for Christmas because I love it so much! It is a dish that takes a little bit of time and love so it is for special occasions.  Since I tend to make quick recipes for dinner most of the time.  I made a new recipe with lentils this time for Christmas, and winter veggies, so I thought I would share the recipe.

    If you think that shepherd’s pie has to be rich and meat filled think again.  I remember having it as a kid with ground beef, and a generic blend of veggies like peas, corn, and carrots in a meat gravy and it was ok, but not my favorite thing.  The mashed potatoes were the only part I really enjoyed at that point.  I have never been a meat lover, always choosing veggies first even before I became vegan.  So when I make my shepherd’s pies, I use ingredients I love and veggies that add flavor instead of just being there.

    Things like leeks, squash and mushrooms plus a few others for color.  I just make the cooking broth into a sort of a gravy to keep it more simple, and it works perfect!  This time I used lentils where the meat would be.  Normally I use tempeh, but I figured I would make a recipe for those who are soy free, and I like to switch things up sometimes.  It was delicious and hearty!  I actually made a larger batch of this recipe a few days before Thanksgiving, to serve on Thanksgiving day day since I knew I wouldn’t have time to cook. These reheat beautifully in an oven.  If you are going to serve the next day, skip the oven part after assembly, cover with foil, and refrigerate.  Pop in the oven for about 45 minutes to 1 hour (uncovering the last 10-15), and you have delicious dinner!

    Vegan Winter Lentil Shepherd’s Pie

    Makes 4 Pies (or one large pie to serve 4-6)

    Ingredients:

    • 1 1/3 cups uncooked French lentils
    • filtered water

    Veggies:

    • Extra virgin olive oil
    • 2 large leeks sliced
    • 2 cloves garlic, minced
    • 2 cups diced butternut squash
    • 2 cups sliced carrots
    • 2 cups sliced celery
    • 1 tsp dried thyme
    • 1 1/2 cups crimini mushrooms, sliced
    • 1/2 cup peas (frozen is fine)
    • 2 cups flavorful veggie stock, store bought or homemade*
    • 2 Tbsp tamari
    • ¼ cup arrowroot starch dissolved in 1/4 cup filtered water


    Topping:

    • 6 russett potatoes, peeled and cut into 2 inch chunks
    • sea salt to taste
    • 1 Tbsp coconut butter (optional)
    • 1/4 cup coconut milk  (or as needed, you may also add water, and it will still be good)


    Instructions:

    1. Cover the lentils with the filtered water by a few inches. Bring to a boil, then lower to a simmer and cook until the lentils are tender, about 30 minutes.  Drain well, season with sea salt to taste and set aside.
    2. Heat the olive oil in a large stockpot, and add the leeks, garlic, thyme, squash, carrots, and celery, and cook until they have softened a bit, then add the garlic, mushrooms, peas, tamari, and stock and bring to a boil.  Lower to a simmer, and place the lid on the pot.  Let cook until the veggies are tender, about 10 minutes.  Once they are tender, add the arrowroot mixture, and let cook a few more minutes while stirring until it has thickened. Remove from the heat.
    3. Meanwhile, place the russets in a large pot of salted boiling water on the stove, and bring to a boil.  Cook until the potatoes are tender, and drain.  Add sea salt to taste, along with the coconut oil and milk and mash until soft, adding a little more milk if desired.
    4. To assemble, spoon the veggie mixture into 4 ovenproof bowls (or one big baking dish if you prefer), then top with the lentils, and lastly with the mashed potatoes.
    5. Place the pies in the oven and cook for about 10 minutes until bubbling.  Let cool slightly before serving.


    *Veggie Stock

    Makes about 1 1/2 quarts

    Ingredients:

    • 1 large onion (or about an onions worth of onion trimmings)
    • 2 stalks celery (or 2 cups celery trimmings)
    • 6 garlic cloves
    • 1 cup sliced mushrooms
    • filtered water

    Instructions:

    Add the onion, celery, garlic, and water to a 2 1/2 quart stockpot and bring to a boil.  Lower to a simmer and cook for a few hours until the veggies have released their flavors.  Strain into a container, pressing the veggies against the strainer to extract all the juices.  Let cool, and store in the refrigerator for up to a week, or freeze.


  • Butternut Squash, Chickpea and Kale Soup

    Butternut Squash, Chickpea and Kale Soup

    The weather is starting to cool off here, I am seeing a touch of color starting on some of the maple trees, and I am getting the comfort food cravings.  So I thought I would make some warming soup last week.  We had a few rainy days here, and it was just the thing to warm me up.  Especially the day Eric and I decided to go for a bike ride then got rained on half way through and had to ride an hour in the cold rain. I made some butternut squash, chickpea and kale soup!  One thing I am super excited about right now is squash coming into season. It is one of my favorite veggies ever!

    For this I used half my butternut squash for soup and I used the other half to roast and stuff for dinner another day.  I love making home made soup. I don’t think I have actually bought any soup at the store, especially canned since my Mom taught me to make soup when I was in college.  The flavor is so much better, and there is just no comparison.  Plus most soup is pretty cost effective to make anyhow, especially if it lasts for a few meals!  This one did for us!

    This is really simple to make!  I used my favorite soup base, which is just celery, onions and garlic with a little thyme.  If you use a flavorful broth for this, it makes it even more delicious. I used some home made broth, but you can use store bought if there is one you like!  After the less tender veggies simmered, I added the squash and let it cook for the last 10 minutes or so just so it didn’t get too mushy. Lastly the beans and kale. I like to add the kale at the last minute so that it retains more nutrients.  This is something I do often, add greens to my soup at the last minute to add extra goodness!

    This soup turned out super delicious! I served it with some home made bread to dunk in it, and the broth was nice and flavorful. I love the sweet squash with the other savory veggies!  Which fall vegetable or fruit are you most excited about?  I love the squash but I am also excited for apple season!

    Butternut Squash, Chickpea and Kale Soup
    Serves 3-4

    Ingredients:

    • 1 tsp olive oil
    • 1/4 cup diced red onion
    • 4 stalks celery, sliced
    • 2 garlic cloves, minced
    • 1 tsp thyme
    • 1/4 tsp red pepper flakes
    • 1/2 tsp sea salt
    • 4 cups flavorful vegetable stock
    • sea salt
    • 4 cups cubed butternut squash
    • 1 1/2 cups cooked chickpeas
    • 2 cups fresh kale, torn into small pieces


    Instructions:

    1. Heat the olive oil in a medium pan.
    2. Add onions and celery and sauté until tender.
    3. Add the garlic, tomatoes, thyme, sea salt, pepper, and filtered water.
    4. Bring to a simmer, and allow to cook until the veggies are very soft and the flavor has melded, about 20 minutes.
    5. Add the squash to the pot, and let cook for about 10-15 minutes.
    6. When the squash is tender, stir in the beans and kale until kale has just wilted.
    7. Serve!


  • BBQ Lentil Sloppy Joes

    BBQ Lentil Sloppy Joes

    When I was a kid, sloppy joes were a staple at just about every summer gathering or party that I went to.  Most likely because they were great for making in a crock pot and having ready ahead of time, and everyone loved them.  They actually weren’t my favorite most of the time unless someone had a really good recipe but I still would eat them as was tradition.  Now of course I have to pass most of the time because I am vegan and ground beef an option for me.  But I have come up with a recipe to make at home that I actually really love, much more than those ones I grew up eating.  I am a big fan of lentils, and I had seen other people make lentil sloppy joes so I gave it a go.

    The only putzy part about this is cooking the lentils, but luckily they cook a lot faster than most beans.  I cooked mine a day ahead of time actually to speed the process.  I like to use french lentils for this, but green lentils or brown will work as well, anything that holds its shape and doesn’t fall apart too much (like red lentils, which would not be a good option).  I made a simple sauce  for these with ingredients I already had on hand and it worked out great!

    I know some people put a lot of extra veggies in their sloppy joe mix but I just went with onions, garlic and tomatoes and kept it simple. To make it BBQ flavored and a bit tangy, I added apple cider vinegar, mustard, maple syrup for a little sweetness and some smoked paprika to give it that smokey flavor.  I don’t like my sauce super sweet, but if you are one of those people that does, feel free to add a little maple syrup. That is what cooking for yourself is all about, making recipes that are tailored to your own tastes!

    These turned out super delicious!  They were way better than the ones I grew up eating.  They had plenty of flavor, and were filling without being heavy.  I served them on buns the first day, but for leftovers the next day I served them over some brown rice and that was good as well!  So you have options here if you are not a bread person or are gluten free.  I hope you all are having a wonderful summer so far!

    BBQ Lentil Sloppy Joes

    Makes 8

    Ingredients:

    • 1 1/3 cups dried french lentils or green lentils
    • filtered water
    • 1 tsp olive oil
    • 1 medium onion, minced
    • 2 garlic cloves, minced
    • 1 6 oz can tomato sauce
    • 1 5 oz can tomato paste
    • 3/4 cup filtered water
    • 2 Tbsp cider vinegar
    • 1 Tbsp dijon mustard
    • 1 Tbsp maple syrup
    • 1 tsp smoked paprika
    • 1/2 tsp black pepper
    • 1/4 tsp sea salt, or to taste
    • 8 whole wheat buns for serving


    Instructions:

    1. In a medium pot, combine the lentils and enough filtered water to cover them by 3 inches. Bring to a boil, then lower to a simmer and cook for about 30-40 minutes or until the lentils are tender but still holding their shape. Remove from heat, drain well and set aside.
    2. In a medium saucepan, heat the onions and garlic in the oil and saute until starting to turn translucent, about 5 minutes. Add the tomato sauce, tomato paste, water, vinegar, mustard, maple syrup, paprika, black pepper, and sea salt and bring to a simmer.  Allow to cook for about 20 minutes to allow the flavors to blend.
    3. Mix in the lentils, and cook until everything is heated through.
    4. Serve the BBQ Lentils on the buns.


  • S. Pellegrino Essenza

    S. Pellegrino Essenza

    This post is sponsored by S.Pellegrino Essenza but the content and opinions expressed here are my own.

    Staying home for dinner does not have to be boring, it can be exciting and fun with the right meal and beverages!  Yes, you could go pick up takeout and I admit that I have a few times, but overall, I find that lately I am cooking about the same amount of meals at home as I always do.  I enjoy cooking at home, and I try to make restaurant quality food. And you know what makes good food even better?

    A fancy drink to go with it, like S. Pellegrino Essenza!  It goes well with many things, especially Summer dishes, and it is made zero calories and zero sugar.  Which are all important to me.  They have three delicious flavors at Walmart, Tangerine & Wild Strawberry, Lemon & Lemon Zest, and Dark Morello Cherry & Pomegranate which are all delicious, but I chose the Tangerine & Wild Strawberry to pair with my meal. From the minute you open the can, you are greeted with the aroma of refreshing citrus and sweet strawberry. It pairs well with light dishes like sauteed veggies, which I make a lot and this is why it is my favorite flavor. You can find all three flavors of S. Pellegrino Essenza I mentioned earlier, at your local Walmart.

    When the weather gets warmer I love things like fajitas and tacos, because they remind me of Summer.  They also pair perfectly with the S. Pellegrino Essenza!  When I make Mexican food, I like a fancy drink to go with it and since I don’t typically drink alcohol the S. Pellegrino Essenza is the perfect healthier choice!  It is light, refreshing, fruit flavored and delicious!  This time I paired it with veggie fajitas.  They are one of my favorite dishes to order when I go out for dinner in the summer, and I love to recreate them in the comfort of my own home.

    You know what is nice about enjoying dinner at home also?  You can still dress up create a beautiful table setting and make a restaurant quality meal, but you don’t have to drive anywhere to enjoy it!  I am one of those people who likes eating out in a restaurant but I also like sharing a quiet dinner with family at home, and I can bring that experience home by putting out a nice table setting, and serving S. Pellegrino Essenza!  You can find it at your local Walmart store, or Walmart online, just click to sign in at Walmart.Com and add S.Pellegrino Essenza to your cart!

    Rainbow Veggie Fajitas

    Serves 2

    • 2 bell peppers, cut julienne
    • 1 cup crimini mushrooms, sliced
    • 1/2 large yellow onion, sliced
    • 1 garlic clove, minced
    • 1 tsp avocado oil
    • 1 tsp chili powder
    • 1/2 tsp cumin
    • 1/8 tsp chipotle powder
    • 1/4 tsp sea salt
    • corn tortillas
    • 1 sliced avocado
    • 1 cup vegan refried beans
    • 1/2 cup salsa

    Instructions:

    1. Heat a skillet over medium heat, and add the bell peppers, mushrooms, onions and garlic. Sautee until starting to soften, then add the chili powder, cumin, chipotle powder, and sea salt, and cook for a minute more until the spices are fragrant.
    2. Serve with corn tortillas, sliced avocado, refried beans and salsa.  To assemble, spread a little refried beans on a tortilla, then top with the veggie mixture, avocado and salsa.


  • Vegan Broccoli Cheddar Mac and Cheese

    Vegan Broccoli Cheddar Mac and Cheese


    Who doesn’t love mac and cheese?!  Growing up, I pretty much lived off of things with cheese like grilled cheese, or mac and cheese.  Not that I was picky or anything, but I just loved them so much and would ask my parents if I could have them often.  I can still enjoy mac and cheese now as an adult, even if I am vegan, because making vegan mac and cheese that tastes delicious actually isn’t difficult at all!  I have perfected my own cheese sauce recipe that is to my liking, and it is even good on potatoes if you are not in the mood for pasta. Or even poured over steamed broccoli, like my Grandma used to do. Except she used Cheese Whiz.  But I thought it was the greatest thing ever when I was little. Which got me to thinking, why not just put broccoli in my mac and cheese?!  

    So I made some broccoli mac last week.  I had some lentil based fusilli pasta on hand, so it was perfect!  I know lentil pasta might sound a little weird, but it is actually quite delicious and tastes pretty much like regular pasta but much higher in protein so it is a complete meal.  For my cheese sauce, I use a mostly veggie base. I have seen other people use a combination of potatoes and carrots, and I have tried that one, but it isn’t my favorite. I use roasted sweet potatoes for the bulk of my base. 

    You can use orange or white fleshed variety, but I used the white. I just like their flavor slightly better in mac and cheese. I used a little Dastony raw cashew butter from Raw Guru along with it, just enough to make it creamy. I find that some mac and cheeses that use only cashews as their base can get a little too heavy and I don’t digest them well.  This sauce is creamy, rich tasting and sooo good!  I have even added some chipotle to it to make a nacho cheese sauce and that is delicious as well. 

    I just threw some broccoli into the pot about 2 minutes before the pasta was done cooking and it was tender and cooked just right!  This mac and cheese turned out bomb!  If you think you can’t have delicious mac and cheese as a vegan, give this one a try, I think it will change your mind! 

    Vegan Broccoli Cheddar Mac and Cheese

    Serves 4

    Ingredients:

    • 2 cups mashed cooked sweet potato* (the white fleshed variety)
    • 1 cup hot filtered water (or as needed)
    • 1/3 cup Dastony raw cashew butter
    • 1 medium garlic clove
    • 2 tsp stone ground mustard
    • 1 Tbsp cider vinegar
    • 1 Tbsp white miso (optional)
    • 1/4 cup plus 2 Tbsp nutritional yeast
    • 3/4 tsp sea salt (or to taste)
    • 16 oz organic lentil pasta
    • 1 large head organic broccoli, cut into florettes and stem peeled and cut into small pieces


    Instructions:

    1. Combine the sweet potato, water, cashew butter, garlic, mustard, vinegar, yeast, and sea salt in a high speed blender and blend until smooth and the consistency of cheese (if it is too thick add a little more water).  Set aside.
    2. Cook pasta according to package directions, and when there is 3 minutes left, add the broccoli and cook until it is bright green and tender.  Drain, the pasta and the broccoli then place back in the pot, add the cheese and and stir to coat.
    3. Pour into a serving dish, and serve!

    *To cook the sweet potatoes, I like to roast them in the oven.  Take a large sweet potato, poke a few holes in it, and cut in half lengthwise.  Place cut side down on a sheet pan lined with parchment and bake for about an hour at 400F degrees or until tender.  Remove from oven and let cool before mashing.

  • Broccoli Almond Apple Slaw

    Broccoli Almond Apple Slaw

    I don’t know why everyone throws all of their broccoli stems away and just keeps the flowrettes, honestly the stems are the most delicious sweet part of the broccoli in my opinion!  So, when I was making a big broccoli salad the other day at work and had a lot of stalks bound for the trash, I decided to save a few and make a broccoli slaw.  I mean, you could pay a lot more for a bag of broccoli slaw mix at the store (essentially just shredded stems with carrots), so why not make your own from stalks?!  I had made a broccoli apple almond slaw years ago on this blog and decided it was time for an update as well.  Not because it was bad as it was, but because I wanted to take new photos.

    This salad is sooo good, and so easy to make!  The most time consuming part is just cutting the broccoli julienne.  I sit and chop veggies all day though, so it isn’t a big deal to me.  But if you are not good with a knife and don’t feel like cutting the broccoli julienne, you are welcome to shred it instead, it will still be delicious in this salad. I combined it with a sweet honeycrisp apple, my go to apple for salads because it is so flavorful, as well as some sweet raisins and almonds.

    The dressing had to be delicious as well. Since the salad already had almonds in it, I figured I would make a creamy almond butter dressing for it. Honestly nut butter based dressings are my favorite and the ones I use most often. They are oil free, good for you and they only take a minute to whip up.  I keep some in the refrigerator at all times, usually it is a walnut pumpkin seed butter base, but almond butter is used often for dressing in my house too.  This one I wanted to be sweet and tangy.

    The salad turned out sooo good!  This would be the perfect thing to make for a side dish, or for lunches to bring to work (when everyone goes back to work, or maybe you are still working during this whole coronavirus thing like me).  It is crunchy, the broccoli and apples are sweet, the almonds add a nice crunch, and that silky tangy dressing is perfect on it!  Give this a try next time you have some leftover broccoli stalks on hand (or if you don’t just have stalks, chopped broccoli would work as well, just use about 4 cups).

    Broccoli Almond Apple Slaw

    Serves 6-8

    Ingredients:

    Salad:

    • 6 broccoli stalks, peeled and cut julienne (or shredded with a larger setting on a grater)
    • 1 large tart sweet apple, such as honeycrisp, cut julienne (or shredded with a larger setting on a grater)
    • 1/2 cup raisins
    • 1/2 cup chopped almonds


    Dressing:

    • 1/2 cup almond butter
    • 1/4 cup filtered water
    • 1 Tbsp apple cider vinegar
    • 2 Tbsp maple syrup
    • 1/2 tsp sea salt


    Instructions:

    1. In a bowl, combine the broccoli stalks, apple, raisins, and almonds.
    2. Whisk together the dressing in another bowl (if it seems too thick, since almond butter varies in thickness, add a little more water).
    3. Toss the dressing with the salad, and serve!
  • Tahini Lemon Broccoli Pasta

    Tahini Lemon Broccoli Pasta

    I know a lot of people are ordering takeout with the whole Coronavirus going on, but that hasn’t been the case with me.  We usually do takeout instead of delivery if we are going to do something like that, but only for a special occasion like my Mom’s birthday coming up, since we can’t go out for it.  Otherwise on weekdays, and most of the time, after work I just prefer quick recipes.  I had a lovely jar of Dastony tahini on hand that Raw Guru had recently sent me, and I thought it would be perfect in a pasta recipe as a creamy sauce.

    Most people think of using tahini in hummus, or maybe as a dressing, but it is good on pasta as well!  Kind of like the way thai peanut noodles are made with peanut butter (I love those too), but a nut free version with a different flavor.  I love tahini with a bit of lemon.  This local restaurant that my Mom and I used to go to when I was little had a tahini lemon salad dressing that we loved, so I use the combo often because I have not gotten sick of it in the last 20 years.  I had some whole wheat pasta on hand, as well as some broccoli, so I thought I would combine them with the tahini.

    This is really simple to make!  While the pasta is boiling, you make the sauce, and then add the broccoli at the end of cooking, then toss with the sauce and dinner is ready!  I like simple recipes when I get off work, and this is about as simple as they come. I combined the tahini with a bit of lemon like I mentioned earlier, some garlic, a little cumin and some red pepper flakes and it was perfect!

    I love tahini, and this dish lets it shine!  It is super satisfying with the creamy sauce, substantial pasta and lightly cooked broccoli!  If you don’t like broccoli, you could sub your favorite veggies. This would also be good with asparagus for spring!  I am going to try that when it comes into season!  I hope you are all staying well, and enjoying spring!

    Tahini Lemon Broccoli Pasta

    Serves 2-4

    Pasta and Broccoli:

    • 8 oz organic whole wheat fusilli pasta
    • 2 medium heads organic broccoli, cut into flowrettes


    Sauce:

    • 1 cup Dastony tahini
    • 1/3 cup lemon juice
    • 1/2 cup filtered water (or as needed)
    • 1 garlic clove, minced
    • 1/2 tsp ground cumin
    • 1/2 tsp sea salt
    • pinch red pepper flakes


    Instructions:

    1. Cook pasta according to directions in a pot of salted water.
    2. While the pasta is cooking, whisk together the sauce.
    3. When the pasta has about minute left to cook, add the broccoli, and cook until it is bright green and slightly tender, about a minute or two.
    4. Drain, then place back in the pot and mix with the sauce.
    5. Serve!


  • Orange Kale Salad 

    Orange Kale Salad 

    Spring is on the horizon, it has been warm and sunny here lately with the snow rapidly melting and lovely outside.  I have been trying to get out for a walk everyday and it is nice that now when I get home from work it is still light outside.  Even though citrus season is almost over with winter being almost over I am still enjoying it at the moment before more local produce becomes available in a few months.  We are a bit behind some of the other states here in Minnesota and it is sometimes end of April before we see local produce.  So oranges and grapefruits it is!

    Last weekend I decided to make a refreshing kale salad with orange.  I used to make kale salads all the time, and I do at work, but I don’t make them quite as often at home now and enjoy them more when I do.  My favorite dressing with kale is a simple vinaigrette, and for this one, I combined some balsamic vinegar with a bit of orange for the acid.  I think balsamic is my favorite vinegar because of its rich flavor and less acidity.  I also sweetened the dressing with a bit of maple syrup since it goes so well with the orange and balsamic and it was nice and balanced.

    The key to kale salads, is to massage the dressing into the kale with your hands to soften it, it makes such a huge difference compared to just pouring it on.  It makes it more tender and easy to eat as well as less bitter.  I massage giant batches of kale at work for our salads.  Since this kind of smushes up the kale, I like to add the more tender ingredients like the oranges at the end and toss them in gently.

    This salad turned out so good!  In addition to the oranges, I also added some pistachios for crunch, dried raspberries for sweetness and color and onions to give it more flavor.  It was a party in my mouth!  If you are craving something fresh and flavorful, definitely give this a try!  It has even more flavor the next day if you have leftovers.

    Orange Kale Salad 

    Serves 2-4

    Ingredients:

    • 1 large bunch kale, washed and torn into bite sized pieces
    • 1 cup shredded purple cabbage
    • 3 Tbsp orange juice
    • 2 Tbsp balsamic vinegar
    • 2 Tbsp avocado oil or olive oil
    • 1 Tbsp maple syrup
    • 1 garlic clove, minced
    • 1/2 tsp sea salt (or to taste)
    • 1/4 tsp pepper
    • 2 medium oranges, peeled and sliced
    • 1/4 cup sliced red or white onion
    • 3/4 cup toasted pistachios
    • 1/2 cup dried raspberries


    Instructions:

    1. In a large bowl, combine the kale, red cabbage, orange juice, vinegar, oil, maple syrup, garlic, sea salt and pepper.
    2. Massage the kale and cabbage with your hands until it softens slightly and is all coated.
    3. Add the oranges, onions, pistachios and berries, and mix gently with your hands until everything is well distributed.
    4. Serve!
  • Vegan Creamy Potato Leek Soup

    Vegan Creamy Potato Leek Soup

    When I was little, one time when my Mom and I were out shopping on a Saturday, we stopped at this restaurant that I considered a little bit fancy at the time. Fancy was anything with ingredients I couldn’t pronounce or where the wait staff wore nice uniforms.  They had a leek soup on the menu and we ordered it.  I had never heard of leeks in my life.  But I ended up liking it, because it was packed with rich flavor.  After that my Mom made a leek soup at home and it was even better.  I decided that I liked leeks.  I was making something with them the other day at work and I decided that I should cook with them more often. 

    So, I decided to make a creamy potato leek soup when I got home.  I knew it would be fairly simple and easy to make which is always a win on a week night when I am tired.  The thing about leeks though, if you have never cooked with them before, is that they are very sandy.  Even when you think you have washed the outside all nicely, when you cut into them you find sand.  So I like to clean them once, then plunge them into a bowl of water, swish them around, let the sand settle, then scoop them out and use them in my recipe.  Then they will be all good and delicious in your soup. 

    For this soup, there is no sauteeing required, and I did not use any oil for this reason.  You just add the veggies and stock to the pot, let it simmer until it is all tender, and then add the “creamy” part of it.  For that, I could have just added some coconut milk and called it a day, but instead I wanted to add a little more protein so I pureed chickpeas into the coconut milk as well as a little cashew butter.  It made for a thick cream that was perfect in the soup! 

    I could not wait to try it!  It smelled amazing and tasted even better.  It has plenty of rich onion and leek flavor, a smooth rich texture and it is perfect served with crusty bread for dipping!  That is one of my favorite uses for crusty bread besides bread pudding, dunking into my soup!  If you are in need of some comfort food, give this a try! 

    Vegan Creamy Potato Leek Soup

    Serves 2-4

    Ingredients:

    • 1 small yellow or white onion, diced
    • 1 large leek, sliced thinly (and washed very well, I like to put mine in water after cutting, then drain)
    • 2 garlic cloves, minced
    • 1/2 tsp dried thyme
    • 3 cups yukon gold potatoes, cubed
    • 1 cup carrots, sliced
    • 1 1/2 cups veggie broth (or as needed)
    • 1/2 tsp sea salt (or to taste)
    • 1/4 tsp black pepper (or to taste)
    • 1 cup full fat or lite coconut milk
    • 1 cup chickpeas
    • 1/4 cup raw cashew butter
    • 1/4 cup nutritional yeast
    • 2 tsp white miso dissolved in 1 Tbsp filtered water (optional)
    • 1 Tbsp cornstarch
    1. Add the onions, leeks, garlic, thyme, potatoes,  veggie broth, salt and pepper to a medium sized pot.
    2. Bring to a boil, then lower to a simmer and let cook about 15-20 minutes or until the veggies are tender.
    3. Add the coconut milk, chickpeas, cashew butter, and nutritional yeast, miso and cornstarch to a blender and blend until smooth.
    4. Add the mixture to the soup, and cook until they are well blended into the soup and it has thickened.
    5. Enjoy!
  • White Bean, Sweet Potato and Kale Soup

    White Bean, Sweet Potato and Kale Soup

    The weather can’t seem to decide what it is doing here lately.  It was thawing out and above 35F degrees, and then it was down to below zero then back to above freezing again. I will take the warmer days though, it is not often we see days above the teens and twenties this time of the year.  Last year we had a polar vortex and it was -60 windchill for a few days.  So I am grateful for this weather. One thing I enjoy to kind of take the chill off is warming soups.  I make at least 3 different kinds during the course of the week.  I have my favorites, but sometimes I like to come up with new ones.

    I was craving something hearty and filled with veggies and greens, and what I came up with was this white bean, sweet potato and kale soup!  I make soups like this a lot at work (not this exact one, but similar ones), and a lot of times they sound really good to me so I go home and make something similar.  I happened to have all of the ingredients for this on hand so it was perfect!  It always makes me happy when I don’t have to spend extra money to buy more ingredients.

    For the base, I went with home made veggie stock and tomatoes.  If you are wondering what I put in my stock, it is mostly onions and garlic (because they have the most flavor), plus a bit of celery. I know some people put carrots in their stock, but I find that they make it a bit too sweet for my liking. So I keep it to the other 3 veggies.  If you just keep your scraps in a bag in the freezer, later on when you have a lot you can whip up some stock with them.  Just simmer the veggies in filtered water on the stove on very low heat for about 4 hours, then strain and cool down.  Also, it is nice to portion out and freeze for later.

    Back to the soup though, I added oregano and basil to give it an Italian flavor, as well as some red pepper flakes for a little kick.  I would usually go with regular potatoes in a soup like this but I went with white fleshed sweet potatoes this time since I had them on hand.  Lastly some white beans for protein and some kale to get my daily greens in.  I try to eat a good amount of greens several times a day, so I include them in my lunch salads, as well as stir them into my soups at the last minute so they are just wilted but retain their nutrients.  This soup turned out so good!  It was dinner for a few nights, and it was nice to have something already made when I got home.  It was packed with flavor, was nice and warming and hearty and we both felt good after eating it. If you are in need of some healthy comfort food, give this a try!

    White Bean, Sweet Potato and Kale Soup
    Serves 3-4

    Ingredients:

    • 1 tsp olive oil
    • 1/4 cup diced red onion
    • 4 stalks celery, sliced
    • 2 garlic cloves, minced
    • 1 tsp dried basil
    • 1 tsp dried oregano
    • 1/4 tsp red pepper flakes
    • 1/2 tsp sea salt
    • 3 cups crushed canned tomatoes or fresh roasted*
    • 2 cups flavorful vegetable stock
    • sea salt
    • 4 cups cubed white fleshed sweet potatoes
    • 1 1/2 cups cooked white beans
    • 2 cups fresh kale, torn into small pieces


    Instructions:

    1. Heat the olive oil in a medium pan.
    2. Add onions and celery and sauté until tender.
    3. Add the garlic, tomatoes, herbs, sea salt, pepper, and filtered water.
    4. Bring to a simmer, and allow to cook until the tomatoes are very soft and the flavor has melded, about 30 minutes.
    5. Add the sweet potatoes to the pot, and let cook for about 10-15 minutes.
    6. When the potatoes are tender, stir in the beans and kale until kale has just wilted.
    7. Serve!


  • Roasted Sweet Potato Kale Salad 

    Roasted Sweet Potato Kale Salad 

    A lot of the time the recipes I make depend on what I already have on hand.  Because I hate wasting things, and I also like saving money and saving a trip to the store.  I had a leftover sweet potato on hand from making a sweet potato lasagna for Christmas, and I wanted to make something for lunch with it.  I thought about yam fries as a side for something else, or maybe roasted and mashed but then I remembered how much I like sweet potatoes roasted and in a salad.  We make a few salads at my work with roasted sweet potato salads and they are always so good!  I mean, I just love how they get all tender on the inside and crispy on the outside plus so flavorful when roasted!

    So, I made a kale salad and included them.  I had kale and cabbage on hand, so I used those as the base. My philosophy when it comes to greens is I can never have too much.  So pretty much most days for lunch I have a pile of greens (either kale, arugula, or spinach) with other veggies and some beans or tempeh mixed in.  This salad would be that way too. I also added in chickpeas for a little more protein and texture because why not.  For some reason really like chickpeas paired with sweet potatoes.

    The crunchy kale and cabbage and tender sweet potatoes needed a delicious dressing to coat them.  I thought about a vinaigrette, the tangy sweetness would be good with the veggies, but then I decided on a nut butter based dressing.  This is actually what I use most often, I usually make a good sized batch then keep it in the refrigerator for my salad for the week.  But for this salad I whipped up a smaller batch.  I like it because it tastes like a traditional creamy dressing but without the dairy.

    For this one I used a combination of ingredients that made it taste almost cheesy, almost like a ranch but without the herbs.  It was delicious!  Even better of course when mixed into the salad!  It was lovely with all of the different colors, but most importantly It was sooo good!  I loved the combination of textures and flavors it had!  Next time you feel like making a salad, give this a try!

    Roasted Sweet Potato Kale Salad 

    Serves 2-4

    Ingredients:

    • 1 medium sweet potato, cut into 1 inch cubes
    • 2 tsp olive oil
    • sea salt
    • 1 large bunch kale, washed and torn into bite sized pieces
    • 1 cup shredded purple cabbage
    • 3/4 cup cooked chickpeas (canned is fine, just rinse them well and drain well)
    • 1/2 cup cashew butter or almond butter (tahini will also work for nut free)
    • 1/4 cup lemon juice
    • 1/4 cup filtered water (or as needed)
    • 3 Tbsp nutritional yeast
    • 2 tsp white miso
    • 1 garlic clove, minced
    • 1/2 tsp sea salt (or to taste)
    • 1/4 tsp pepper


    Instructions:

    1. Preheat the oven to 375F degrees, and oil a sheet pan.
    2. Toss the sweet potatoes with the olive oil, spread out on the sheet pan and sprinkle with sea salt.
    3. Place in the oven and roast for about 30-45 minutes until tender (depending on your oven).  Remove from the oven and let cool to room temperature.
    4. In a large bowl, combine the kale, red cabbage, chickpeas and sweet potatoes.
    5. In a smaller bowl whisk together cashew butter, lemon juice, water, yeast, miso, garlic, sea salt and pepper until smooth (adding a little more water if it seems too thick to pour).
    6. Pour the dressing over the salad, and toss to coat.
    7. Serve!
  • Rutabaga and Yam Fries with Garlic Dipping Sauce

    Rutabaga and Yam Fries with Garlic Dipping Sauce

    One of my all time favorite things we make at the deli I work at is sweet potato or yam fries.  They are so simple but so good.  So, often times I will make them at home.  I call them my bacon, because they are to me what bacon is to meat eaters.  Hard to stop eating and kind of addictive.  You know maybe if more people tried them they would think giving up bacon isn’t so bad!  I was making a recipe for work the other day, and I got to thinking, since yam fries are good, what about other veggies as fries?  The rutabaga I was using for a recipe sounded like a good thing to test out, so I bought myself some and decided to give it a go.

    The truth is I used to hate rutabaga back in the day and my Dad would always tease me and say that is what we were going to have for dinner.  I don’t know why I hated it, I think it was because it was a foreign veggie to me at the time and I had been told it was gross and maybe once my Grandma had made some and I didn’t care for it.  But then when I was in college and experimenting with cooking and all sorts of new veggies I decided to try it again and ended up loving it.  The recipe that I had made the first time was a vanilla scented mashed rutabaga and it was amazing!  But it is so good roasted and in soups too I quickly discovered.  It has a sort of sweet flavor to it.

    I figured it would be perfect made into fries.  I combined them with some yams I had on hand, because why not do two different veggies?  As far as I am concerned the more veggies the better when it comes to what I eat. I kept them simple, just tossing them with a bit of avocado oil, sea salt, pepper and cayenne and it was perfect to showcase the sweetness of the rutabagas and yams.  They would have been good just like that, but I decided to make a dipping sauce as well.

    For the dipping sauce, I wanted something creamy and garlicy so I whisked together some almond butter, garlic, lemon and salt with a bit of water to thin it out and it was perfect!  You could use a different nut butter or even tahini for a nut free version if you prefer and it would be delicious as well.  The fries were sooo good!  The sweetness of the root veggies was brought out even more by roasting and the garlic sauce was the perfect partner for them!  Definitely give these a try this winter, just be warned, you may eat the whole batch they are pretty darn addictive!

    Rutabaga and Yam Fries with Garlic Dipping Sauce
    Serves 2-4

    Ingredients:

    Yams:

    • 2 medium sized yams, cut into fries
    • 1 large rutabaga peeled and cut into fries
    • 1 Tbsp avocado oil
    • 1/2 tsp sea salt (or to taste)
    • 1/4 tsp ground black pepper
    • 1/8 tsp ground cayenne or chipotle powder


    Sauce:

    • 1/3 cup filtered water (or as needed)
    • 1/3 cup almond butter
    • 1/4 tsp sea salt
    • 1 tsp lemon juice
    • 1 garlic clove, minced


    Instructions:

    1. To make the fries, preheat the oven to 400F degrees, and line a sheet pan with parchment.
    2. Toss the fries with the oil, sea salt, pepper and chipotle powder until they are coated, and spread them out on the sheet pan.
    3. Place in the oven and roast until tender and starting to brown, about 45 minutes.
    4. Meanwhile, to make the dip, combine all ingredients in a bowl, and whisk until smooth (if you want it thinner, add more water since almond butters vary in texture sometimes).  Set aside.
    5. When the fries are done, remove them from the oven and serve with the dip!
  • Vegan Sweet Potato Casserole and Vegan Sweet Potato Maple Cake with McCormick Spices!

    Vegan Sweet Potato Casserole and Vegan Sweet Potato Maple Cake with McCormick Spices!

    This post is sponsored by McCormick® but the content and opinions expressed here are my own.

    There are so many things to be excited about around the holidays!  Seeing friends and family you might not normally see the rest of the year because they live far away, the celebrations, and of course the amazing food!  I have to say, ever since I was a little kid, the food has always been pretty important to me, even when I did not make it myself.  I loved helping my Mom and Grandma in the kitchen, preparing the meals and desserts for the holidays!  I am so happy I get to continue the tradition of making food for my loved ones around the holidays, even if my Grandmas are no longer around to celebrate with me.  I know they would love the things I am making.  Good recipes start with good ingredients, which is why I love McCormick® Spices.  They are really good quality (they know a thing or two about making spices since they have been around for over 100 years) and they are affordable which is important to me!  Also, you can find them at Walmart, which is where I bought mine, in the baking aisle with all of the other seasonings and baking goodies!  I don’t know about you, but it is one of my favorite aisles.  Maybe I am biased because I love to bake!

    I picked up some McCormick® vanilla (one of my most used ingredients in my recipes), nutmeg and cinnamon at Walmart. I planned on making a dish that my family loves, Sweet Potato Casserole!  We have always been fond of sweet potatoes, and although back in the day my Grandma used to make the casserole with the marshmallows, our tastes have changed a bit and we now prefer it a little simpler and less sweet (but still plenty sweet enough).  It is really simple to make, and so good!  I just take sweet potatoes or yams and roast them into sweet flavorful perfection in the oven, then scoop out the flesh and mash it until it is light and fluffy with a bit of McCormick® cinnamon, nutmeg and maple syrup, then top it off with crunchy pecans and a little bit of maple sugar!  When it is all baked and the topping is all crispy it is heavenly!  The perfect side dish for your holiday meal!  Recipe follows post.

    If you happen to have leftovers from the casserole, I also have a delicious Maple Sweet Potato Cake that I made with them.  Don’t have time to make something right away with them?  Put them in a container and freeze them for later.  Just thaw before using in your recipe.  I love leftover sweet potatoes in general, there is so much you can do with them.  Make pancakes, muffins, bread, or the cake that I just mentioned if you want to be a little more over the top.  I love making cakes, so of course that is what I chose.  Not only that, it is perfect for Holiday entertaining as well!  Who doesn’t love cake?  I know my family does.  My Grandma and Mom passed down their love of maple to me, so that is what gave me the idea to pair the sweet potatoes with maple in this!  Not only that, I already had the McCormick® spices and flavors on hand I would need for it!  So wins all around!

    I know some people like to make pie for the holidays, and we do as well, but I like cake even more because it just seems so festive!  For this one, I made a flavorful batter with the leftover mashed sweet potatoes, plus maple sugar and of course McCormick® cinnamon, nutmeg and vanilla for an aromatic cake.  Let me tell you, it fills your home with the most heavenly aroma! What you get is a soft, moist but light and fluffy cake with a slight caramel maple flavor and sweet spices!  It would be good on its own, but I decided to make a luscious faux cream cheese frosting for it!

    That has always been my favorite type of frosting after all.  I was so happy when I figured out how to veganize it!  I use a coconut cream base with a bit of cashew butter to give it a nice texture along with maple syrup to sweeten, and this time I added some McCormick® pure vanilla extract to it!  Like I said earlier in the post, it is my most used flavor ingredient in my recipes.  The frosting was heavenly alone but I knew it would be even better on the cake!  Once it was all frosted and ready to go we couldn’t wait to try it!  It was sooo good, the soft sweet spiced cake with a hint of sweet potato and maple flavor plus the luscious creamy frosting!

    I hope you give these recipes a try this holiday season, my family loved them and I have a feeling you will too!  Definitely check out the McCormick® Spices next time you are in Walmart, or on their website HERE. They are just what you need for making super delicious holiday recipes, and so convenient!

    Vegan Sweet Potato Casserole

    Serves 8-10

    Sweet Potatoes:


    Topping:


    Instructions:

    1. Preheat the oven to 425F degrees.
    2. Prick sweet potatoes with a fork all over, and place in the oven on a baking sheet. Roast until tender, about 1 hour. Remove from the oven and cool until cool enough to handle.
    3. Remove the skins, place in a bowl, and add the maple syrup, coconut milk, McCormick Sea Salt, and McCormick® Ground Cinnamon and Nutmeg. Mash together with a potato masher or a large fork, and then place in an oiled 8 or 9 inch square baking dish (or two smaller casserole dishes).
    4. Sprinkle the pecans over the top, drizzle with the maple syrup and mix together the sugar and McCormick® Ground Cinnamon and sprinkle over the casserole.
    5. Lower the oven temperature to 375F degrees, and place the dish in. Bake for 20 minutes until warmed through and the topping is toasted and lightly brown.
    6. Remove from the oven and cool slightly before serving.
    7. Enjoy!

    Keeps refrigerated for up to 1 week, when kept in an airtight container and the leftovers are perfect for using in my maple sweet potato cake recipe (see below)!


    Vegan Maple Sweet Potato Cake
    Makes 1 6 inch 2 layer cake
    2 6 inch cake pans
    Cake:


    Frosting:


    Instructions:

    1. Preheat the oven to 350F degrees and position rack in center of oven.
    2. Line two six-inch-diameter cake pans with 2-inch-high sides with parchment paper. Coat parchment paper and pan sides lightly with oil.
    3. Whisk flour, baking soda, McCormick® Ground Cinnamon, McCormick® Ground Nutmeg, McCormick® Sea Salt, and sugar in a large bowl to blend well.
    4. Whisk sweet potato, pecan butter, McCormick® Maple Extract, McCormick® Vanilla Extract, and water together in small bowl to blend well, then whisk into the flour mixture until well blended.
    5. Whisk in cider vinegar until pale bubble swirls form in the batter and it is well combined (but don’t over mix).
    6. Fold in pecans.
    7. Transfer cake batter to prepared pans and bake cakes until tester inserted into center comes out almost clean with a few moist crumbs attached, about 25-30 minutes.  Remove from oven.
    8. Cool cakes completely in pan on rack, about 1 hour. Cut around sides of pans to loosen. Turn cakes out onto platter; peel off parchment paper.
    9. Meanwhile, to make the frosting, combine all ingredients but the coconut butter, in a high speed blender or food processor and blend until smooth.  With the motor running, add the coconut butter and process a minute more (if it starts to get lumpy at all during the process it is just the fat separating because it is 2 different temperatures.  Just continue to blend until it is smooth, and it will get warm so it will just have to chill longer).
    10. Pour the frosting into a bowl and let sit in the freezer until the consistency of whipped cream, whisking every 15 minutes (this may take anywhere from 15 minutes to hour to an hour depending on how warm it has gotten and which appliance you used).
    11. When ready to frost, place one cake layer on a plate. spread frosting about 1/2 inch thick over the first layer, then top with the second. Spread remaining frosting over the top and down the sides of the cake. You can tint the remaining frosting with natural food coloring if you wish and decorate the top, or just decorate with pecans.
    12. Refrigerate for at least 1 hour before serving.

    Store any leftover cake in the refrigerator, keeps in an airtight container for up to 1 week.

  • Vegan Butternut Squash and Chickpea Chowder

    Vegan Butternut Squash and Chickpea Chowder

    We are full swing into soup season, and in the deli I work in it is just flying out of the pots because it is the most popular thing we have right now.  I mean, I don’t blame people, I go home and eat warming soup too this time of the year most nights.  You would think that I would get tired of making soup at work and not want to make it at home, but that actually isn’t the case.  I love warming soup!  I was going through our box of recipes the other day at work and I came across a soup that I used to enjoy but can’t eat anymore because it isn’t vegan.  Well, I might just have to go home and make it I thought to myself. It was a butternut squash parmesan chowder and I remember it being really delicious. 

    I have been there 13 years, but it was 7 years ago I went vegan so I haven’t had it since then.  I do remember how it tasted though, enough to recreate it!  I had some butternut squash and all of the ingredients at home already so it was the perfect thing to make!  Don’t you just love when you don’t have to shop to make a recipe you are craving?! The original one was loaded with heavy cream, cheese, butter and refined flour.  I wanted to make mine a bit healthier while veganizing it.  I think I succeeded pretty well.

    For the creamy base, I used a mixture of coconut milk, broth and a little cashew butter instead of the cream.  It was just as thick and creamy as the original and I didn’t need to even add anything to thicken it, it was pretty thick on its own. To give it a cheesy flavor, I added some nutritional yeast and miso and it tasted as if I had added parmesan which is exactly what I was going for. For the veggies, it had to have butternut squash of course, but I also added in potatoes since it was a chowder, and celery and garlic for flavor. I figured it didn’t need carrots since it already had the sweet squash. Lastly, I added in some chickpeas for protein. 

    It smelled amazing and I couldn’t wait to try it!  It was soooo good!  Rich and creamy with a cheesy flavor, aromatic thyme and tender sweet squash and potatoes!  I only wished I had some crusty bread to dip in it.  Because I love doing that with soup!  If you are in the mood for comfort food, give this a try!  It is pretty quick and easy to make!

    Vegan Butternut Squash and Chickpea Chowder

    Serves 2-4

    Ingredients:

    • 2 tsp avocado oil
    • 1 small yellow or white onion, diced
    • 1 stalk celery, sliced
    • 2 garlic cloves, minced
    • 1/2 tsp dried thyme
    • 2 cups butternut squash, cubed
    • 2 cups yukon gold potatoes, cubed
    • 1 15 oz can full fat or lite coconut milk
    • 1 1/2 cups veggie broth (or as needed)
    • 1/2 tsp sea salt (or to taste)
    • 1/4 tsp black pepper (or to taste)
    • 1/4 cup raw cashew butter
    • 1/4 cup nutritional yeast
    • 2 tsp white miso dissolved in 1 Tbsp filtered water (optional)
    • 1 1/2 cups cooked chickpeas
    1. Heat the oil in a medium soup pot with a lid, and add the onions celery, and garlic.  Sautee for a few minutes until starting to turn translucent, and add the thyme, potatoes, squash, coconut milk, water, salt and pepper.
    2. Bring to a boil, then lower to a simmer and let cook about 15-20 minutes or until the veggies are tender.
    3. Add the cashew butter and nutritional yeast, and cook until they are well blended into the soup, then add the chickpeas and cook until heated through.
    4. If it is too thick, add a little more broth. Enjoy!
  • Vegan Mexican Street Corn

    Vegan Mexican Street Corn

    I have been wanting to make veganized Mexican street corn for a while now, and I finally decided to do so this week when I got a good deal on organic sweet corn.  You know what is really sad? I haven’t had any sweet corn yet at all this year until now, and it is the end of summer!  So it was about time. What gave me the idea to make the Mexican street corn in the first place besides finding the corn on sale, was seeing someone make it in an air fryer on a show I was watching.  It seemed like a really good idea to roast corn in the air fryer. Especially when you are someone like me that doesn’t own a grill.  I use my air fryer all the time anyhow, even more often than my actual oven for roasting vegetables.

    It worked out perfect for the corn!  It roasted up in about 25 minutes and it was some of the best corn I had tasted, even without the topping I put on it.  Roasting it makes it even more sweet and flavorful.  I grew up always just eating microwaved or steamed corn and it just isn’t the same. Traditionally Mexican street corn has a mayonnaise mixture spread over it and it is then dipped in Mexican cheese.  Since I have always thought mayonnaise is gross and I am vegan I went about it a little bit differently.  Raw Guru recently sent me some macadamia nut butter, so I used that for the creamy element instead of the mayo.  It works similarly to raw cashew butter in things like vegan cheese sauce so I figured it would be perfect. Of course if you can’t get macadamia nut butter, you could use raw cashew butter instead in this recipe.

    I mixed it with a little bit of lime juice, garlic, sea salt and water and it was super delicious.  Way tastier than actual mayo would ever be.  It needed something cheesy flavored for the coating as well, so I went with nutritional yeast.  It is a vegan staple after all. Also, I sprinkled a bit of cilantro and paprika over it for color and flavor and because it is traditional.  It may not be quite as pretty as the real thing but trust me it is even better tasting.

    How things look isn’t always most important anyhow.  This corn was bomb, and honestly some of the best tasting corn I have tried!  Trust me when I say you might just eat the whole batch of this yourself, so maybe double it if you are sharing with other people.  I think this is one dish that is perfect for enjoying the last of the sweet corn of summer with!  So get on it!

    Vegan Mexican Street Corn

    Makes 3

    Ingredients:

    • 3 ears organic sweet corn, leaves and silk removed, and washed
    • 1/4 cup macadamia nut butter or raw cashew butter
    • 1 Tbsp lime juice
    • 1/4 tsp sea salt
    • 1 garlic clove, minced
    • 3 Tbsp minced cilantro
    • 1/4 cup plus 2 Tbsp nutritional yeast
    • about tsp smokey paprika

    Instructions:

    1. Place the corn in your air fryer and cook at 375F degrees for 25 minutes until tender (alternatively you could use an oven and place the corn on a sheet pan, but it may take 5-10 more minutes).
    2. Meanwhile, mix together the macadamia nut butter, lime juice, and garlic plus 1 Tbsp of filtered water (or as needed to thin it out to mayonnaise consistency).
    3. When the corn comes out of the air fryer, brush the macadamia nut butter mixture over it, sprinkle it with the cilantro, nutritional yeast, and paprika, and serve!
  • Vegan Caramelized Onion Mac and Cheese

    Vegan Caramelized Onion Mac and Cheese

    As I was chopping some super strong onions at work and trying not to cry as my eyes burned I began to think about how it is funny you never become immune to them, even when you are someone like me who chops them just about every day. I also started to think about how good caramelized onion dip, or french onion dip is and how good those flavors would be in a mac and cheese. So, I decided that I needed to make some vegan mac and cheese when I got home.

    It was perfect! I already had onions, elbow macaroni and my secret sauce ingredient on hand. Oooh sounds exciting doesn’t it? But really my secret ingredient is just white fleshed sweet potatoes, or Japanese sweet potatoes. They have a more mellow flavor than the orange variety and they are perfect for blending up in things to get some extra veggies in them without anyone noticing. The thing that always bothered me about traditional mac and cheese was that there weren’t enough veggies in it.

    Well, I have fixed that with my mac and cheese recipes. The sauce for this is just a little bit of nut butter and mostly veggies. Honestly, this comes together in about 30 minutes too and is easier to make than any dairy mac and cheese I made from scratch back in the day. For this one I caramelized onions until they were golden brown, then combined them with the already delicious mac and cheese.

    The sauce has a few ingredients that may sound odd to you, like miso, white balsamic vinegar, stone ground mustard and nutritional yeast, but trust me on this one, they give it that amazing cheesy flavor! This is sooo good! The sauce is rich and flavorful almost like a mellow white cheddar, and the sweet caramelized onions are the perfect pairing with it! If you are in the mood for some somewhat healthy comfort food, give this a try!

    Vegan Caramelized Onion Mac and Cheese
    Serves 4

    Ingredients:

    • 1 large sweet yellow onion, sliced thinly
    • 2 tsp avocado oil
    • 2 cups mashed cooked sweet potato* (the white fleshed variety)
    • 1 cup hot filtered water (or as needed)
    • 1/3 cup raw cashew butter
    • 1 medium garlic clove
    • 2 tsp stone ground mustard
    • 1 Tbsp white balsamic vinegar
    • 1 Tbsp white miso (optional)
    • 1/4 cup plus 2 Tbsp nutritional yeast
    • 3/4 tsp sea salt (or to taste)
    • 16 oz organic gluten free elbow pasta

    Instructions:

    1. Heat a pan over medium heat, and add the onion and oil. Cook, stirring often until the onion caramelizes, about 15 minutes. You may need to add a splash of water now and then to prevent it from sticking on the bottom. Remove from heat once golden brown and tender. Set aside.
    2. Next, combine the sweet potato, water, cashew butter, garlic, mustard, vinegar, yeast, and sea salt in a high speed blender and blend until smooth and the consistency of cheese (if it is too thick add a little more water).  Set aside.
    3. Cook pasta according to package directions, drain, then place back in the pot, add the cheese and onions, and stir to coat.  Pour into a serving dish, and serve!

    *To cook the sweet potatoes, I like to roast them in the oven.  Take a large sweet potato, poke a few holes in it, and cut in half lengthwise.  Place cut side down on a sheet pan lined with parchment and bake for about an hour at 400F degrees or until tender.  Remove from oven and let cool before mashing.

  • Summer Basil Pesto Pasta

    Summer Basil Pesto Pasta

    When you are gifted a bag of pine nuts and a large bunch of basil, you make pesto! Or, at least that is the way I think. That is just what happened last week, and I had some whole wheat spaghetti on hand so it was perfect! Back in the day when I first got interested in cooking (college), basil pesto was one of the first things I made with pasta. I mean, it is so simple and so easy and you can be eating dinner in no time. Not only that, it is super delicious as well!

    Over the years I have made many different kinds of pesto, I started off with cheese included of course because I was a vegetarian at that point, then later moved on to adding nutritional yeast for that cheesy flavor. Or just leaving it out all together, that is good too depending on what mood I was in. Normally I do not actually use pine nuts jut because they are so expensive (at least where I live), so I used almonds or walnuts instead. I was lucky this time though since I was gifted the pine nuts for the pesto so I could use them.

    They do make the pesto a little more buttery and smooth, I can see why they are in the classic pesto. I like mine with plenty of lemon juice and a good amount of garlic as well! Kinda like hummus, I add those two ingredients to that too more than most people. The pesto comes out super flavorful and pretty smooth since I used a Vitamix to blend it. It even tastes a little rich from the pine nuts! That is actually the only source of richness in this recipe since I did not use oil in it. It didn’t need oil.

    This is the perfect thing to make for dinner on a summer night when you don’t want to put in a lot of effort into making dinner, but still want something really satisfying, delicious and packed with flavor. It is kind of like summer comfort food!

    Summer Basil Pesto Pasta

    Serves 2

    Ingredients:

    • 2 cups packed fresh basil leaves
    • 3/4 cup pine nuts or almonds
    • 1/4 cup lemon juice
    • 1/4 cup nutritional yeast
    • 1 garlic clove
    • 1/4 cup filtered water or as needed
    • 1/2 tsp sea salt
    • 1/4 tsp black pepper

    Pasta:

    • 4 oz organic whole wheat spaghetti
    • 2 cups organic cherry tomatoes, halved or quartered

    Instructions:

    1. To make the pesto, combine all ingredients in a food processor or blender and blend until almost smooth (adding a little more water if you think it is too thick to coat pasta). Set aside.
    2. Cook the pasta according to package directions.
    3. Drain the pasta, then place back into the pan and stir in the basil pesto and tomatoes until the pasta is coated.
    4. Serve!
  • Vegan Eggplant Parmesan Stacks

    Vegan Eggplant Parmesan Stacks

    Growing up, I used to love eggplant parmesan. Or anything parmesan for that matter, my Mom would make chicken parmesan a lot as well. I loved the red sauce served with it and the crispy parmesan crust, the cheese and all of the good flavors of course. Surprisingly I haven’t yet tried to make a vegan eggplant parmesan until this week. I have been wanting to for a while, and I finally had time on one of my days off so I went for it!

    Traditionally it is fried, and a pretty rich dish but I made mine much lighter. Since I never actually fry things I prefer to bake them or use the air fryer. I decided to bake these though because I had to spread them out on a large pan and I wanted them all to get done at the same time. To start off with, instead of an egg wash, I used a flax egg wash because it was what I had on hand. And it worked perfect! For the coating I used a mixture of almond meal and nutritional yeast with herbs and spices because I wanted it to be delicious but gluten free. The almond meal has some protein and the nutritional yeast gives it a cheesy flavor so it is wins all around!

    They baked up beautifully and I couldn’t want to add the sauce and cheese. For the sauce, I made it really simple and oil free but it turned out super flavorful. For the cheese sauce I used Dastony Raw Cashew Butter that Raw Guru recently sent me and it turned out rich and delicious! Who doesn’t love a good cashew cheese sauce?!

    Once the eggplant was all layered up with the cheese I could not wait to try it! It was super delicious, like an eggplant lasagna! If you get your hands on some eggplant, definitely give this recipe a try! Since it is eggplant season now, I expect to be seeing it at the farmer’s market soon!

    Vegan Eggplant Parmesan Stacks

    Makes 3 stacks

    Eggplant:

    • 1 medium Italian Eggplant, cut into thin 1/4 inch thick slices lengthwise
    • 2 Tbsp ground flax seed mixed with 1/4 cup plus 2 Tbsp filtered water
    • 1 1/2 cups almond meal
    • 3/4 cup nutritional yeast flakes
    • 1/2 tsp sea salt
    • 1 tsp dried basil
    • 1 tsp dried oregano
    • 1/2 tsp garlic powder


    Sauce:

    • 3/4 cup tomato paste
    • 1 cup filtered water (or as needed)
    • 1 Tbsp balsamic vinegar
    • 2 garlic cloves, minced
    • 1 tsp dried basil
    • 1 tsp dried oregano
    • 1/3 tsp sea salt or to taste
    • 1/4 tsp red pepper flakes


    Cheese Sauce:

    • 3/4 cup Dastony raw cashew butter
    • 1 garlic clove, minced
    • 2 Tbsp nutritional yeast
    • 2 tsp cider vinegar
    • 1/2 tsp sea salt (or to taste)


    Instructions:

    1. To make the eggplant, preheat the oven to 375F degrees, and line a sheet pan with parchment.
    2. Spread the eggplant slices out on the pan.
    3. Brush the slices of eggplant on one side with the flax mixture.
    4. Mix together the almond meal, nutritional yeast, salt, basil, oregano, and garlic powder, in a bowl until well blended, then sprinkle it over each eggplant slice, patting it in after.
    5. Flip the eggplant slices over, and brush the other side with the flax mixture, and sprinkle with the remaining almond meal mixture.
    6. Place in the oven and bake until tender and starting to brown, about 25-30 minutes.
    7. Meanwhile, to make the sauce, combine all ingredients in a saucepan. If it seems too thick, add a little more water. Bring to a simmer. Simmer for 20 minutes, stirring every so often, then remove from heat.
    8. Meanwhile, to make the cheese sauce, whisk together all ingredients until smooth. You want it to be thick but pour-able so if it seems too thick, add more water.
    9. When the eggplant is ready, to make the stacks, place 3 slices of eggplant on a tray. Spoon some of the red sauce and cheese sauce over it, and top with another eggplant slice. Repeat 2 more times until you have 3 slices in each stack and end with the red sauce and cheese sauce.
    10. Serve!
  • Roasted Garlic Scape Hummus

    Roasted Garlic Scape Hummus

    About 10 years ago, I was shopping at a local co op that I made the trip to every weekend, and I came across an odd item in the produce. They looked like a bunch of green electrical cords or something, but they were obviously plants. What they were was garlic scapes, as I soon discovered when I read the sign near them. I was curious as to what they tasted like, so I brought some home and googled some recipes so I knew what types of things people used them in. I experimented a bit and bought them for a few weeks (until the season ended, since it is short), and I liked them best roasted. They get all crispy and yummy and snack-able when roasted. But they also make a great thing to add into your pesto. Garlic scape pesto is amazing. I get a bit excited now when I see them, because I know I won’t have too many chances to buy them since the season is short so I always buy a bunch when I can.

    I was at the Northeast Minneapolis Farmer’s Market last weekend, and I was lucky enough to score some there. The first thing I decided to make was hummus. I hadn’t made any in a while, and I was craving it. I like to include it in my lunches for dipping veggies, or to eat as a snack with chips. I figured roasted garlic scapes would make it super delicious!

    So I roasted them for a little while in the oven before adding them to the recipe. This has a whopping 2 cups of them, so it is packed with their lovely flavor. If you haven’t had them, they are not as strong as garlic cloves, they are a bit more mellow and sweet. Roasting them intensifies the flavor even more!

    I combined them with some classic hummus ingredients like chickpeas for the base, tahini to make it creamy, and a bit of lemon juice and sea salt to bring out the flavor of the scapes and it was super delicious! If you get your hands on some garlic scapes, definitely give this a try!

    Roasted Garlic Scape Hummus
    Makes about 2 cups

    Ingredients:

    • 2 cups garlic scapes, cut into 2 inch pieces
    • 1 tsp avocado oil or olive oil
    • 1 1/2 cups cooked chickpeas
    • 1/2 cup tahini
    • 1/4 cup lemon juice
    • 1/2 tsp sea salt
    • 1/2 cup filtered water

    Instructions:

    1. Preheat the oven to 375F degrees.
    2. Toss the garlic scapes with the oil and spread out on a lightly oiled sheet pan. Place in the oven and roast until tender, about 20 minutes.
    3. Remove from oven and let cool.
    4. Combine the scapes, and all other ingredients in a high speed blender or food processor and blend until smooth (adding a little more water if necessary). 
    5. Serve!
    6. Keeps in the refrigerator for 2 weeks in a sealed container.
  • Roasted Spring Vegetable Buddha Bowl

    Roasted Spring Vegetable Buddha Bowl

    I tend to eat the same 4 things every week for dinner. Unless I am creating a new recipe then I will vary what I make. But the rest of the time when I make the same things it is mostly just because I know what I like, and because it ends up being a no brainer to make those recipes once I do it so many times. One of those items I make all the time is buddha bowls. I sometimes use different vegetable ingredients based off of what time of the year it is and what is in season or what I have on hand. I switch off quinoa and brown rice for the grain usually. But my current favorite is this one involving Spring vegetables.

    I get kind of excited about the different types of produce that can be found in the store in the Spring, Summer and Fall. But in the Spring I feel like I have been kind of deprived for a while of all of the super fresh vegetable type stuff since here in Minnesota we can’t really grow anything unless it is indoors. So it is awesome to see things like asparagus and radishes. I like to eat radishes raw but the other day when I made this bowl I thought to myself, how would they be roasted? The answer to that is super delicious. They kind of lose that peppery bite that they have and become a bit sweeter, kind of similar to roasting turnips.

    I combined them with asparagus, which I could not resist buying since it is so springy. As well as carrots, chickpeas and avocado in my bowl over brown rice and it was sooo good! But the part that made it really all come together was the creamy pumpkin seed butter sauce that I put over it all. I made it with Dastony Pumpkin Seed Butter from Raw Guru and you would swear it had dairy or cream or something in it it is nice and rich tasting.

    I added a little cumin, chipotle, lemon garlic and salt to it so that it was similar to a classic tahini dressing, but it was even more delicious since the pumpkin seeds don’t have that bitterness that tahini sometimes has. This bowl was so good I will probably be making it for the rest of Spring. If you are in need of a hearty healthy dinner that tastes like comfort food, give this a try!

    Roasted Spring Vegetable Buddha Bowl
    Serves 2-3

    • 2/3 cup brown jasmine rice
    • 1 1/3 cups filtered water
    • 2 cups sliced carrots
    • 2 cups asparagus, cut into 2 inch pieces
    • 2 cups radishes, quartered
    • avocado oil
    • sea salt

    Sauce:

    • 1/2 cup Dastony pumpkin seed butter
    • 1/4 cup lemon juice
    • 1/4 cup filtered water (or as needed)
    • 1 garlic clove, minced
    • 1 tsp ground cumin
    • 1/8 tsp dried chipotle pepper
    • 1/4 tsp sea salt or to taste

    To assemble:

    • organic greens, such as arugula, spinach or spring mix
    • 1 1/2 cups cooked chickpeas
    • 1 avocado, diced

    Instructions:

    1. Place rice and water in a medium saucepan and bring to a simmer. Reduce to a low simmer, cover and cook until all the water is absorbed about 25-30 minutes, or when the rice is tender.
    2. Meanwhile, to cook the veggies, preheat the oven to 400F degrees. Toss the veggies with just enough oil to coat them lightly, then spread out on a sheet pan and sprinkle with sea salt Place in the over and roast until they are tender and starting to brown, about 25-30 minutes. Remove from the oven.
    3. Whisk together the sauce ingredients, adding water to achieve your desired consistency.
    4. To assemble, put some greens into the bottom of each bowl, then top with the rice, the chickpeas, the veggies, and avocado. Drizzle the sauce over the contents of the bowl. Serve!
  • Vegan Porcupine Meatballs

    Vegan Porcupine Meatballs

    Growing up, I never realized how much work goes into making meat balls. I mean all the mixing and rolling them into a gazillion balls, that takes work! It’s no wonder we ate frozen meatballs growing up most of the time and not home made. Once in a while though my Mom would make some really good home made meat balls and they were a real treat. It is kind of the same way with me making my vegan meatballs, they are a few steps I won’t lie about that, but they are so worth it in the end.

    My Mom loves my vegan meatballs. Although she isn’t vegan, she tries not to eat very much meat. Every once in a while she asks me to make my vegan meatballs for her, and she says she likes them better than ones made with real meat. Well, last weekend she asked me if I could make some vegan porcupine meatballs, like they used to serve at her school when she was little. She even showed me the recipe in one of her church cookbooks. I had to make them!

    If you have never heard of porcupine meatballs, they are meatballs made with rice mixed into them in a sweet and tangy tomato sauce. They sounded good to me! I tweaked my classic vegan meatball recipe and it worked perfect! I used the same lentils and walnuts as the base, but swapped the rolled oats I normally use for the rice. This sounds kind of weird but the meatball mixture before I formed it and baked it was actually really good! I had to taste it because it needs to taste good before it goes into the oven or it won’t taste good when it comes out and I wanted to get the flavors right. Lucky they are vegan and I am not dealing with raw meat here that I would have to cook to sample.

    The usual sauce is usually tomato sauce and brown sugar with a few other things, but I swapped the brown sugar for a little maple syrup and a few other ingredients and it was perfect! It was so good on the meatballs! I almost wish I had made these sooner, they are fantastic! My Mom enjoyed them as well, and I think you will too should you choose to give them a try!

    Vegan Porcupine Meatballs
    Serves 4

    Meatballs:

    • 2/3 cup uncooked French lentils
    • filtered water
    • 1 tsp olive oil
    • 1 small onion, diced
    • 2 garlic cloves, minced
    • 2 Tbsp tamari or shoyu
    • 1/4 cup organic tomato paste
    • 1/4 tsp sea salt
    • 1/4 tsp black pepper
    • 1/4 tsp red pepper flakes
    • 2 cups chopped walnuts
    • 2 1/2 cups cooked white rice

    Sauce:

    • 2 tsp olive oil
    • 1/4 cup chopped onion
    • 2 garlic cloves, minced
    • 1/4 tsp red pepper flakes
    • 1 15 oz can tomato sauce
    • 1/2 cup tomato paste
    • 1/2 cup filtered water
    • 1/4 cup maple syrup
    • 1 Tbsp tamari
    • 1 Tbsp cider vinegar
    • 1 tsp dijon mustard
    • 1/2 tsp sea salt (or to taste)

    Garnish:

    • chopped fresh parsley
    • sliced scallions

    Instructions:

    1. To make the meat balls, add the lentils to a pot, and cover them with enough water to have a few inches above the lentils.  Bring to a simmer, and cook for about 30-40 minutes until the lentils are just tender but not mushy.  Drain very well, and set aside.
    2. In a pan, heat the olive oil and onions, and cook until the onions are softened and tender, about 5 minutes.
    3. Add the garlic and sautee a minute more until fragrant.
    4. Add to a food processor, along with lentils, and all other meatball ingredients.  Pulse until everything is blended but not completely smooth.
    5. Preheat the oven to 375F degrees.  Roll the meatball mixture into one and a half inch balls (they may be a little soft), and place them on a lined baking sheet. Place in the oven and bake for 30 minutes or until firm, but still soft in the middle.
    6. Meanwhile, to make the sauce, heat the oil in a non-stick skillet, and add the onions.  Sautee for about 5 minutes until softened, over medium heat, then add the garlic and red pepper and cook a minute more.  Add the tomatoes, water, maple syrup, tamari, vinegar, mustard and sea salt, and bring to a simmer.  Cook for about 10-15 minutes until the flavors have combined.
    7. When the meatballs have finished cooking, toss them (very gently because they will fall apart if you are rough) with the sauce just before serving, and serve garnished with scallions and parsley!
  • Vegan Broccoli Cheese Chowder

    Vegan Broccoli Cheese Chowder

    Growing up, I used to eat a lot of canned soup and I thought nothing of it. That is, until me and my Mom started to make our own soups at home when I was in high school from a soup cookbook we had bought and when I later started working in a deli that makes its own soup. I never went back to the canned. It just tasted tinny to me and just over all inferior to the home made stuff. I guess I am just sort of s soup snob, or have been for a while.

    I am even super picky if I order soup in a restaurant and it is sub par because I make so many soups at my work and they have to taste good. So, one time (before I was vegan) I decided to order a broccoli cheese soup at a restaurant that was supposed to be good and I was really disappointed. It was really bland, and too thin, and cooked to oblivion. There has to be a better way to make this at home I thought, and I ended up making a version that was really good that I later made at work and the customers loved it! I hadn’t really made a veganized version of it yet, that is until last weekend. I decided it was time I make some because it used to be so good and I was sure I could come up with an even better animal product free version.

    I wanted it to have plenty of veggies in it, not be just pureed broth with a cheesy flavor. So, I added in broccoli, carrots, onions, potatoes, and garlic. Really I guess it was more of a chowder, which is why I am calling it that. I made a silky creamy broth with coconut milk, cashew butter and nutritional yeast to give it a cheesy flavor and it was so good you would swear it has dairy in it.

    I think I like this version even better than the original, and it is much better for you instead of the loads of cheese in the other soup. Even my boyfriend Eric likes it and he is not vegan, so that counts for something! If you are looking for a soup that is pure comfort food but still filled with veggies, give this a try!

    Vegan Broccoli Cheese Chowder

    Serves 2-4

    Ingredients:

    • 2 tsp avocado oil
    • 1 small yellow or white onion, diced
    • 2 stalks celery, sliced
    • 2 garlic cloves, minced
    • 1/2 tsp dried thyme
    • 2 cups yukon gold potatoes, cut into cubes
    • 1 large head broccoli, flowrettes removed and stem peeled and diced (cut off the tough end)
    • 2 medium carrots, cut in half and sliced
    • 1 15 oz can lite coconut milk
    • 1 1/2 cups veggie broth (or as needed)
    • 1/2 tsp sea salt (or to taste)
    • 1/4 tsp black pepper (or to taste)
    • 1/4 cup raw cashew butter
    • 1/4 cup nutritional yeast
    • 1 Tbsp cornstarch dissolved in 1 Tbsp filtered water
    1. Heat the oil in a medium soup pot with a lid, and add the onions, celery and garlic.  Sautee for a few minutes until starting to turn translucent, and add the thyme, potatoes, broccoli, carrots, coconut milk, water, salt and pepper.
    2. Bring to a boil, then lower to a simmer and let cook about 20 minutes or until the veggies are tender.
    3. Add the cashew butter, nutritional yeast, and cornstarch mixture and cook until they are well blended into the soup and it has thickened slightly.
    4. Enjoy!
  • Roasted Sweet Potato Red Lentil Hummus

    Roasted Sweet Potato Red Lentil Hummus

    We make giant batches of hummus in the deli where I work.  We are talking like gallons.  It is such good hummus too!  I think the trick to delicious classic hummus is plenty of lemon juice and sea salt.  Of course it has to have a good amount of tahini to make it rich and some cumin as well, then it is perfect.  One of my coworkers was making a batch of hummus last week and it made me crave hummus all of a sudden. I decided that I needed to make a batch at home.

    I usually stray away from classic hummus when I make it at home though since I can get the classic stuff at work. So I decided to make a roasted sweet potato hummus!  I already had some leftover roasted sweet potatoes on hand since they are something that I make often, so it was perfect!  I am always trying to come up with recipes that use things I already have so I don’t need to spend extra money or go to the store.  It is a good feeling using up leftovers too!

    I had some cooked red lentils on hand as well, from making another recipe.  I always keep portions of cooked beans and lentils (or lefotvers such as the lentils since I hate wasting food).  Here is a tip to save time and money.  Cook a big batch of beans or lentils, then let them cool and portion them out for whatever you will need them for.  I use mine in salads as well as hummus, and I need them a few times a week usually so it saves me a lot of time.  I do this with all of my beans.  It has been years since I have bought canned ones.

    Back to the hummus though, it turned out super delicious!  I used red lentils as the base (because I have loads of them in my pantry), combined them with the flavorful sweet potato, some tahini to make it silky smooth, lime juice to give it a bit of tartness, some cumin, coriander and chipotle for spice.  It was a delicious combination! I like this as a veggie dip, but of course you could use it as a sandwich spread or with crackers if those are more your thing!

    Roasted Sweet Potato Red Lentil Hummus

    Makes about 3 cups

    • 1 cup dried red lentils
    • 1 cup roasted sweet potatoes*
    • 1/4 cup sesame tahini
    • 1/4 cup lime juice
    • 1 tsp cumin seed
    • 1/2 tsp coriander seed
    • 1/4 tsp ground chipotle
    • sea salt to taste

    Instructions:

    1. To cook the lentils, place them in a pot with 3 cups of water, and bring to a boil.  Lower to a simmer, and cook until the lentils are tender, about 20 minutes.  Drain any excess water, and set aside to cool.
    2. For the hummus, combine all remaining ingredients plus the lentils in a food processor and process until smooth.  Store in the refrigerator for up to 2 weeks in a sealed container.

    *If you don’t happen to have leftover roasted sweet potatoes, you can make one: For the roasted sweet potatoes, preheat the oven to 400F degrees, and place a sweet potato cut in half lengthwise cut side down on a lined tray.  Roast until the sweet potato is tender, about 45 minutes to an hour.  Remove from the oven and let cool for the recipe.

  • Air Fried Spicy Crispy Broccoli with Lemon Tahini Sauce

    Air Fried Spicy Crispy Broccoli with Lemon Tahini Sauce

    The first thing I made in my air fryer back when I got it for Christmas was crispy breaded cauliflower. I had been ordering cauliflower “wings” at a few vegan restaurants a lot before that and I wanted those amazing crispy wings at home but without the deep frying of course so the air fryer was perfect for that. They turned out amazing the first time and without any oil. They were super light and crispy with the perfect amount of breading on the outside. I was craving some last weekend but I didn’t have any cauliflower on hand and didn’t want to go to the store, so I made some fried broccoli instead and it was so good I decided that I needed to share it with you all!

    It was really easy to make, and I was able to enjoy it in less than 25 minutes thanks to the air fryer being so quick! I use that thing a lot just to roast veggies, it takes much less energy and time than the oven. For the coating I just use a simple batter made with gluten free flour and water plus some spices. I like to switch it up to change flavors but I wanted this one to be spicy so I added both chipotle powder and red pepper flakes. I actually sprinkled some of my ghost pepper flakes on these as well, which is an option if you like it even spicier but I know not everyone can get those so I didn’t include that in the recipe.

    Once these are coated in batter, they only take 15 minutes to “fry”. Which is more than enough time to make a dipping sauce for them. I like crispy things with something for dipping. You know like french fries and ketchup, or wings and ranch? Plus these had a little kick so a creamy dipping sauce was the perfect partner for it. This time I decided to make a lemon tahini dipping sauce with the Dastony tahini that Raw Guru recently sent me. It took about a minute to whip up and it was so good!

    The broccoli was so tasty! It reminded me of something I would get at a restaurant as an appetizer but it was so much healthier! These are crispy on the outside with tender broccoli in the center. A little spicy, and a hint of garlic and cumin and the creamy bright tasting lemon sauce is perfect with them! If you have an air fryer (or even if you don’t because I included instructions for baking them in a normal oven as well), give these a try the next time you are craving something fried but still want to eat somewhat healthy!

    Ingredients:

    Broccoli:

    • 1 cup filtered water
    • 1 cup Bob’s Red Mill all purpose gluten free flour
    • 1/2 tsp chipotle powder
    • 1/2 tsp cumin
    • 1/2 tsp garlic powder
    • 1/2 tsp sea salt
    • 1/2 tsp red pepper flakes
    • 1 large head of broccoli or two smaller hears, cut into larger florettes


    Dipping Sauce:

    • 1/2 cup Dastony tahini
    • 1/4 cup lemon juice
    • 1/2 tsp cumin
    • 1/4 tsp sea salt
    • 1 clove garlic, minced


    Instructions:

    1. Whisk together the filtered water, flour, chipotle powder, cumin, garlic powder, sea salt and red pepper flakes in a large bowl until smooth.
    2. Add the broccoli florettes the bowl, and toss with the batter until coated.
    3. Spread out on an oiled air fryer tray so that they are not touching each other.
    4. Bake in the air fryer for 15 minutes at 375F until crispy. (or alternatively, you can spread it out on a sheet pan and roast in the oven at 375F for about 30 minutes until crispy.)
    5. Meanwhile, to make the tahini sauce, whisk together all ingredients until smooth.
    6. Serve the broccoli with the dipping sauce!
  • Creamy Coconut Curried Split Pea Soup

    Creamy Coconut Curried Split Pea Soup

    We went from 40F degrees here at the beginning of the week to a cold snap of below zero temps in a matter of one day.  It is kind of a shock to the system, and sometimes I wonder how as a high schooler I spent every day in the Winter practically outside at nordic skiing practice.  Lots of layers I guess and moving around a lot.  But it feels so much colder now for some reason.  I shouldn’t complain though, we are having a warmer than average Winter over all and it is supposed to warm up again soon.  Either way, I have been making warming comfort food dishes to take the chill off after being outside.  One of which was a Creamy Coconut Curried Split Pea Soup!

    One of my coworkers in the deli I work at had recently made a split pea soup for the customers and I thought it sounded good.  I hadn’t made any in a really long time at home, and I had a bunch of split peas in the cupboard ( I bought way to many the last time I bought them) and I knew that use them up soon.  The reason I hadn’t made split pea in a while was because the last time I made it was kind of a disaster.  I am one of those people who tries to squeeze in too many things at once to multi task at because I want to get a lot done, and I had the split pea soup cooking on the stove while I did other things and I burned it on the bottom.  That is like the worst feeling in the world, when you have to throw a pot of soup away because it tastes burnt (I hate wasting things).  And, it happens quickly with split pea because it is thick.  So just so you all know, I have kitchen disasters too.  One time someone said to me she imagined me like I had a magic kitchen where everything goes perfect and I had spices dancing around and whatnot, but that is so far from the truth.  It is sometimes a disaster area and it is not usually neat until I am done cooking and clean up.  So never feel bad if you mess up once in a while when you are making things.  Anyways, back to my soup I made this week.

    I made it similar to a classic split pea, and included the carrots, onions and celery as well as hearty potatoes.  But for the flavor, I used mild curry powder to give it a nice warming spices quality. It was so good with the split peas!  I wanted to add a little richness too, since this recipe actually isn’t made with any oil, so I added in some full fat coconut milk at the end.  It made the texture smooth and silky.  This soup is so good!  Even though split peas take a while to cook, this really doesn’t require much hands on time or anything and is pretty simple to make.  So if you are a split pea soup fan or you just want some healthy warming comfort food because it is cold right now where you live too, give this a go!

    Creamy Coconut Curried Split Pea Soup
    Serves 2

    Ingredients:

    • 1 small onion, chopped
    • 2 stalks celery, sliced
    • 2 garlic cloves, minced
    • 1 cup dried split peas
    • 3 cups filtered water
    • 1 Tbsp mild curry powder
    • 1/2 tsp red pepper flakes (more or less depending on the spice level you want)
    • sea salt to taste
    • 2 medium organic carrots, sliced
    • 3 medium organic red potatoes, diced
    • 1/2 cup full fat coconut milk


    Instructions:

    1. In a pot, combine all ingredients but the carrots and potatoes, and bring to a boil.
    2. Lower to a simmer, and cook until the split peas are softened, about 40 minutes, then add the carrots and potatoes and cook until they are tender and the split peas are falling apart.
    3. Stir in the coconut milk until well combined and serve!
  • Tuscan Chickpea Vegetable Soup 

    Tuscan Chickpea Vegetable Soup 

    We make soup like crazy in the deli I work in this time of the year, so you would think I would hate making soup at home. But that is not the case at all!  I love soup just as much as the customers do, I just prefer to make a big batch for myself and eat it for a few days (less work to get dinner on the table later in the week is always a good thing).  I tend to be boring and monotonous with my soup that I make though, often times it is the same two soups every week.  What can I say, I know what I like.  But This week I decided to be a little different and make a soup very similar to one that I make at work, a Tuscan bean soup. It is actually my recipe that I make at work, that I first made at home back when I was just out of college, but I haven’t made it in a really long time and I have never shared it on my blog before surprisingly.  I decided to make it this week mostly because I was making dinner for me and Eric and I think he is getting just a little sick of chili every week.

    This soup is actually pretty easy to make too.  It requires a little cooking time, but it is ready to enjoy in under an hour.  I have to say too, it is even better the next day if you let it all sit together overnight.  I love that this soup is loaded with good veggies!  Although I consider it essential for my soups to be mostly veggies.  I am not a fan of soups that are mostly completely broth, or just a cream base and pureed. I have to have chunky veggies in there!  This soup is so aromatic while it cooks, the scent of Italian herbs, basil, oregano, and rosemary fill the air along with sweet tomatoes and garlic.  I know some people hate garlic but I love it, and we all need it to stay healthy this time of the year.

    This soup always turns out super delicious.  Not only that, I love the heartiness of it, without it being heavy at all.  At the end, I even stirred in kale because I like to try to get greens with at least once of my meals every week.  And stirring them into your soup at the last minute when you pull it off the stove (so they don’t get over cooked) is a great way to get a bunch in (since they wilt and you can fit more).  If you are in need of some healthy comfort food, give this a try!

    Tuscan Chickpea Vegetable Soup 
    Serves 3-4

    Ingredients:

    • 1 tsp olive oil
    • 1/4 cup diced red onion
    • 2 stalks celery, sliced
    • 2 large carrots, cut in half and sliced
    • 2 garlic cloves, minced
    • 1 tsp dried basil
    • 1/2 tsp fennel seed
    • 1 tsp dried oregano
    • 1/4 tsp red pepper flakes
    • 1/2 tsp sea salt
    • 1 Tbsp balsamic vinegar
    • 3 cups crushed canned tomatoes or fresh roasted*
    • 2 cups flavorful vegetable stock
    • sea salt
    • 3 cups diced potatoes
    • 2 cups cooked chickpeas
    • 2 cups fresh kale, torn into small pieces


    Instructions:

    1. Heat the olive oil in a medium pan.
    2. Add onions, carrots and celery and sauté until tender.
    3. Add the garlic, tomatoes, herbs, sea salt, pepper, vinegar, and filtered water.
    4. Bring to a simmer, and allow to cook until the tomatoes are very soft and the flavor has melded, about 30 minutes.
    5. Add the potatoes to the pot, and let cook for about 10-15 minutes.
    6. When the potatoes are tender, stir in the chickpeas and kale until kale has just wilted.
    7. Serve!


    *To roast the tomatoes, cut them into 2 inch wedges, and spread them out on a parchment lined baking sheet.  Place in a 400F degree oven and roast for about 30-45 minutes until tender and starting to brown at the edges. Remove from oven and you are ready to use them in this recipe.

  • Vegan White and Green Bean Casserole

    Vegan White and Green Bean Casserole

    Casserole sounds so sophisticated, but in Minnesota we usually call things baked in the oven hot dishes.  So I find it funny that we don’t call green bean casserole green bean hot dish here! Green bean casserole is a Holiday staple, it was pretty much at every Thanksgiving and Christmas when I was little.  But I haven’t had it in many years because It usually isn’t vegan, and I am not a fan of using cream of mushroom soup in things.  Surprising I haven’t veganized it until now, but this year after Thanksgiving my Mom asked me if I could veganize them for her.  Also, she had a specific recipe she wanted me to veganize that had a mixture of green beans and white beans.  Because one can never have too many beans, and they have always been a big part of cooking for me and my Mom.  We used to always use them in soups and stews growing up, as well as on salads, or with pasta.  Pretty much a lot of our meals.  White beans were what we used the most, so this recipe is fitting for her.

    I veganized the recipe as well as made a few upgrades to make it even more delicious.  The original recipe had a bechemel sauce, but I made a creamy sauce from coconut milk and cashew butter with garlic, shallots, white wine, nutritional yeast, a touch of lemon and thyme.  It was super flavorful and delicious and you would swear that it had dairy in it!  It was perfect with the green and white beans, and tasted so much better than any cream of mushroom soup would have.

    Instead of the usual fried onions, the recipe I was veganizing had bread crumbs on top.  But I decided just bread crumbs were kind of boring, and so I used my home made bread crumbs mixed with hazelnuts and nutritional yeast.  It made for a satisfying crunchy topping!  The casserole turned out super delicious!  The green bean casserole I grew up eating was just ok.  But this one was so incredibly good.  I consider this a full meal in and of itself.  I mean, you have protein and fiber from the beans, plus they are a vegetable, and why not eat them in a creamy sauce like mac and cheese and call it a dinner?  Well, my Mom loved it as well, and I think this might end up being something that we make every year for the Holidays!  If you are still looking for a delicious side dish for this Christmas and Holidays, definitely consider this!

    Vegan White and Green Bean Casserole
    Serves 2-4

    Ingredients:

    • 2 tsp avocado oil, or olive oil
    • 2 small shallots, diced
    • 2 garlic cloves, minced
    • 1/2 tsp dried thyme
    • 2 Tbsp white wine
    • 3/4 cup full fat coconut milk at room temperature
    • 3/4 cup raw cashew butter*
    • 2 Tbsp nutritional yeast
    • 1 tsp lemon juice
    • 1/2 tsp sea salt (or to taste)
    • 1/4 tsp freshly ground black pepper
    • pinch of cayenne (optional)
    • 1 1/2 cups cooked cannelini beans
    • 16 oz frozen green beans, thawed (or fresh green beans, blanched)


    Topping:

    • 1 cup breadcrumbs
    • 1/2 cup chopped hazelnuts
    • 2 Tbsp nutritional yeast
    • 2 Tbsp avocado oil
    • 1/4 tsp sea salt


    Instructions:

    1. Preheat the oven to 375F degrees.
    2. In a large ceramic pan, heat the oil, and add the onions.  Sautee until soft and tender, about 10 minutes. Add the garlic, thyme and white wine and cook until the wine has evaporated.
    3. Whisk together the coconut milk, brazil nut butter, nutritional yeast, lemon juice, pepper, and cayenne in a bowl, then pour over the onions and cook until heated.
    4. Add the beans, and stir to combine.  Pour into a 2 quart oven proof baking dish.
    5. Mix the breadcrumbs with the hazelnuts, nutritional yeast, avocado oil and sea salt in a bowl for the topping.
    6. Sprinkle the breadcrumbs over the top of the beans, and place in the oven.  Bake until the top is browned, about 10-15 minutes.
    7. Serve!


  • Vegan Mushroom Stroganoff

    Vegan Mushroom Stroganoff

    Stroganoff is a dish that is big here in Minnesota.  People usually make it with venison or beef, and it is considered comfort food and who doesn’t need comfort food when it is 20F degrees below zero in the Winter?!  I grew up eating it and actually liked it, mostly because of the noodles and creamy sauce, not the meat and because I thought it was kind of fancy since we didn’t eat it often.  Back when I was vegetarian I used to make a meat free version of it once in a while that still had dairy that was good.  But up until now I hadn’t veganized it.  Surprising because it is kind of a classic!  Well, last week my Mom asked if I could veganize it and so I finally made some.

    It was a win all around because I feel like the vegan version is so much easier to make and less fussy than the original and even the vegetarian recipes were.  In place of the meat, I used plenty of meaty mushrooms.  I love mushrooms.  I know they are kind of a polarizing food that people either love or hate but I love their earthy  umami flavor and meaty texture.  They give this dish so much good flavor along with the garlic and onions I included in it.

    For the sauce, it had to be silky and rich, so I added some coconut milk to it as well as some Dastony brazil nut butter from Raw Guru.  I know that may sound like an odd combo, but the brazil nut butter is perfect for savory dishes just like cashew butter is, it is rich, creamy  and silky smooth.  I used a gluten free pasta made from chickpeas, so this had protein in it as well, and was a complete satisfying meal!  Yes it is rich, and something I would consider serving for a special occasion with maybe a light salad on the side.  Maybe for the Holidays!  It was super delicious though!  I enjoyed it way more than the meat version I ate as a kid.  This comes together in about 35 minutes, so it is also a good weeknight dinner option. It certainly made the snowy day we had the night I made it seem a little less chilly!

    Vegan Mushroom Stroganoff
    Serves 2-4

    Ingredients:

    • 8 oz gluten free fusilli pasta
    • 2 tsp avocado oil, or olive oil
    • 1 small onion, diced
    • 4 cups sliced organic mushrooms (I used crimini, button and shiittake mushrooms)
    • 3 garlic cloves, minced
    • 1/2 tsp dried thyme
    • 2 Tbsp white wine
    • 3/4 cup full fat coconut milk at room temperature
    • 3/4 cup Dastony brazil nut butter* or raw cashew butter
    • 2 Tbsp nutritional yeast
    • 1 tsp lemon juice
    • 1/2 tsp sea salt (or to taste)
    • 1/4 tsp freshly ground black pepper
    • pinch of cayenne (optional)
    • 3 Tbsp freshly chopped parsley

    Instructions:

    1. Cook the pasta according to package directions, drain, place back in the pan, cover and set aside on the stove.
    2. Meanwhile in a large ceramic pan, heat the oil, and add the onions and mushrooms.  Sautee until soft and tender, about 10 minutes. Add the garlic, thyme and white wine and cook until the wine has evaporated.
    3. Whisk together the coconut milk, brazil nut butter, nutritional yeast, lemon juice, pepper, and cayenne in a bowl, then pour over the mushroom mixture and cook until heated.
    4. Pour the mushroom mixture over the pasta in the pot, and stir to combine.
    5. Add the parsley and mix until incorporated.
    6. Serve!

    *If you do not have brazil nut butter, you can use the same amount of raw cashew butter in the recipe.

  • 30 Vegan Savory Thanksgiving Recipes

    30 Vegan Savory Thanksgiving Recipes

    Sometimes I feel like people think that vegans don’t get to enjoy good food on holidays like Thanksgiving.  But on the contrary, we feast just like the omnivores!  There is just as much delicious vegan food out there as there are is food containing animal products and I never feel deprived with what I cook on holidays.  I also love bringing vegan dishes to gatherings and having those who think that vegan food is gross actually end up loving them.  If you are still looking for ideas for what to serve your family or bring to a gathering, this post is for you!  I am sharing my Thanksgiving worthy dishes that I would be proud to have on my table.  Of course I can’t make them all, but I want you to have lots to chose from!  Whether you are feeding a small family, or a large one there is something or everybody here.  Some are raw, some are cooked, most are gluten free and all are delicious!  So, enjoy, I hope you are inspired!

    Cranberry-2BRelish-2Band-2BChevre-2B1

    Pine Nut Chevre with Cranberry Pear Relish

    Vegan Pumpkin Cranberry Chevre 

    Greens-2BSalad-2B1

    Lemony Autumn Greens Salad

    Vegan Pumpkin Cornbread

    Sweet and Tangy Roasted Brussels Sprouts 

    Sweet and Spicy Roasted Brussels Sprouts

    Mushroom Wild Rice Casserole

    Butternut Squash Cranberry Casserole 

    Vegan Green and White Bean Casserole 

    Root Vegetable Mash 

    Vegan Creamed Spinach 

    Vegan Sweet Potato Casserole 

    Sweet and Spicy Asian Roasted Brussels Sprouts 

    IMG_1437

    Sweet and Spicy Double Squash Salad

    Pom-2BPilaf-2B2

    Raw Pomegranate Almond Couscous

    Vegan Squash Cornbread Stuffing 

    Cranberry Apple Wild Rice Stuffing 

    Vegan Sweet Potato Casserole

    Jalapeno-Cheddar-Taters

    Vegan Jalapeno Cheddar Mashed Potatoes

    Chickpea Cutlets in Mushroom Gravy 

    008

    Festive Quinoa Stuffing

    Savory Lentil and Wild Rice Stuffed Squash 

    Vegan Sweet Potato Lasagna 

    Lentils-in-mushroom-gravy-with-sweet-and-gold-mashed-potatoes-1

    French Lentils in Mushroom Gravy with Sweet and Gold Mashed Potatoes

    0071

    Apple Stuffed Squash

    Vegan Lentil Walnut Meatloaf

    Vegan-Tater-Tot-Hotdish-3

    Vegan Tater Tot Hotdish

    Mushroom-Meatballs

    Vegan Mushroom Walnut “Meatballs” with Gravy and Mashed Potatoes

    Vegan-Shepards-Pie

    Vegan Shepard’s Pie

    TGD-2B1

    Raw Miso “Roasted” Mushrooms and Green Beans with Rich Parsnip Puree


  • Root Vegetable Lentil Stew

    Root Vegetable Lentil Stew

    In the deli I work at, we sell so much soup it is unreal.  We sell at least 24 quarts a day.  I understand.  We do make really good soups  and stews from scratch, using organic ingredients.  I am the vegan soup maker.  Of all of the soups I make, my favorites are the soups involving beans and lentils.  Chili of course, but also just hearty comfort food lentil soups or curries.  After making so much soup at work lately you would think I would not want to make soup when I got home, but I have made 3 already at home this week!  The latest was a delicious lentil root vegetable soup that was so good I decided to share the recipe with you all.  It was snowing and sleeting outside the day I made this and I was feeling a bit chilled after work and needed warming stew.

    The best part was, I had all of the ingredients on hand.  That is usually the deciding factor on what I make for dinner.  Even though I work at a health food store and I could buy ingredients for things on a whim, I like to save money and use what I already have.  As far as I am concerned, soups have to have a lot of vegetables.  In fact, they should be the main ingredient. For this soup, I used a mixture of root veggies.  They are so good this time of the year in pretty much anything.  I had made a root vegetable mash as a side dish the night before and I had just the right amount left over for the soup.  Rutabagas, sweet potatoes, and yukon gold potatoes.  Starchy, delicious veggies are just what I was in the mood for.

    I use sweet potatoes and potatoes all year round in things, but rutabagas are a bit more special because I only use them in the cooler months when they are in season.  As a kid I disliked them just because I thought they were weird (even though I don’t think I had ever actually tried them but you know how kids are about things), but I grew to love them in college when branched out with veggies and I discovered that they are delicious roasted or included in your mashed potatoes.  They are nice in a soup like this because they do not fall apart and get mushy.

    I included lentils in the soup for protein, and aromatic thyme, sage, garlic and onions and it smelled wonderful while cooking.  It tasted even better than it smelled too!  I served it with some fresh parsley and it was lovely!  This is the sort of comfort food I love, things that are hearty and delicious but also healthy!  If you are looking for a warming weeknight meal, give this a try!

    Root Vegetable Lentil Stew

    Serves 2-4

    Ingredients:

    • 1 small red onion, diced
    • 3 garlic cloves, minced
    • 2 stalks celery, sliced
    • 2/3 cup french lentils
    • 4 cups vegetable broth or filtered water
    • 1/2 tsp dried thyme
    • 1/4 tsp dried sage
    • 1/4 tsp black pepper or to taste
    • 1/2 tsp sea salt, or to taste
    • 2 medium rutabagas (2 cups), cubed
    • 1 medium yukon gold potato, cubed
    • 1 medium sweet potato (2 cups) cubed
    • 2 Tbsp chopped fresh parsley


    Instructions:

    1. Combine the onions, garlic, celery, lentils, water, thyme, sage salt and pepper in a large pot and bring to a boil.  Lower to a simmer, add the rutabagas and cook until the lentils are starting to soften, about 30-40 minutes.
    2. Add the sweet potatoes and potatoes and cook until tender, about 15 more minutes.
    3. When the lentils and veggies are tender, add the fresh parsley and serve!
  • Sweet and Spicy Roasted Brussels Sprouts

    Sweet and Spicy Roasted Brussels Sprouts

    One of my all time favorite items to make in the Fall is roasted brussels sprouts.  They are like savory candy honestly.  Tender on the inside, crispy and salty on the outside…sooo good!  I make them all the time at work with just a little olive oil and sea salt and they are amazing.  I could seriously eat a giant bowl of them and be happy.  Funny because as a kid I thought brussels sprouts were gross.  Probably because my Grandma steamed them for Thanksgiving and they were kind of mushy and stinky (they are a cruciferous vegetables after all).  I would take some just because I felt like I needed to take a little of everything but they were definitely not my favorite. It all depends on how you cook them though!  They are so delicious when roasted to crispy perfection!  So that is mainly how I make them.  Sometimes I will add them halved to a stir fry, but I don’t over-cook them.

    My Mom gave me a bag of them that she had picked up at Trader Joes and asked me to try making a side dish with Asian flavors that could be used for Thanksgiving with them.  Of course I was down for that, I do enjoy them after all!  So I created a simple dish that was easy to make, and I was enjoying delicious roasted brussels sprouts in about 45 minutes! I wanted them to be salty, sweet and have a little kick to them.  So I combined some home made chili oil, maple syrup, tamari, lime juice and garlic as a sort of marinade, tossed the brussels sprouts with that, and roasted them to flavorful perfection.

    They turned out so good!  Sweet, spicy, salty and tender. I think these would make a perfect Thanksgiving side dish!  I shared them with my Mom and she approved as well.  I think that if people served these instead of steamed brussels sprouts a whole lot more people would learn to love them!  I will definitely be making these again soon! Speaking of Thanksgiving side dishes, what is your favorite?  Mine were always mashed potatoes and stuffing, but of course now I can add brussels sprouts to the list!

    Sweet and Spicy Roasted Brussels Sprouts
    Serves 4

    • 2 Tbsp chili oil
    • 3 Tbsp maple syrup
    • 2 Tbsp tamari
    • 1 Tbsp lime juice
    • 2 garlic cloves, minced
    • 2 lbs fresh organic brussels sprouts, trimmed
    1. Preheat the oven to 350F degrees, and oil a sheet pan.
    2. Add all ingredients to a bowl, and toss the brussels sprouts until coated in the mixture.
    3. Spread out on the sheet pan, place in the oven and roast until the brussels sprouts are tender, about 45 minutes.
    4. Remove from the oven, and enjoy!


  • Autumn Apple Fig Salad with Lemon Maple Tahini Dressing

    Autumn Apple Fig Salad with Lemon Maple Tahini Dressing

    I still haven’t been to an apple orchard yet this year.  Maybe next weekend.  But I have bought some amazing local apples at the grocery store.  The Honeycrisp apples are still my favorite.  The local ones are the best though, and taste slightly different than the ones that are flown in from elsewhere.  Not only do I enjoy using them in desserts like a really good apple pie, I love them in savory things like salads as well.  Since I had an abundance of apples I had bought last weekend, I decided to use one in a salad.  Now when I make salads, I like them to be substantial.  None of this just greens with a dressing stuff that doesn’t fill you up.  You know, like the ones you get in a restaurant that has no vegan entrees that you have to order because it is all that you can possibly get from the menu that won’t have animal products in it?  Or the ones that people who don’t know much about the vegan diet think that we all eat.  I like lots of delicious add ins.  I was at a restaurant up in Duluth (MN), Canal Park Brewery  with my family last weekend, and I ordered a salad and I was pleasantly surprised.  Not only was it large, it was filled with delicious stuff.  Berries, and beets, and pecans, and cranberries, fresh greens, and some grilled portabello mushroom (that I ordered extra to top it because it sounded good). It was not a wimpy salad.  It was a meal.  Now that is how I like my salads!

    So this salad is substantial too.  I gave it an arugula base, because it is my favorite type of greens, and I have it on hand at all times. It has the apples of course, but I added figs and cranberries as well.  Yes, I know it is kind of a sweet salad, but trust me on this it is so good.  I love dried figs, they have such a satisfying chewy texture and delicious flavor.  I also added in some Sunbiotics probiotic truffle almonds that Raw Guru sent me.  That might sound odd in combination with the other ingredients, but these almonds are amazing.  Not chocolate truffle by the way, truffle as in the expensive mushrooms that give things a delicious flavor.

    The salad needed a good dressing as well, and I get a little tired of vinaigrettes sometimes so I went for my favorite type of dressing a creamy nut/seed butter dressing. Tahini dressing has always been one of my favorites, so I used some Dastony tahini whisked together with some lemon juice and maple syrup to make a delicious dressing.  I usually make it very savory with just the lemon juice and a little cumin.  But since this salad has fruit I decided to add the sweet maple syrup instead.  I wasn’t sure how it would taste, but it was so good! It was perfect with the sweet fruit and peppery arugula on the salad! If you like big salads too, and are in the mood for something with apples, give this a try!

    Autumn Apple Fig Salad with Lemon Maple Tahini Dressing
    Serves 2

    Ingredients:


    Instructions:

    1. Combine the arugula, apple, figs, almonds, and cranberries in a bowl, and toss until combined.
    2. In a small bowl, whisk together the tahini, lemon juice, maple syrup, and sea salt, along with water if needed if it seems to thick to pour (you want it thick enough to coat your salad, but not so thick that it stays in clumps).
    3. Pour some of the dressing on the salad and toss to coat. Then divide between plates and drizzle a little more dressing on the salad.  Serve!
  • Thai Red Curry Vegan Mac and Cheese

    Thai Red Curry Vegan Mac and Cheese

    When Eric and I were at Twin Cities Veg Fest last Sunday, the Herbivorous Butcher food truck had some Thai Red Curry Mac and Cheese that sounded good, but we didn’t get any because we had already spent our money.  It sounded good really though, good enough to inspire me to make my own at home.  I loved mac and cheese growing up, but after a while when I got older and started learning more about nutrition I realized that it really wasn’t that good for me.  So I didn’t eat any for a really long time.  That is until I became vegan.  I couldn’t justify to myself eating that much cheese and refined flour (from the noodles) and no vegetables for dinner.  I guess I tended to go more unhealthy in the form of dessert if I wanted to indulge back then. But when I became vegan I discovered making mac and cheese with healthy things that I wanted to put into my body that would make it feel good.  The mac and cheese that I make now is loaded with veggies in the sauce!  Now don’t let that deter you, you don’t really notice that it is there, it just tastes good.  In fact, I pretty much nailed the mac and cheese my Mom made out of a box when I was little.  Yes, I liked that box stuff.  My secret ingredient for the sauce?  Sweet potatoes! Or sometimes butternut squash too!

    I always have sweet potatoes on hand anyhow, so I thought one day, why not use them to make a cheese sauce?  I had seen other people make it with potatoes and carrots and I have tried that and it wasn’t my favorite but the sweet potatoes are perfect! I didn’t want a completely fat free sauce because I still wanted the rich mouthfeel of actual cheese for my mac and cheese, so I added in some raw cashew butter.  That combo was a winner!  Of course I add in other seasonings as well, some of which may sound odd like the vinegar, miso and nutritional yeast, but just trust me on this one, it is delicious!  I made this batch with plenty of Thai red curry paste, and a bit of cayenne for a little kick, plus some green onions and red bell pepper for color.  The sauce was super delicious, like cheese but it didn’t leave me feeling heavy or yucky after eating it.  Probably because I was getting a serving of veggies instead of just cheese like in non vegan mac and cheese.

    For the pasta I actually used a gluten free elbow pasta made from quinoa and brown rice.  It actually tastes just like traditional pasta too!  If you are looking for a healthier mac and cheese packed with flavor, give this one a try!  It is actually really quick and easy to make too so perfect for a weeknight when you are in need of some comfort food!

    Thai Red Curry Vegan Mac and Cheese 
    Serves 4

    Ingredients:

    • 2 1/2 cups mashed sweet potato*
    • 1 cup hot filtered water (or as needed)
    • 1/2 cup raw cashew butter
    • 2 medium garlic cloves
    • 1/4 cup Thai red curry paste
    • 1 Tbsp apple cider vinegar
    • 1 Tbsp white miso (optional)
    • 1/4 cup plus 2 Tbsp nutritional yeast
    • 1/8 tsp cayenne pepper
    • 3/4 tsp sea salt (or to taste)
    • 16 oz organic gluten free elbow pasta
    • 1 red bell pepper, cut into small dice
    • 2 green onions, thinly sliced


    Instructions:

    1. Combine the sweet potato, water, cashew butter, garlic, Thai red curry paste, cider vinegar, miso, yeast, cayenne, and sea salt in a high speed blender and blend until smooth and the consistency of cheese (if it is too thick add a little more water).  Set aside.
    2. Cook pasta according to package directions, drain, then place back in the pot, add the cheese, red peppers and green onions, and stir to coat.  Pour into a serving dish, and serve!

    *To cook the sweet potatoes, I like to roast them in the oven.  Take a large sweet potato, poke a few holes in it, and cut in half lengthwise.  Place cut side down on a sheet pan lined with parchment and bake for about an hour at 400F degrees or until tender.  Remove from oven and let cool before mashing.

  • Strawberry Peach Avocado Quinoa Salad 

    Strawberry Peach Avocado Quinoa Salad 

    We have a quinoa salad in the deli I work in that has Summer fruits in it and it is pretty popular.  You wouldn’t think that quinoa and fruit would be a pair unless it was a breakfast quinoa or something but it actually really works as a savory salad!  I actually have made quite a few quinoa salads with fruit at home too, and they are always delicious.  The fruit has to be ripe and flavorful though. Buying fruit that is in season and ripe is the key to success when making dishes that include it.  Especially if it is going to be raw.  I decided to make one last weekend because I had extra peaches and strawberries from making a crisp, and didn’t feel like using them for dessert.  They were perfectly ripe, the peaches had that delicious aroma and the strawberries were packed with flavor.  So I thought that a simple salad would be best to let the flavors shine through.

    I love that quinoa is quick to make, contains protein and is a neutral flavor so it can be combined with pretty much anything.  I make it several times a week for those reasons.  I had made some ahead of time for a different meal, so this salad came together fast!  In addition to the fruit I felt like the salad needed something rich.  I usually pair a home made vegan chevre (goat cheese) with fruit in quinoa and it is delicious but I don’t always have it on hand, so sometimes I use avocado instead.  Trust me, it is just as satisfying as the cheese, and I always have some on hand because I buy a bag of avocados every week since I love them so much. You may be thinking avocado and fruit sounds weird together but they totally pair with each other!

    I also added some greens in the form of arugula to the salad, because I always try to get a serving of greens in every day.  I stir them into soups, toss them into salads like this or use them as a base for a salad, but they are something that I always have in my refrigerator and work into my diet every day.  Lastly, I made a simple lemon dressing with a hint of thyme and it was so good once it was all mixed together!  It is satisfying, balanced, and you will feel great after eating it!  If you are looking for a more substantial Summer salad, give this a try!  Only a few weeks of Summer left, so might as well enjoy it while you can!

    Strawberry Peach Avocado Quinoa Salad 
    Serves 2-4

    Ingredients:

    • 1 cup quinoa, rinsed
    • 2 cups filtered water
    • 1/4 cup lemon juice
    • 1 Tbsp organic lemon zest
    • 2 Tbsp avocado oil or olive oil
    • sea salt to taste
    • 2 tsp fresh thyme leaves
    • 1 cup organic peaches, cut into 1 inch pieces
    • 1 cup organic strawberries, quartered
    • 1 good handful arugula
    • 1 large avocado, cut into large dice


    Instructions:

    1. To prepare the quinoa, place quinoa and water in a medium saucepan and bring to a boil. Reduce to a simmer, cover and cook until all the water is absorbed about 15 minutes, or when all the grains have turned from white to transparent, and the spiral-like germ has separated. Drain, and set aside.
    2. Whisk together the lemon juice, avocado oil, sea salt and thyme in a small bowl.
    3. To assemble the salad, combine all remaining ingredients in a bowl  and the dressing, and toss together until well combined.
    4. Enjoy!
  • Blueberry Sweet Corn Salad

    Blueberry Sweet Corn Salad

    Some people think it is weird to eat sweet corn raw, right off of the cob, but when you get really good fresh organic sweet corn, it is so delicious that way!  We have loads of fresh sweet corn here in Minnesota right now, it is the peak season, and nothing compares to it.  Sure you can get frozen corn all year round but it is not sweet and the texture is not the same.  I learned about the eating it off of the cob thing from Eric, because he always does that.  Growing up, I was taught to cook my corn and drown it in butter (which is the most popular way to eat it here probably), but it is so sweet and delicious raw, I can’t believe I hadn’t tried it until about 5 years ago.  I now like to include it in my salads raw.  I was gifted some organic sweet corn and blueberries earlier this week, and I decided that they would make a delicious salad together!

    I wasn’t in the mood to make anything complicated or time consuming, and this was perfect!  It only took me about 5 minutes to make minus cutting the corn kernels off of the cobs.  I wanted to keep the ingredients simple, because the corn and berries were so fresh and flavorful even before adding anything to them.  I added some arugula, because I love greens in pretty much 95% of my salads, and I love the peppery bite it gives.  Just a little scallions and thyme for a savory flavor, and some pistachios for crunch and I had all of the components but the dressing.

    My favorite go to dressing is a blend of just lemon juice, avocado oil and sea salt, and that was perfect with this!  The corn and blueberries were sweet, and the lemon juice balanced it out so it all blended together well.  This is so good!  I think it would be the perfect thing to bring to a picnic, or to make ahead of time to include in your lunches. I get kind of excited when I have a good salad I brought to work for lunch.  Yes, I know I am a nerd and I am motivated by food, but what can I say?!  Good food is important!

    Blueberry Sweet Corn Salad

    Serves 4

    Ingredients:

    • 3 cups fresh organic sweet corn kernels
    • 2 cups organic blueberries
    • 2 cups organic arugula
    • 1 scallion, sliced
    • 1/2 cup pistachios, coarsely chopped
    • 1/4 cup lemon juice
    • 3 Tbsp avocado oil
    • 1/2 tsp dried thyme, or 1 tsp fresh thyme leaves
    • 1/4 tsp sea salt, or to taste


    Instructions:

    1. In a large bowl, combine the corn, blueberries, arugula, scallions, and pistachios.
    2. In a smaller bowl, whisk together the lemon juice, avocado oil, thyme and sea salt.
    3. Pour the dressing over the salad in the bowl, and mix together gently until it is all combined.
    4. Serve!
  • Moroccan Roasted Carrot Hummus

    Moroccan Roasted Carrot Hummus

    One of my favorite things to make at work (in a health food store deli) is hummus.  It is not my usual job, I am the one who makes salads, vegan soups and vegan hot bar, but when I have all of my stuff done, and they need help making hummus, I always volunteer.  We make really good hummus, red pepper and regular, and of course, we always have to taste test it to make sure it is fit for the customers.  Which is why I love to make it.  It has plenty of lemon juice, sea salt, and a little bit of a kick, which is the way I love it, and the way I usually make it at home.  A few days back my coworker was making it and I said to myself, you know what sounds good for dinner?  Hummus with a big plate of veggies.  So, that is exactly what I made when I got home.  I decided to make a new flavor of hummus though, because I like to keep it interesting.  Raw Guru had recently sent me some Dastony Sesame Tahini so, it was the perfect time to make hummus!  Their tahini is super smooth and creamy, not bitter like tahini sometimes is.  So, it made for some rich and delicious hummus!

    I decided to make a Moroccan roasted carrot hummus, because I was in the mood for something with plenty of spices and I had carrots on hand.  When deciding what to make, I almost always try to just use what I have on hand at home already.  This way I never waste food, and I save money which is a win all around.  I roasted the carrots until they were tender in the oven, bringing out their sweet flavor, and then combined them with cooked chickpeas for the bulk of the hummus.  I always have cooked chickpeas on hand for things like this, because I cook up a big batch, then freeze them in portions so that they are ready to use. It is more cost effective than using canned, plus I think they taste a little better.  I added  the smooth Dastony Sesame Tahini to the hummus, and it was so silky smooth!  All it needed were the aromatic spices.   I chose garlic, cumin, paprika, cinnamon, coriander and turmeric.  Also some cayenne for heat.  It smelled sooo good!

    I could not wait for dinner!  I just had to cut up all of my veggies.  It didn’t take long because I am a veggie chopping expert, and I was hungry for that hummus!  The flavor was delicious!  A little sweet from the carrots, and the blend of aromatic spices a bit warming with that rich tahini texture…it was sooo good!  I ate the whole plate of veggies and hummus.  This is one of my favorite Summer meals, and I always have to make it a few times.  But if I am not ambitious about cutting that many veggies, the hummus just makes the perfect afternoon snack with some cucumber slices after work.  I hope you are all having a fabulous Summer so far, if you are a hummus fan like me, give this one a try!

    Moroccan Roasted Carrot Hummus
    Makes about 2 1/2 cups

    Ingredients:

    • 2 large organic carrots, cut into 1 inch pieces
    • olive oil
    • 1 1/2 cups cooked chickpeas
    • 1/2 cup Dastony Sesame Tahini
    • juice of 2 large lemons (1/4 cup)
    • 1 garlic clove, minced
    • 1/2 tsp Raw Guru Himalayan salt or sea salt (or to taste)
    • 2 tsp ground cumin
    • 1 Tbsp smoked paprika
    • 1/8 tsp cayenne (or more if you like spicy)
    • 1/4 tsp cinnamon
    • 1/2 tsp coriander seed
    • 1/2 tsp turmeric
    • filtered water as needed


    1. To roast the carrots, preheat the oven to 400F degrees.
    2. Toss the carrots with just enough olive oil to lightly coat them, and spread out on an oiled sheet pan.  Place in the oven and roast until the carrots are tender, about 30-40 minutes.  Remove from oven and let cool.
    3. Place the carrots in a high speed blender or food processor, along with all of the other ingredients, and blend until smooth, adding filtered water as needed to create a smooth consistency.
    4. Enjoy!  Keeps in an airtight container in the refrigerator for up to 2 weeks.


  • Vegan Roasted Asparagus Garlic Flat Bread

    Vegan Roasted Asparagus Garlic Flat Bread

    Last weekend I ran the Foodie 4 Mile, a race to celebrate the opening day of the Minneapolis North East Farmer’s Market.   It was a beautiful perfect morning for running, about 49 degrees and cloudy.  I like the cooler temperatures because then I don’t overheat.  I ended up beating my time from last year by 6 seconds which was a surprise because I recently took a little time off from an injury and didn’t feel like I was in as good of shape as I normally am this time of the year. It went really well though, and I was glad I did it.  I just prayed before the race that I would feel good and go well, and it did!  They gave out reusable totes with coupons to the farmer’s market, so we had to stop there after and browse around.  I love farmer’s markets, but I don’t get there often because usually I work on Saturdays and am busy on Sundays, so it is packed up by the time I would get there.  But it was awesome to be able to visit right after the race on the way home.  They had surprisingly a good amount of produce for this time of the year.  I bought some beautiful asparagus, purple and green.  Since it is so good this time of the year.

    I thought it deserved to be used in something delicious. I usually would just roast it with a little olive oil and sea salt and eat it like that, but I decided to use that roasted asparagus to top off a flatbread. It just sounded good.  I wanted it to have a nice sauce on the bottom underneath the veggies, so I decided to use some Dastony watermelon seed butter that Raw Guru recently sent me to make a creamy garlic sauce.  If you have never had watermelon seed butter, it tastes similar to tahini just a little more mild.  I honestly did not even know it existed until they sent me some to try but it is good, and actually has health benefits!  Perfect for people who want to make a creamy sauce but are allergic to cashews.  If you want to check it out for yourself, you can find it HERE. If you do check out the Raw Guru Website, and you decide to order something, use my coupon code FRAGRANTVANILLA to get 10% off your order, typed in at your checkout.  Back to that flatbread.  The creamy garlic sauce was the perfect thing to spread over the flatbread.

    I had made a whole wheat cracker crust, because that is what I like. I am not as much of a fan of doughy crusts for some reason.  It is the toppings that matter to me.  I roasted plenty asparagus, then combined it with arugula, kalamata olives, and some vegan garlic white cheddar I had made and it was beautiful.  Lastly a sprinkle of red pepper flakes for garnish and it was perfect!  It was a nice combination of textures and flavors, with the crunchy crust, savory veggies, creamy cheddar and garlic sauce and kick of pepper flakes.  If you are in the mood for something that screams “Spring!” give this a try!

    Vegan Roasted Asparagus Garlic Flat Bread
    Serves 2

    Ingredients:

    Dough:

    • 1 1/2 cups organic whole wheat pastry
    • 1 Tbsp olive oil
    • 1/2 tsp sea salt
    • 1/2 cup plus 1 Tbsp filtered water


    Asparagus:

    • 2 cups organic asparagus, cut into 2 inch pieces
    • olive oil
    • sea salt


    Sauce:

    • 1/2 cup Dastony watermelon seed butter
    • 1 garlic clove, minced
    • 1 Tbsp lemon juice
    • 1/3 cup filtered water (or as needed)
    • 1/4 tsp sea salt, or to taste


    To finish:

    • 1/2 recipe Vegan Garlic White Cheddar , or store bought, such as Miyoko’s Kitchen cheddar
    • 1 handful arugula
    • 1/2 cup kalamata olives, halved
    • red pepper flakes


    To make the dough, combine the flour, and sea salt in a bowl, and whisk until well blended. Add the oil and water, and mix in until you have a soft dough.  Turn out onto a sheet of parchment paper with a light dusting of flour, and roll out into a 14 inch circle.  Set aside.

  • Vegan Chili Mole with Rice

    Vegan Chili Mole with Rice

    I have always loved spicy chili. When I was little, my best friend’s Dad made the best chili with the vegetables from his garden. Including spicy peppers like habaneros and jalapenos. I always loved it when I could eat dinner at her house when chili was being served. It was so packed with flavors, unlike any soup I usually ate from a can at that point in my life (I was about 10). I remember one time we were enjoying dinner, and the doorbell rang so we all got up to see who it was, and when we got back to the table the dog had jumped up and was enjoying the chili too. So everyone loved it! When I decided to start cooking for myself in college, I made vegetarian chili a lot because I knew it was something I liked. Also, because it was pretty hard to mess up, and it was always so good. I ended up combining several recipes, and it included some unusual ingredients like peanut butter, cacao powder, and vegan worchestershire sauce. Every time I served it to people, they would tell me how good it was but they couldn’t quite figure out what made it so good. I love making foods like that. I still make a version of that chili at the deli I work in and the customers like it. But at home I like to switch it up a bit. The peanut butter and cocoa powder thing was kind of a play on mole sauce I believe. So, recently I have been making a slightly different chili mole.

    Or, at least that is what I am calling it. It is by no means traditional mole sauce, but it is inspired by it so I am calling it that.  I have made this chili about 4 times now and it is so good that I finally needed to include it on my blog. It has been Sunday supper for me and Eric and I have been loving it! It is easy to make, and so good! I just combine the ingredients in a pot, cook them until flavorful, and it is that simple. I know traditionally people sautee everything in oil, but I decided to skip that step because I think it tastes the same and I know a lot of you appreciate oil free recipes. It does have a lot of spices in it, 5 different kinds of chilies technically, but that is what makes it so good.  That and cocoa powder, touch of cinnamon, and almond butter I added, which were mole inspired.

    I used to serve my chili with cornbread, but I have recently been serving it with jasmine rice and I love it that way!  The rice kind of cools the heat from the chili, because I make mine spicy.  Also, I serve it topped off with cool, rich avocado.  Trust me, the combination is so good!  I know the weather is getting warmer now, but I still like this sort of thing, especially on a rainy day which we tend to get a lot in the Spring.  Eric loves this chili too, which is why I have made it a few times. Both of our bowls are always gone pretty fast!  If you love a good spicy chili too, give this a try!

    Vegan Chili Mole with Rice
    Serves 2-3

    Chili:

    • 1 small onion, diced
    • 1 jalapeno, minced
    • 1 stalk celery, sliced
    • 2 garlic cloves, minced
    • 3 cups diced tomatoes (canned are fine)
    • 1 tsp ancho chili powder
    • 2 tsp ground cumin
    • 1/2 tsp chipotle powder
    • 1/2 tsp cinnamon
    • 1/4 tsp cayenne pepper
    • 1/4 tsp black pepper
    • 2 tsp Spanish paprika
    • 1 Tbsp unsweetened cocoa powder
    • 1/2 tsp sea salt or to taste
    • 2 Tbsp almond butter
    • 1 1/2 cups cooked black beans
    • cooked rice for serving (I used jasmine rice)


    Instructions:

    1. In a pot, combine all ingredients but the almond butter and beans.
    2. Bring to a boil, and lower to a simmer.
    3. Cook on low heat for about 20 minutes or until the veggies are getting tender.
    4. Add the beans, and almond butter and cook for about 10 minutes more until they soak up the flavor and the almond butter is well incorporated.
    5. Remove from heat, and serve with the rice in bowls topped off with the avocado slices.


  • Italian Pasta and Chickpea Soup 

    Italian Pasta and Chickpea Soup 

    So apparently Winter is never going away here.  They are predicting even more snow, even though it is mid April and the tulips should be blooming by now.  I am so over it.  Last year the first week of April I was wearing shorts outside.  So, I am not quite into the light Spring food yet, I am in comfort food mode until it warms up.  Which will probably be another month from the looks of it.  The soups are flying out of  the deli I work in, and I feel like soup making and serving is non-stop.  I can’t blame people, I feel the same way about soup right now.  So a few nights back I made myself a big pot of warming comforting soup.  I was in the mood for something with Italian flavor because I had made one at work and it just tasted and smelled so good I wanted my own. I had all of the ingredients on hand as well, so it was perfect!  I love it when I don’t have to go shopping for things to make dinner.

    It was really pretty simple to make as far as soups go. I have made my own soup ever since my Mom taught me how to make soup when I was in high school.  She had gotten this soup book and we would pick different recipes and make them together.  I thought that was pretty exciting, and it taught me a lot. It was useful knowledge when I decided I wanted to cook for a living.  My favorite soups out of that book were the Italian ones, so that is what we made most often, and those memories are what I based my Italian soup I made this week off of.  One called pasta e fagioli, or beans with pasta.  It had plenty of vegetables in the base, it was flavorful thanks to the herbs and alliums, and it was definitely comfort food. This one came together in about 45 minutes and it was just as delicious!

    The only things I changed were I swapped the usual white beans we used to use for chickpeas, and used elbow pasta instead of little alphabet shaped pasta I loved so much when I was younger, just because that is what I had on hand.  If you are making this for yourself, feel free to add in your favorite vegetables, or pastas or use a different bean.  Because that is what cooking at home is all about, making it work for you, and using what you like and have on hand!

    Italian Pasta and Chickpea Soup 

    Serves 3

    Ingredients:

    • 1 tsp olive oil
    • 1/4 cup diced red onion
    • 2 stalks celery, sliced
    • 2 carrots, cut in half and sliced
    • 2 garlic cloves, minced
    • 1 tsp dried basil
    • 1/2 tsp fennel seed
    • 1 tsp dried oregano
    • 1/4 tsp red pepper flakes
    • 1/2 tsp sea salt
    • 3 cups crushed canned tomatoes or fresh roasted*
    • 2 cups filtered water
    • 1 Tbsp balsamic vinegar
    • sea salt
    • 4 oz gluten free elbow pasta
    • 1 1/2 cups cooked chickpeas
    • 1/4 cup chopped fresh parsley


    Instructions:

    1. Heat the olive oil in a medium pan.
    2. Add onions, carrots and celery and sauté until tender.
    3. Add the garlic, tomatoes, herbs, sea salt, pepper, vinegar, and filtered water.
    4. Bring to a simmer, and allow to cook until the tomatoes are very soft and the flavor has melded, about 30 minutes.
    5. Add the pasta to the pot, and let cook for about 5 minutes.
    6. When the pasta is cooked, stir in the chickpeas and fresh parsley.
    7. Serve!


    *To roast the tomatoes, cut them into 2 inch wedges, and spread them out on a parchment lined baking sheet.  Place in a 400F degree oven and roast for about 30-45 minutes until tender and starting to brown at the edges. Remove from oven and you are ready to use them in this recipe.

  • Tofu Vegetable Noodle Soup

    Tofu Vegetable Noodle Soup

    I feel like everyone around me (including myself a few weeks ago) has been sick lately.  The cold and flu are going around like no other.  At least I just had a cold and it went away fairly quickly.  But others around me are not over it yet, and so I thought I would make some soup to share.  Because warm brothy soup and netti pots are your friend when you have a cold.  Of course the classic that my Grandma always made is chicken noodle, and I think that is the most popular thing that people buy at the store.  But this girl is vegan, and I think you can be just as healthy without chicken in your soup!  So, I made the classic, but my way.  Tofu vegetable noodle soup!  I was never a fan of chicken growing up anyhow, but I would have gladly eaten a bowl of tofu noodle.  To start off, I used a bunch of veggie scraps to make a flavorful stock for the soup.  It is important to start out with a flavorful base when your soup is going to be brothy.  Plus home made vegetable stock is healthier than store bought.  Many store bought brands have artificial flavors or sugar in them.  So, I make my own.  It is really easy and a good way to use veggie scraps.

    If you would like to make your own, you need about a cup of onion ends (or just 1 onion), about 2 cups of celery (or 3 stalks), about 1 cup green onion trimmings (or 1 bunch), and about 5 cloves of garlic, crushed.   Throw it all into a pot, cover with water, bring to a boil, then lower to a simmer and cook it slowly for at least 4 hours.  I make this at work a lot from scraps from my other dishes, which is why I say use onion butts etc.  But I know not everyone has that many left over if they have not been saving them in a bag in the freezer, so you can just use veggies that are not scraps if you wish.  Anyways, it made a great base for my soup.  I went with the classic carrots, celery, garlic and onions for my veggies, and my favorite Winter herb, thyme. It smelled amazing while it cooked on the stove!

    I added in some gluten free chickpea pasta for the noodles.  I know it is not traditional, but I love to add extra protein, and so gluten free bean noodles are a life saver!  I cooked my tofu in the oven and it was ready by the time the soup was ready.  Once it was added in and the soup came together, I could not wait to try it!  It was way better than any chicken noodle soup I ate as a child.  Rich with flavor, loaded with veggies and packed with protein.  So it was a win all around!  If you are feeling under the weather, give this soup a try!  The warm flavorful broth will definitely make you feel better!


    Tofu Vegetable Noodle Soup
    Serves 2-3

    Ingredients:

    Tofu:

    • 16 oz organic extra firm tofu, cut into cubes
    • 3 Tbsp sesame oil
    • 3 Tbsp tamari


    Soup:

    • 1 16 oz block 4 cups vegetable stock
    • 3 celery stalks, sliced
    • 1 small onion, diced
    • 2 carrots, sliced
    • 2 garlic cloves, minced
    • 1/3 tsp sea salt or to taste
    • 1/2 tsp dried thyme
    • 4 oz Explore Asian chickpea fusilli or other bean based pasta


    Directions:

    1. Preheat the oven to 400F degrees.
    2. Toss the tofu with 3 Tbsp sesame oil, and 3 Tbsp tamari in a bowl until the tofu is coated, and spread out on an oiled sheet pan.  Place in the oven, and bake until the tofu is starting to brown, and get crisp at the edges, about 45 minutes.  Set aside.
    3. Meanwhile, to make the soup, combine the stalk, celery, onion, carrots, garlic, sea salt, and thyme in a pot and bring to a boil.  Lower to a simmer and cook for about 20 minutes until the veggies have softened, then add the pasta and continue to cook until it is tender, about 10 minutes more.
    4. Add the tofu.  Remove from heat, and serve!


  • Colorful Kitchen Review and Sweet Potato Skins Recipe

    Colorful Kitchen Review and Sweet Potato Skins Recipe

    I have been admiring Ilene Godofsky Moreno’s recipes from her blog The Colorful Kitchen for a long time, so when she offered to send me a copy of her new book “The Colorful Kitchen” to review I was excited!  I am always admiring her amazing looking sandwiches, bowls full of colorful veggies and decadent looking desserts.  Everything of hers always looks so delicious and vibrant, so I knew this would be a good book.   It has over 100 vegan recipes, almost all of which are gluten free and made without refined sugars.  It includes smoothies breakfast, salads, soups sandwiches, sides, snacks & appetizers, entrees and dessert.  So no matter what you are hungry for chances are you can find something to satisfy your craving in this book.

    As I paged through it I couldn’t help but notice how beautiful the photography was.  This is a big draw for me, a book with lots of photos.  It is almost as important as the recipes as far as I am concerned and this is a book full of food art as much as it is recipes.  She has each one photographed so you know exactly what you are making.  The recipes themselves are very well organized and easy to read and follow. Also they are simple enough to make so that someone who is new to cooking will enjoy them and be able to make them as well as interesting enough that someone who cooks a lot will appreciate them.  So, there is something for everyone here. I should point out that this would be the perfect book for a new vegan who is looking to eat healthy and feel good. Because everything in this book is whole foods plant based and deliciously made breaking that stereotype that vegan food is boring and bland.  She has a list of main ingredients in the book as well explained so you will know exactly what you are using and preparing.  As I paged through the book I saw so many things that I wanted to make!  She has delicious breakfast recipes like Carrot Cake Oatmeal, salads like Crispy Chickpea and Kale Caesar Salad, Snacks like Coconut Crusted Avocado fries, desserts like Chocolate Cookie Sandwiches and main dishes like Sweet Potato Skins, which is the first recipe I made, and the one that she has allowed me to share with you today!

    I am a huge fan of sweet potatoes in any form, so this is the thing that caught my eye first.  They were super simple to make, and so good!  Roasted sweet potatoes have so much flavor, and filling them with things is one of my go to meals. Her recipe uses cooked lentils and black beans to stuff them with, and they are topped off with avocado and cashew sour cream.  This is the perfect balanced meal to keep you satisfied and feeling good.  It has it all, protein, fiber, veggies and healthy fats.  All of the recipes in her book are balanced this way, and if you eat this way, you will feel good.

    It is not often I come across a cookbook where I want to eat all of the recipes, but this one is that way.  Usually there are things in cook books that I say to myself, well that sounds tough to make, or it has ingredients that are hard to find, or things that I don’t think are that healthy but this book fits all of my nutritional needs as well as includes the types of things that I crave.  So you should definitely go check it out HERE!  Also, be sure to check out The Colorful Kitchen on Facebook and Instagram as well, it is definitely worth following! Guess what?! have another surprise for you!  If this book sounds like the sort of thing you will love, you can enter to win a copy of it for yourself!  Just leave a comment on this blog post!  Good luck! Giveaway ends February 9th.

    Sweet Potato Skins

    Ingredients:

    Sweet Potato Base:

    • 4 medium sweet potatoes
    • 1 batch Lentils (see below)
    • 1½ cups cooked black beans (or one 15-ounce can, rinsed and drained)
    • Salt and black pepper, to taste


    Toppings:

    • 1 avocado, sliced
    • Cashew Sour Cream (see below) or store-bought vegan sour cream
    • 2 tablespoons chopped green onions


    Instructions:

    1. To roast the sweet potatoes, preheat the oven to 400°F. Line a baking sheet with parchment paper. Use a knife to poke holes in the sweet potatoes, and place them on the baking sheet. Bake for 45–60 minutes, until tender. Remove the sweet potatoes from the oven, and let them sit until they are cool enough to handle.
    2. While the sweet potatoes cool, combine the Lentils and black beans in a medium saucepan over medium-low heat. Heat them until warm, about 5 minutes. Season them with salt and pepper.
    3. Slice the sweet potatoes in half lengthwise. Use a spoon to scoop out about half of the flesh from each Reserve the scooped-out flesh for another use. Spoon the lentil and black bean mixture into the sweet potatoes.
    4. Top each sweet potato half with an avocado slice. Top with the Cashew Sour Cream and green onions. Add any sauce you like, if desired.


    Lentils

    • 3 cups water or vegetable broth
    • 1 cup lentils
    • Dash of salt


    1. In a medium pot, bring the water or vegetable broth to a boil over high heat. Add the lentils and salt, reduce the heat to low, and simmer uncovered for about 30 minutes, until the water is absorbed. If you are not using the lentils right away, store them in an airtight container in the refrigerator for up to 4 days.


    Cashew Sour Cream

    • 1 cup raw cashews, soaked in water at least 4 hours
    • Juice of ½–1 lemon, to taste*
    • 2 teaspoons apple cider vinegar
    • 1 teaspoon maple syrup
    • 1–3 tablespoons nondairy milk
    • Salt and black pepper, to taste


    1. Drain and rinse the cashews. Transfer the cashews to a blender and add the lemon juice, apple cider vinegar, and maple syrup.
    2. Starting with 1 tablespoon at a time, add the nondairy milk as needed to blend, and blend until completely smooth. Add the salt and pepper and stir. Transfer to an airtight container and store in the refrigerator for up to 5 days.

    NOTE: Use a whole lemon for a tangier sour cream and a half lemon for a more mellow version.


  • Caramelized Onion Hummus

    Caramelized Onion Hummus

    Sadly last weekend my favorite team, the Minnesota Vikings lost their chance at getting to the Super Bowl.  Now, that may not seem like such a big deal to most, but of course we are hosting the Super Bowl here in Minnesota this year, so it would have been cool to have a team finally play in their home stadium for the big game.  Since that has never happened before.  But we had a really rough heartbreaking game and lost our chance.  It’s ok though, we still had a really good season, and I am still looking forward to watching the big game taking place in my home stadium.  Not from the stadium of course, because no way I could afford that, but in the comfort of my own home, which is really how I would prefer it.  Because I can be all comfy and make good snacks.  Everyone is in Super Bowl snack mode, and so I thought, what would I like to eat for the big game?  Well, I definitely would want some chips along with delicious things to dip them in.  I would already be making my Roasted Squash Nacho Cheese, and guacamole and salsa of course are a must, but why not something with a little protein and substance too?  Like a savory hummus!  I am a huge hummus fan.  I mean, it goes great with veggies for a snack, or dropped onto the top of a salad, or as a sandwich spread, or with chips of course.  So I figured I could get multiple uses out of it besides just snacking on for the big game.

    I love classic hummus with plenty of cumin, garlic, lemon and cayenne.  But I wanted something a little different this time.  You know that caramelized onion dip that everyone loves that is packed with onion flavor and loaded with dairy?  Well that was a favorite of mine with chips growing up.  So I thought why not make a hummus with those flavors.  So, I got some onions and garlic caramelizing on the stove and my house smelled like pure savory heaven. Yes, I actually do enjoy the smell of cooking onions, it is so comforting.  Once they were all caramelized browned and happy, I combined them with chickpeas and some cashew butter to make it extra rich and smooth in the blender.  All it needed was a little miso, sea salt and balsamic vinegar and it was sooo good!

    It smelled amazing even before I tasted it, but the flavor was rich and mellow.  It tasted of sweet onions and garlic, not harsh like the raw ones, but a savory flavor that was craveable, kind of like the flavor in the base of a good French onion soup. The balsamic added just a tad of acidity that it needed to cut the sweetness, and the miso a savory note.  All in all it was even better than I imagined it to be.  It is amazing with any kind of chips.  I happened to have corn chips on hand, because they are my favorite, but I have a feeling it would be amazing with ruffled potato chips, the way I used to always eat that onion dip with when I was little.  If you are a hummus lover like me, give this a try!

    Caramelized Onion Hummus
    Makes about 2 cups

    Ingredients:

    • 2 medium yellow onions, sliced
    • 8 garlic cloves, sliced
    • 1 Tbsp avocado oil or olive oil
    • 1 1/2 cups cooked chickpeas
    • 1/2 cup raw cashew butter
    • 1 Tbsp white miso
    • 2 tsp balsamic vinegar
    • 1/2 tsp sea salt
    • 1/2 cup filtered water


    Instructions:

    1. In a non-stick ceramic pan, combine the onions, garlic, and avocado oil over medium heat.  Cook over medium heat, stirring every few minutes until the onions and garlic are caramelized and nice and golden brown (about 15 minutes).  If at any time they stick a little to the pan, just add a couple of Tbsp filtered water.  Once they are caramelized remove from heat.
    2. Combine the onions, and all other ingredients in a high speed blender or food processor and blend until smooth (adding a little more water if necessary).  Keeps in the refrigerator for 2 weeks in a sealed container.


  • Basil Almond Roasted Tofu and Veggies and Pop and Cook: My New Favorite Cooking Secret!

    Basil Almond Roasted Tofu and Veggies and Pop and Cook: My New Favorite Cooking Secret!


    There has been a big chill in the air here lately, and I am craving savory, warming vegan comfort food. A few nights back, I made delicious Basil Almond Roasted Tofu and Veggies, a new recipe experiment featuring Pop and Cook, which I discovered it at my local Walmart in the frozen vegetable section. It is an ingredient that makes prepping and preparing my meals a lot easier!  During the week, I like to make simple meals for dinner that don’t involve too many ingredients, because after work I don’t have a lot of time, and I want to have time to be able to relax at night.  I don’t know about you, but being able to unwind after work is very important to me.  Good tasting healthy food is also very important to me. Maybe you are trying to eat healthy too in the new year, if so read on.  I like all of my meals to have plenty of veggies and protein, so a tofu dish is the perfect option!  I love a good baked tofu, it is simple and a delicious blank palate perfect for soaking up delicious sauces and goes perfect with any veggies.  Which is where the Pop and Cook comes in.

    While my veggies and tofu were baking, I made a simple easy to make sauce using only 6 ingredients including salt and water.  Just almond butter, Pop and Cook basil, Pop and Cook glazed onions, and Pop and cook garlic. It may sound very plain but it was so flavorful and delicious thanks to the Pop and Cook!  If you have never heard of them, they are little frozen cubes of veggies or herbs used for flavoring, and all you need to do is pop them out into your dish that you are making.  Because they come frozen, they stay fresh until you need them.  Not only that, each little cube stays covered until you pop it out, so they stay fresh and don’t get freezer burned.  I don’t know about you, but I think peeling garlic and onions and chopping herbs can be a pain sometimes when I am in a hurry.  Not only that, fresh basil is not available here now, so the only option is usually dried which is just not the same.  If you use Pop and Cook, you get the same flavor as you would with fresh.  This sauce I made tasted like creamy basil pesto but better.  Who would have thought something as simple as Pop and Cook garlic, onions, and basil could make it taste so good! It was the perfect comfort food dish for a chilly Winter night.

    If you are busy like I am, you definitely need to check out this product.  Also, if you end up throwing away things like fresh herbs or garlic because you only need a little bit at a time for a recipe, then Pop and Cook is perfect for you.  You can use only what you need and save the rest for later.  Also, you would think that something as convenient as this would be spendy, but they are actually very affordable, and you can find them at your local Walmart in the frozen vegetable section.  So next time you are there, take a little trip down that aisle, it will make your weeknight dinner cooking so much easier.  Click HERE to find the nearest Walmart to you that carries them.  Pop and Cook doesn’t just offer basil, glazed onions and garlic, they also have cilantro, and ginger.  Think of all of the delicious things you could make with those.  No chopping onions, peeling garlic and ginger and mincing herbs. So you can get to the table faster, and enjoy really delicious food without a lot of effort.  Pop and Cook, is my new favorite cooking secret.

    Basil Almond Roasted Tofu and Veggies
    Serves 2

    Ingredients:

    Tofu:

    • 16 oz organic extra firm tofu, cut into cubes
    • 3 Tbsp sesame oil
    • 3 Tbsp tamari


    Veggies:

    • 1 1/2 cups butternut squash, cut into 1 inch cubes
    • 1 medium zucchini, cut in half, and sliced 3/4 inch thick on the bias
    • 2 Tbsp sesame oil


    Sauce:


    For Serving:

    • 2 cups cooked jasmine rice (optional)
    • green onions for garnish


    Instructions:

    1. Preheat the oven to 400F degrees.
    2. Toss the tofu with 3 Tbsp sesame oil, and 3 Tbsp tamari in a bowl until the tofu is coated, and spread out on an oiled sheet pan.  Place in the oven, and bake until the tofu is starting to brown, and get crisp at the edges, about 45 minutes.
    3. Meanwhile, to make the veggies, toss the butternut squash with 1 Tbsp sesame oil and spread out on an oiled sheet pan.  Place in the oven and roast for about 45 minutes or until tender and browned at the edges.
    4. Toss the zucchini with the remaining Tbsp sesame oil, and spread out on an oiled sheet pan.  Place in the oven and roast for about 25 minutes until tender and starting to brown at the edges. Remove from the oven once finished baking, while you wait for the tofu and squash to be done.
    5. Meanwhile while the veggies and tofu are cooking, to make the sauce, combine the almond butter, filtered water, Pop and Cook basil, and Pop and Cook garlic, and Pop and Cook onions and sea salt in a small saucepan over low heat.  Cook and stir to combine until the Pop and Cook cubes are completely mixed in and the sauce has warmed.
    6. When the tofu and veggies are finished cooking, combine them with the sauce in the pan, and mix until they are coated in the sauce.
    7. Serve with jasmine rice and sprinkle with green onions.


  • Vegan Spicy Sweet Potato Tots with Cilantro Avocado Dipping Sauce

    Vegan Spicy Sweet Potato Tots with Cilantro Avocado Dipping Sauce

    Minnesotans love their tater tots.  I mean, we have a whole hot dish featuring them and named after them.  So, why didn’t I love them as a child like everyone else?  I don’t know.  Maybe because they were always served in school lunches, and the first time I tried them they were soaked in the jello that was next to it, and I had kind of an aversion to them after that. Or because I liked mashed potatoes more, because that was what my family served.  My Mom never made tater tots.  But you know what?  As an adult one day I decided to make my own.  After all, they are just little mini hash browns sort of.  So, I made my own at home, and I ended up loving them.  Either they were way better than the ones I used to eat as a kid, or my tastes had changed.  Now I love the crunchy salty little morsels.  I have since made them many times at home, and even a tater tot hot dish vegan style.  I like to experiment with adding different other veggies to them too besides potatoes.  The latest of which was sweet potatoes.  I know, still sort of potatoes, but totally different flavor.

    Sweet potatoes are a diet staple for me, I eat them at least 5 times a week, sometimes more. I can’t help it, they are just so good stuffed, or cut into fries.  I had to find out if sweet potato tots were as good as regular tater tots.  So, I cooked some up a few nights back.  I actually used a mixture of sweet potatoes and regular potatoes because they need the starch of the regular but the flavor that came through was all sweet potato.  I wanted to add a bit of spiciness to them too, so I added some chipotle powder.  They turned out super delicious just like that, but when you have something spicy, you need a little something cooling to serve it with.  Plus tater tots are made for dipping.  Usually in ketchup but ketchup isn’t cooling, so I made a cilantro avocado sauce.

    Super simple, just buzz all of the ingredients for the sauce in the food processor while you are waiting for the tots to bake and you are all set!  These are so good I could eat the whole recipe.  But I decided to share some this time.  If you eat all of them yourself though, I totally won’t judge.  Next time you have a hankering for tater tots, give these a try.  Or, maybe for the Superbowl in a month you need a snack to serve to your friends.  I think these would be great for that!

    Vegan Spicy Sweet Potato Tots with Cilantro Avocado Dipping Sauce
    Serves 2-4 (two if you are me)

    Ingredients:

    Sweet Potato Tots:

    • 3 medium russett potatoes, peeled and cut into 2 inch chunks
    • 2 medium sweet potatoes  peeled and cut into chunks
    • filtered water
    • sea salt to taste
    • 1/4 tsp chipotle pepper (1/2 if you want it spicy)
    • 1 Tbsp olive or avocado oil (optional)


    Cilantro Avocado Sauce:

    • 1 large avocado
    • 1 bunch cilantro
    • 1/4 cup lime juice
    • 1/4 tsp sea salt, or to taste


    Instructions:

    1. Pre-heat the oven to 425F degrees. To make the tater tots, place the potatoes and sweet potatoes in a large pot of salted boiling water on the stove, and bring to a boil.  Cook until the potatoes are just tender but not too mushy, and drain.
    2. Let cool until able to handle the potatoes, and grate them into a bowl.  Add sea salt to taste, chipotle pepper, and mix together.
    3. Shape the potatoes into tater tots (they will be a little sticky, but no worries, they will crisp up when baked).
    4. Place on an oiled sheet pan, and drizzle with 1 Tbsp oil, tossing them around in it gently to coat them.  Place in the oven and bake for about 30-40 minutes until lightly browned and crisp on the outside, flipping them over with a spatula half way through so that they brown evenly.
    5. Meanwhile, to make the sauce, combine all ingredients in a food processor and process until smooth.
    6. Serve the tots with the sauce!
  • Veggie Filled Tempeh Fried Rice

    Veggie Filled Tempeh Fried Rice

    I was given an Instant Pot for Christmas, and I was pretty excited about it.  Before this year, I have never really thought about using a pressure cooker, but I had been seeing a bunch of my friends cooking things in them and posting photos on Instagram and Facebook and it got me interested. I haven’t made anything super exciting in it yet, just rice and beans, but wow do they ever cook fast!  I cooked dry un-soaked garbanzo beans in 40 minutes and it normally takes me like 2 hours on the stove!  And the other day I made some rice in it because I had a tofu dish I wanted to serve it with and it came out perfect in only 10 minutes.  I have a confession to make, I am usually horrible at cooking rice on the stove. I usually end up making it too mushy, or it gets to dry because I do other things and forget to turn it down. We use a steamer at work and it is a life saver for that type of stuff so I don’t have to worry about watching it.  Anyways, the Instant Pot is even faster than the steamer so I was very impressed.  I had some of that rice leftover because I made more than I needed, so I thought what better use for it, then to make some fried rice?!

    I hadn’t made it in years. Well, the traditional kind at least, I made a raw version a few years back but that is different.  I like my fried rice to be filled with veggies.  None of that super greasy stuff that is mostly rice and not much else that you get at restaurants sometimes.  Shrimp fried rice used to be my favorite before I went vegan.  But anything shellfish or shrimp totally grosses me out now, not to mention the idea of eating an animal.  So, for this one I decided to use tempeh cut into little cubes.  Kind of like they do for chicken with fried rice. It was perfect!  It added protein and a nice meaty texture without being meat.  I added in plenty of veggies as well, carrots, mushrooms, green onions, and garlic.

    Also, I had to add flavor, so I went for a tamari, miso and mirin mixture and it was super delicious!  The best part about this is it only took me about 15 minutes to make start to finish.  You can’t beat that for a quick weeknight dinner.  If you have different veggies on hand, or one of these ones is not your jam, feel free to swap them.  I am all for using what you have in the refrigerator and not wasting food.  Some of the best meals are made that way.  So, the next time you have leftover rice give this a try!

    Veggie Filled Tempeh Fried Rice

    Serves 2

    Ingredients:

    • 2 Tbsp avocado oil, divided
    • 6 oz organic tempeh, cut into small cubes
    • 2 garlic cloves, minced
    • 2 tsp fresh ginger, minced
    • 6 scallions, sliced very thinly
    • 1 medium carrot, cut julienne
    • 1 medium zucchini, cut in half lengthwise, and sliced on the bias
    • 8 crimini mushrooms, sliced
    • 2 tsp white miso
    • 2 Tbsp mirin
    • 2 Tbsp tamari
    • 2 cups cooked rice
    • sea salt to taste


    Instructions:

    1. Heat 1 Tbsp oil over medium heat in a ceramic pan. Add the tempeh, and sautee it until it is starting to brown slightly.  Remove from the pan and set aside.
    2. Add the remaining oil to the pan, along with the garlic, ginger, and scallions.  Sautee for a minute until fragrant.  Add the carrot, zucchini and mushrooms and sautee until softened, about 5 minutes.
    3. Mix together the miso, mirin, and tamari in a small bowl, and add to the pan, along with the rice. Cook and stir together until the rice is uniform in color.  Add the tempah back to the pan and stir to incorporate.  Add a touch of sea salt if needed.
    4. Serve!
  • Vegan Southwest Shepherd’s Pie Chili

    Vegan Southwest Shepherd’s Pie Chili

    I made my Sweet Potato lasagna the other day, but I have had another sweet potato recipe floating around in my head for a while that I wanted to try out. It is definitely comfort food type weather here, so warming food is needed so badly.  I have been wanting to make a sweet potato topped shepherd’s pie for a while.  I usually just make the classic shepherd’s pie with gravy, loads of veggies, lentils instead of the meat and mashed potatoes on top, very Minnesotan and not spicy at all.  But I have been dreaming of a version with a spicy chili on the bottom and mashed sweet potatoes on top.  I figured I would make a batch and share it with Eric because he loves chili, beans, and anything spicy.  I actually was going to make this for New Years eve, because we are staying in and staying warm this year.  So, I thought it would be a good test run.

    I made a simple chili for the bottom portion, it cooked up quickly, and I added plenty of spice in the form of chili powder, cumin, cinnamon, chipotle powder and smoked Spanish paprika. It smelled wonderful while cooking.  It cooked up quickly as well, because I already had some cooked black beans on hand.  I don’t buy canned beans because it is more wasteful and I like the texture of my own home cooked ones better plus they are cheaper when I buy dried.  I them in the bulk section at the store, then I just cook up a big batch, then freeze them in containers, pulling them out when I need them. Which works perfect for things like this.  The chili tasted delicious, and of course you could eat it just like that if you didn’t want to mess with the topping, but this was to be a beautiful shepherd’s pie.  So I baked up some sweet potatoes to top it off.  Although you could steam them if you were in a hurry, they taste so much better roasted, all of the flavor intensified and caramelized into them.

    I like to add a little lime juice and sea salt, a trick I learned from a vegetarian cookbook a long time ago when I was learning to cook.  It is sooo good, even just as a side dish.  But even better when topping spicy chili like this!  It turned out so good!  The perfect savory dinner for a chilly night!  The best part is, this was easier and faster to make then the usual shepherd’s pie and that is always a win!  I hope you are all staying warm this Winter!

    Vegan Southwest Shepherd’s Pie Chili
    Serves 2-4


    Ingredients:

    • 2 large sweet potatoes or yams, cut in half lengthwise
    • 2 Tbsp lime juice
    • 1/4 tsp sea salt or to taste


    Chili:

    • 1 small onion, diced
    • 1 carrot, cut in half  lengthwise and sliced
    • 1 stalk celery, sliced
    • 2 garlic cloves, minced
    • 3 cups diced tomatoes (canned are fine)
    • 1 Tbsp chili powder
    • 2 tsp ground cumin
    • 1/4 tsp chipotle powder (or 1/2 if you really want it spicy)
    • 1/2 tsp cinnamon
    • 1 Tbsp Spanish paprika
    • 1/2 tsp sea salt or to taste
    • 1 1/2 cups cooked black beans


    Instructions:

    1. Preheat the oven to 400F degrees, and place the sweet potatoes cut side down on an baking sheet lined with parchment.  Bake until tender, about 45 minutes to 1 hour. Let cool until you can handle them to take the skin off. Place the flesh in a bowl, and add the lime and sea salt.  Mash together until smooth.  Set aside.
    2. Meanwhile, in a pot, combine all ingredients but the beans.  Bring to a boil, and lower to a simmer.  Cook on low heat for about 20 minutes or until the veggies are getting tender. Add the beans, and cook for about 10 minutes more until they soak up the flavor.  Once everything is cooked, remove from heat, and spoon into a casserole dish, or two smaller ones.
    3. Spoon the sweet potatoes over the top of the chili, place in the oven and bake for about 10-15 minutes at 400F degrees until bubbling.
    4. Remove from the oven, let cool for about 10 minutes, and enjoy!


  • Vegan Sweet Potato Lasagna

    Vegan Sweet Potato Lasagna

    Before I went vegan, I used to like to make lasagna for Christmas.  I would make home made noodles, my own sauce, and fill it up with veggies and plenty of ricotta.  It was so good!  It was something I wished I could have all the time, but even without making your own noodles and sauce, it is kind of a long process that you should plan on taking a big chunk of your day. Well, the last time I made lasagna was back in 2010, and it actually was a vegan version oddly enough with tofu ricotta and Daiya mozzarella on top.  It was really good!  And, I totally could have made lasagna since then but I can be kind of lazy and psych myself out about making dishes that require a lot of steps.  Well this year I decided that I had to make some because I was hard core craving lasagna after seeing so many people post their yummy vegan versions on Instagram and Facebook.  I have had this idea in my head for a while to make a vegan lasagna with sweet potato slices instead of noodles.  But I have been putting it off. Well it was happening.

    I kind of made this over the course of a couple of days, because I was already roasting some other sweet potatoes in the oven the day before I assembled it, so I figured why not roast the slices?  These are kind of like sweet potato toast if you have heard of that, or that is how they appear once they are ready for lasagna.  You just roast them with some olive oil and sea salt.  The next important element to this lasagna was the filling.  It had to have lots of “cheese”.  I have been eating tofu ricotta since I was a kid, because my Mom actually made lasagna with it too and oddly enough I hated tofu as a kid but loved her lasagna.  It was all in the disguising of it.  My Mom was a genius to hide it in lasagna.  So, if you are trying to impress non-vegans and show them that tofu can be good, maybe make them some lasagna with tofu ricotta.  Mine turned out delicious!  It tasted just like cheese thanks to the add ins for flavoring.  That’s why I love tofu, it is a blank palate.

    I also wanted to include a faux “meat”, so I took a cue from my favorite vegan meatloaf recipe and used a mixture of lentils and walnuts.  Before you go thinking that sounds weird, once you add in all of the seasonings to make it taste like Italian sausage and put it in the lasagna it tastes like traditional lasagna.  For the sauce I kept it pretty simple and just make a tomato sauce with garlic and herbs.  That is how I like my pasta sauce though, simple and savory.  Lastly, it needed to be topped off with cheese.  This is where I got lazy, but it was totally ok and meant to be because I got to try a new vegan cheese I had been eyeing at work for a while. Normally I would make my own mozzarella but I bought some  Parmela Creamery mozzarella aged nut cheese.  Compared to the other brands it has way less ingredients, and not any fake ones, which is why I chose it.  And I am glad I did, it is delicious. It doesn’t melt completely but I did not mind.

    The lasagna baked up beautifully and smelled amazing.  I have missed lasagna. I admit I was a little worried that it might not come out nice, or the sweet potatoes might get too mushy but neither of those things happened.  It turned out even better than I had imagined!  It was sooo good!  It tasted like traditional lasagna with cheese and meat and all but of course no animals were harmed in the making of this.  I had a giant piece. This is the type of thing I would pay $20 in a restaurant for, and that is saying a lot because I am picky about what I spend my money on.  Good food of course is worth it though.  So, if you are looking for a really good gluten free vegan lasagna give this a try!  I have a feeling you will love it too, this is the ultimate crave worthy comfort food.  I might have to make it a Christmas tradition and make it every year!

    Vegan Sweet Potato Lasagna
    serves 6

    “Sweet potato noodles”

    • about 2 large sweet potatoes, sliced 1/4 inch thick lengthwise (so they resemble noodles, you want enough to fill 3 layers in a 9 inch square pan)
    • olive oil
    • sea salt


    Lentil walnut “meat”

    • 1 cup dried french lentils or brown lentils
    • 1 cup raw walnuts
    • 2 garlic cloves
    • 1/2 tsp sea salt or to taste
    • 1 tsp dried basil
    • 1 tsp dried oregano
    • 1/2 tsp fennel seeds
    • 2 tsp paprika


    Tofu ricotta:

    • 2 10 oz pkgs extra firm tofu
    • 1/2 cup raw cashew butter
    • 3 garlic cloves
    • 3 Tbsp nutritional yeast
    • 1/2 tsp sea salt or to taste
    • 1 Tbsp white miso


    Sauce:

    • 2 garlic cloves, minced
    • 2 tsp olive oil
    • 1 15 oz can diced tomatoes
    • 1 15 oz can tomato sauce
    • pinch red pepper flakes
    • 1 tsp dried basil
    • 1 tsp dried oregano
    • 1 Tbsp balsamic vinegar
    • 1/2 tsp sea salt or to taste


    For assembly and topping:

    • 2 handfuls of organic arugula or spinach
    • 7 oz pkg vegan mozzarella (I used Parmela Creamery)


    Instructions:

    1. To make the noodles, preheat the oven to 400F degrees, and line 2 sheet pans with parchment.
    2. Brush the sweet potato pieces with olive oil on both sides, and spread out on the sheet pan.  Sprinkle with sea salt, and place in the oven.  Bake for about 40 minutes or until almost tender and starting to brown. Remove from the oven and let cool.
    3. Meanwhile, to make the lentil walnut meat, combine the lentils and enough water to cover them by 3 inches in a saucepan, and bring to a simmer.  Cook until the lentils are tender, about 40 minutes.  Drain very well.  Place the lentils in a food processor along with all other “meat” ingredients and pulse until well blended but still chunky.  Set aside.
    4. Rinse out the food processor and drain well.
    5. To make the tofu ricotta, combine all ingredients in the food processor and process until smooth.  Set aside.
    6. To make the sauce, in a saucepan over medium heat, combine the garlic and olive oil and sautee for a minute until fragrant.  Add the tomatoes, and all other remaining ingredients and allow to simmer for about 10 minutes.  Remove from heat.
    7. To assemble the lasagna, spoon a little of the sauce into the bottom of a greased 9×9 inch square pan.  Then cover with a layer of the sweet potato “noodles”.  Next, half of the lentil “meat” over it, then spread half the ricotta over that.  Sprinkle with arugula leaves. Put a little more sauce over that, then the rest of the “meat”, ricotta, and arugula.  Top with another layer of noodles, then the remaining sauce, and lastly sprinkle the nut cheese over the top.
    8. Place in the 400F degree oven, and bake for about 30 minutes covered with greased foil, then uncover and bake another 15 minutes.  Remove from the oven and let set for about 15-20 minutes before serving.
    9. Enjoy!
  • Vegan Christmas Tree Pizza

    Vegan Christmas Tree Pizza

    The ground is covered in snow, and I am listening to Christmas music all day at work, all of my Christmas presents are bought, but for some reason I still can’t believe Christmas is almost here!  The year went by so fast, it seems like it was just Summer.  Anyways, I am trying to be festive and making fun stuff, so I decided to make a Christmas tree pizza a few nights ago on my day off.  We will get to that in a minute though.  Pizza was a big part of my life before going vegan.  There was a point in time where pizza was made every week at my house, soon after I was gifted a pizza stone.  I would choose different toppings every week, almost never repeating them to keep it interesting.  Some were just ok, but other combinations were amazing.  I learned that I liked fruit on pizza, especially strawberries and pineapple because they become sweet and delicious when roasted and it is a wonderful contrast with the salty cheese.  I also learned that I love lots of veggies on pizza. I have tried almost every kind, and one of my favorites is winter squash.  No plain cheese pizza for me, which is funny because that was my favorite as a child, with extra cheese always.  Back to that Christmas tree pizza, I made it using ingredients that I had on hand that were colorful.

    I figured I might as well include the cooked squash I had on hand, since it is my favorite.  But that wasn’t enough on it’s own, it needed more.  So I made a quick simple chunky tomato sauce to go on it as well.  And, I had to add something healthy and green, so I added arugula after baking.  It is my favorite green, so I always have some on hand in my refrigerator and try to eat it daily.  On a side note, it is awesome stirred into your soup just before serving.   The pizza had to have cheese as well, so I used some home made vegan mozzarella I had on hand. I often times make a batch, then freeze half and use it later.  It makes the pizza making process a little faster the second time around.

    I made a simple gluten free dough, and shaped it into a tree.  It looked lovely with the red and green very festive!  But most importantly, it baked up nicely and it was super delicious.  I don’t even miss regular pizza with dairy cheese, this type of pizza is so much better! Not only that, your tummy will be happier after eating it because it is easier to digest than dairy.  As a side note, if you don’t prefer to make this gluten free, you can swap it with whole wheat pastry flour.  I hope you give this pizza a try, and I hope you are all having a wonderful Holiday season!

    Vegan Christmas Tree Pizza
    Makes one 14 inch pizza

    Vegan Mozzarella Cheese:

    • 1 15 oz can full fat organic coconut milk
    • 2 Tbsp arrowroot starch
    • 1/4 plus 1 Tbsp filtered water
    • 3 Tbsp agar flakes or 1 Tbsp agar powder
    • 1 Tbsp lemon juice
    • 1 tsp sea salt or Himalayan salt
    • 1 Tbsp virgin coconut oil
    • 1 tsp guar gum


    To make the cheese, heat the coconut milk in a saucepan until it comes to a simmer.  Meanwhile, dissolve the arrowroot starch in the water and set aside.Once the coconut milk has come to a simmer, add the agar flakes, and heat until they are dissolved (mine took about 8 minutes, if you are using the powder, it should dissolve within one minute). Next, add the lemon juice and sea salt to the coconut milk.  Mix the coconut oil with the guar gum so that the guar gum does not clump up.  Turn off the heat and add the arrowroot mixture, guar gum and coconut oil. Whisk for about 30 seconds, then pour into a silicone mold (I used a loaf pan, but if you had another shape you would like to use go ahead). Refrigerate for a few hours until firm, then pop out of the mold. You will need half the cheese for this recipe, reserve the other half for another use in the fridge, wrapped in an airtight container.  Shred the half you will be using into a bowl, and keep in the refrigerator until ready to use.


    Tomato Sauce:

    • 2 tsp olive oil
    • 2 garlic cloves, minced
    • 1 1/2 cups organic diced tomatoes (canned is fine)
    • 1/2 tsp each basil and oregano
    • sea salt to taste


    Heat the olive oil over medium heat in a small pan, add the garlic and allow to cook until fragrant, about 30 seconds.  Add the tomatoes, herbs and sea salt and cook for about 10 minutes until the tomatoes have started to break down.  Remove from heat and set aside.


    Pizza Dough:

    • 1 1/2 cups organic whole wheat pastry
    • 1 Tbsp olive oil
    • 1/2 tsp sea salt
    • 1/2 cup plus 1 Tbsp filtered water


    To make the pizza crust, combine the flour, and sea salt in a bowl, and whisk until well blended. Add the oil and water, and mix in until you have a soft dough.  Turn out onto a sheet of parchment paper with a light dusting of flour, and roll out into Christmas tree shape.  Set aside.


    For Pizza Assembly:

    • olive oil
    • 1 cup cooked butternut squash, cubed
    • fresh arugula leaves


    Pre-heat the oven to 400F degrees.  Set a pan on the center rack with an upside down sheet pan, or a pizza stone set on it. Brush the crust with olive oil, sprinkle with sea salt, and slide the parchment with the crust on it onto the stone.  Bake crust for 10 minutes, then remove the crust from the oven (still on the parchment). Top with the tomatoes and squash, then the cheese, making sure it is all evenly distributed.  Place the pizza in the oven, turn up the temperature to 475F and bake for 20-25 minutes until the cheese is bubbling and starting to brown (keep an eye on it after 15 as some ovens cook faster than others). Remove the pizza and parchment from the oven, slide pizza onto a cutting board or plate, scatter arugula over the top, slice and enjoy!

  • Loaded Baked Potato Bites

    Loaded Baked Potato Bites

    I was watching a cooking show recently with a football game foods theme and they were making potato skins.  They looked delicious and it got me to thinking, I haven’t eaten potato skins since I was about 10 probably.  I mean, it isn’t something I really see often at the restaurants I go to and it isn’t like I ever made them at home.  But I love the idea of them.  They are usually loaded up with some pretty greasy stuff at most restaurants like bacon, cheese and sour cream so even if they were on a menu somewhere they are most likely not at all vegan or something I would eat.  But you know me, I like to veganize things and make them a bit healthier, so I decided to do just that.  Well, kind of.  Let me explain, what I made wasn’t exactly skins because I instead sliced the potatoes and made little loaded baked potato bites.  You know the concept of sweet potato toast?  Well I thought why not use it with regular potatoes.  I thought about making large ones and slicing the potato lengthwise, which you can totally do if you are having these for dinner or something and you want them more like actual potato skins without all of the work of scooping flesh (plus no wasting this way).  But, I thought since it is the Holiday season, why not make them little bites perfect for serving at parties?

    So, I sliced a few potatoes thinly into cute little rounds, and roasted them with some olive oil to create delicious little potato disks.  Now, I thought about making a vegan sour cream to top them off with but I instead decided on using guacamole.  After all, it is creamy, delicious, AND healthy.  Already winning over those traditional potato skins.  I wanted to top them with bacon too.  No greasy animal products here though.  I made a crispy coconut bacon to top them off.  Trust me, if you have never tried coconut bacon it is something you have to try.  It is the most delicious vegan bacon substitute I have had and perfect for crumbing over things like salads or popcorn or these little bites.  Don’t do it until the last minute before serving though because you want them to stay nice and crispy not absorb moisture (this is not an appetizer that should be assembled more than an hour before serving).   Lastly, I sprinkled scallions and red pepper flakes over them.

    They looked adorable, but not only that, they were super delicious.  If I were at a party, I would be the one that kept coming back and eating all of them.  You know what I mean.  I was kind of like that as a kid with anything involving cheese.  No cheese here though, just vegan deliciousness.  These are not only vegan, but they happen to be completely gluten free and nut free too, so they are perfect if you are serving guests with allergies to those things.  Happy Holiday season!


    Loaded Baked Potato Bites
    Serves 12

    Ingredients:

    Potatoes:

    • 4  yukon gold potatoes, sliced into 1/4 inch thick slices
    • olive oil
    • sea salt to taste

    Coconut Bacon:

    • 1 1/2 cups large flake coconut
    • 2 Tbsp tamari
    • 2 Tbsp liquid smoke
    • 1 Tbsp maple syrup

    For topping:

    • 1  cup guacamole
    • 2 scallions, sliced
    • red pepper flakes


    Instructions:

    1. Preheat the oven to 400F degrees, and oil a sheet pan.
    2. Toss the potatoes with just enough olive oil to coat, and sea salt.  Spread the potatoes out on the sheet pan, place in the oven and roast until golden brown, about 25 minutes depending on your oven.  Remove from the oven and let cool until just warm or at room temperature.
    3. To make the coconut bacon, preheat the oven to 350F degrees, and line a sheet pan with parchment.
    4. Toss the large flake coconut with the tamari, liquid smoke and maple syrup and spread out on the pan.  Place in the oven and bake for about 12-15 minutes (depending on your oven), keeping a close eye at the end and checking it in the final minutes because it burns fast.  Remove from oven and let cool.
    5. Spoon some of the guacamole onto each potato slice.  Place a little coconut bacon and scallions on each toast and sprinkle them with a little red pepper flakes.  Arrange on a plate and serve!


  • Butternut Squash and Cranberry Casserole

    Butternut Squash and Cranberry Casserole

    Squash is one of my favorite things ever, and I get super excited when it comes into season.  There was a point in my life when I was younger when I used to eat it almost every day for pretty much the Fall and Winter seasons in different ways for dinner. My skin even started to take on a little squash like hue that my Mom called my “squash tan”.  I don’t go quite to that extreme now, but I do enjoy it a couple of times a week.  After all, it is not around all year (well at least not the good tasting kind that only come when in season) so it is special and deserves to be enjoyed.  I love it stuffed, roasted in cubes in salads, or even mashed sometimes.  I can’t believe as a little kid I thought it was gross because I had been told that it was by a family member and I didn’t want to try it.  I was missing out.  I started to enjoy it though, when my Mom served the roasted kind stuffed with apples.  It turned me around and got me over my fear.  I have mostly  been roasting it cubed up this year for salads because it gets nice and crispy, but sometimes I roast it cut in half, which is what I did the other night when I happened to have a lot of extra squash.  I thought I could use it for other recipes.  You know, you can replace canned pumpkin in desserts with it, and it tastes even more sweet and delicious!  But this time I decided to make a savory side fit for the Thanksgiving table.

    Everyone makes sweet potato casserole, and that is fine, I love sweet potatoes, but I thought why not make a squash casserole?  I have not seen one before (I am sure they are out there, I have just never tried one), and I thought it would be delicious.  I also had a package of cranberries in my refrigerator waiting to be used in a recipes, so I decided to make this a double layer casserole with the cranberries.  I cooked them into a jammy sauce.  Not that nasty stuff from the can type of sauce, but the good kind that can only come from real cranberries.  I like them a little chunky.  Trust me, butternut squash and cranberries are a delicious combination for those that are skeptical.  Plus you get two of your Thanksgiving sides in one!

    Lastly, I wasn’t going to leave the casserole just like that, because in Minnesota casserole, (or really “Hot Dish” as we call it), should have some sort of crispy topping sprinkled on top that can be browned.  So, I made an oat streusel.  The whole thing smelled amazing while baking! Kind of like dessert, but it is definitely a savory Thanksgiving side.  It was super delicious!  The squash was sweet and delicious, the cranberries slightly tart, aromatic with orange and jammy, and the struesel was the perfect touch, crunchy and satisfying.  If you are looking for a new dish to try this Thanksgiving, give this a go!

    Butternut Squash and Cranberry Casserole
    Serves 12

    Ingredients:

    Squash:

    • 2 large butternut squash, halved
    • 1 tsp cinnamon
    • 2 Tbsp maple syrup
    • 1/4 tsp sea salt


    Craberries:

    • 2 7.5 oz packages fresh organic cranberries
    • 1/2 cup maple syrup (or to taste)
    • 1/4 cup orange juice
    • 1/4 tsp sea salt


    Topping:

    • 1/2 cup gluten free rolled oats
    • 2 Tbsp gluten free all purpose flour
    • 1/4 cup coconut sugar
    • 1/4 tsp sea salt
    • 1/2 tsp cinnamon
    • 2 Tbsp coconut oil


    Instructions:

    1. Preheat the oven to 400F degrees and oil a sheet pan, or line it with parchment.
    2. Cut the squash in half lengthwise and remove the seeds.  Place cut side down on the tray, and place in the oven.  Roast for about an hour until the squash is tender.  Remove from the oven and scoop out the flesh into a bowl.
    3. Add the maple syrup, cinnamon, and sea salt, and mash the squash with them until there are not any big lumps.  Spoon into an 8×8 square pan, or two smaller casserole pans (which is what I did).
    4. To make the cranberries, combine them with the syrup, orange juice, and sea salt in a saucepan and bring to a boil.  Lower to a simmer and cook until the cranberries are tender and thickened, about 15 minutes.  Remove from heat, and pour over the squash in the pan.
    5. To make the topping, combine all ingredients in a bowl, and mix together with your hands until it is small clumps that hold together when squeezed.  Scatter over the cranberries evenly.
    6. Place the pan (or pans) in the oven and bake until the topping is browned about 15-20 minutes.
    7. Remove from the oven and serve!
  • Vegan Chipotle Mac and Cheese with Greens 

    Vegan Chipotle Mac and Cheese with Greens 

    I loved mac and cheese when I was little.  I could have had it for every meal of the day every day.  Well that and grilled cheese.  I guess I was just a cheese loving little girl.  It never dawned on me that it might not be healthy because I didn’t really care I just knew that it was good.  I would beg my parents to make it for me, and we always had it on hand.  My Mom at least tried to add veggies to it to make it healthier.  When I got older and was more aware of what I was eating and the nutritional value that it had, I didn’t really enjoy mac and cheese anymore.  To me it was just a pile of white carbs with cheese and cream which wasn’t really what I was going for.  Not that it isn’t fine to indulge once in a while because you should but I try to have at least something healthy in every meal.  So I gave it up for a long time.  That is until I went vegan and began experimenting with healthier options with veggies included.  Because there should be veggies in every savory dinner as far as I am concerned.  My Mom was telling me about this frozen Mac and Cheese that she bought and I said to her, “I bet I can make an even better vegan version”.  It was on.  Although I was pretty confident because I have made vegan mac and cheese quite a bit before. I am one of those people who likes to experiment with things and make them in different ways to find the best one so this was going to be a different version.  I have made the regular potato and carrot version of mac and cheese that many vegans seem to swear by but I actually prefer something like squash in the base.  My Mom however doesn’t like squash and I was making this mac and cheese for her and to suit her tastes so I went with yams.

    We both love yams, so this was going to be good. I decided to make it chipotle mac and cheese as well with a little kick.  My Mom loves to sprinkle a little chipotle powder on things the way most people use red pepper flakes so it was perfect.  This cheese sauce is actually really easy to make once your yams are cooked and it comes together fast in a blender.  It is so good you will want to eat it with a spoon, or maybe dip some chips in it…I might have done both of those things while making it.  It reminds me of the mac and cheese sauce I enjoyed as a child but better. The thing that makes it appear to be rich like cheese is the cashew butter that I add.  But it is surprisingly mostly yams.  Who would have thought they would make such a good cheese sauce.  Banza had sent me some pasta to try, so that was what I used this time.  I use gluten free pasta 99% of the time, but I only like the ones made with beans that actually have protein in them.  This one was made from chickpeas, which is awesome!  Don’t worry, there was no beany flavor, just tasted like regular pasta.

    Once it was all mixed together I added in some greens to give it even more nutrients. It was super delicious.  My Mom loved it as well, she said it was better than the mac and cheese she had bought and the flavors were perfectly balanced.  Also, that it tasted like dairy and you would not be able to tell it was vegan.  That makes me so happy!  If you are craving mac and cheese, but want it to be healthy as well, you must give this a try!  It may become a staple this Winter!

    Vegan Chipotle Mac and Cheese with Greens 
    Serves 4

    Ingredients:

    • 2 cups mashed yam potato*
    • 3/4 cup hot filtered water (or as needed)
    • 1/3 cup raw cashew butter
    • 1 medium garlic clove
    • 1 Tbsp apple cider vinegar
    • 1/4 cup plus 2 Tbsp nutritional yeast
    • 1/4 tsp chipotle powder
    • 3/4 tsp sea salt (or to taste)
    • 16 oz gluten free pasta
    • 2-3 large handfuls of arugula or baby spinach


    Instructions:

    1. Combine the sweet potato, water, cashew butter, garlic, cider vinegar, yeast, chipotle, and sea salt in a high speed blender and blend until smooth and the consistency of cheese (if it is too thick add a little more water).  Set aside.
    2. Cook pasta according to package directions, drain, then place back in the pot, add the greens and cheese, and stir to coat.  Pour into a serving dish, and serve!


    *To cook the sweet potatoes, I like to roast them in the oven.  Take a large sweet potato, poke a few holes in it, and cut in half lengthwise.  Place cut side down on a sheet pan lined with parchment and bake for about an hour at 400F degrees or until tender.  Remove from oven and let cool before mashing.

  • Vegan Cheesy Potato Casserole

    Vegan Cheesy Potato Casserole

    My Mom used to make a really delicious cheesy potato casserole when I was young to serve at family gatherings. Usually brunch type occasions, like when she hosted Easter at our house, or maybe a Christmas special request from me.  I used to ask her to make it a lot because it was so good!  I think it filled most of my plate when it was served over all else.  I could have cared less about the meat of course, and I always took my token amount of veggies, and a roll, but the potatoes were the star to me.  I mean, what’s not to like about layers of creamy cheese and potatoes!  I have been saying to myself for a while now, you have to make a vegan version.  So this past week, I finally got around to it.  I had extra potatoes on hand, and some cheese sauce left over from some mac and cheese that I had made, so it was perfect!  My Mom used to use frozen hash browns in hers, but I decided to be a little different with mine since I don’t think I have ever bought frozen hash browns, and I had fresh potatoes to use up.

    I guess this was sort of in the style of a cheesy potatoes one of my coworkers at the deli used to make, crossed with my Mom’s potatoes. My coworker always just used large diced potatoes in her casserole and a little kick.  My Mom’s was more mellow and just creamy and delicious.  Combining the two ended up being awesome.  Of course both of these dishes had tons of cheese, butter, flour and cream.  I think my Mom’s had heavy cream in fact, because this dish was considered a treat.  But my cheesy potatoes actually have a healthy cheese sauce made from a secret ingredient that gives them their lovely yellow color.  Winter squash!  I like to hide veggies in my dishes, and lighten things up with them, so that was the idea here.  I guess I can’t bring myself to make vegan mac and cheese without including veggies in the sauce, so why would I not include them with the potatoes?  Don’t worry, the sauce is super delicious.  I added cashew butter to give it a little richness and volume so it has more of the texture of cheese, along with things like miso, nooch (nutritional yeast), salt, mustard and garlic to give it a wonderful savory flavor.  It may sound like a weird combo but it is so good once it is done!

    Once combined with the cooked potatoes it is bomb!  I could eat a giant bowl of these potatoes (just like I used to when I was little), but I would not feel bad about doing so or get a tummy ache after because these are so much healthier than the original version.  I love recreating old dishes from my childhood and making them vegan!  Often times they turn out even better!  If you are looking for a delicious side dish, or maybe you are just craving potatoes and cheese, which is totally legit too, give these a try!

    Vegan Cheesy Potato Casserole

    Serves 6-8

    Cheese Sauce:

    • 2 cups mashed cooked butternut squash or sweet potato*
    • 1 cup hot filtered water (or as needed)
    • 1/3 cup raw cashew butter or almond butter
    • 1 medium garlic clove
    • 2 tsp yellow mustard or stone ground mustard
    • 1 Tbsp apple cider vinegar
    • 1 Tbsp white miso (optional)
    • 1/4 cup plus 2 Tbsp nutritional yeast
    • 1/8 tsp cayenne pepper
    • 3/4 tsp sea salt (or to taste)


    Potatoes:

    • 3 lbs yukon gold potatoes, cut into 1 inch cubes
    • filtered water
    • sea salt


    Topping:

    • 3 Tbsp nutritional yeast
    • paprika for sprinkling


    Instructions:

    1. To make the cheese sauce, combine the squash, water, cashew butter, garlic, mustard, cider vinegar, yeast, cayenne, sea salt and turmeric in a high speed blender and blend until smooth and the consistency of cheese (if it is too thick add a little more water).  Set aside.
    2. Preheat the oven to 375F degrees.
    3. To make the potatoes, put them in a large pot, and cover with filtered water by 1 inch.  Add a few tsp sea salt to the water.  Bring to a boil, and then lower to a simmer.  Allow the potatoes to cook until tender, about 10-12 minutes.  Drain, then add back to the pot.
    4. Stir in the cheese sauce, then pour into a baking dish.
    5. Sprinkle the potatoes with the nutritional yeast, and place in the oven for about 15 minutes.  Sprinkle with paprika and serve!

    *To cook the squash, I like to roast them in the oven.  Cut one medium squash in half top to bottom, and remove the seeds.  Place cut side down on a sheet pan lined with parchment and bake for about an hour at 400F degrees or until tender.  Remove from oven and let cool before removing the skin and mashing.

  • Rustic Fall Root Vegetable Tart

    Rustic Fall Root Vegetable Tart

    Fall is at it’s peak of beauty right now here in Minnesota.  The leaves are all painted in warm hues, and fluttering to the ground.  But it hasn’t gotten cold yet, so it is the perfect weather to go walking and enjoy the view, and listen to the crunch of the leaves beneath your feet.  I am still craving Fall dishes though despite the warmth.  Things like roasted root vegetables and squash. We make a roasted root vegetable in the deli where I work and it is super popular when made but it takes me a really long time to prep it because I am slicing about 30 lbs of rutabagas and carrots to roast.  But it is so good when finished!  I mean, nothing compares to roasted vegetables. I have found that even vegetables that I don’t like are delicious when roasted.  It is my main method of cooking vegetables at home during the cooler months.  I mean, why not warm up the house with the oven and cook something delicious?!  So, I decided to make a roasted vegetable tart a few days back.  My Mom actually gave me the idea.  She likes to make suggestions of things I could veganize, and she showed me a photo of a gorgeous roasted vegetable tart.  It was far from vegan with a buttery crust and bacon on it.  But I knew I could make something even better.

    I made a gluten free crust for it actually, enhanced with a little almond flour because I love nut flours in crusts to make them more rich and delicious tasting.  For the filling I used some root vegetables that I had on hand.  Rutabagas, parsnips, carrots and yams.  That original tart that my Mom showed me had other veggies in it too, but I wanted this a little more simple and to my tastes.  I tossed the veggies with avocado oil, garlic, thyme, sea salt and pepper, and it all roasted to deliciousness in the oven once placed into the crust. This is a rustic tart, nothing fussy.  But if you wanted to get fussy and more fancy, you could place it into a 10 inch tart pan instead of free forming it.

    Once it was all baked and lovely, I added some coconut bacon instead of that real bacon that was on the inspiration recipe tart.  Not only that, I decided a bit of nut cheese would be awesome as well, and I happened to have some spiced nut cheese on hand which was perfect with the root vegetables (plain would be delicious too if you don’t like spicy).  Lastly a little arugula for color.  It was so delicious!  I never used to think I would like rutabagas and parsnips when I was younger, but they are really delicious when roasted like this, and in this tart, even better!  If you have root veggies on hand, give this a try!

    Fall Root Vegetable Tart
    Makes 1 10 inch tart

    Filling:

    • 3 1/2 cups mixed 1/2 inch thick cubed root vegetables  (rutabagas, parsnips, yams, carrots)
    • 2 Tbsp avocado oil or olive oil
    • 1 tsp dried thyme
    • 1 garlic clove, minced
    • 1/2 tsp sea salt (or to taste)
    • 1/2 tsp black pepper


    Crust:


    To finish Tart:

    • 1/2 cup vegan chevre from THIS RECIPE with or without the spices, broken into pieces
    • 1/2 cup coconut bacon from THIS RECIPE
    • a few fresh arugula leaves for garnish


    Instructions:

    1. Preheat the oven to 400F degrees, and line a sheet pan with parchment.
    2. To make the filling, add the root vegetables to a bowl, along with the oil, thyme, sea salt and pepper and toss to coat.  Set aside.
    3. To make the crust, combine the flour, almond flour, sea salt, and coconut oil in a bowl, and mix and squeeze together with your hands until the oil is in pea sized chunks. Add the water, and mix with hands just until it comes together and is not sticky.  If it is too dry, add a few Tbsp more water, too wet, a little more flour).
    4. Roll dough out on a sheet of parchment into an 11 inch round, then spoon the veggies into the middle, leaving a 1 1/2 inch boarder.  Fold the sides up, using the parchment to assist.
    5. Transfer the parchment to a sheet pan with the tart on it, and place in the oven.
    6. Bake for about 1 hour, or until the veggies are tender and the tart is lightly brown.
    7. Remove from the oven, let cool slightly and sprinkle the chevre, coconut bacon, and arugula over the top.  Cut into pieces and serve!

    *Note: Whole wheat pastry flour or sprouted whole wheat flour can be swapped for the gluten free if you prefer a more sturdy crust.

  • Vegan Roasted Squash Garlic Nacho Cheese

    Vegan Roasted Squash Garlic Nacho Cheese

    There was a point in time I ate so much squash that my skin started to turn slightly orange hued.  I try to vary my diet a little more now, but maybe I am still a little orange since all year round I am eating squash, sweet potatoes and carrots at least once a day.  But not as much as the every day squash dinner that I used to do.  I was pretty obsessed in the Fall and Winter. I mean, it is pretty delicious, and I pretty much love it any way that it is prepared.  Roasted and stuffed is my favorite.  But sometimes you end up with a giant squash, and you bake one side for dinner to stuff and have an extra one, so what do you do with that? Well, I like to swap it out for pumpkin in baked goods, add it to hummus, or add it to things you don’t expect it in.  Like mac and cheese, or the Vegan Roasted Squash Garlic Nacho cheese I made last week.  I honestly did not set out to make nacho cheese, I set out to make a roasted garlic squash dip that I decided would be good made into a nacho cheese with something rich like cashew butter added to it.

    So, it morphed into nacho cheese.  I have corn tortilla chips on hand at all times, because they are my crunchy savory indulgence of choice with guac or salsa, so I was excited about the idea of nacho cheese.  I remember back in middle school, for lunch I would buy nachos with cheese a lot. I know, totally not healthy, and I am sure it was not real cheese but that didn’t stop me and I don’t think I cared about healthy food at that point, I loved the stuff. I mean, who doesn’t love gooey nacho cheese until they find out what is actually in it?!  Funny story though, one time at lunch (still in middle school), someone accidentally spilled nacho cheese on my head.  It was a gooey mess, and I was not happy at the time, but now looking back in it the situation was kind of funny. It didn’t deter me from eating it though.  It was a middle school lunch favorite for me.  As an adult though, I don’t think I have actually eaten nacho cheese ever.  Because I have tried to eat healthy since I was about 18, and the fake stuff in the usual nacho cheese was unappealing.  But…the idea of a healthy nacho cheese made with squash sounded awesome!  I could enjoy one of my old favorites and it would still be healthy!

    So, I was excited about this nacho cheese.  It is mostly squash, but the ingredient that makes it so good is the 4 heads of roasted garlic I added.  Before you go thinking 4 heads???  Yes, but when roasted they mellow out and become super delicious and almost a little sweet and rich.  I added cashew butter to that to make it silky and cheesy as well as some nutritional yeast and miso to give it even more of a cheesy flavor.  And, nacho cheese needs a little kick so it needed chipotle powder as well.  It turned out sooo good!  I am not going to lie, I ate most of a batch with my chips in one sitting. If you are looking for a healthier nacho cheese alternative, give this recipe a try!

    Vegan Roasted Squash Garlic Nacho Cheese
    Makes about 1 1/2 cups

    Ingredients:

    • 4 heads garlic
    • 1 cup cooked squash
    • 3/4 cup filtered water
    • 1/2 cup cashew butter
    • 1 Tbsp white miso
    • 2 Tbsp nutritional yeast
    • 1/2 tsp chipotle powder
    • 1/2 tsp sea salt or to taste


    Instructions:

    1. Preheat the oven to 425F degrees.
    2. Cut just the tops off of each head of garlic to expose the cloves, then wrap them in foil.
    3. Place the garlic in the oven and roast for about 45 minutes to 1 hour until the garlic is soft and tender.  Remove from the oven and let cool.
    4. Squeeze the garlic cloves out of the papery skins into a blender or food processor.
    5. Add all other ingredients and blend until smooth.
    6. Enjoy!
  • Smokey Yam and Lentil Chili

    Smokey Yam and Lentil Chili

    We sell so much soup in the deli I work at that it is not even funny.  4 quart pots are emptied out in no time, and we are always making soup.  You would think it would slow down a lot in the Summer, but it still sells like hotcakes! Even more of course in the Fall and Winter. Especially Fall though, as people are feeling shocked by the cooler weather and wanting something warming.  To be fair, our soups are really good, some of the best I have tried anywhere.  I tend to be disappointed when I go out to restaurants and order soup because ours is top notch.  I like to think I make good soup at home too though.  My Mom taught me how when I was younger when we got a big soup book and made about 20 different soups from it.  We hardly ever bought canned after that.  I never buy canned now because I like home made so much more. My Mom gave me an idea for a chili to make combining lentils and yams, and I had to go right home and make it!

    I had all of the ingredients on hand, and I was excited.  I had never actually made chili with lentils, it was always beans. But I actually prefer lentils.  This chili was really easy to make, you just throw all of the ingredients but the yams in a pot and cook it, then throw in the yams.  I used tomatoes from my Grandpa’s garden instead of canned and I think that made it extra good.  I added a bit of liquid smoke to give it a little smokey flavor and make it more interesting.  It smelled so good while cooking!  Chili always reminds me of watching fall football games, or chilly fall evenings after spending the day outdoors.

    It turned out really good!  The thing I didn’t like so much about traditional chili growing up was always the ground beef.  I have never liked it and the smell of it turned my stomach.  But if lentils were added instead of the beef I think I would have liked it a lot more.  Because this lentil chili was awesome!  Also, they cook a lot faster than dried beans, so if you want your chili faster consider lentils.  The smokey chili was delicious with the sweet yams too!  If you are cooking for one like I was, this is even better and more flavorful the next day, so you will be excited when you have that second bowl for lunch the next day.  Or, of course you can double the recipe if you are cooking for two.  Either way, give it a try on a chilly Fall evening, you won’t be disappointed!

    Smokey Yam and Lentil Chili
    Serves 2-4

    Ingredients:

    • 2/3 cup french lentils
    • 1/2 cup diced onion
    • 1 carrot, cut in half  lengthwise and sliced
    • 1 stalk celery, sliced
    • 2 garlic cloves, minced
    • 2 cups diced tomatoes (canned are fine)
    • 4 cups filtered water
    • 1 Tbsp chili powder
    • 1 Tbsp ground cumin
    • 1/4 tsp chipotle powder
    • 2 tsp liquid smoke
    • 1/2 tsp sea salt or to taste
    • 2 small yams or sweet potatoes, diced


    Instructions:

    1. In a pot, combine all ingredients but the yams.  Bring to a boil, and lower to a simmer.  Cook on low heat for about 40 minutes or until the lentils are getting tender. Add the sweet potatoes, and cook for about 10 minutes more until they are tender.  Once everything is cooked, remove from heat, and enjoy!


  • Vegan Margherita Pizza

    Vegan Margherita Pizza

    Back when I was in college, I got a pizza stone for Christmas, and I would make some of the best pizza.  Well, I thought it was the best.  Because it had a thin, cracker like crust which is what I prefer, and I topped each pizza with fresh veggies and different types of delicious cheese.  That crust recipe I had found in an Italian cookbook, and I modified it to be just the way I liked it.  I would roll it out super thin so it would be nice and crunchy.  For the toppings, I would use different combinations of fruits and veggies, and I would visit a local cheese shop and choose a different cheese every time.  Although I had a few favorites, the classic margherita was the first one I made and always a favorite in the Summer when I could get local tomatoes.  I thought I would have to say goodbye to this delicious home made pizza when I went vegan, but I was wrong.

    I have made different types of home made vegan cheeses, and they are always delicious on my pizzas, plus no animals were harmed in the process. I make mozzarella the most, because it is the cheapest to make and the most classic of course for a pizza.  Especially when you are going with the classic margherita with tomatoes, mozzarella and basil.  There is nothing like one of these babies hot from the oven especially when made with fresh picked tomatoes that are super flavorful.  I got my tomatoes from my Grandpa last weekend.  He sent over about 40 lbs, and I have been eating tomatoes at lunch and dinner almost every day.  I am super grateful for them though, because they are so good!

    For this pizza I roasted them to intensify the flavor and sort of caramelize them and they were perfect on the pizza! I used a sprouted wheat flour for the crust, because I was given some organic flour, and it worked perfect.  I always used to use whole wheat pastry flour in my crusts when I made them years ago and this tasted just as good.  I was just discussing vegan cheeses with a coworker a few days back and how she thought that they couldn’t possibly be good.  Well, I think that this pizza would prove her wrong.  The cheese got nice and melty, and perfect and gooey, and I topped it off with basil and it was so good!  I shared some with my Mom and she enjoyed it as well.  She is not vegan, but she is a fan of the things I make with vegan cheese. If you are craving pizza and have given up on cheese since you went vegan, or maybe you are not vegan yet, and are thinking about going vegan but aren’t because you don’t think you can give up cheese…either way, definitely try this pizza out! You will find that vegan cheese on pizza can be delicious!

    Vegan Margherita Pizza

    Makes one 14 inch pizza

    Vegan Mozzarella Cheese:

    • 1 15 oz can full fat organic coconut milk
    • 2 Tbsp arrowroot starch
    • 1/4 plus 1 Tbsp filtered water
    • 3 Tbsp agar flakes or 1 Tbsp agar powder
    • 1 Tbsp lemon juice
    • 1 tsp sea salt or Himalayan salt
    • 1 Tbsp virgin coconut oil
    • 1 tsp guar gum


    To make the cheese, heat the coconut milk in a saucepan until it comes to a simmer.  Meanwhile, dissolve the arrowroot starch in the water and set aside.Once the coconut milk has come to a simmer, add the agar flakes, and heat until they are dissolved (mine took about 8 minutes, if you are using the powder, it should dissolve within one minute). Next, add the lemon juice and sea salt to the coconut milk.  Mix the coconut oil with the guar gum so that the guar gum does not clump up.  Turn off the heat and add the arrowroot mixture, guar gum and coconut oil. Whisk for about 30 seconds, then pour into a silicone mold (I used a loaf pan, but if you had another shape you would like to use go ahead). Refrigerate for a few hours until firm, then pop out of the mold. You will need half the cheese for this recipe, reserve the other half for another use in the fridge, wrapped in an airtight container.  Shred the half you will be using into a bowl, and keep in the refrigerator until ready to use.

    Roasted Tomatoes:

    • 3 medium tomatoes, cut into wedges
    • olive oil
    • sea salt


    Preheat the oven to 450F degrees.  Toss the tomatoes with just enough oil to coat and a little sea salt, and spread out on a sheet pan.  Place in the oven and roast for about 30 minutes until starting to brown at the edges and softened.  Remove from oven and set aside.

    Pizza Dough:

    • 1 1/2 cups organic whole wheat pastry
    • 1 Tbsp olive oil
    • 1/2 tsp sea salt
    • 1/2 cup plus 1 Tbsp filtered water


    To make the pizza crust, combine the flour, and sea salt in a bowl, and whisk until well blended. Add the oil and water, and mix in until you have a soft dough.  Turn out onto a sheet of parchment paper with a light dusting of flour, and roll out into a 14 inch circle.  Set aside.

    For Pizza Assembly:

    • olive oil
    • 1 garlic clove, cut in half
    • fresh basil leaves


    Pre-heat the oven to 400F degrees.  Set a pan on the center rack with an upside down sheet pan, or a pizza stone set on it. Brush the crust with olive oil, sprinkle with sea salt, and slide the parchment with the crust on it onto the stone.  Bake crust for 10 minutes, then remove the crust from the oven (still on the parchment). Brush the crust with olive oil, and rub with the garlic cloves. Top with the tomatoes, then the cheese, making sure it is all evenly distributed.  Place the pizza in the oven, turn up the temperature to 475F and bake for 20-25 minutes until the cheese is bubbling and starting to brown (keep an eye on it after 15 as some ovens cook faster than others). Remove the pizza and parchment from the oven, slide pizza onto a cutting board or plate, scatter basil over the top, slice and enjoy!

  • Vegan Lentil Goulash

    Vegan Lentil Goulash

    Goulash is a classic comfort food that many American families had in their recipe box growing up. But my Mom did not cook that sort of thing.  She was never really a big fan of hamburger helper type things, and I can totally understand why as ground beef never usually appealed to me either growing up.  But I did however eat some really good goulash at the Church daycare I went to when I was in elementary school.  Those lunch ladies who made the goulash were amazing cooks, and although the goulash was nothing special to look at, it was super delicious.  It was flavorful, hearty and had plenty of veggies along with the beef.  If Grandmas across the country made goulash like that, I can see why people liked it, and I can see how it would be something easy and economical to make for a big family. I had not even thought about that goulash lately, I mean it has been over 14 years since I even ate beef, but I was recently discussing what was in goulash with a coworker.  Which made me think to myself, I should make a vegan version!

    I am a big fan of healthy comfort foods, and I figured I could swap out the beef for lentils instead.  Even if you are not a vegan, I think you could be a fan of the health benefits of this swap.  After all, lentils are packed with fiber, and lower your risk for heart disease where as beef increases your risk.  I try to have lentils at least 3 times a week for dinner.  I admit they used to intimidate me because they looked weird to me when I first became vegan, and I had been just eating beans up until then, but then I tried some amazing Indian food with them and I was hooked.  I started experimenting with them in recipes and came to love their flavor, texture and the fact that they cooked faster than beans. So back to that goulash…they were the perfect swap for the beef!  I made a flavorful tomato sauce with tomatoes from my Grandpa’s garden that I had roasted.  If you have fresh tomatoes from the garden I highly recommend doing this, they are so good that way.  I combined them with Italian herbs, bay leaf, and alliums, and let it simmer for a while to let the flavors get all happy and delicious together.

    I then added in some lentils I had cooked, along with some gluten free chickpea fusilli and it was as simple as that!  A big pot of comfort food!  It was super delicious, rich in flavor, no greasy meat, and loads of yummy tomatoes. I shared some with Eric and he approved as well. If you were a fan of goulash growing up and want to enjoy it without the beef, give this recipe a try!

    Vegan Lentil Goulash

    Serves 3

    Ingredients:

    • 2/3 cup French lentils
    • filtered water
    • 1 tsp olive oil
    • 1/4 cup diced red onion
    • 1 garlic clove, minced
    • 1 tsp dried basil
    • 1/2 tsp fennel seed
    • 1 tsp dried oregano
    • 1/4 tsp red pepper flakes
    • 1 Tbsp tamari
    • 3 cups crushed canned tomatoes or fresh roasted*
    • bay leaf
    • filtered water as needed
    • 1 Tbsp cider vinegar
    • sea salt
    • 4 oz gluten free fusilli pasta or macaroni pasta


    Instructions:

    1. To cook the lentils, place in a pot and cover with filtered water by 3 inches.  Bring to a boil, then lower to a simmer and cook for 20 minutes or until the lentils are tender.  Drain, and set aside.
    2. Heat the olive oil in a medium pan. Add onions, and sauté until tender.  Add the garlic, tomatoes, bay leaf, herbs, tamari, pepper, vinegar, and filtered water as needed.  Bring to a simmer, and allow to cook until the tomatoes are very soft and the flavor has melded, about 15-20 minutes. Add the lentils and allow to heat through, taste for seasoning and add more salt if needed.  Meanwhile, cook the pasta according to package directions, and drain. Mix the pasta into the lentil mixture, and serve.

    *To roast the tomatoes, cut them into 2 inch wedges, and spread them out on a parchment lined baking sheet.  Place in a 400F degree oven and roast for about 30-45 minutes until tender and starting to brown at the edges. Remove from oven and you are ready to use them in this recipe.

  • Vegan Cheesy Hasselback Potatoes

    Vegan Cheesy Hasselback Potatoes

    Monday was kind of a rainy dreary day here in Minnesota.  Everyone was excited about the lunar eclipse taking place, but it ended up being covered by clouds.  Eric and I were hoping to see it, but instead we went out for a walk with our umbrellas.  It was one of those days where the weather makes you tired and you want to just curl up and watch movies.  I had a big bag of potatoes that needed to be eaten and I figured this was just the day to use them. After all, potatoes are one of the best comfort foods!  I thought about mashed potatoes, tater tots, or just roasted potatoes, but I wanted to do something more fun with them.  I decided on a vegan version of hasselback potatoes. I had seen a version on Pinterest for parmesan hasselback potatoes, and I figured I could make cheesy vegan potatoes with some nutritional yeast to make them a bit crispy instead.

    I have always seen this type of potato dish, and always wanted to try it but never have for some reason.  Maybe all of the little cuts into the potatoes intimidated me.  They sounded time consuming. But actually these ended up being fairly quick to prep.  They took a while to bake, but that gives you time to relax, or prepare something to go with them.  Most recipes for hasselback potatoes have lots of butter, but I used avocado oil instead.  Because it is vegan of course, and because it is neutral and stands up to high heat.  I coated the potatoes with plenty of nooch as well as some thyme, sea salt, garlic and pepper, to keep it simple.  A good hour plus in the oven later, my house smelled wonderful.  I don’t know about you, but nutritional yeast is a life saver for anyone who is craving something cheesy.  Good on popcorn or pasta dishes, or now roasted potatoes!

    They turned out delicious!  Cheesy tasting with just the right amount of garlic and thyme for aromatics.  Some of the potato at the edges got nice and crispy like chips, which was delicious, but then the inside ones were nice and tender.  These would be delicious served with a vegan porterhouse “steak” from the Herbivorous Butcher, or some sauteed tempeh, or my Chickpea Cutlets with Mushroom Gravy.  They turned out even more delicious than I thought, and I definitely forgot about the crummy weather outside.  So the next time you are in the mood for some comfort food potato style, give these a try!

    Vegan Cheesy Hasselback Potatoes
    Serves 5

    Ingredients:

    • 10 medium organic Yukon Gold potatoes
    • avocado oil or olive oil
    • 1 cup nutritional yeast
    • 1/2 tsp sea salt
    • 1/4 tsp black pepper
    • 2 tsp dried thyme
    • 2 garlic cloves, minced


    Instructions:

    1. Preheat the oven to 400F degrees, and oil a sheet pan.
    2. To prepare the potatoes, place one on a cutting board, and set 2 chopsticks on either side of it lengthwise (this will prevent you from cutting all the way through).  Use a knife to cut it into 1/8 inch thick slices crosswise, and set on the pan.  Repeat with the remaining potatoes.
    3. When they are all cut, drizzle each one with the avocado oil, being sure it covers all of the potato and gets in the sliced part too (being careful not to break it).
    4. Combine the nutritional yeast, sea salt, pepper, thyme, and garlic in a bowl, and mix up.
    5. Roll each potato in this mixture, and sprinkle a little between each cut.  Place back on the tray.  Repeat with other potatoes.
    6. Drizzle with a little more oil, and sprinkle with some of the leftover nutritional yeast mixture.
    7. Place in the oven and bake for about 1 hour and 15 minutes until the potatoes are tender and browning slightly.
    8. Remove from the oven and let cool for a few minutes before serving.


  • Vegan Spice Crusted Chevre

    Vegan Spice Crusted Chevre

    Before I went vegan, I used to buy tubs of local chevre at the co op all the time.  It was mild, slightly tangy (without being goaty) and delicious.  I would top salads off with it, eat it with fruit for dessert, or spread it on toast.  It was a staple.  So, of course I had to figure out how to make a vegan chevre.  At the time, there were not as many good store bought vegan cheeses out there, or they were expensive so that is why I chose to make my own.  I have made it many times over the years, and although the recipes change slightly depending on what I have on hand, it is always good.  Cashew based chevre is the most wallet friendly, but it is pretty amazing made with pine nuts or macadamia nuts if you happen to have some on hand. I don’t usually so cashews it is, and it is still darn delicious.  So delicious that in fact my boyfriend Eric loves it too even though he is not vegan.  I have never served it to anyone and had them not like it.  In fact most people are pleasantly surprised how good it is.  I always add a little something to give it a touch of tang, but it never has that off putting goat aroma that regular goat cheese sometimes has that people don’t like.

    I decided to make some last week because I wanted to serve it on a salad I would be making, and I decided to make a spice crusted one.  I love the aroma of spices like cumin and coriander so those were the main two I used.  I like to sprinkle them on my salads sometimes for extra flavor and crunch, so I knew they would be delicious with the nut chevre.  I added in some red pepper flakes and thyme as well, since I love all of those flavors together, and it smelled amazing!  It tasted even better.  I like the crunch of the spices on the smooth chevre.  This is good eaten just as is, plain honestly, but who sits and eats a log of just cheese.  Well, me maybe.  But I didn’t this time because I wanted to save some for that salad I was making.  This cheese would also be good with crackers of course, or veggies, such as stuffed celery like my Grandma used to make.  Or even spread on bagels or toast.  I will leave it up to you what you serve it with.  If you think vegan cheese can’t be good I do hope you give this a try.  I have a strong feeling you will love it.

    Vegan Spice Crusted Chevre
    Serves 10

    • 2 cups raw cashews, soaked for 4 hours, and drained
    • 1/4 cup filtered water
    • 1 Tbsp lemon juice
    • 1/2 tsp sea salt (or to taste)
    • 1/3 cup raw coconut butter, warmed to liquid
    • 1 1/2 Tbsp cumin seeds
    • 1 1/2 Tbsp coriander seeds
    • 2 tsp thyme
    • 2 tsp red pepper flakes


    Instructions:

    1. In a high speed blender combine the soaked cashews, filtered water, lemon juice, salt and coconut butter and blend until smooth.
    2. Pour into a bowl, place in the freezer for about 10-15 minutes until it is easier to work with, then scrape onto a piece of plastic wrap, and shape into a log while wrapping tightly.
    3. Place in the freezer for about 15 minutes until more firm (you want it to hold shape, but still stick to the herbs).
    4. Crush the herbs slightly with a mortar and pestle to make them more aromatic.
    5. Place the spices on a plate, then roll the log in them. Place in the refrigerator until firm, a few hours. Then enjoy!
  • Creamy Vegan Mac and Cheese (GF)

    Creamy Vegan Mac and Cheese (GF)

    I loved anything with cheese when I was little. Grilled cheese, mac and cheese, cheesecake.  I mean cheese was delicious.  I begged my Mom to make mac and cheese a lot, and what I liked was the boxed variety.  We always had some on hand, but what we didn’t usually have on hand was milk.  My Mom was not much of a milk drinker so we didn’t have any unless we specifically bought it for a recipe.  But one time I wanted mac and cheese and we had no milk.  So my Mom improvised and added apple juice and some mustard to the boxed mac and cheese.  It may sound really weird, but I ended up loving it so much that I always wanted her to make it that way.  It worked out because we usually had juice on hand. It had a delicious tangy cheesy flavor that I craved.  Whereas the normal recipe on the box was kind of blah.  So that is my random funny story about mac and cheese.  When I got older and started cooking more I made mac and cheese occasionally, but it usually had special stuff in it like veggies or something to give it some healthy qualities and some kind of fancy blend of cheese to make it taste delicious.

    When I went vegan of course, I had to change up the way I made it and get creative.  Cashew mac and cheese is pretty darn delicious, but I don’t always want my entire sauce made out of cashews because they can be pricey, so I have found I like to add other ingredients to make a creamy sauce and just some cashew butter so it still tastes rich but is more wallet friendly and not so heavy.  One of my favorite things to make cheese sauce out of is sweet potatoes.  The white fleshed variety that is a little less sweet and more savory work perfect for it.  They make a silky sauce once blended up with cashew butter and once you add in a few special ingredients to give it a cheesy flavor, it is amazing!  Not only that, then you are getting a serving of veggies without even realizing it.

    I use whatever pasta I have on hand normally, but since I found some actual elbow pasta that was gluten free I thought I would make a classic mac and cheese this time.  I kept is simple, no mix ins since I served a salad on the side instead.  This reminded me of the mac and cheese I had as a kid but of course the ingredients are real and I feel good after eating it, not sluggish.  So, the next time you are craving rich mac and cheese, give this a try!

    Creamy Vegan Mac and Cheese (GF)
    Serves 4

    Ingredients:

    • 2 cups mashed sweet potato* (the white fleshed variety)
    • 1 cup hot filtered water (or as needed)
    • 1/3 cup raw cashew butter
    • 1 medium garlic clove
    • 2 tsp stone ground mustard
    • 1 Tbsp apple cider vinegar
    • 1 Tbsp white miso (optional)
    • 1/4 cup plus 2 Tbsp nutritional yeast
    • 1/8 tsp cayenne pepper
    • 3/4 tsp sea salt (or to taste)
    • 1/4 tsp turmeric powder
    • 16 oz organic gluten free elbow pasta


    Instructions:

    1. Combine the sweet potato, water, cashew butter, garlic, mustard, cider vinegar, yeast, cayenne, sea salt and turmeric in a high speed blender and blend until smooth and the consistency of cheese (if it is too thick add a little more water).  Set aside.
    2. Cook pasta according to package directions, drain, then place back in the pot, add the cheese, and stir to coat.  Pour into a serving dish, and serve!

    *To cook the sweet potatoes, I like to roast them in the oven.  Take a large sweet potato, poke a few holes in it, and cut in half lengthwise.  Place cut side down on a sheet pan lined with parchment and bake for about an hour at 400F degrees or until tender.  Remove from oven and let cool before mashing.

  • Summer Watermelon and “Chevre” Salad

    Summer Watermelon and “Chevre” Salad

    There used to be this fabulous watermelon and mozzarella salad at a restaurant my Mom and I would go to often when I was younger and it was super delicious. I hadn’t thought about it since then, but then recently my Mom made a salad for a party for one of her friends that was very similar except with watermelon and chevre. She said it was a hit, and asked me if I could make a vegan version for her, since she doesn’t always eat cheese (she has cut down a lot on dairy). I was very happy to do so! It sounded really good to me, and I tweaked it slightly to make it more substantial. The funny thing about watermelon is, I don’t buy it often. Maybe because it is a lot to cut up, or heavy to lug home. But when I do get it and have it all prepped and ready, I wonder why I don’t get it more often. It is so good! Especially on a hot day after a long run. Probably the most refreshing thing to eat I can think of in the Summer. So, I was really happy my Mom suggested this.

    Her salad had just contained watermelon, chevre and basil. But I decided to add in some arugula tossed with a little avocado oil and lemon juice as well to make it more colorful and add some healthy greens. I made my usual cashew coconut chevre to top it off and scattered some fresh basil that was growing on my patio over it and it was so pretty! But it wasn’t just pretty, it was super delicious! You will not even miss the fact that this isn’t real cheese, it is salty, tangy and creamy just like real chevre. It is perfect with the sweet melon, peppery arugula and fragrant basil. Once you have the cheese made this is super fast to make, and I think it would be the perfect side salad for something like grilled tempeh.

    So, the next time you see a watermelon at the store, you need to try this! Since that watermelon was so good, it has me thinking about watermelon wine. I have been making my own fruit wines since last fall, and I have made many berry wines, and a mango peach wine, but not watermelon. I think it would be amazing since it is so sweet. What do you think?

    Summer Watermelon and “Chevre” Salad
    Serves 2-4

    Ingredients:

    • 8 oz arugula
    • 1 Tbsp avocado oil
    • 1 Tbsp lemon juice
    • sea salt to taste
    • 4 cups cubed organic watermelon
    • 1 cup crumbled vegan chevre*
    • 6 larger basil leaves, cut into chiffonade


    Instructions:

    1. Toss the arugula with the avocado oil, lemon juice and sea salt in a bowl.  Add the watermelon and toss until evenly distributed.
    2. Transfer the mixture to a serving plate, then crumble the chevre over it and sprinkle the basil over it.
    3. Serve!

    *Use this chevre recipe, minus the herbs and lavender.

  • Creamy Garam Masala Noodles

    Creamy Garam Masala Noodles

    I am a big fan of Thai peanut noodles.  They are simple, savory easy to make comfort food.  We make them at my work and they sell like hotcakes!  But I feel sorry for people who can not experience them because they are allergic to peanut butter.  So, I thought why not create something similar with out the peanuts or nuts?  I had been gifted a jar of Sunbutter, and I thought this would be the perfect opportunity to use it.  Not only are sunflower seeds nut and peanut free, they are rich in healthy fats and vitamin E so you are getting those benefits from eating them as well.  The Sunbutter has a little different flavor than other nut butters, but once you add the spices to it, it tastes delicious.

    I thought about making these Thai noodles, but I went with curry instead.  It was sort of inspired by an African groundnut stew recipe I used to make from one of the Moosewood cookbooks back in the day.  Or the flavors at least, with the Sunbutter instead of peanut butter.  It contained garam masala spice blend, which is really delicious paired with a silky sauce like nut butter.  I kept it simple for this since garam masala is already so aromatic and flavorful adding just a touch of garlic and red pepper flakes for heat.  This sauce is super easy to make, just whisk together, and toss with the cooked noodles and veggies.  I wasn’t sure if it would be as good as Thai peanut sauce, but once I tasted it I knew it would be wonderful combined with the rest of the ingredients.

    This was a quick and delicious dinner, and it was just as good as the peanut noodles.  Not to bash sunflower seed butter or anything, but using it in an application like this tastes so much better than simply spreading it on toast because it needs a little something if you know what I mean.  But it is awesome in a silky sauce like this.  If you are allergic to peanuts and want something similar to Thai peanut noodles or you just want something other than the usual give this a try!  It is also good cold the next day, so it is good for lunches.

    Creamy Garam Masala Noodles
    Serves 2

    Ingredients:

    • 4 oz organic edamame spaghetti
    • 2 small organic carrots, cut julienne
    • 1 small bell bell pepper, sliced
    • 2 scallions, sliced
    • 1 handful arugula or spinach

    Sauce:

    • 1/2 cup Organic Sunbutter (be sure to buy the kind with only sunflower seeds)
    • 3/4 cup filtered water (or as needed)
    • 1 garlic clove, minced
    • 1 Tbsp garam masala
    • 2 tsp cider vinegar
    • 1/4 tsp sea salt or to taste
    • 1/4 tsp red pepper flakes

    Instructions:

    1. Cook the pasta according to package directions.
    2. Meanwhile, in a bowl combine the veggies, and when the pasta is done cooking add that as well.
    3. Whisk together the sauce ingredients (if you want it thinner add a little more water), then toss with the pasta and veggies.
    4. Enjoy!
  • Roasted Yam, Coconut Bacon and Black Bean Salad with Miso Almond Dressing

    Roasted Yam, Coconut Bacon and Black Bean Salad with Miso Almond Dressing

    I made a potato salad with coconut bacon over the 4th of July holiday weekend and it was really good but I thought of something that would be even better.  Yams or sweet potatoes and coconut bacon.  A match made in heaven, sweet and salty together.  I had actually been thinking about this combination and how good it would be in the past, but never made it because I didn’t have a good vegan bacon substitute.  But then I discovered coconut bacon a few months back and it was perfect for such an application.  Coconut bacon is just the thing to top off salads, loaded baked potatoes and things like popcorn.  Not only that, you don’t have to kill anything to make it, and it keeps better than real bacon.  It is honestly the closest thing to real bacon that I have eaten.  And I used to be a bacon lover before I went vegetarian then vegan. So anyways, back to that roasted yam and bacon combo.

    I made a super delicious salad with that combination a few nights back.  It was crave worthy.  I tossed some chunks of yam with olive oil and sea salt and roasted them to crispy perfection in the oven.  This is one of my all time favorite things to snack on anyway, and it is amazing on a salad. I made some crispy coconut bacon, which was good for snacking (I probably ate half the pan before I made the salad) and awesome with the yams. I decided to add some black beans too for protein, since I always like full meal salads. I added in some greens, and bell peppers for color, and then I needed a delicious dressing to drizzle over it.

    I used one of my all time favorite dressings, a creamy almond miso. This is actually something that I keep in my refrigerator at all times, and I make it weekly.  I have instructions for a smaller batch below though in case you don’t want a giant jar of something, and I have also included instructions at the bottom for a large batch like I make if you become a fan. I like it served over pretty much any type of veggies, it is creamy and garlicy and just a tad sweet from the miso and it is honestly like nothing I have ever had.  It was amazing over this salad with the salty crunchy bacon and roasted yams.  A crave worthy salad may sound like an oxymoron, but it totally isn’t when it comes to this.  Trust me, you need to try it.  It was so good I am going to have to make it for Eric soon too because I did not share this batch.

    Roasted Yam and Chickpea Salad

    Serves 2

    Coconut Bacon:

    • 1 1/2 cups large flake coconut
    • 2 Tbsp tamari
    • 2 Tbsp liquid smoke
    • 1 Tbsp maple syrup


    Yams:

    • 1 large yam, diced
    • olive oil
    • sea salt


    Dressing:

    • 1/4 cup almond butter
    • 1/4 cup filtered water (or as needed)
    • 1 small garlic clove, minced
    • 2 tsp white miso
    • sea salt to taste


    Salad:

    • 1 cup cooked black beans
    • 1 red bell pepper, diced
    • 4 cups arugula leaves


    Instructions:

    1. To make the coconut bacon, preheat the oven to 350F degrees, and line a sheet pan with parchment.
    2. Toss the large flake coconut with the tamari, liquid smoke and maple syrup and spread out on the pan.  Place in the oven and bake for about 12-15 minutes (depending on your oven), keeping a close eye at the end and checking it in the final minutes because it burns fast.  Remove from oven and let cool.
    3. Raise the temperature of the oven to 400F degrees.  Toss the yams with just enough olive oil to coat and sprinkle with sea salt, then spread out onto the pan.  Roast for about 20-30 minutes until softened and browning at the edges.  Once the yams have finished cooking let them cool to room temperature.
    4. Meanwhile, to make the dressing, combine all ingredients in a bowl, and whisk together until smooth (or, I like to use an immersion blender in a tall glass measuring cup if you have that).
    5. To assemble the salad, scatter the arugula on the bottom of the plates, then top with the beans, yams, bell pepper and some of the coconut bacon. Drizzle with the dressing and serve!


    *If you want a large batch of dressing like I keep in my refrigerator:

    Miso Almond Dressing:

    • 1 cup almond butter
    • 1 cup filtered water (or as needed)
    • 3 small garlic cloves, minced
    • 2 Tbsp white miso
    • 1/4 tsp sea salt or to taste


    Blend in a blender or food processor until smooth (or whisk together if you don’t have one).  Keeps for 2 weeks in the refrigerator.

  • Cherry Berry Quinoa Salad with “Chevre”

    Cherry Berry Quinoa Salad with “Chevre”

    I have been eating more quinoa lately than I used to.  It stems from trying to eat a variety of vegan protein sources instead of my usual few in my meals (tofu, tempeh, garbanzo beans, lentils).  Plus, quinoa makes a great salad and that is usually how I enjoy it.  I can make a big batch ahead of time, and it makes a satisfying meal later. So, I have been making many different new recipes with it.  The most recent of which involved sweet berries and cherries.  It may sound like more of a breakfast porridge combination than a salad, but it was savory, sweet and super delicious!  In the past I have always jumped to making desserts first when I have fruit, but lately I have been trying to incorporate it into savory applications as well.  After all, I eat more meals than I do desserts.

    I decided to keep the flavors in this quinoa simple and just use lemon, mint and a little avocado along with some lime juice to flavor it.  No overpowering alliums in this dish.  I wanted the flavors of the strawberries and cherries to shine!  The mint just gave it a lovely fragrance along with the berries and lemon plus added the little pop of green color that it needed.  I tossed in some toasted walnuts for crunch and some nut “chevre” that I had on hand, and it was delicious!

    This is the perfect make ahead of time salad for Summer if you want something delicious for lunch or even of you are having a picnic or party and want to impress guests.  Just make sure your fruit is super flavorful, that is crucial to this tasting amazing!

    Cherry Berry Quinoa Salad with “Chevre”
    Serves 2-4

    Ingredients:

    • 1 cup quinoa, rinsed
    • 2 cups filtered water
    • 1/4 cup lemon juice
    • 1 Tbsp organic lemon zest
    • 2 Tbsp avocado oil or olive oil
    • sea salt to taste
    • 1 cup cherries, pitted and halved
    • 1 cup strawberries
    • 1/4 cup fresh mint leaves (if larger, tear them into pieces)
    • 1/2 cup toasted walnuts
    • cashew chevre*

    To prepare the quinoa, place quinoa and water in a medium saucepan and bring to a boil. Reduce to a simmer, cover and cook until all the water is absorbed about 15 minutes, or when all the grains have turned from white to transparent, and the spiral-like germ has separated. Drain, and set aside.

    To assemble the salad, combine all ingredients in a bowl except the chevre, and toss together until well combined.  When ready to serve, sprinkle with the chevre (you will have more left over for another use).

    *Use this chevre recipe and omit the herbs: https://www.fragrantvanilla.com/vegan-herbes-de-provence-chevre/

  • Vegan Broccoli “Bacon” Salad

    Vegan Broccoli “Bacon” Salad

    There is a broccoli bacon salad that is very popular among Minnesotans at church potlucks or summer picnics.  It has a creamy dressing, raisins, sunflower seeds, onions and sometimes cheese depending on who makes it.  I used to like it when I was little because it was sweet and had bacon, but when I got older it was too sweet for me, as it is usually loaded up with sugar and mayonnaise two things I am not a fan of not to mention the bacon which I haven’t eaten since I went vegetarian in 2003 (I have been vegan 5 years).  One of my friends jokingly used to call it “broccoli barf”  because she was a vegetarian too and thought it was too sugary and mayo filled as well.  We actually make a version of this in the deli I work at and it is pretty popular.  Which got me to thinking, why couldn’t I make a vegan version of it that I could actually eat, and tailor it to my tastes so I would enjoy it as well?

    I admit I don’t usually reach for the broccoli first, but I really wanted to make a good vegan version of this!  I mean, yes, I could have made it really simple and bought vegan bacon and vegan mayonnaise, but were is the fun in that?  And, I don’t usually like store bought mayonnaise even if it is vegan.  So, I made my own creamy sweet dressing that ended up tasting even better than the mayo one.  It had a coconut milk cashew base made a little tangy with cider vinegar and sweet with maple syrup.  It was delicious once poured over the salad.

    For the bacon, I made coconut bacon.  It is now my favorite vegan bacon for when I want to sprinkle it on top of something or just snack on it.  It is honestly the closest thing texture and flavor wise I have found to real bacon.  It was super delicious in the salad and added a nice crunch.  I kept it classic with onions and sunflower seeds, but I swapped out the raisins for dried cherries because I am not a huge raisin fan and that was what I happened to have on hand.  I shared some of this salad with my Mom, who has tried the original version probably way more times than me and is usually not a fan, but she loved the vegan version I made.  If you are looking for a dish to bring to a Summer picnic or potluck, give this a try!

    Vegan Broccoli “Bacon” Salad
    Serves 2-4

    Ingredients:

    Coconut Bacon:

    • 1 1/2 cups large flake coconut
    • 2 Tbsp tamari
    • 2 Tbsp liquid smoke
    • 1 Tbsp maple syrup


    Dressing:

    • 1/3 cup raw cashew butter
    • 1/3 cup full fat coconut milk (mostly the thick part from the top of the can)
    • 1 Tbsp cider vinegar
    • 1 1/2 Tbsp maple syrup
    • 1/3 tsp sea salt (or to taste)


    Salad:

    • 2 medium heads organic broccoli
    • 1/4 cup diced onion
    • 1/2 cup dried cherries
    • 1/2 cup sunflower seeds


    Instructions:

    1. To make the coconut bacon, preheat the oven to 350F degrees, and line a sheet pan with parchment.
    2. Toss the large flake coconut with the tamari, liquid smoke and maple syrup and spread out on the pan.  Place in the oven and bake for about 12-15 minutes (depending on your oven), keeping a close eye at the end and checking it in the final minutes because it burns fast.  Remove from oven and let cool.
    3. To make the dressing, whisk all ingredients together until smooth.
    4. Combine broccoli, onions, cherries, sunflower seeds, and coconut bacon in a bowl, and toss together with the dressing.
    5. Enjoy!


    *Note: If you are not serving this right away, do not add the coconut bacon until you are just about to serve it so that it stays crisp.


  • Vegan Italian Lentil Walnut Meatballs

    Vegan Italian Lentil Walnut Meatballs

    When I was little, my Mom made really good meatballs with a red sauce.  It was a recipe from a family friend.  So years ago, she had asked me to make some vegan ones and she ended up liking them even better than this original recipe.  I don’t have that recipe anymore, it was from before I was big into blogging (so not saved anywhere) and they were not gluten free so I would have to tweak them anyway to make them to my liking. So I thought why not make them again, and if they were really good I could share the recipe.  Also I kind of wanted to make something for my Mom that I knew she would like around Mother’s Day but we went out for dinner that day, so I thought I would make it after so she could enjoy them during the week.

    I based this meatball recipe off of my classic meatball recipe that everyone, including meat eaters raves about.  It is just a really good base made from lentils, walnuts and oats for a binder that ends up tasting pretty amazing once finished.  I have had people that were skeptical of vegan meat substitutes try it and say they really liked it!  Which always means a lot to me, it means I did a good job, and maybe they will think about eliminating meat from their diet.  I made a simple Italian sauce for these, and served them with some of my favorite pasta, one made from edamame and mung beans that is gluten free.

    But the important thing was, Mom loved them as well!  They were super delicious.  I was never a big fan of ground beef growing up, so I think if I did a taste test of both I would have picked these as the winner!  I think they beat meat hands down taste wise!  If you are craving meatballs, give these a try!

    Vegan Italian Lentil Walnut Meatballs
    Serves 4

    Meatballs:

    • 2/3 cup uncooked French lentils
    • filtered water
    • 1 tsp olive oil
    • 1 small onion, diced
    • 2 garlic cloves, minced
    • 2 Tbsp tamari or shoyu
    • 1/4 cup organic tomato paste
    • 1 tsp dried oregano
    • 1 tsp dried basil
    • 1 tsp fennel seeds
    • 1/4 tsp sea salt
    • 2 cups chopped walnuts
    • 1 cup gluten free rolled oats


    Sauce:

    • 2 tsp olive oil
    • 1/4 cup chopped onion
    • 2 garlic cloves, minced
    • 1 tsp dried basil
    • 1 tsp dried oregano
    • 1 tsp fennel seeds
    • 1/4 tsp red pepper flakes
    • 1 15 oz can diced tomatoes
    • 1/2 cup tomato paste
    • 3/4 cup filtered water
    • 1/2 tsp sea salt (or to taste)


    Instructions:

    1. To make the meat balls, add the lentils to a pot, and cover them with enough water to have a few inches above the lentils.  Bring to a simmer, and cook for about 40 minutes until the lentils are tender.  Drain, and set aside.
    2. In a pan, heat the olive oil and onions, and cook until the onions are softened and tender, about 5 minutes.
    3. Add the garlic and sautee a minute more until fragrant.
    4. Add to a food processor, along with lentils, and all other meatball ingredients.  Pulse until everything is blended but not completely smooth.
    5. Preheat the oven to 375F degrees.  Roll the meatball mixture into one and a half inch balls, and place them on a lined baking sheet. Place in the oven and bake for 30 minutes or until firm, but still soft in the middle.
    6. Meanwhile, to make the sauce, heat the oil in a non-stick skillet, and add the onions.  Sautee for about 5 minutes until softened, over medium heat, then add the garlic and spices and cook a minute more.  Add the tomatoes, water, and sea salt, and bring to a simmer.  Cook for about 10-15 minutes until the flavors have combined.
    7. When the meatballs have finished cooking, toss them with the sauce, and serve garnished with parsley over pasta!
  • Thai Red Curry Noodles

    Thai Red Curry Noodles

    We sell vegan Thai peanut noodles at my work, and they just seem to fly off the shelf!  I feel like we are always making them.  For good reason, what’s not to like about noodles in a creamy savory peanut butter sauce?!  Well, I have made similar ones at home for a while and they are always delicious.  Not only that, wallet friendly, and super fast to make as well!  In 20 minutes, you can be enjoying a comfort food dinner! Noodles are comforting, at least to me.  I recently made a variation on my peanut pasta, one using Thai red curry paste, and it was so good I had to share the recipe with you all.

    For most of my pasta recipes I use a bean based pasta because not only it it gluten free, but packs protein as well, so I don’t have to worry about adding another protein source to the recipe.  My favorite is either a mung bean and edamame fettuccine or an edamame spaghetti. In this case I used the spaghetti because it was what I happened to have on hand.  That is usually how I cook, I look in the pantry and the fridge and figure out what would be good together!  For the sauce, I used a silky almond butter.  There used to be a raw pad thai recipe that I made, and the dressing was almond butter based and it was sooo good!  That is how I knew this would be too!

    The sauce is pretty simple, just the nut butter, tamari, Thai red curry paste, water and garlic.  Just whisk together and voila!  A rich and delicious sauce!  It is also good on tofu by the way, which is how I first discovered it a few weeks ago when I was experimenting. Just toss the cooked pasta with some veggies, and this sauce and dinner is ready!  It is perfect for a weeknight when you don’t want to mess with making anything time consuming or complicated, and it is satisfying.  Bookmark this for next time you need a quick and delicious dinner!  Or, if you are just making it for yourself like I did, save the other half for lunch the next day.  It is good chilled as well as warm.

    Thai Red Curry Noodles
    Serves 2

    Ingredients:


    Sauce:

    • 1/2 cup almond butter
    • 1 Tbsp Thai red curry paste
    • 1 Tbsp tamari
    • 1/3 cup filtered water (or as needed)
    • 1 garlic clove, minced


    Instructions:

    1. Cook the pasta according to package directions.
    2. Meanwhile, in a bowl combine the veggies, and when the pasta is done cooking add that as well.
    3. Whisk together the sauce ingredients (if you want it thinner add a little more water), then toss with the pasta and veggies.
    4. Enjoy!
  • Spring Minted Pea Pasta and Vegan Garlic Chive Cheese

    Spring Minted Pea Pasta and Vegan Garlic Chive Cheese

    Before I went vegan I thought that Boursin cheese was some pretty delicious stuff.  If you have never heard of it, it is a spreadable, soft cheese filled with lots of garlic, and some herbs. It is versatile stuff.  It can be spread on crackers or used like a cream cheese, or stirred into hot pasta for a creamy sauce, or stuffed into things to be baked.  Anything with garlic and cheese always got my attention.  I saw a commercial for it recently and I thought to myself, why not veganize it?!  I could use it for the same types of things, and I have made lots of delicious nut cheeses in the past, so I knew it would turn out.  Plus, I had been looking for an excuse to make more cheese.  So, I gave it a go!

    I used a mixed cashew and macadamia nut base for mine, but of course you can use either of the nuts and it will be amazing. This is my go to vegan cheese base.  I added in some lemon juice for tang, sea salt, and of course the all important garlic, chives and parsley with a touch of white pepper.  It was a delicious mixture even before chilled, and I could not stop sampling it.  Once it was chilled and shaped into classic little rounds I could not wait to try it!  It was even more delicious once the flavors had melded (I had let mine sit overnight), and I could not wait to use it in some dishes!

    First, I decided to make a Spring pasta.  I used an edamame pasta which is gluten free, and packed with protein.  Win win all around.  Plus it is a lovely green color!  I added in some peas, greens, lemon and olive oil with a little sea salt.  Topped off with the cheese it was simply yummalicious!  Sometimes simplest is best when it comes to dinners. This came together quick and it was just what I wanted. I am sure you can think of a lot of delicious uses for the Vegan Garlic Chive Cheese too!  So, next time you are craving cheese, give it a try!

    Vegan Garlic Chive Cheese
    Serves 10

    • 2 cups raw cashews (or raw macadamia nuts), soaked for 4 hours, and drained
    • 1/4 cup filtered water
    • 1 Tbsp lemon juice
    • 1/2 tsp sea salt (or to taste)
    • 1/3 cup raw coconut butter, warmed to liquid
    • 1 Tbsp dried chives or 2 Tbsp chopped fresh chives
    • 2 tsp dried parsley, or 1 Tbsp fresh parsley
    • 2 garlic cloves, minced
    • 1/8 tsp white pepper


    Instructions:

    1. In a high speed blender combine the soaked cashews, filtered water, lemon juice, salt and coconut butter and blend until smooth.
    2. Pour into a bowl, stir in the chives, parsley, garlic, and pepper and place in the freezer for about 10-15 minutes until it is easier to work with, then scrape onto 2 pieces of plastic wrap, and shape into small wheels while wrapping tightly.
    3. Place in the refrigerator until firm, a few hours. Then enjoy!


    Spring Minted Pea Pasta
    Serves 2

    Ingredients:

    • 4 oz organic edamame spaghetti pasta
    • 1 cup fresh or frozen organic peas
    • 3 Tbsp fresh mint, chopped
    • 2 Tbsp lemon juice
    • zest of one lemon
    • 1 Tbsp olive oil
    • sea salt to taste
    • 1 round Vegan Garlic Chive Chevre


    Instructions:

    1. Cook the pasta according to package directions.
    2. Once the pasta has finished cooking, drain it, allow it to cool for a few minutes, and toss it together with the peas and all other remaining ingredients.  Serve! Please note the chevre melts and turns creamy as the pasta sits depending on how hot it is, turning into a delicious sauce.  If you do not want it to melt, serve the pasta at room temperature (allowing it to cool completely).


  • Roasted Carrot and Chickpea Quinoa Bowl

    Roasted Carrot and Chickpea Quinoa Bowl

    Last week, a coworker of mine made some roasted carrot fries for the hot food bar at work, and they were pretty amazing.  I admit, carrots are not usually my go to favorite ingredient when it comes to starring roles, but I was surprised at how good it could be when prepared that way.  It got me to thinking I should roast some of the ones I had at home up to crispy perfection and include them in my dinner. I mean, I have roasted carrots before, but I usually just slice them thin and go for chips.  There was something really delicious about them being in larger chunks for the fries.  I was going to just make carrot fries for a snack, but instead I decided to cut them into little smaller chunks, roast them with spices and include them in a bowl.

    I love bowls.  No, I am not talking about the piece of dishes that you eat off of, I am talking about the composed dish that goes into it.  I love quinoa bowls, with lots of delicious toppings.  The sort of thing that you would pay a lot of money in a restaurant for but at home it can be made super affordable.  I decided to combine the carrots in one of those quinoa bowls with some vegan chevre that I had on hand, some chickpeas, and greens.  All topped off with lemon and parsley.  I was pretty hungry, so I was excited about this one.  The carrots turned out super delicious as I had tossed them not just with olive oil, but with the aromatic spices coriander, cumin and chipotle as well.  They smelled wonderful while roasting, and upon tasting them when they came out of the oven before they made it into the bowl, they were super delicious.

    Once the bowl was all composed, I was pretty pleased with it!  It turned out to be even more delicious than I imagined. I really ought to venture out more and make new dinners more often.  I do tend to get stuck in a rut and make the same things all the time, and no matter how delicious they may be new things are always exciting!

    Roasted Carrot and Chickpea Quinoa Bowl
    Serves 2-3

    Quinoa:

    • 2 cups water
    • 1 garlic clove minced
    • 1/4 tsp sea salt
    • 1 cup quinoa, rinsed


    Roasted Carrots:

    • 3 cups carrots, cut into 1 inch pieces
    • olive oil
    • sea salt
    • 1/2 tsp coriander seeds
    • 1/2 tsp cumin seeds
    • 1/4 tsp ground chipotle pepper
    • 1/2 tsp thyme


    For finishing the bowl:

    • 1 cup cooked chickpeas
    • lemon juice
    • 1/2 cup vegan chevre
    • 3 handfuls arugula
    • fresh parsley leaves for garnish


    Instructions:

    1. Place quinoa, garlic and water in a medium saucepan and bring to a boil. Reduce to a simmer, cover and cook until all the water is absorbed about 15 minutes, or when all the grains have turned from white to transparent, and the spiral-like germ has separated. Drain, and let cool.
    2. To make the carrots, preheat the oven to 400F degrees and line a sheet pan with parchment. Toss the carrots with just enough oil to coat, spices and sea salt and spread out on the pan. Place in the oven and roast for about 20-30 minutes until the carrots are tender.
    3. Spoon the quinoa into bowls, then top with the garbanzo beans, roasted carrots, chevre, arugula and parsley, and squeeze the lemon juice over it, and sprinkle with sea salt. Enjoy!
  • Vegan Colcannon with Tempeh Bacon

    Vegan Colcannon with Tempeh Bacon

    My Mom e-mailed me a recipe the other day for colcannon with bacon, asking me if I could veganize it. I have actually never had it or made it before, but I thought why not give it a go!  It sounded good to me, and like the perfect comfort food for a chilly day.  Also, since St. Patrick’s Day is coming up, and it is an Irish dish, it was perfect!  If you have never heard of it before, it is a traditional Irish dish, made with mashed potatoes, cabbage, milk, and butter.  Sometimes it has leeks, and things like bacon added, which is where I went with it.  I can’t believe I have never made it before, because it is the type of thing I enjoy when I want comfort food, and there are lots of veggies added which is always a plus in my book!  My Mom says that I make the best mashed potatoes, just as good if not better than my Grandma’s and I know she is not just saying that because she is super picky.  So, I figured I would start this dish off with my classic mashed potato recipe.

    I have a secret ingredient that I put into them that makes them really good.  And that is coconut butter.  It may sound odd, but seriously, it melts into them and makes the most luscious mashed potatoes ever!  You don’t even need to add any milk or other non-dairy butter or anything because they are so tasty with just that and the cooking water.  They turn out super fluffy too if you put them through a ricer.  I could eat a whole bowl of these potatoes just as they are, but it is even better adding veggies to them!  So I sauteed some leeks and cabbage with some garlic and mixed those into the potatoes and soon found out how good colcannon was.  I didn’t stop there though, this dish had to have a little protein too since it was going to be a main dish.

    So, I had made some tempeh bacon both to stir into it and sprinkle on top.  I admit, the idea of tempeh bacon is so much more appealing to me then regular bacon because no animals were harmed in the process, and it isn’t all greasy.  Once that was stirred into the colcannon it was super delicious!  I was proud to share it with my Mom, because I knew she would love it too!  If you are looking for a comfort food dish to make for St. Patrick’s Day, give this a go!  It might not be the prettiest, but it is darn delicious!

    Vegan Colcannon with Tempeh Bacon
    Serves 2-3

    Ingredients:

    For the Potatoes:

    • 3 large russett potatoes, peeled and cut into 2 inch chunks
    • filtered water
    • sea salt
    • 1/2 cup reserved potato cooking water
    • 3 Tbsp coconut butter (not oil)


    For the tempeh:

    • 1 8 oz pkg tempeh, cut into 1/4 inch thick slices
    • 1 Tbsp olive oil
    • 2 tsp maple syrup
    • 1 Tbsp tamari
    • 2 tsp liquid smoke
    • 1/8 tsp ground chipotle pepper


    Veggies:

    • 1 Tbsp olive oil
    • 2 medium leeks, sliced
    • 3 cups chopped cabbage
    • 2 garlic cloves, minced
    • sea salt to taste


    Instructions:

    1. To cook the potatoes, place them in a pot of filtered water with about 1 tsp sea salt, and bring to a boil.  Lower to a simmer and cook until the potatoes are tender, about 10-12 minutes.  Drain, reserving about 3/4 cup of the water (you may not need all of it but just in case) and put potatoes through a ricer (or mash) into a large bowl.  Add the reserved water and coconut butter, and stir in until well combined (you may add more if you need to in order to make them fluffy and smooth).
    2. To make the tempeh, preheat the oven to 400F degrees.
    3. Combine all marinade ingredients in a bowl. Add the tempeh strips to it and carefully mix them around until they are coated. Place the tempeh strips on a parchment lined sheet pan, place in the oven and cook for about 20-30 minutes until starting to brown and crisp up. Remove from the oven, and cut into 1/2 inch pieces.
    4. Meanwhile, heat the oil over medium heat in a sautee pan, and add the leeks.  Sautee until starting to get tender, about 4 minutes.  Then add the cabbage and garlic and cook until tender.
    5. Add the cabbage and leeks to the potatoes, add sea salt to taste, and mix well.  Fold in the tempeh, and enjoy!


  • Roasted Sweets and Beets Lentil Salad

    Roasted Sweets and Beets Lentil Salad

    It was so warm here yesterday we set a record.  Sixty degrees in February in Minnesota is almost unheard of.  I am sure the skiers and other Winter sport enthusiasts are sad, but I am loving this weather.  I would love it if we went straight into Spring.  Anything above 45 degrees I will take.  To me, 45 degrees is running shorts weather.  It seriously feels like March right now, and I am going to get out and make the most of this weather this weekend.  I half expect the tulips to start popping up and trees to start budding, but I know we have at least a month before that. All of the warm weather had me craving lighter food, so I decided to make a warm lentil salad for dinner last night.  I have had the idea of this salad on my mind for quite a while, but finally got around to making it.  I tend to fall into dinner ruts, making the same few dishes every week because they are easy fast, and good.  But when I have time to be creative, then I like to switch it up.  This week I felt was pretty stress free compared to the last few.

    Roasted Beet, Sweet Potato and Lentil Salad

    Lentils are a staple in my diet, and I make things like lentil stew all the time, but I make very few lentil salads unless it is Summer.  For this salad, I wanted to combine the lentils with beets and sweet potatoes.  Because those are my two favorite veggies, and I don’t make beets often enough.  Sweet potatoes however are a daily occurrence  in my kitchen and I could not resist putting them in this dish as well.  While the lentils were cooking on the stove, I decided to roast the sweet potatoes and beets to maximize the flavor.  Although I usually roast my beets whole, I decided to try a different method and cut them up and then roast them.  It worked out perfect!  The veggies turned out super delicious and I could have snacked on them just as they were, but to make a full meal I added the lentils, along with some greens, and a lemony vinaigrette.

    Roasted Beet, Sweet Potato and Lentil Salad 2

    Lastly, this dish needed to have some nut chevre.  I had imagined it topped off with crumbled chevre in my head, and I had just made some macadamia chevre, so it was perfect!  A quick sprinkle of fresh thyme and I was ready to dive in. The combination was super delicious!  I am going to have to make this again, the recipe is a complete keeper, which is why I had to share it with you all.  I would even go as far to say I would pay money for this in a restaurant, and that says a lot.  I hope you all have a wonderful weekend!

    Roasted Beet, Sweet Potato and Lentil Salad 1

    Roasted Sweets and Beets Lentil Salad
    Serves 2

    Macadamia chevre:

    • 2 cups macadamias, soaked for at least 4 hours and drained
    • 1/4 cup lemon juice
    • 1 tsp cider vinegar
    • 1 tsp sea salt (or to taste)
    • 2-3 Tbsp filtered water as needed


    Roasted Vegetables

    • 4 medium beets, peeled and cut into 1 inch cubes
    • 2 medium sweet potatoes cut into 1 inch cubes
    • sea salt

    Lentils:

    • 2/3 cup french lentils
    • 1 shallot, diced
    • 1 garlic clove, minced
    • sea salt to taste
    • filtered water

    Dressing:

    • 1 Tbso olive oil
    • 2 Tbsp lemon juice
    • sea salt to taste


    To finish salad:

    • thyme
    • a few large handfuls of fresh greens (such as spinach, baby kale, or arugula)


    Directions:

    1.  To make the chevre, combine all ingredients in the food processor and process until smooth, adding a Tbsp or two of water as needed to create a goat cheese like consistency (do not add too much or it will be too thin.).  Place the cheese in 2 layers of cheesecloth, fold it around the cheese and let sit in the fridge overnight.
    2. To make the roasted vegetables, preheat the oven to 375F degrees, and line a sheet pan with parchment.  Toss the sweet potatoes and beets with just enough oil to coat them, and spread them out on the pan.  Sprinkle with a little sea salt.  Place in the oven and roast for about 45 minutes to one hour, or until they are tender.  Remove from the oven.
    3. Meanwhile, when the veggies are cooking,  place the lentils, onions, garlic, sea salt, and enough filtered water to cover by a few inches in a pot, and bring to a boil.  Lower to a simmer, and cook over low heat for about 40 minutes until the lentils are tender.  Drain through a fine meshed strainer.  Set aside until the veggies are done roasting.
    4. Whisk together dressing ingredients until combined.
    5. Place the lentils, and roasted veggies in a bowl, and toss with the dressing.
    6. place a bed of greens on a plate, and top off with the lentil mixture.  Then crumble some of the chevre over it, and sprinkle with the fresh thyme.  Serve!
  • Roasted Sweet Potato Wild Rice Salad

    Roasted Sweet Potato Wild Rice Salad

    Wild rice is a Minnesota staple.  Especially creamy wild rice soup, which we can’t ever have enough pots of at work, since it flies out of the deli!  But soup is not the only way to enjoy it, hearty salads are awesome too for when you want to have something a little lighter.  I am a big fan of wild rice, but I don’t like to pair it with mayonnaise like many old time church recipes do, I like mine either with a vinaigrette or even no really dressing at all, which is the direction I went with the one I am sharing with you today.  A dash of orange juice, some thyme and sea salt was enough to give it all of the flavor it needed once the other ingredients were added.

    Wild Rice Sweet Potato Salad 1

    I had some sweet potatoes on hand, as well as a pomegranate and some fresh arugula, so I thought they would be tasty additions to the rice for a complete meal.  I roasted the sweet potatoes until they were all flavorful and caramelized, and they were so good with the earthy quinoa!  I have sweet potatoes in some form or another pretty much every day so it is no surprise that I decided to add them.  They are just so good!  The pomegranate seeds added little burst of sweet tart flavor and crunch, and the arugula a little bit of a peppery bite.  I love just throwing  a bit of greens into my meals, even soups at the last minute to add some extra nutrients.  Lastly, I added some toasted pecans to the salad.

    Wild Rice Sweet Potato Salad

    Not only was it beautiful, but delicious as well.  This keeps well, so it is perfect for making ahead and bringing for lunch the next day to work.  Now that is a lunch I would get excited about!  I bet all of your coworkers would be jealous if they saw you eating it!  It has been a bit warm for January here lately (like in the 40s (F)), so I am more in the mood for lighter things.  I hope you are all having a wonderful week!

    Wild Rice Sweet Potato Salad 3

    Roasted Sweet Potato Wild Rice Salad
    Serves 2

    Ingredients:

    • 1/2 cup uncooked wild rice
    • 2 cups diced sweet potatoes
    • olive oil
    • sea salt
    • 1/2 cup pomegranate seeds
    • 1 large handful arugula
    • 1/2 cup toasted pecans
    • 2 Tbsp orange juice
    • 1/2 tsp dried thyme
    • sea salt to taste


    Instructions:

    1. Place the wild rice in a pot, and cover with water by 3 inches.  Bring to a boil, then lower to a simmer and cook until wild rice has flowered (the grains have split), which can be anywhere from 30 minutes to 1 hour depending on the wild rice you have (mine takes about an hour, it is the long grain Minnesota rice). So pay attention to the package or bulk directions when you buy it. Once rice has finished cooking pour it into a bowl.
    2. Preheat the oven to 400F degrees, and line a sheet pan with parchment.  Toss the sweet potatoes with just enough oil to coat, then spread out on the sheet pan and sprinkle with sea salt.  Place in the oven and roast until tender and starting to brown at the edges, about 40 minutes or so.  Remove from oven.  Add to the bowl with the rice.
    3. Toss rice together with all other ingredients, and serve!
  • Vegan Florentine Pizza

    Vegan Florentine Pizza

    Florentine Pizza 3

    Do you ever accidentally buy too much of something, and realize that you need to use it up fast before it starts to go bad?  Well, I have.  I sometimes buy things like large containers of greens thinking I will eat more than I end up eating in a week, or I just don’t use them up fast enough.  Well, I am not one to waste things.  So I find ways to use them. I had bought a big thing of spinach, and at the end of the week, I said to myself, this needs to be eaten.  Like now.  So, I came up with a delicious recipe to use that large amount of spinach, a vegan Florentine pizza!  Because pizza is always good, especially on a cold Winter day.  It was 8F degrees, I think that qualifies as cold.  I was excited about this pizza, I had some vegan mozzarella in my freezer that I had already made, and ingredients to make a ricotta cheese for the spinach portion, so it was perfect.

    Florentine Pizza 2

    I had this huge bag of sunflower seeds, and I decided to make a nut free ricotta cheese with some of them.  Because I know there are a few nut free peeps that read this blog, and I want them to be able to enjoy recipes too.  I blended up the sunflower seeds like I would cashews with my other typical cheese ingredients in the blender and it turned out yummy!  I knew it would be good mixed with the spinach and spread over the pizza.  I have made creamed spinach before, and this was sort of like that only with cheese instead of the cream.  I sautéed the spinach with little garlic and olive oil before I mixed it into the cheese, and the combination was delicious!  Once it was spread over the crust, sprinkled with mozzarella and ready to bake, I thought, this is going to be good!  What’s not to like about cheese, greens and pizza?!

    Florentine Pizza 1

    It turned out super tasty, and decided to be nice and save some for Eric, who was at work at the time.  I may have eaten whole large pizzas by myself when I was in high school, but now I practice a bit more restraint.  At least this one comes with healthy greens!  Who says vegans can’t have delicious pizza with gooey cheese?!  This is way better than the traditional chain takeout pizza I had as a teenager, and way healthier!

    Florentine Pizza

    Vegan Florentine Pizza

    Makes one 14 inch pizza

    Vegan mozzarella Cheese:

    • 1 15 oz can full fat organic coconut milk
    • 2 Tbsp arrowroot starch
    • 1/4 cup plus 1 Tbsp filtered water
    • 3 Tbsp agar flakes or 1 Tbsp agar powder
    • 2 tsp lemon juice
    • 1 tsp sea salt or Himalayan salt
    • 1 Tbsp virgin coconut oil
    • 1 tsp guar gum


    1. To make the mozzarella cheese, heat the coconut milk in a saucepan until it comes to a simmer.
    2. Meanwhile, dissolve the arrowroot starch in the water and set aside.
    3. Once the coconut milk has come to a simmer, add the agar flakes, and heat until they are dissolved (mine took about 8 minutes, if you are using the powder, it should dissolve within one minute).
    4. Next, add the lemon juice and sea salt to the coconut milk.
    5. Mix the coconut oil with the guar gum so that the guar gum does not clump up.
    6. Turn off the heat and add the arrowroot mixture, guar gum and coconut oil. Whisk for about 30 seconds, then pour into a silicone mold (I used a loaf pan, but if you had another shape you would like to use go ahead). Refrigerate for a few hours until firm, then pop out of the mold. You will need half the cheese for this recipe, reserve the other half for another use in the fridge, wrapped in an airtight container.  Shred the half you will be using into a bowl, and keep in the refrigerator until ready to use.


    Pizza Dough:

    • 1 1/2 cups gluten free all purpose flour
    • 1 Tbsp olive oil
    • 1/2 tsp sea salt
    • 1/2 tsp xanthan gum
    • 1/2 cup plus 1 Tbsp filtered water


    1. To make the pizza crust, combine the flour, xanthan gum and sea salt in a bowl, and whisk until well blended. Add the oil and water, and mix in until you have a soft dough.
    2. Turn out onto a sheet of parchment paper with a light dusting of flour, and roll out into a 14 inch circle.  Set aside.


    Sunflower Seed Ricotta:

    • 1 cup raw sunflower seeds, soaked in filtered water 1 hour and drained*
    • 1/2 cup filtered water
    • 1/4 tsp sea salt
    • 1/2 Tbsp lemon juice
    • 2 tsp white miso (optional)
    • 2 Tbsp nutritional yeast (optional)

    To make the ricotta, combine all ingredients in a blender and blend until smooth.  Set aside.


    Spinach:

    • 1 Tbsp olive oil
    • 8 cups of spinach
    • 2 garlic cloves, minced
    • sea salt to taste


    1. To make the spinach, heat the olive oil in the bottom of a pot, add the spinach, garlic and salt and cook until the spinach is just wilted.
    2. Add the ricotta, and stir until blended.


    Pizza Assembly:

    1. Pre-heat the oven to 400F degrees.  Set a pan on the center rack with an upside down sheet pan, or a pizza stone set on it. Brush the crust with olive oil, sprinkle with sea salt, and slide the parchment with the crust on it onto the stone.
    2. Bake crust for 10 minutes, then remove the crust from the oven (still on the parchment). Top the crust with the ricotta spinach mixture spreading around evenly. Then top with the cheese, making sure it is all evenly distributed.
    3. Place the pizza in the oven, turn up the temperature to 475F and bake for 20-25 minutes until the cheese is bubbling and starting to brown (keep an eye on it after 15 as some ovens cook faster than others). Remove the pizza and parchment from the oven, slide pizza onto a cutting board or plate, slice and enjoy!

    *If you are not a sunflower seed fan, you may use raw soaked cashews instead.

  • Vegan Rosemary Sage Cranberry Chevre

    Vegan Rosemary Sage Cranberry Chevre

    rosemary-sage-cranberry-chevre-2

    I used to be a huge cheese eater before I decided to go vegan.  In fact, I had said “I could never give up cheese, people who have to live without it must be so sad”.  But I could not have been further from the truth.  The fact is, there are many great vegan cheeses out there, or recipes for them, and you just have to find the ones that suit you.  If I am buying a cheese, I like Punk Rawk Labs, or Miyoko’s Kitchen the best.  One of my favorite cheeses was always chevre, so when I make vegan cheese, I make that type the most.  Also, it is easy to make, some of the others involve more complicated steps.  This one is pretty much blend, shape and chill.  I like it with crackers, or crumbled on top of a salad, or even with some fruit for dessert (that was my favorite way to eat the dairy variety back in the day).  I hadn’t made any cheese in a while, so I decided to last week because I was craving some.

    rosemary-sage-cranberry-chevre-3

    I wanted something seasonally flavored, so I decided to add some herbs to it.  My Mom had given me an herb pot over the Holidays with rosemary, sage, and thyme, and it is still looking so lovely, so I thought, why not? I picked the rosemary and sage this time, because thyme is usually my go to Winter herb and I decided to switch it up.  Rosemary and sage are so fragrant, and a little goes a long way.  I don’t know about you, but the smell of those herbs brings back good memories of Holiday feasts.  The herbs added pretty little flecks of green, but I decided it would be even more lovely with some red and a little sweetness, so I added cranberries.

    rosemary-sage-cranberry-chevre

    It was easy to make, and so delicious!  Aromatic, cheesy, melt in your mouth, with a hint of herbs.  This is good with apples or pears on a salad (or just the fruit), with crackers of course, or even crumbled over pasta (a butternut squash pasta would be perfect). Vegans are sooo not deprived when it comes to good food.  We can have delicious cheese too, without animals being abused for it!

    rosemary-sage-cranberry-chevre-1

    Vegan Rosemary Sage Cranberry Chevre
    Serves 10

    2 cups raw cashews, soaked for 4 hours, and drained
    1/4 cup filtered water
    1 Tbsp lemon juice
    2 tsp white miso (optional
    1/2 tsp sea salt (or to taste)
    1/3 cup raw coconut butter, warmed to liquid
    1 Tbsp fresh rosemary leaves plus additional for coating
    2 large fresh sage leaves plus additional for coating
    1/3 cup dried cranberries

    In a high speed blender combine the soaked cashews, filtered water, lemon juice, miso, salt and coconut butter and blend until smooth. Add the herbs and cranberries, and pulse in the blender at a low speed until chopped (alternatively, chop by hand and stir it in).  Pour into a bowl, place in the freezer for about 10-15 minutes until it is easier to work with, then scrape onto a piece of plastic wrap, and shape into a log while wrapping tightly. Place in the freezer for about 15 minutes until more firm (you want it to hold shape, but still stick to the herbs). Place the rosemary and sage for coating on a plate, then roll the log in the herbs. Place in the refrigerator until firm, a few hours. Then enjoy!

  • Vegan Roasted Sweet Potato Pizza

    Vegan Roasted Sweet Potato Pizza

    sweet-potato-pizza-5

    There was a point in my life at which I made pizza every week on a certain day. It became a tradition and something I looked forward too. I would choose different veggies (or sometimes fruits) and cheeses to experiment with every week so it was quite exciting! Some of the combinations were things like lemon fennel and gruyere cheese with thyme and walnuts or strawberry basil with blue cheese and caramelized onions. I liked some better than others, but they were all good. That tradition has since died out however since I don’t make pizza weekly, it is more like every few months. But I still appreciate it, and I like the vegan pizzas I make now just as much (if not better) than the ones I used to make. There is no lack of melty cheese on my vegan pizzas like some people’s who either don’t like the store bought or refuse to make their own. But making your own is actually pretty easy! I just go for the vegan mozzarella most of the time.

    sweet-potato-pizza-2

    I decided to make a pizza a few days back with some ingredients I had on hand. Mainly featuring sweet potatoes. My Mom has been telling me about this pizza at Trader Joes that she buys a lot for a while and how good it is so it was kind of my inspiration. It has sweet potato puree as the sauce, kale, and actually butternut squash too, but I skipped that and just did the sweet potatoes for the sauce and to top it. I roasted them in the oven to bring out their sweet flavor and they were delicious even before topping the pizza, so I knew this was going to be good!  I also topped the pizza with arugula, jalapenos, and pomegranate seeds, which might sound like an odd combo but it was wonderful!

    sweet-potato-pizza-1

    Once the cheese was all gooey and melty and the pizza was cooked to perfection, I could not wait to try it! The flavorful sweet yams paired perfectly with the spicy jalapeno, tart pomegranate and peppery arugula! This is a festive looking pizza as well as being delicious!  I love experimenting with not so common ingredients on my pizza, it is a great way to find new favorite combinations!  If you have a hankering for pizza over Winter break, give this a try!

    sweet-potato-pizza

    Vegan Roasted Sweet Potato Pizza
    Makes one 14 inch pizza

    Vegan Mozzarella Cheese:

    • 1 15 oz can full fat organic coconut milk
    • 2 Tbsp arrowroot starch
    • 1/4 plus 1 Tbsp filtered water
    • 3 Tbsp agar flakes or 1 Tbsp agar powder
    • 2 tsp lemon juice
    • 1 tsp sea salt or Himalayan salt
    • 1 Tbsp virgin coconut oil
    • 1 tsp guar gum

    To make the cheese, heat the coconut milk in a saucepan until it comes to a simmer.  Meanwhile, dissolve the arrowroot starch in the water and set aside. Once the coconut milk has come to a simmer, add the agar flakes, and heat until they are dissolved (mine took about 8 minutes, if you are using the powder, it should dissolve within one minute).Next, add the lemon juice and sea salt to the coconut milk.  Mix the coconut oil with the guar gum so that the guar gum does not clump up.  Turn off the heat and add the arrowroot mixture, guar gum and coconut oil. Whisk for about 30 seconds, then pour into a silicone mold (I used a loaf pan, but if you had another shape you would like to use go ahead). Refrigerate for a few hours until firm, then pop out of the mold. You will need half the cheese for this recipe, reserve the other half for another use in the fridge, wrapped in an airtight container.  Shred the half you will be using into a bowl, and keep in the refrigerator until ready to use.

    Roasted Sweet Potatoes:

    • 2 medium sweet potatoes, cut into cubes
    • olive oil
    • sea salt
    • 1 garlic clove
    • 1/8 tsp ground chipotle powder or cayenne

    Preheat the oven to 450F degrees.  Toss the sweet potatoes with just enough oil to coat and a little sea salt, and spread out on a sheet pan.  Place in the oven and roast for about 45 minutes until starting to brown at the edges and softened.  Remove from oven and set aside until cool enough to handle. Place about 1 1/2 cups of them in a food processor, and process until smooth along with 1/4 tsp sea salt, a garlic clove, and 1/8 tsp ground chipotle powder. Set the puree and remaining diced potatoes aside.

    Pizza Dough:

    • 1 1/2 cups gluten free all purpose flour
    • 1 Tbsp olive oil
    • 1/2 tsp sea salt
    • 1/2 tsp xanthan gum
    • 1/2 cup plus 1 Tbsp filtered water

    To make the pizza crust, combine the flour, xanthan gum and sea salt in a bowl, and whisk until well blended. Add the oil and water, and mix in until you have a soft dough.  Turn out onto a sheet of parchment paper with a light dusting of flour, and roll out into a 14 inch circle.  Set aside.

    For Pizza Assembly:

    • olive oil
    • handful fresh arugula
    • 1 jalapeno, sliced
    • 1/2 cup pomegranate seeds

    Pre-heat the oven to 400F degrees.  Set a pan on the center rack with an upside down sheet pan, or a pizza stone set on it. Brush the crust with olive oil, sprinkle with sea salt, and slide the parchment with the crust on it onto the stone.  Bake crust for 10 minutes, then remove the crust from the oven (still on the parchment). Top with the roasted sweet potato puree, the arugula, the diced roasted potatoes, jalapenos, then the cheese, making sure it is all evenly distributed.  Place the pizza in the oven, turn up the temperature to 475F and bake for 20-25 minutes until the cheese is bubbling and starting to brown (keep an eye on it after 15 as some ovens cook faster than others). Remove the pizza and parchment from the oven, slide pizza onto a cutting board or plate, scatter pomegranate seeds over the top, slice and enjoy!

  • Holiday Entertaining! Mini Sweet Potato Avocado Crostini and GOODFOODS Guacamole

    Holiday Entertaining! Mini Sweet Potato Avocado Crostini and GOODFOODS Guacamole

    goodfoods-guac

    The Holidays are a beautiful time of the year.  Getting together with loved ones you haven’t seen in ages, sparkling snow and twinkling lights, and choosing the perfect thoughtful Christmas presents for friends and family.  But they can also be hectic, and stressful if you are the one hosting the get together, or maybe you are working a lot and don’t have a lot of time to prepare.  You want to make sure you are taking care of yourself this time of the year and eating healthy so you have enough energy to enjoy all of the Holiday traditions, but maybe you do not have a lot of time to prepare foods.  This is where GOODFOODS Guacamole comes in!

    goodfoods-guac-1

    It is my go-to snack as of lately and it is available in so many stores nationwide so you should not have a hard time finding it.  I bought it at my local Super Target in the produce section.  Why do I love it so much?  Many reason!  First off, it is made with good ingredients.  And by good, I mean Nothing you can’t pronounce, no preservatives, chemicals or additives.  Just avocadoes, and veggies which is really important to me!  I want to be fueling my body with good things, and GOODFOODS guacamole is a good thing!  This stuff is packed with nutrients to keep you feeling good, and it is always fresh, never heated because they use a special process. Not only is it made with good ingredients, but these guys care about the environment as well, they compost all of their avocado skins and pits and hope to become a zero waste to landfill facility! It is not often you hear about companies that do that.  For a healthy snack, I like to mix it into black beans and then use it as a dip for veggies or organic corn chips (made with healthy oils of course).  This is my favorite thing in the afternoon lately after work to eat lately!  Not only that though, GOODFOODS Guacamole is an essential addition to home made tacos, the perfect dip for my sweet potato fries, and even a great addition to appetizers for Holiday parties!  Like the recipe I am sharing with you today!

    goodfoods-guac-4

    Sweet potato toast is all the rage lately with vegans like myself, because I am not a big bread fan and I love sweet potatoes.  Also, avocado toast is always filling my Instagram feed and it always looks so good.  So, I thought why not combine the two, and make a healthier Holiday crostini with smaller sweet potato toasts and the GOODFOODS Guacamole, because they pair so well together!  Low carb, healthy and delicious! All you need to do is roast your sweet potato slices in the oven until golden, top off with the GOODFOODS Guacamole, and then sprinkle with some festive pomegranate seeds, cilantro and jalapenos (or be creative and add your own colorful things)!  Talk about simple and delicious!  They look so festive too!  I always love it when Holiday snacks are healthy, guilt free, AND good. You do not find that at parties often.  I tried both the Pineapple Poblano Guacamole and the Chunky Guacamole for this recipe and they are both good in it so pick the one that sounds best to you!  Even if you don’t try my recipe, I encourage you to find some GOODFOODS guacamole in your area!  You can locate a store near you that carries them on their website HERE. They are in many stores including Target, Costco and Walmart among others, it is not hard to get your hands on.  Make this guacamole part of your Holidays!  Share the Goodness with GOODFOODS!

    goodfoods-guac-5

    Mini Sweet Potato Avocado Crostini with GOODFOODS Guacamole
    Serves 12

    Ingredients:

    Instructions:

    1. Preheat the oven to 400F degrees, and oil a sheet pan.
    2. Toss the sweet potatoes with just enough olive oil to coat, the chipotle powder and sea salt.  Spread the sweet potatoes out on the sheet pan, place in the oven and roast until golden brown, about 45 minutes depending on your oven.  Remove from the oven and let cool until just warm or at room temperature.
    3. Spoon some of the GOODFOODS guacamole onto each sweet potato toast.  Place a slice of jalapeno, a cilantro leaf and a few pomegranate seeds onto each toast.  Arrange on a plate and serve!


  • Vegan Creamed Spinach

    Vegan Creamed Spinach

    My Mom and I were recently out to one of our favorite restaurants, one known for creatively using seasonal veggies, and she ordered the creamed spinach.  She said it was really good, but of course it had dairy in it, so I couldn’t try it.  But, she said “I bet you can recreate this at home using vegan ingredients, and it would be even better!”  She has confidence in my veganizing and cooking skills.  Of course I was all for it, I love making new (or old classic) recipes for people who want them without the animal products.  So, I went for it!  Something like cream is not hard to recreate when you have cashews and coconut milk on hand.  No, this is not a low fat recipe because that is not what she wanted.  Yes, I know you could use some sort of veggie pureed in the sauce if you wanted it to be but I will leave that for another day. Cashews and coconut milk are darn delicious and are staples of vegan mac and cheeses and fettuccini alfredos everywhere!

    creamed-spinach-3

    The creamed spinach she had at the restaurant had parmesan cheese in it, so I decided to give this a little cheesy flavor along with the richness by adding a little miso, nutritional yeast and lemon juice for zip!  A touch of garlic, and voila!  Cheesy creamy deliciousness ready for the spinach!  Now 18 oz of spinach might seem like a lot mind you (it is like 3 bags baby spinach), but it wilts down to practically nothing, and this does serve 4 people.  If you want to get a lot of spinach in fast, this is definitely a way to do it.  I think Popeye would be proud.  Just take care not to overcook it, you don’t want to lose those nutrients!

    creamed-spinach-1

    This is sooo good!  It better than just regular creamed spinach that most people make, not only because it is vegan, but because it is delicious!  My Mom was excited about it, and she much approved!  I think this would be a good addition to your Thanksgiving or Holiday table.  You could just make the cream part ahead of time, reheat and add the spinach at the last minute before serving.  Because one can never have too many veggie dishes on the table for the Holidays right?

    creamed-spinach

    Vegan Creamed Spinach
    Serves 4-6

    • Ingredients:
    • 1 1/4 cups organic coconut milk
    • 1/2 cup raw cashew butter
    • 1 garlic clove, minced
    • 2 Tbsp nutritional yeast
    • 1 tsp white miso
    • 1/2 tsp lemon juice
    • 1/4 tsp sea salt or to taste
    • 1 Tbsp arrowroot powder dissolved in 1 Tbsp filtered water
    • 18 oz  organic baby spinach leaves

    Directions:

    1. In a medium saucepan, combine the coconut milk and cashew butter and heat until almost simmering and they are combined.
    2. Add the garlic, yeast, miso, lemon juice and sea salt and cook until combined.
    3. Add the arrowroot and cook until thickened slightly.  Remove from heat.
    4. Add the spinach in batches until it is all wilted down (taking care not to overcook it).
    5. Pour into a dish, and serve!


  • Vegan Sweet Potato Casserole

    Vegan Sweet Potato Casserole

    sweet-potato-casserole-4

    Like any mid-western cook, my Grandma would always serve a sweet potato casserole with Thanksgiving.  As much as I loved my Grandma’s cooking, it was probably my least favorite thing and I politely would just take a small spoonful.  Now, I am sure some sweet potato casseroles are good, and they use real yams, but this one had the syrupy canned ones, loads of butter and brown sugar and was sickeningly sweet.  Now I know my Grandma had enough other dishes to make and it was a lot of work, so I don’t blame her for using canned sweet potatoes.  Since this was the only type of sweet potatoes I had ever tried in my life, the canned ones on Thanksgiving, up until I was in college, I didn’t really like sweet potatoes.  Then I found a recipe I wanted to try from a cookbook at the library, and it was a simple roasted mashed sweet potato with a dash of lime and sea salt.  It was so good I fell in love and I have been in love with them ever since.  In fact yams are almost a daily occurrence in my kitchen.  Yam fries and stuffed yams are my favorite.

    sweet-potato-casserole-3

    But…I have never really made my own vegan version of sweet potato casserole.  Even though I know I can adjust the levels of sweetness and whatnot to make it to my liking.  I guess I wasn’t real big on the store bought mini marshmallows that topped the original one off either, but I saw a sweet potato casserole made on a cooking show recently that used a meringue instead of the potatoes and that sounded way better.  I had a vegan aquafaba meringue recipe that would be perfect!  And my Mom had recently asked me if I could make something like this, so it all worked out.

    sweet-potato-casserole-2

    I roasted the sweet potatoes until they were all nice and flavorful, then mashed them with some maple syrup, spices, a dash of lime juice and sea salt and they tasted sooo good!  I made my aquafaba meringue marshmallows, and topped them off and it all smelled so good when it emerged from the oven!  OMG…it was so tasty!  Way better than the sweet potato casserole of my childhood.  If my Grandma were still alive today I think she would have loved and appreciated this if I brought it to Thanksgiving dinner (because now I would be bringing dishes and helping her since I cook now).  My family approved, and I think yours will too!  This is an indulgent dish because of course it is a little sweet, but it is actually low in fat and worth indulging in for a special occasion! Do you have any family classic Thanksgiving recipes that you have veganized?

    sweet-potato-casserole-1

    Vegan Sweet Potato Casserole
    Serves 8-10

    Sweet Potatoes:

    • 6 large sweet potatoes
    • 3 Tbsp maple syrup (or to taste)
    • 1/4 tsp chipotle powder or 1/8 tsp cayenne
    • 2 Tbsp lime juice
    • 1 tsp cinnamon
    • 1/4 tsp sea salt (or to taste)

    Marshmallows:

    • 1 cup aquafaba*
    • 1 Tbsp xanthan gum or guar gum
    • 1 tsp cream of tartar
    • 1 cup powdered xylitol, maple sugar or coconut sugar**
    • 1/4 tsp sea salt (if your chickpea liquid has no salt)
    • 1 tsp pure vanilla extract

    Directions:

    1. Preheat the oven to 400F degrees.
    2. Cut the yams in half lengthwise, and set cut side down on an oiled sheet pan.  Place in the oven and roast for about an hour to an hour and 15 minutes until they are very tender.  Remove from the oven (but leave it on) and allow to cool until cool enough to handle.  Scoop out of the skins into a bowl, and mash with the maple syrup, chipotle, lime juice, cinnamon, and sea salt.  Spoon into an oiled casserole dish (9×9 inch will work, but I spooned mine into 3 smaller ones.  Just use what you have).  Set aside.
    3. Meanwhile, In a food processor (which is what I used, or you may use a stand mixer with a whisk attachment), whip up the chickpea liquid until it has reached pretty stiff peaks. This will take about 2 minutes in the food processor.  Add the guar gum and cream of tartar and process until incorporated.  Add the sea salt and sugar and with the motor running, a little at a time through the feed tube (so you do not deflate it), then allow to process until the sugar is completely dissolved and the meringue is smooth, shiny and thick.  Add the vanilla, and blend until uniform in color.
    4. Turn on the broiler.
    5. Pipe marshmallows over the top of the sweet potatoes, then place the casserole under the broiler for about 2 minutes until the meringue is toasted and starting to brown on top (watch it closely, it could easily burn fast).

    *Aquafaba is the liquid from cooked or canned chickpeas.  If you are using liquid from the cooked, you want to make sure it is thick, not watery.

  • Vegan Roasted Squash Black Bean Tacos Recipe with GOODFOODS Guacamole

    Vegan Roasted Squash Black Bean Tacos Recipe with GOODFOODS Guacamole

    roasted-squash-and-black-bean-tacos-4

    Vegans love their avocadoes.  So, it comes of no surprise that we scope out the best guacamole!  Because sometimes we want to just grab it and go, not sit and scoop out avocadoes and add all of the seasonings.  This is why I am happy I discovered GOODFOODS guacamole!  I picked some up at Super Target (in the deli area of the store) earlier this week, two different varieties, Chunky Guacamole and Pineapple Poblano Guacamole.  They other varieties to try as well, which I will be picking up next time, because I love my guac!  Why did I pick this brand?  Well, simple, it is made with good ingredients.  Nothing you can’t pronounce, no preservatives, chemicals or additives.  Just avocadoes, and veggies (or fruit if you get the pineapple) which is really important to me!  I want to be putting good things into my body and GOODFOODS guacamole fits the bill!  This stuff is packed with nutrients to keep you feeling good, and it is always fresh, never heated because they use a special process. Not only is it made with good ingredients, but these guys care about the environment as well, they compost all of their avocado skins and pits and hope to become a zero waste to landfill facility! It is not often you hear about companies that do that.

    roasted-squash-and-black-bean-tacos-3

    Their guacamole is wonderful for snacking with chips, but it is also good for Holiday entertaining.  Whip out a container of this for your guests with some chips and veggies, and I can guarantee they will be happy.  So easy! My Grandma always used to set out tables of snacks before our Holiday meals while she prepared them, and this would have been a good and healthy addition.  I always love it when snacks are healthy, guilt free, AND good. But not only is it a good snack for the Holidays, it is going to be a part of my main dish as well!  So, how does guacamole fit into my Thanksgiving meal?

    roasted-squash-and-black-bean-tacos

    Well, although this is a wonderful time of the year, the beautiful season, getting together with friends and loved ones you haven’t seen in a while, and good meals.  But it can also be kind of stressful if you are the host for Thanksgiving (or any other Holiday meal) and you have to prep and cook all of the food.  I don’t know about you, but I would rather focus on the spending time with the people I love part.  Which is why in past years I have simplified my Thanksgiving meal with one great main dish, maybe a side and dessert.  Now, I know it is traditional to cook a meal with many different dishes, but I am a little non-traditional and creating new traditions is ok too.  So, this year I am going with something a little creative, but everybody loves, tacos.  I mean, who doesn’t love tacos?!  You can be creative with them, fill them with all sorts of different ingredients and toppings, and even use seasonal ones!  Which is what I am doing.  Roasted Squash and Black Bean Tacos with GOODFOODS guacamole to top them off, which I am sharing the recipe for at the end of the post!  Because in my opinion ALL good tacos contain guacamole, and I love that I can just open a container, and not have to make it myself.  These tacos are pretty simple to make, and would go great with either of the GOODFOODS guacamoles that I bought, the Pineapple Poblano if you are extra feeling festive or the Chunky Guacamole if you want it more traditional.  Also, I might add, this Thanksgiving meal will leave you feeling good, and not in a food coma.  So you can spend quality time with your family after dinner as well!

    roasted-squash-and-black-bean-tacos-1

    If you are not into the whole serving tacos on Thanksgiving day thing, how about the next day if you have guests staying over that you need to feed in between shopping on black Friday?  Either way get yourself some GOODFOODS guac!  I encourage you to find some GOODFOODS guacamole in your area!  You can locate a store near you that carries them on their website HERE. They are in many stores including Target, Costco and Walmart among others, it is not hard to get your hands on.  Make this guacamole part of your Holidays!  Share the Goodness with GOODFOODS!

    roasted-squash-and-black-bean-tacos-5

    Vegan Roasted Squash Black Bean Tacos Recipe with GOODFOODS Guacamole
    Serves 6

    Ingredients:

    Squash:

    • 2 large butternut squash, peeled and diced
    • olive oil
    • sea salt to taste


    Beans:

    • 2 cups cooked black beans
    • 1 Tbsp olive oil
    • sea salt to taste
    • 1 Tbsp chili powder
    • 1 tsp cumin
    • 1/8 tsp chipotle powder
    • 1 garlic clove, minced


    Assembly:


    Directions:

    1. Preheat the oven to 400F degrees.
    2. Toss the squash with just enough olive oil to coat then spread out on a sheet pan, and sprinkle with sea salt. Place in the oven and roast for about 30 minutes until the squash is tender and starting to brown at the edges.
    3. Meanwhile, toss the black beans together with the olive oil, spices and garlic and set aside.
    4. When the squash is done roasting, to assemble the tacos, spoon some of the beans and squash onto each tortilla, then sprinkle with cranberries, top off with GOODFOODS Guacamole, sprinkle with some scallions, garnish with cilantro, and drizzle with hot sauce.  Serve!


  • Vegan Italian Walnut Stuffed Mushrooms

    Vegan Italian Walnut Stuffed Mushrooms

    From time to time, my Mom brings me veggies and asks me to make something with them for her, or to veganize a classic recipe and I am more than happy to do so!  She has been trying to eat more plant based lately, and I am proud of her for that!  She brought me some mushrooms this week, and asked if I would make stuffed mushrooms for her because they were so beautiful.  They sounded good to me to, so I was all for it!  This Italian restaurant we used to go to had stuffed mushrooms, and I thought I would make something similar to those.  Those mushrooms tasted good, but my Mom had said they would be better with a less bready stuffing.  They also had cheese, so I had to figure out how to give them a cheesy flavor as well.

    italian-walnut-stuffed-mushrooms-2

    I decided on a walnut stuffing, because in the past I have made walnut meat for things (in my fully raw days) and it is always a hit.  It is usually a substitute for beef, but I thought it would be good here because it would taste similar to meat balls.  I mixed in my typical Italian herbs along with some arugula, tomato paste and some nutritional yeast to give it a cheesy flavor, and it did taste like really good meat balls (but better since it was vegan).  I knew these guys were going to be good!

    italian-walnut-stuffed-mushrooms-1

    I stuffed all of the mushrooms, popped them into the oven, and couldn’t wait to try them once they were baked.  They smelled amazing while baking, enough to make anyone really hungry.  They tasted even better than I had hoped, but most importantly, my Mom thought they were delicious as well!  These would make a great appetizer for a Holiday party! But they make a wonderful snack, or light dinner with a salad as well.

    italian-walnut-stuffed-mushrooms

    Vegan Italian Walnut Stuffed Mushrooms
    Serves 6 as an appetizer

    Ingredients:

    • 1  1/4 cups raw walnuts
    • 1/4 cup nutritional yeast
    • 1/2 tsp dried basil
    • 1/2 tsp dried oregano
    • 1 garlic clove
    • 1/4 tsp sea salt, or to taste
    • 2 Tbsp tomato paste
    • 1 hanful arugula or spinach
    • 8 oz crimini mushrooms, stems removed


    Directions:

    1. Preheat the oven to 400F degrees, and line a sheet pan with parchment.
    2. Combine the walnuts, yeast, basil, oregano, garlic and sea salt in the food processor and process until chopped and walnuts are small pieces. Add the tomato paste and arugula and pulse until blended and arugula somewhat chopped.
    3. Spoon into the mushroom caps so that they are heaped full.  Place in the oven, and bake for about 30 minutes until the mushrooms are tender.  Remove from the oven, garnish with basil, and serve!


  • Vegan Pumpkin Cranberry Chevre

    Vegan Pumpkin Cranberry Chevre

    It has been beautiful here lately!  Normally in November it is about 20 degrees cooler and we are all bundling up in hats and coats, but I actually am able to go out for my runs in shorts, wear t-shirts during the day, and enjoy the season!  The sunsets have been awesome, and I have taken out my road bike a lot lately to tour the scenery.  It has been especially beautiful, the colors on the trees seeming to hang around longer than usual and only just starting to come to an end.  I am just thankful for all of this because here in Minnesota we definitely get enough winter whether it lasts 3 months or 5.  So, I will take all of the colorful warmer days and enjoy them to their fullest!  I am also sooo into all of the flavors of fall.  Apples, pumpkins, root veggies, brussels sprouts, squash and cranberries making frequent appearances in my home.  I am always up for creating new recipes using them, because I wait all year for this!  I saw a pumpkin chevre at the store this week, and I was inspired to create a vegan version.

    vegan-pumpkin-cranberry-chevre-3

    I used to be a huge cheese eater before I went vegan.  In fact, every week I would go to a local cheese shop that had hundreds of different kinds of cheeses, pick out a few to try and learn about them.  I had a few favorites, but one that I had to buy over and over again was always just simple chevre.  I thought I would have to give it up when I went vegan but that is far from the case.  I have figured out how to make vegan chevre that is even better than any of the dairy varieties.  Even skeptics have tried the chevre that I make and agree it is good.  Real dairy actually kind of grosses me out now that I know the process the animals go through and what it actually is.  Just not something that makes me feel good at all, so I will take my vegan cheese thank you very much!

    vegan-pumpkin-cranberry-chevre-1

    So, back to this pumpkin chevre, it sounded interesting and really tasty so I had to make some!  For the base, I used a combination of cashews and coconut milk to make it rich like real cheese.  I added in a little coconut butter to thicken it properly, and dates to sweeten it.  The classic pumpkin pie spices were also included, although in an amount light enough for it to still taste like chevre and not just pumpkin pie.  I was going to make it plain like that but decided that dried cranberries would make it much prettier and festive.  This cheese was bomb!  Sooo delicious, and I am sure way better than the dairy version.  This is good with crackers of course, or apples, or crumbled atop a fall salad, or just good for snacking on in general!  So, if you are craving cheese, you know what to make!

    vegan-pumpkin-cranberry-chevre

    Vegan Pumpkin Cranberry Chevre
    Serves 8-10

    Ingredients:

    • 1 cup raw cashews, soaked in filtered water for at least an hour and drained well
    • ½ cup full fat organic coconut milk*
    • 1/4 cup pumpkin puree
    • 1/2 cup raw coconut butter, warmed to liquid
    • 1/3 cup soft, pitted medjool dates
    • ¼ tsp sea salt
    • 1 tsp cinnamon
    • 1/2 tsp ginger
    • 1/8 tsp cloves
    • 1/8 tsp nutmeg
    • 2 tsp apple cider vinegar
    • 1/2 cup dried cranberries

    Directions:

    1. In a high speed blender, combine the cashews, coconut milk, pumpkin, coconut butter, dates, sea salt, lemon juice, and blend until smooth. Mix in the cranberries.
    2. Pour into a bowl, and place in the freezer for about 30 minutes until more firm, them scoop onto a piece of plastic wrap and roll into a log.  Place in the refrigerator until firm, a few hours.
    3. Once chilled enough,

    *If you want to make this raw, you may use raw coconut milk and use 1/4 cup very finely chopped raw pumpkin, squash or carrot instead of the pumpkin puree.

  • Vegan Cheesy Squash Tots with Cranberry Chipotle Ketchup

    Vegan Cheesy Squash Tots with Cranberry Chipotle Ketchup

    cheesy-squash-tots-3

    It’s funny, growing up I was never a big fan of tater tots.  Whenever they were included in my school lunches, I just left them there, because for some reason they did not appeal to me.  French fries however were another story.  Kind of weird for a kid or teenager I know, but that is how I was.  So, as an adult, I decided to make my own tater tots at home once, and see if I liked them any better.  Well, I am happy to report I loved them!  They were so much better than the gross frozen ones in my school lunch.  I even made vegan tater tot hot dish with some!  I was no longer against tater tots.  But sadly, it has been last year since I made any.  I consider them sort of a cool weather thing, so now is the time.

    cheesy-squash-tots-2

    I wanted to make some yesterday, but I decided to do a variation on the ones from last year due to my lack of potatoes, and my love of all things squash right now.  I made cheesy squash tots.  They were made the same as the other ones, but these were even better!  They had the sweetness of butternut squash, the starch of the potatoes, and I could have eaten the whole batch!  I added some nutritional yeast for the cheesy flavor, and a dash of chipotle and sea salt and they were just right!  I made some of my Cranberry Chipotle Ketchup to dip them in and it was perfect!  I am not a big fan of most store bought ketchups because they have lots of sugar but this ketchup tastes better and is sweetened mostly with fruit.  These tots are crave worthy…just sayin’ so do make yourself some when you get the chance!

    cheesy-squash-tots-4

    Also, do you notice the pretty heathered granite napkin my tater tots are sitting on?  Well, it was a gift from Kari over at the Beautiful Ingredient!  She sells them over at Food 52!  She actually started making the napkins for her family, and turned it into a side business!  So cool! The napkin she sent me is made with organic cotton and hemp recycled fibers, so these are a product you can feel good about using! I love the idea of cloth napkins, not only for food photos, but for every day use. My family has been using them for a while, because it saves on costs and the environment of course.  These are good quality napkins that I can tell will hold up well for a long time. If you would like to buy some hers for yourself, you can find them HERE.  Also, Kari has been kind enough to offer a discount code on her products, so when you head over use the discount code: HOLIDAYVB1012 for 15% off of $25 orders through November. While you are over at her blog be sure to check out her recipes as well, they all sound delicious!

    cheesy-squash-tots

    Vegan Cheesy Squash Tots with Cranberry Chipotle Ketchup
    Serves 2-4 (two if you are me)

    Ingredients:

    • 3 russett potatoes, peeled and cut into 2 inch chunks
    • 1 medium butternut squash, peeled and cut into chunks
    • filtered water
    • sea salt to taste
    • 1/3 cup nutritional yeast
    • 1/4 tsp chipotle pepper
    • 1 Tbsp olive or avocado oil (optional)
    • Cranberry Chipotle Ketchup

    Directions:

    Pre-heat the oven to 425F degrees. To make the tater tots, place the potatoes and squash in a large pot of salted boiling water on the stove, and bring to a boil.  Cook until the potatoes and squash are just tender but not too mushy, and drain. Let cool until able to handle the potatoes, and grate them into a bowl.  Add sea salt to taste, nutritional yeast, chipotle pepper, and mix together. Shape the potatoes into tater tots (they will be a little sticky, but no worries, they will crisp up when baked).  Place on an oiled sheet pan, and drizzle with 1 Tbsp oil, tossing them around in it gently to coat them.  Place in the oven and bake for about 30 minutes until lightly browned and crisp on the outside. Serve with chipotle cranberry ketchup, or your favorite ketchup.

  • Golden Roasted Cauliflower and Chickpeas

    Golden Roasted Cauliflower and Chickpeas

    golden-cauliflower-2

    My Mom bought me a cauliflower, and asked me to make her something with it.  And, since it is prime veggie roasting season, I decided to roast it!  When I was young, she had this book for healthy recipes that heal the body, and one of them was for a curries cauliflower rich in turmeric.  I kind of decided to go off of that recipe, minus the curry.  Turmeric is an awesome spice!  In fact, I try to include it in my diet in some form every day to help decrease inflammation in my body among other things.  Usually it is in my oatmeal in the morning with a few other spices, but it is wonderful in savory dishes as well!  Plus, it gives everything such s pretty yellow color!  Since cauliflower is white, and not very colorful, I thought it would make it pop more.  Plus, I kind of feel like they are a match made in heaven.\

    golden-cauliflower-3

    I whisked some turmeric into some olive oil along with a little cinnamon for sweetness, and chipotle powder for a kick, and a little sea salt, and it was the perfect balanced mixture to coat the cauliflower with.  To make this more of a complete dish, I also added some chickpeas to roast along with it, as well as some lemons to squeeze over the final dish (allowing their flavor to intensify in the oven).  They all turned out beautifully and everything was a lovely shade of gold when I removed it from the oven.  I plated it all up, sprinkled it with toasted almonds and arugula and it was so pretty!

    golden-cauliflower-1

    Not only that, it tasted wonderful, and my Mom was super happy with it, which is what mattered since the dish was for her. It was savory, a touch sweet from the cinnamon, and that hit of lemon made it extra delicious!  The chickpeas were a little crunchy and the cauliflower tender.  This can either be a main dish, or a side dish depending on what you serve with it.

    golden-cauliflower

    Golden Roasted Cauliflower and Chickpeas
    Serves 2

    Ingredients:

    • 1 large head cauliflower, sliced thickly
    • 1  1/2 cups chickpeas
    • 1/4 cup olive oil
    • 1 1/2 tsp turmeric
    • 1/2 tsp chipotle powder
    • 1/2 tsp cinnamon
    • sea salt to taste
    • 1 lemon, halved
    • 1/4 cup chopped roasted almonds
    • 1 handful arugula

    Directions:

    1. Preheat the oven to 400F degrees.
    2. Whisk together the oil, spices, and salt in a bowl, and toss the cauliflower and chickpeas with it.
    3. Spread the cauliflower and chickpeas out on a sheet pan, along with the lemon halves.
    4. Place in the oven and roast until the cauliflower is tender and starting to brown a little.  Remove from the oven.
    5. Place the cauliflower and chickpeas on a serving plate, squeeze the lemon over them, and sprinkle the almonds and arugula over the top.  Serve!


  • Savory Lentil and Wild Rice Stuffed Squash

    Savory Lentil and Wild Rice Stuffed Squash

    I have always had a thing for squash.  It is the vegetable that I always used to get the most excited about, and when Fall rolled around, I had to have some in my kitchen at all times.  There was a point when I ate it almost every day, and my skin turned slightly orange.  My Mom called it my squash tan.  I try to branch out a little more now and eat a variety of things, but I still devour a couple of squash per week.  My favorite thing to do with them is to stuff them.  With things like soup, or savory rice or quinoa stuffings. I was in the mood for a really hearty dinner a few nights back, because it was a chilly day and I was super hungry from a big workout and working, so I made a lentil and wild rice stuffed squash.

    lentil-and-wild-rice-stuffed-squash-1

    Lentils and wild rice are used often in my kitchen lately, because to me they are perfect for comfort foods like creamy wild rice soup, or lentil walnut meatloaf.  Combining them together is awesome because they have this beautiful earthy savory flavor that is perfect for this time of the year.  I kept this stuffing pretty simple, adding some mushrooms and garlic for flavor, celery for texture and saltiness, and a little thyme because it is my favorite Fall and Winter spice.  For the squash, I used buttercup, because it is my all time favorite squash, the perfect balance of sweet and starchy.

    lentil-and-wild-rice-stuffed-squash-2

    There was a time in my life when I had squash roasting in the oven almost every night, and it is always comforting to smell it roasting in the oven and warming up the house.  This recipe takes a little time to cook, but it is not difficult to make or hands on time consuming.  It is sooo worth the time though!  I made extra and served it for dinner the next night!  It is deliciously savory, like warm you up, satisfy your comfort food craving but still feel good after meal.   I think I might just be making this often this year!

    lentil-and-wild-rice-stuffed-squash-3

    Savory Lentil and Wild Rice Stuffed Squash
    Serves 4

    Ingredients:

    • 2/3 cup wild rice
    • 2/3 cup French lentils
    • 1 tsp olive oil
    • 2 stalks celery
    • ¾ cup sliced crimini mushrooms
    • 1 clove garlic, minced
    • ½ tsp dried thyme
    • Sea salt to taste
    • 2 medium buttercup or kabocha squash, cut in half and seeds removed

    Directions:

    1. Place the wild rice in a pot with just enough water to cover by 3 inches, then bring to a boil, and lower to a simmer.  Cover and cook for about 1 hour until the rice is tender and starting to bloom.  Drain.
    2. Meanwhile, do the same with the lentils as you did with the rice, and cook for about 40 minutes until tender.  Drain.
    3. Meanwhile, while the rice and lentils are cooking, preheat the oven to 400F degrees.
    4. Place the squash in the oven, cut side down on an oiled baking tray.  Bake for about 1 hour until tender.
      While the squash is cooking, heat the olive oil in a pan, and add the celery and mushrooms.  Sautee for about 10 minutes over medium heat until tender, then add the garlic, thyme, the cooked lentils and wild rice.  Season to taste with salt, then stir all together.
    5. Once the squash have finished cooking spoon the lentil and wild rice mixture into them.  Serve!


  • Vegan Black Bean Tostadas with Apple Salsa

    Vegan Black Bean Tostadas with Apple Salsa

    What do you do when you have a hungry boyfriend who has had one of those terrible horrible no good very bad days arriving at your house and you have nothing made?  You improvise and raid the pantry and make a random delicious recipe.  I guess I am a softie when it comes to hungry people and I usually end up making them food.  And I know he would do the same for me if he had time to cook (but it’s ok, he does other nice things for me).  After all, a good meal always makes one feel better, am I right?!  Well for me it does.  So, I started to raid my pantry yesterday for this quick meal.  Eric loves Southwestern type food since he is from there so I decided to make tostadas.  Not traditional or authentic though.  These were kind of seasonal fusion due to using ingredients I had on hand.  I had some lovely honeycrisp apples, because they are wonderful this time of the year, so I made a quick salsa including them.  Apple salsa is actually pretty delicious and goes awesome with savory food.  Along with the usual salsa add ins like tomatoes, bell peppers, onions and garlic, I added some apple cider and a touch of maple syrup.  It was refreshing and delicious!

    Black Bean Tostadas with Apple Salsa 1

    For the protein filling on the tostadas I kept it simple with black beans sautéed with sun dried tomatoes, alliums and spices.  Having a big bag of cooked black beans in your freezer always comes in handy when it is meal time.  I find myself grabbing them often for everything from salads, to hummus to this recipe.  I topped off some toasted tortillas with the flavorful beans, some lettuce and the salsa and it was a light and delicious lunch!  Eric scarfed it down in no time, and it boosted his mood a little.  If you have some apples from the local orchard that you want to use in something other than dessert try out this salsa recipe! It is also good for spooning over greens in a salad, which is what I did the next day in my lunch along with some sautéed tempeh.

    Black Bean Tostadas with Apple Salsa

    Vegan Black Bean Tostadas with Apple Salsa
    Serves 4

    Salsa:
    1 large sweet apple (honeycrisp or pink lady work well) diced
    1 cup halved organic cherry tomatoes
    1 yellow or red bell pepper, diced
    1 small red or white onion, diced
    1 jalapeno, minced
    1 clove garlic, minced
    juice and zest of 1 lime
    1 Tbsp cider vinegar
    sea salt to taste
    1 tsp red pepper flakes
    2 tsp maple syrup

    Combine all ingredients together in a bowl, cover and refrigerate for a few hours (or overnight) to let the flavors combine.

    black beans:
    2 tsp olive oil
    1/2 cup minced onion
    1 garlic clove, minced
    2 tsp chili powder
    1 tsp ground cumin
    1/4 tsp sea salt
    1/2 cup sun dried tomatoes, soaked in water until soft (3 Tbsp water reserved), drained and chopped
    2 cups cooked black beans

    In a pan, heat the olive oil over medium heat, and add the onions. Sautee for about 5 minutes until softened, then add the garlic, chili powder, cumin, and sea salt. Sautee a minute more until the spices are fragrant, then add the tomatoes, beans and reserved water.

    For assembly:
    8 sprouted corn tortillas
    1 1/2 cups shredded lettuce
    hot sauce (optional)

    Heat the tortillas in a 400 degree oven until toasted and crisp. Set on a plate. Spoon some of the bean mixture over the tortillas, top with a little lettuce, a little salsa, and some hot sauce. Enjoy!


  • Berries and Beets Quinoa Salad with “Chevre”

    Berries and Beets Quinoa Salad with “Chevre”

    People consider berries to be sexy.  But you know what else is sexy?  Beets.  I mean, they are beautiful.  Look at the color, they are sweet, and they keep you healthy.  They are a pretty amazing vegetable if you ask me.  Beets are actually one of my favorite things to juice, because the juice on it’s own tastes amazing.  But I also love them roasted.  In fact, this was how I first enjoyed them and I fell in love.  Back in college actually.  Sad that I didn’t really get to enjoy beets until then.  I admit as a child, I was a bit intimidated by them, and the only beets that I was ever offered were of the canned variety at my Grandma’s house.  I thought that they looked scary so I passed them up.  When I started to explore cooking though in my early 20s, I decided that I wanted to try making a roasted beet salad from a vegetarian cookbook that I had checked out from the library at the time. They tasted so good when prepared that way!  The sweetness intensified through roasting.  That is now my favorite way to cook them over boiling them any day.

    Berries and Beets Quinoa Salad with Chevre 1

    If I am eating them plain, I love them with a little vinegar and sea salt so they taste almost like pickled beets.  I had gotten some beets and berries at my work thinking they would be lovely together in a colorful salad.  I was thinking light salad at first, but them I decided to make it a main course by adding some quinoa for protein.  If I am looking to boost a meal quinoa is one of my go to ingredients.  It packs protein and fiber perfect for a satisfying dinner. I kept the flavor of the salad simple to allow the ingredients to shine adding only a little olive oil and lemon juice for the dressing.  Also, some fresh basil joined the show because that is an herb that I have growing on my patio and I use it as much as I can in the Summer.

    Berries and Beets Quinoa Salad with Chevre 2

    It was good as it was, but I also added some toasted almonds for crunch, and some cashew chevre to add a little richness.  I am a big texture and flavor person, so it was important to different flavors and textures in this salad.  Not only did it end up being beautiful thanks to all of the beautifully colored ingredients, but it tasted amazing.  This is something I would pay big bucks to be served in a restaurant.  It was so good.  Summer is almost over, and I am kind of hanging onto the last of it with salads like this that are fresh, but also hearty since it has cooled down a bit.


    Berries and Beets Quinoa Salad with “Chevre”
    Serves 2-4

    Ingredients:

    • 4 medium sized red beets
    • 1 cup quinoa, rinsed
    • 2 cups filtered water
    • 1/4 cup lemon juice
    • 1 Tbsp lemon zest
    • 2 Tbsp olive oil
    • sea salt to taste
    • 1 cup blueberries
    • 1 cup blackberries
    • 1/4 cup fresh basil leaves (if larger, tear them into pieces)
    • 1/2 cup toasted almonds
    • cashew chevre*


    To roast the beets, wrap them in foil, and roast them in a 400F degree oven for about an hour to an hour and a half depending on how big they are until they are tender when pierced with a knife.  Once roasted, allow to cool, peel and cut into large dice. Meanwhile, to prepare the quinoa, place quinoa and water in a medium saucepan and bring to a boil. Reduce to a simmer, cover and cook until all the water is absorbed about 15 minutes, or when all the grains have turned from white to transparent, and the spiral-like germ has separated. Drain, and set aside.

    To assemble the salad, combine all ingredients in a bowl except the chevre, and toss together until well combined.  When ready to serve, sprinkle with the chevre (you will have more left over for another use).

    *Use this chevre recipe and omit the herbs: https://www.fragrantvanilla.com/vegan-herbes-de-provence-chevre/


  • Moroccan Lentil Stew

    Moroccan Lentil Stew

    Moroccan Lentil Stew Tomatoes

    I visited my Grandpa last Sunday and came home with about 10 lbs of fresh tomatoes from his garden.  What does one do with that many fresh tomatoes besides make sauce?  Well, I found lots of uses for them!  I love my Grandpa’s Tomatoes, and every year I anxiously await them.  It is so nice of him to share so many with me, and I am very appreciative.  My grocery bill always goes down, because I enjoy all of the tomatoes in my recipes when they become available instead of buying canned, dried or of course fresh for my salsas, soups and sauces.  Many of the tomatoes end up fresh in my lunch salads or roasted and paired with pastas, but I immediately dried a bunch of these in the dehydrator.  They are honestly the best tasting dried tomatoes I have ever had.  I dry a bunch every year and enjoy them for the next couple months (because they only last me that long, I use them a lot).

    Moroccan Lentil Stew Tomatoes 1

    Some of the batch I dried on Sunday was put to use right away.  I decided to make a Moroccan Lentil Stew because it was kind of a rainy day, and I am ready for Fall.  Normally I might have used canned tomatoes in something like this, but the dried ones are so lovely, and way more flavorful.  Lentils are a staple in my diet.  I eat them almost daily, and whenever any omnivore asks me where I get my protein they are my first answer (of the long list because as fellow vegans know, there are lots of vegan protein sources).  I enjoy simple stews made with them the most.  They are comforting, always delicious and easy to make because lentils cook faster than most beans. Lentils are just awesome!

    Moroccan Lentil Stew 1

    Anyways, I had some cauliflower and zucchini on hand, and they made it into the stew as well.  I used my Moroccan spice blend in this which is super aromatic and once you start cooking this people will show up in the kitchen in no time!  My home smelled delicious. It cooked up in less than 45 minutes and very little hands on time (which is always important, I know you all have other things to do while you are home as do I).  It was super satisfying.  The intensely flavored tomatoes infused the spiced broth, and the veggies and lentils had soaked it all in.  Sooo good.  If you had some flatbread to serve this with, that would be awesome, because trust me you want to soak up the juices.  If you would like to make your own dried tomatoes like I used in the recipe, simply cut them into 1/2 inch thick wedges, spread them out on a lined dehydrator tray, sprinkle with a little sea salt and dry for about a day and a half at 115F degrees or until they are completely dry.

    Moroccan Lentil Stew

    Moroccan Lentil Stew
    Serves 1-2

    Ingredients:

    • 2 tsp olive oil
    • 1/4 cup diced onion
    • 2 garlic cloves, minced
    • 1/8 tsp chipotle pepper
    • 1/2 tsp thyme
    • 1/2 tsp ground cumin
    • 1/4 tsp cumin seeds
    • 1/4 tsp coriander seeds
    • 1/4 tsp cinnamon
    • 1 tsp smoked paprika
    • 1/4 tsp sea salt or to taste
    • 1/2 cup sun dried tomatoes
    • 1/3 cup dried lentils
    • 2 1/4  cups filtered water
    • 1 cup cauliflower cut into bite sized pieces
    • 1 cup zucchini, cut in half lengthwise and sliced
    • 1 Tbsp lemon juice

    Directions:

    1. Heat the olive oil in a medium stock pot.  Add the onions and sautee for a few minutes until softened, then add the garlic and herbs and spices and sautee a minute more.
    2. Add the salt, tomatoes, lentils, and water and bring to a simmer.  Cook for about 30 minutes until the lentils are starting to get tender.
    3. Add the cauliflower and zucchini and cook for about 10 more minutes until they are tender.  Add the lemon juice and serve!