Tag: thanksgiving

  • Vegan Pumpkin Apple Pie

    Vegan Pumpkin Apple Pie

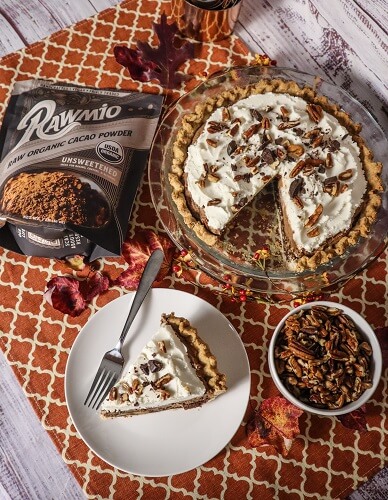
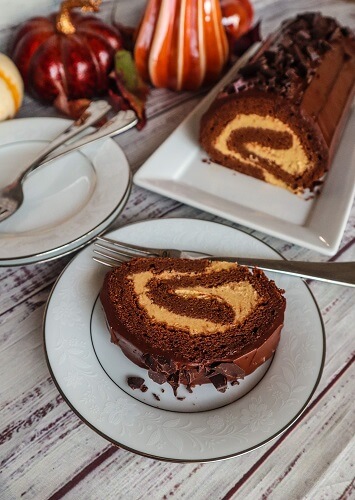
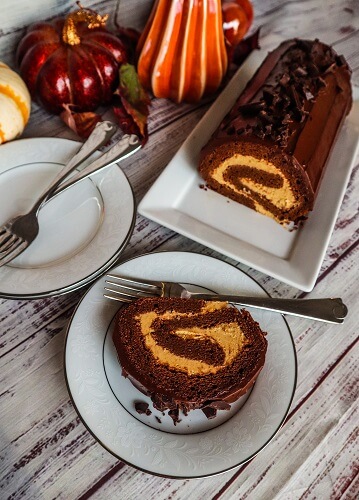
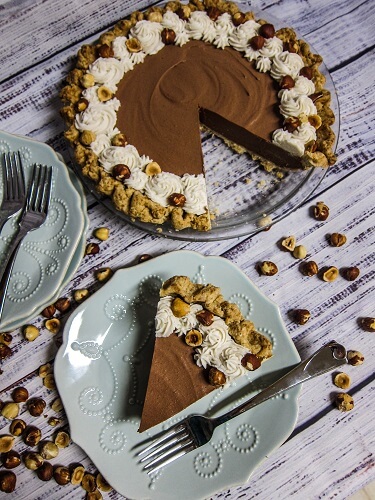
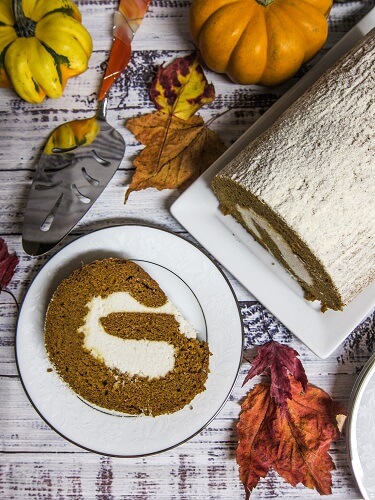
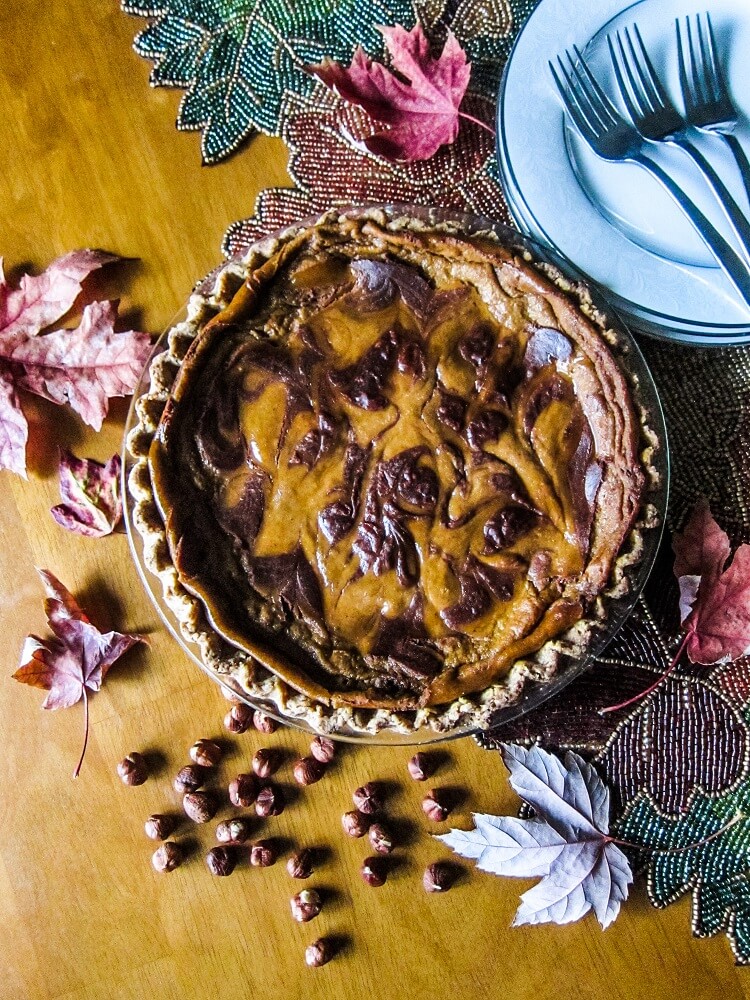
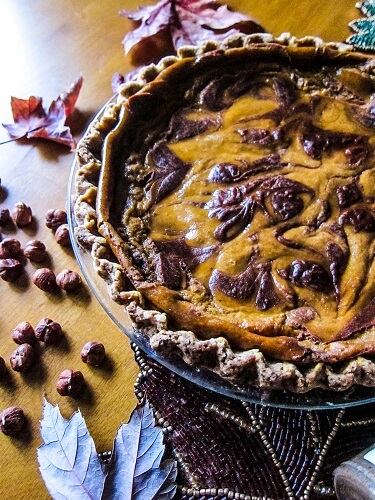
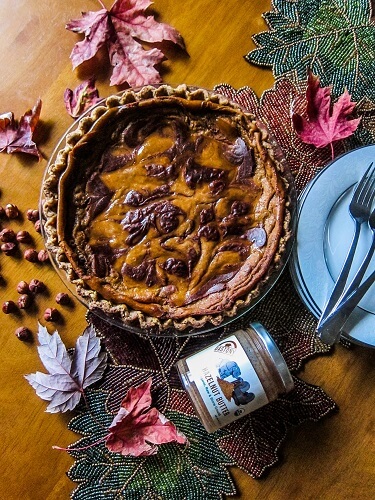
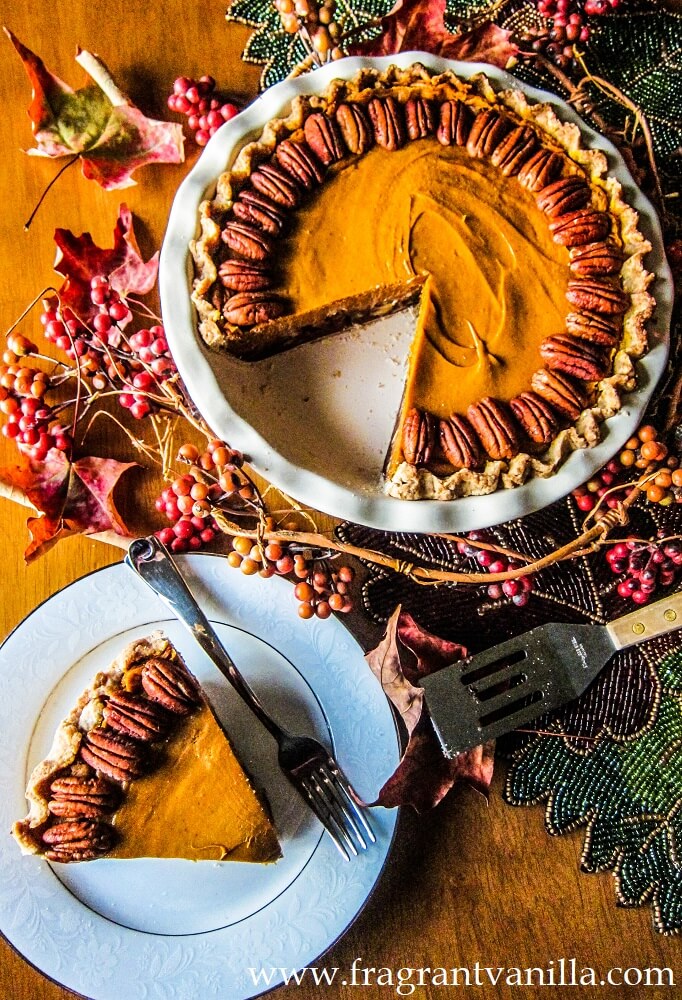
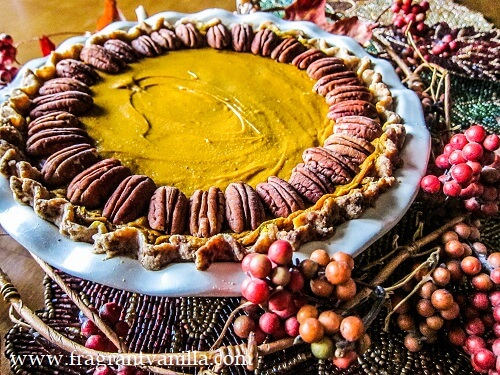
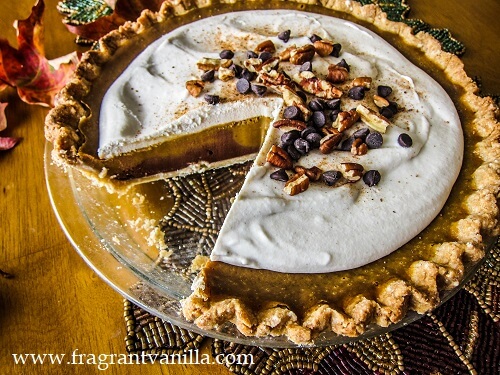
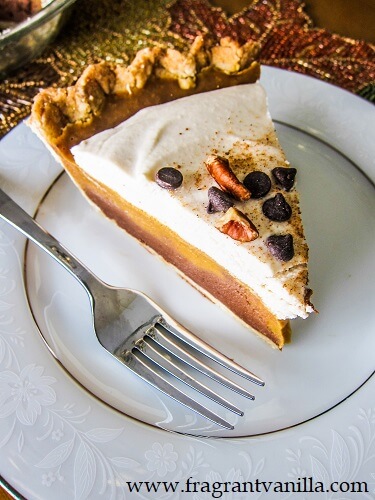
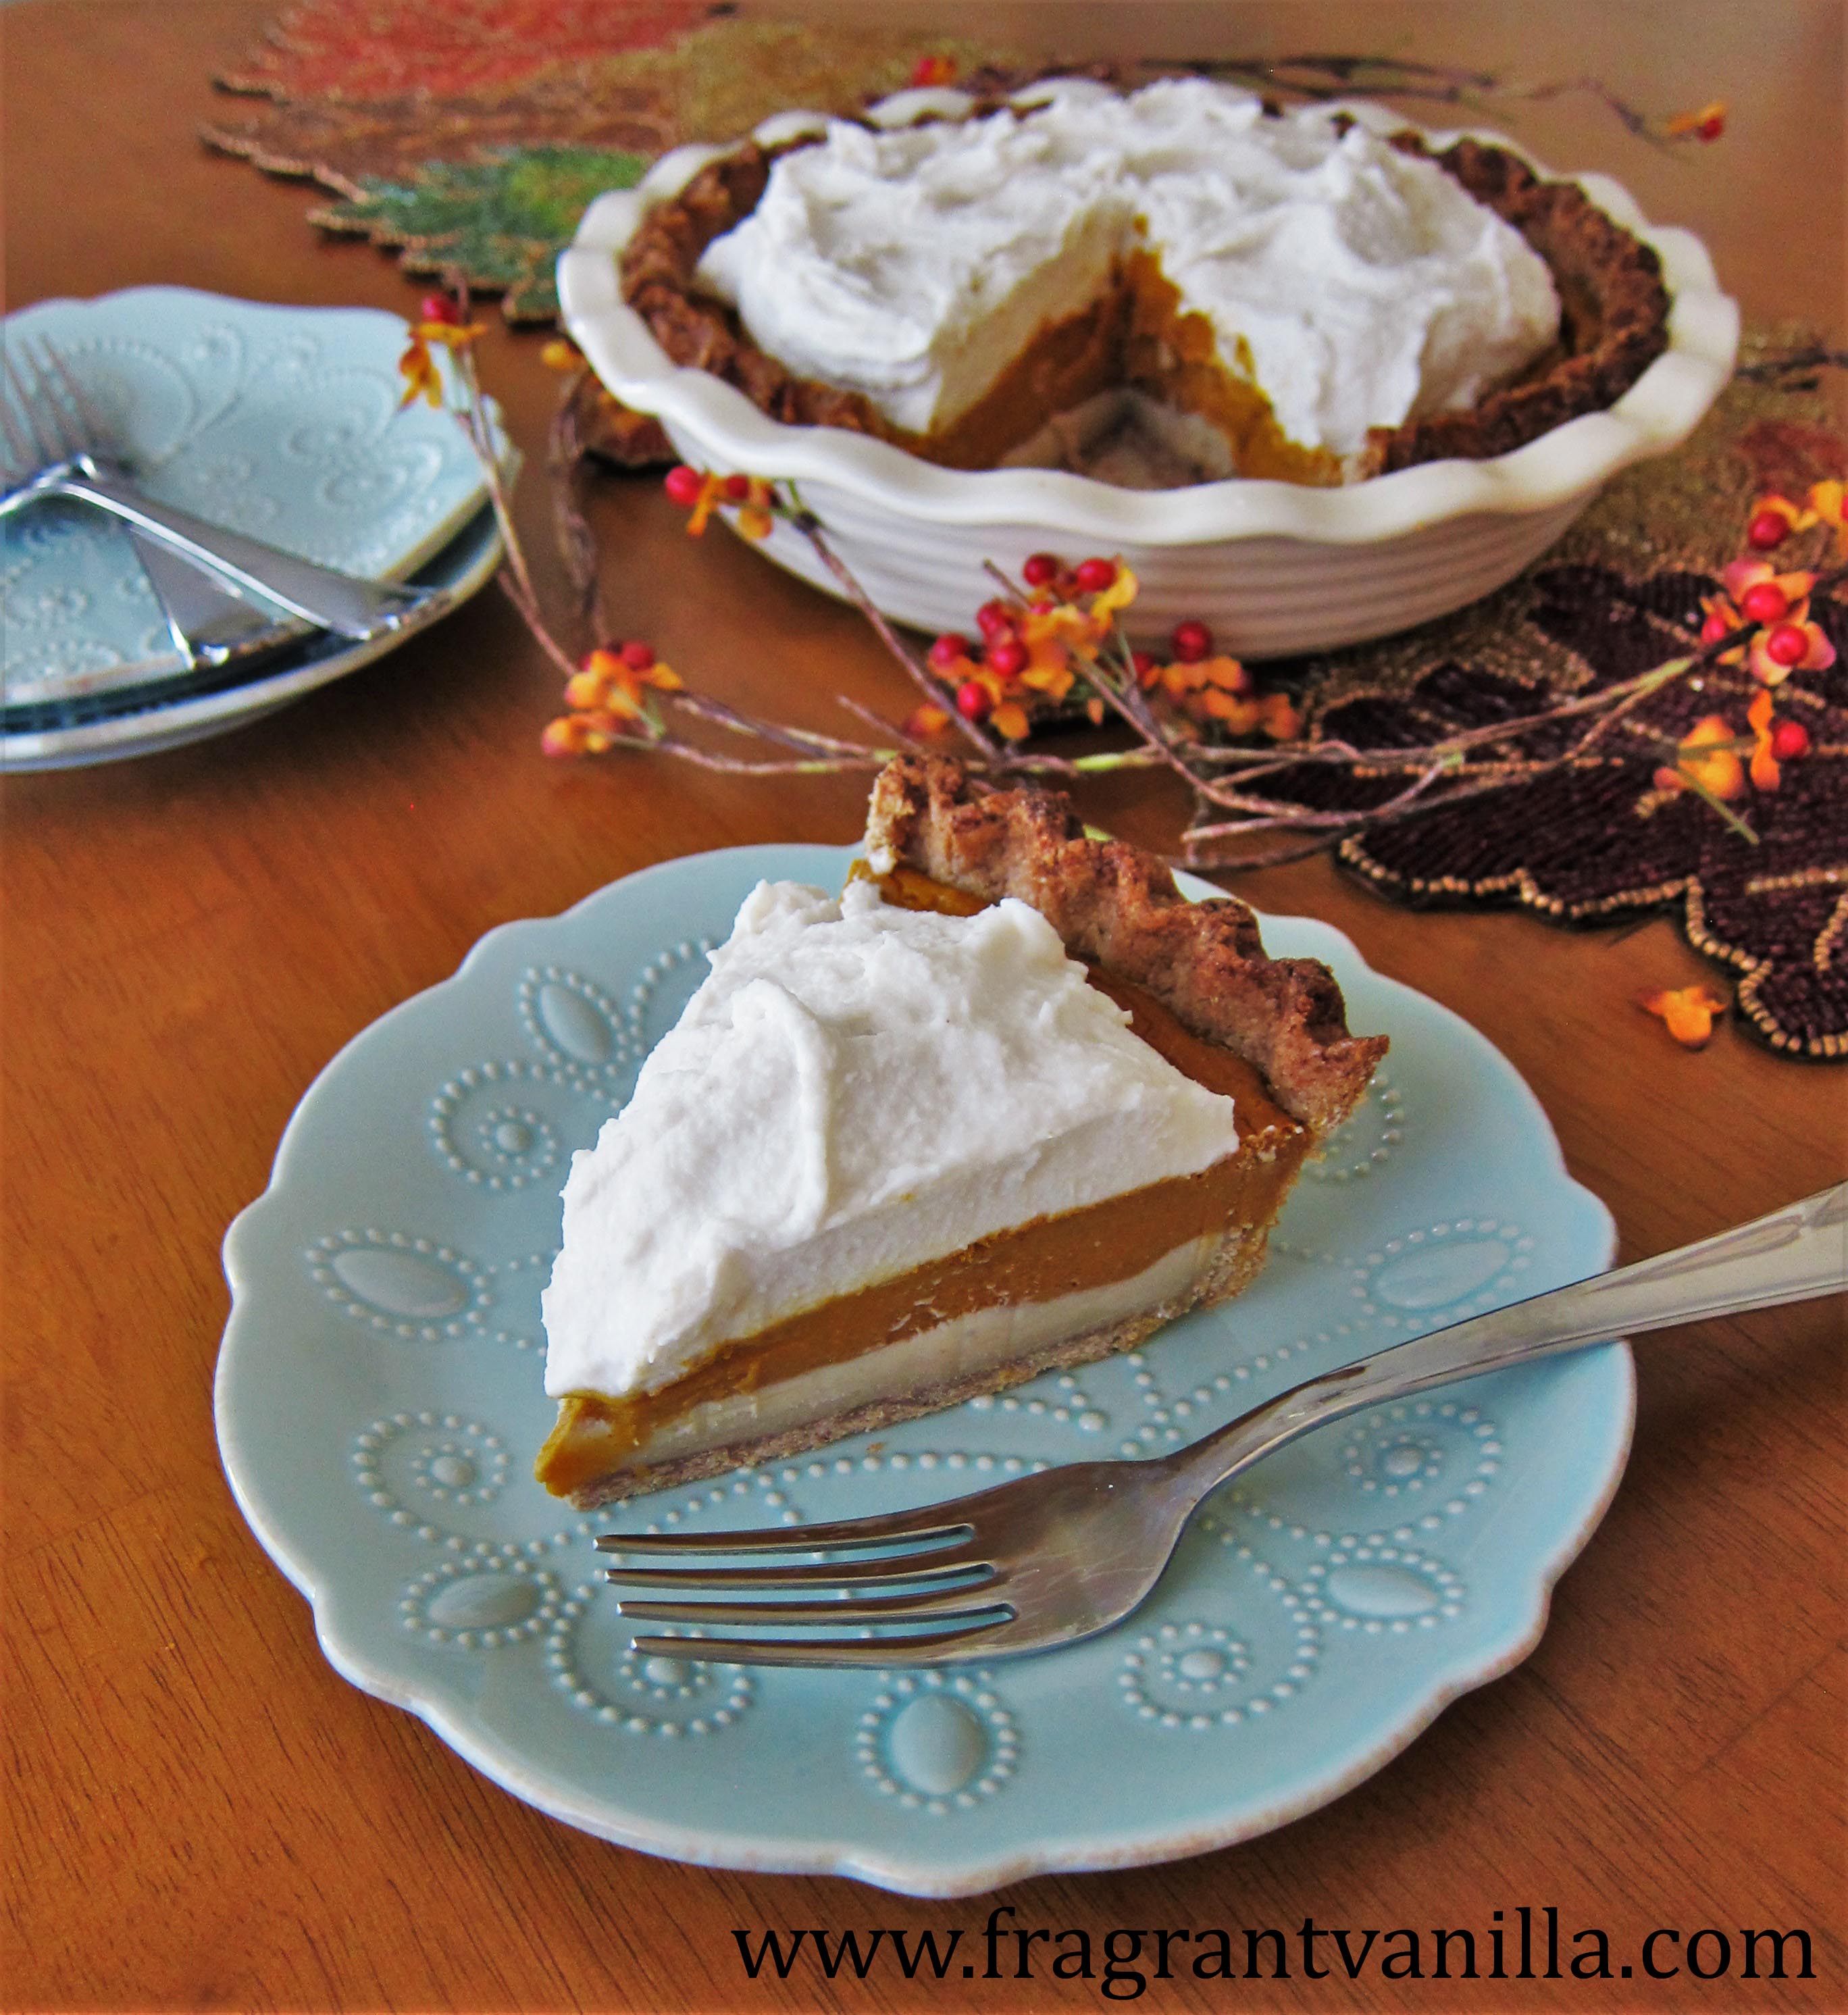
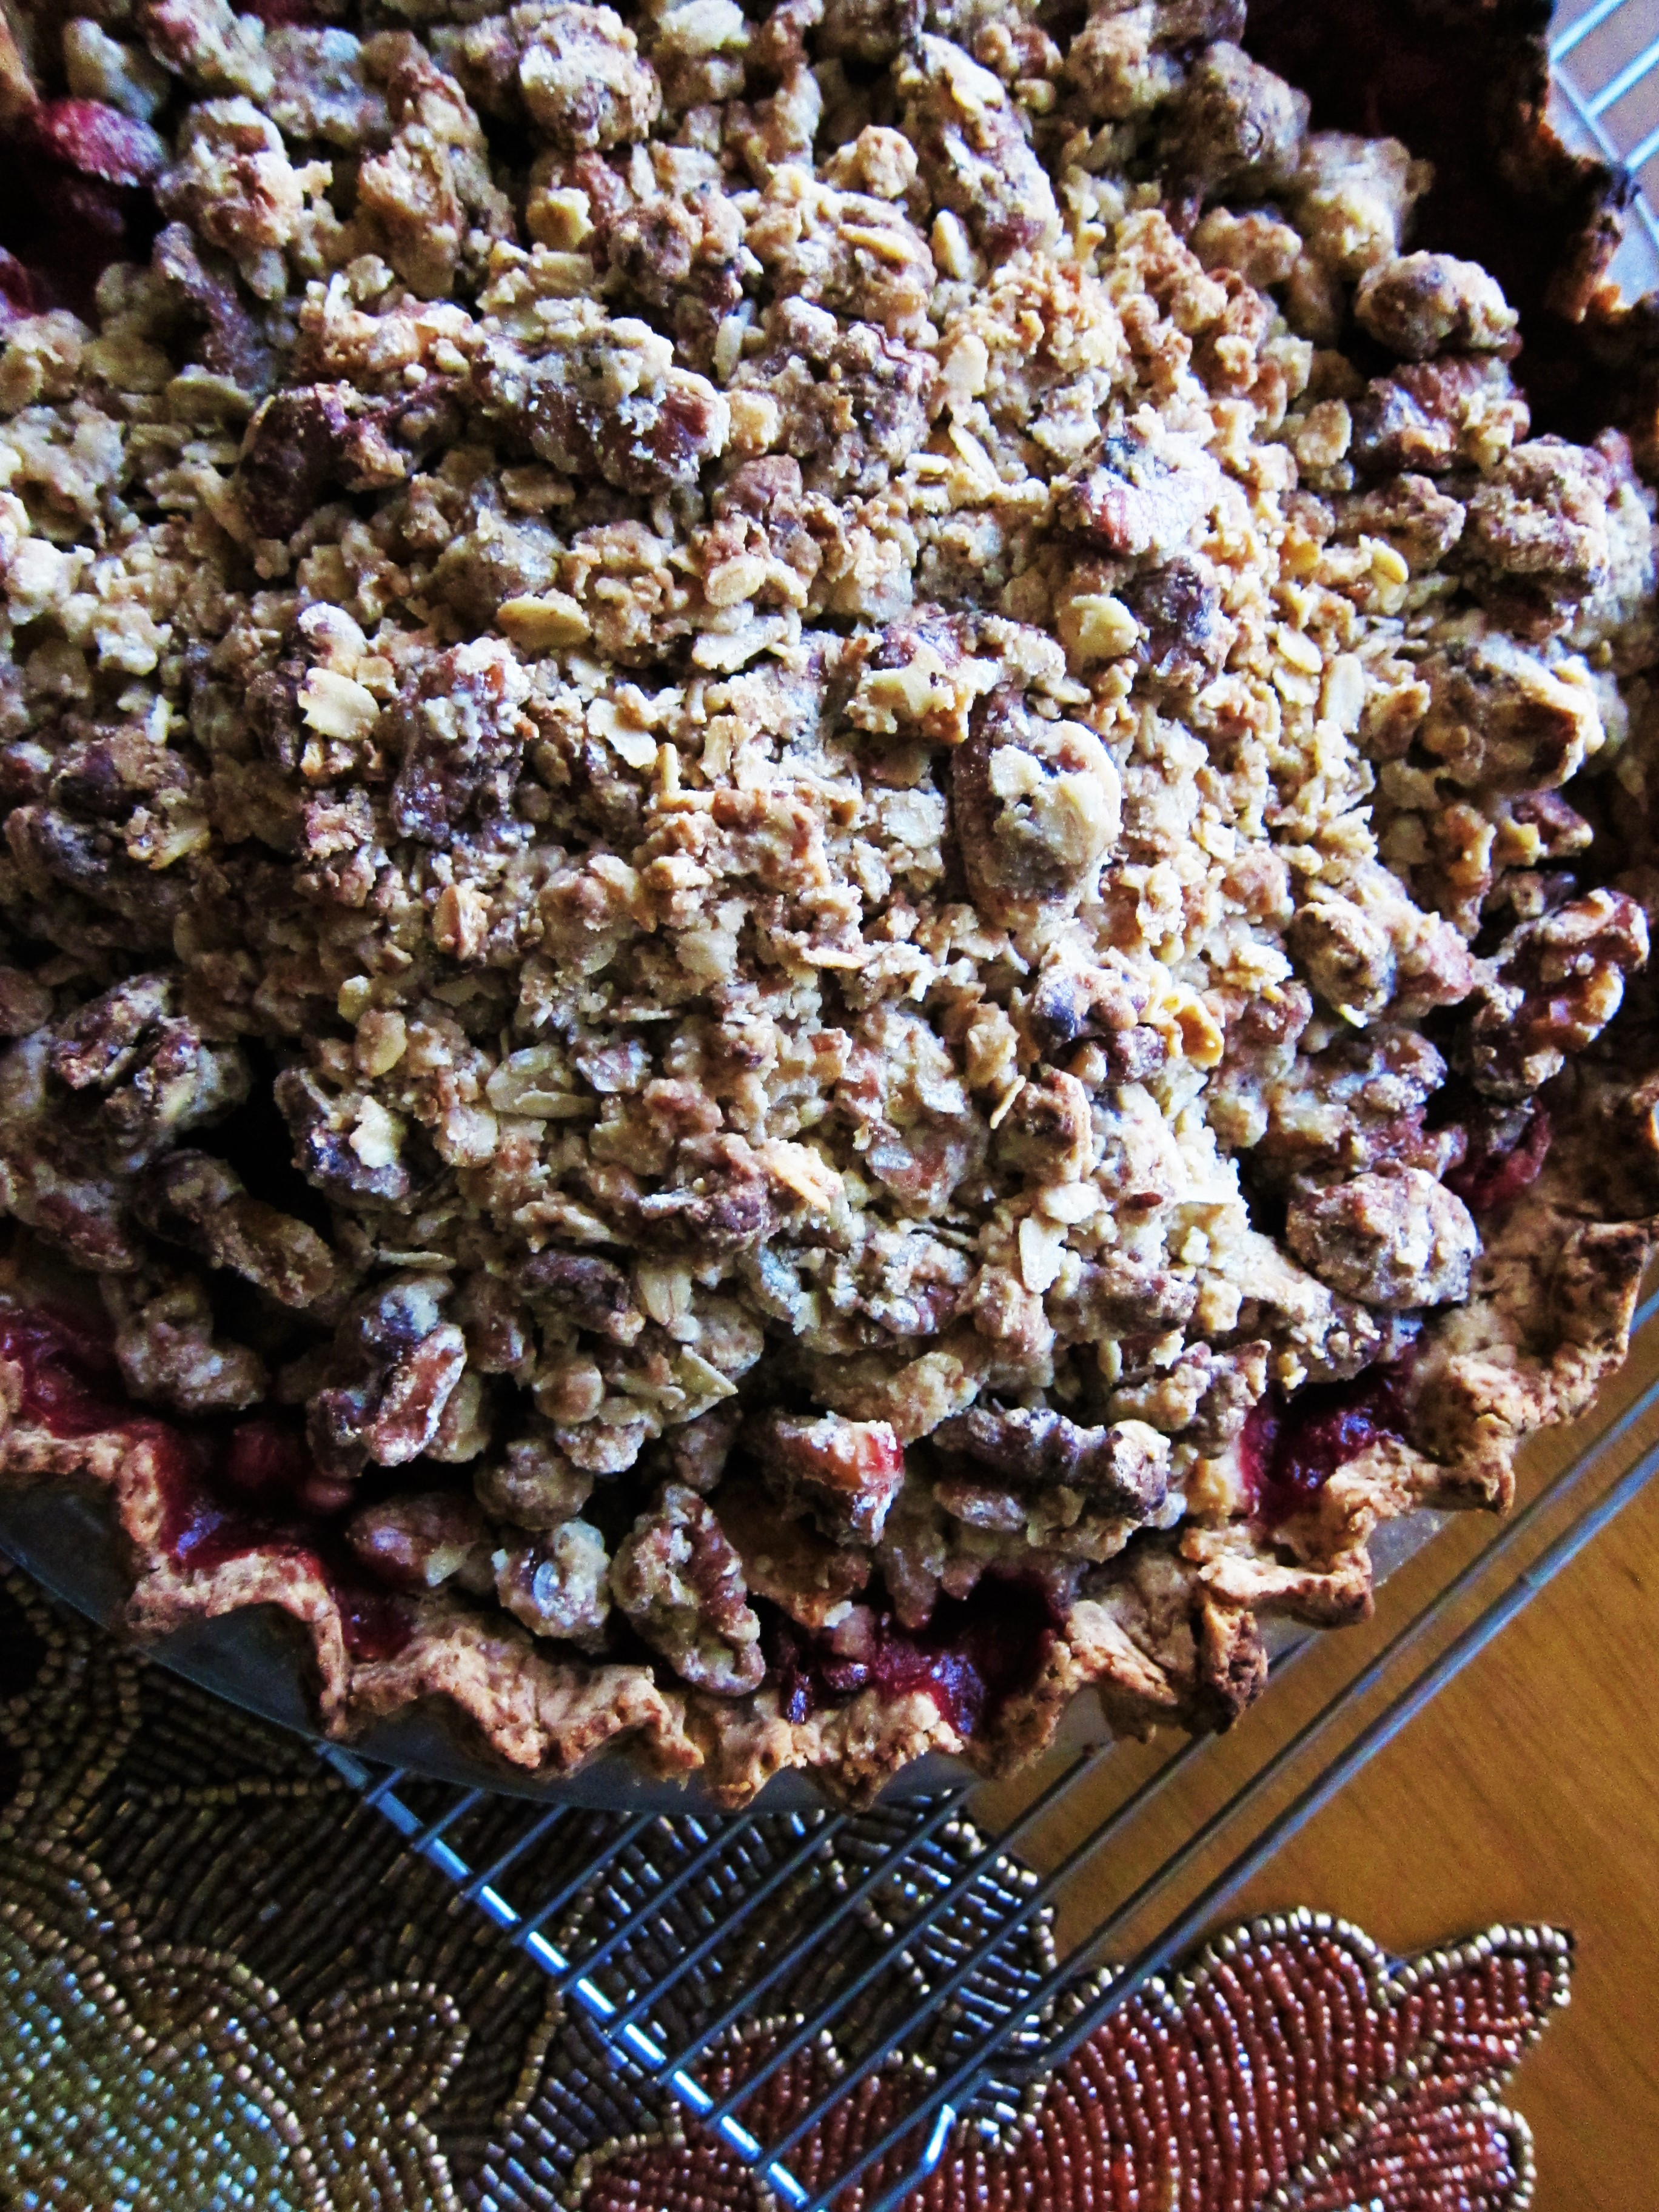
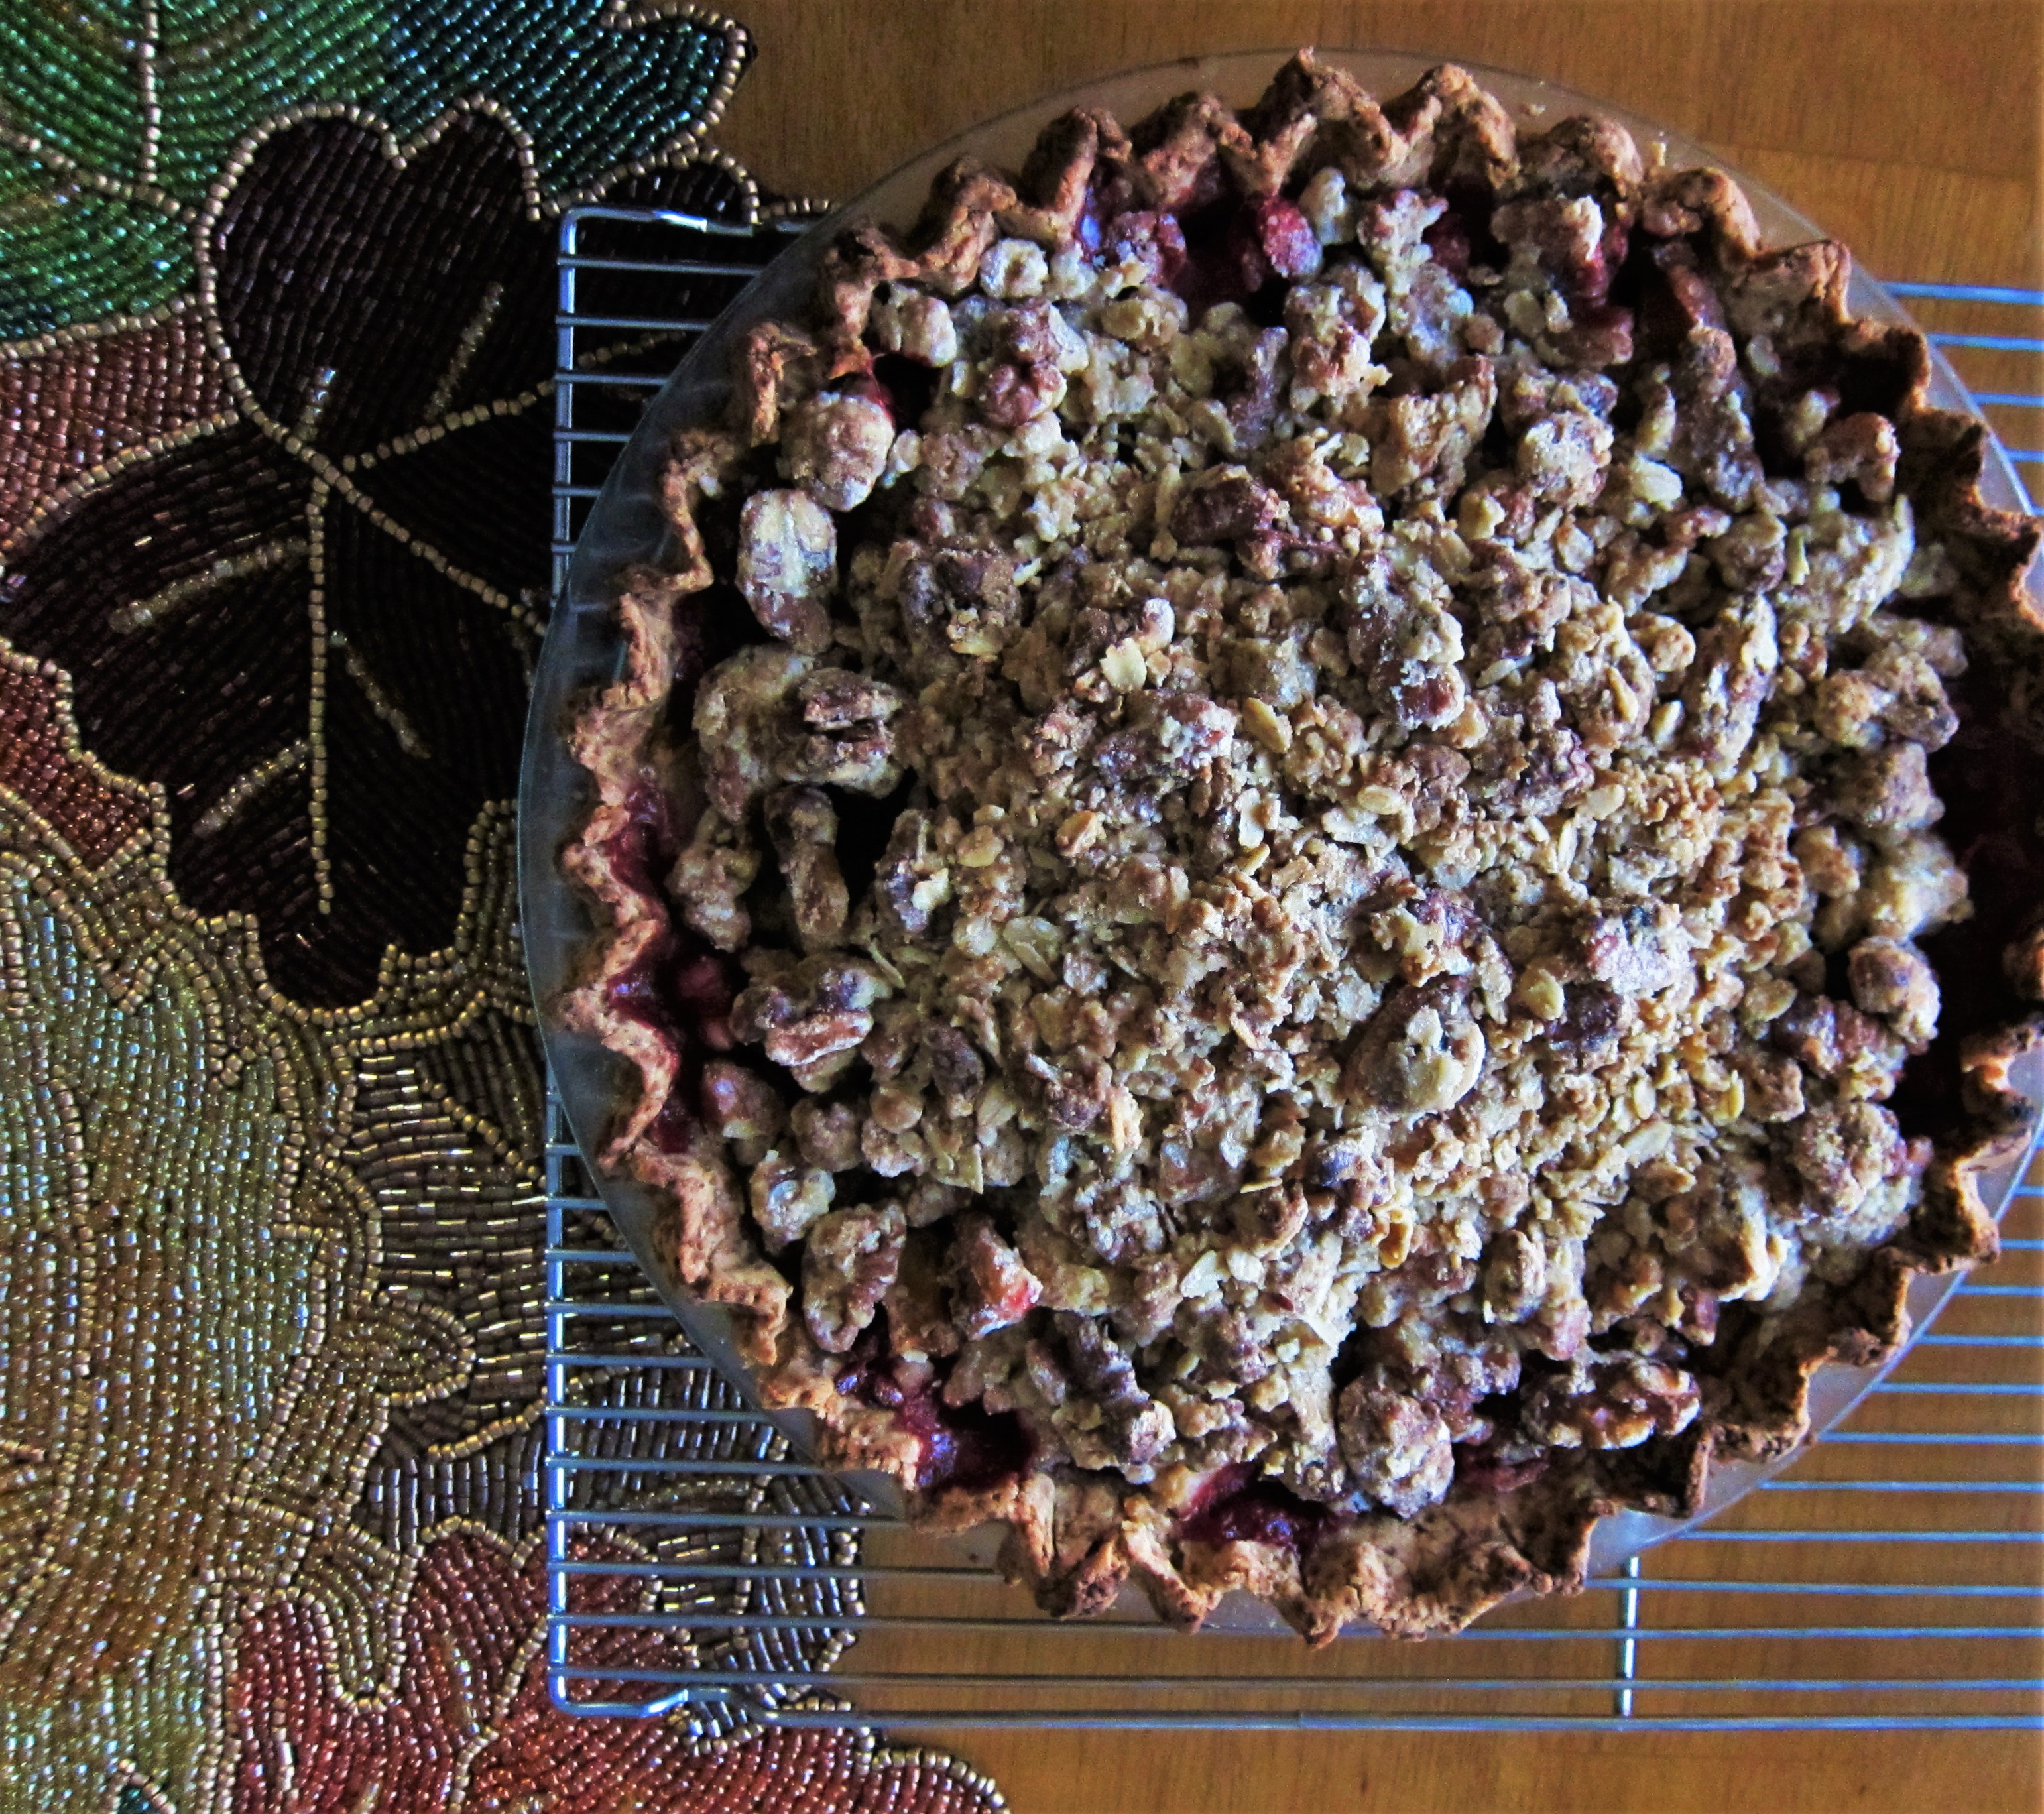
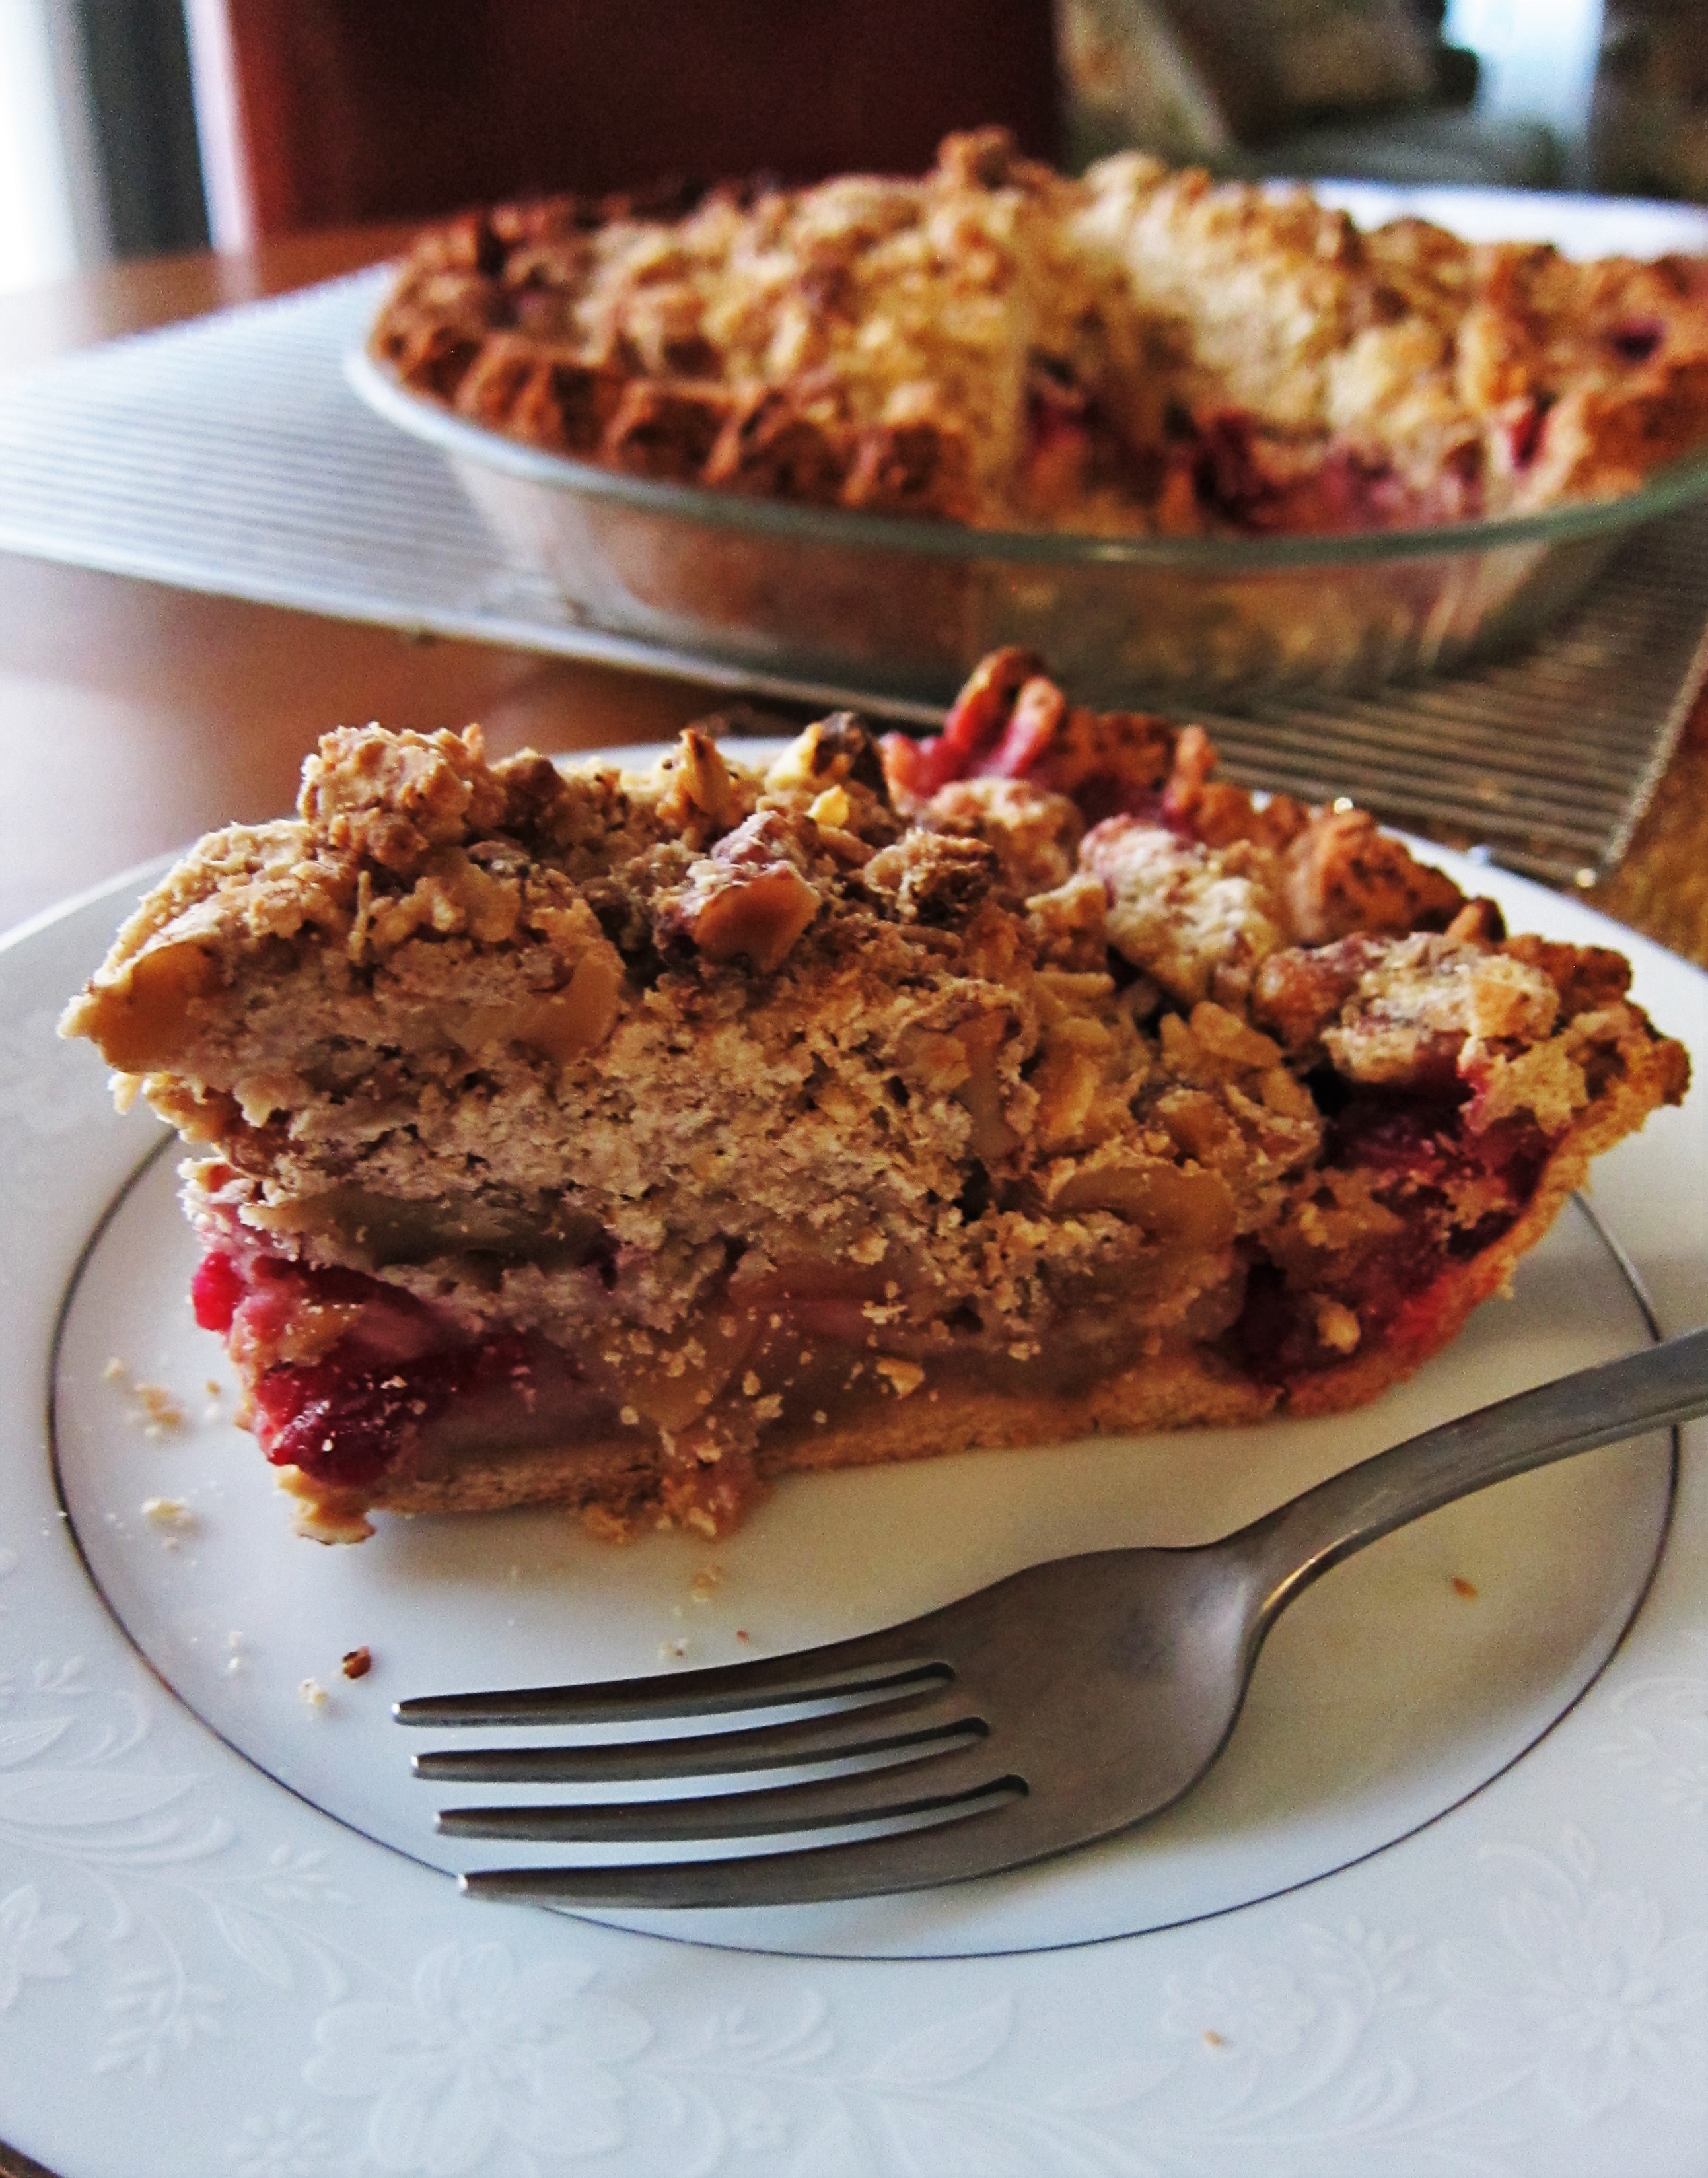
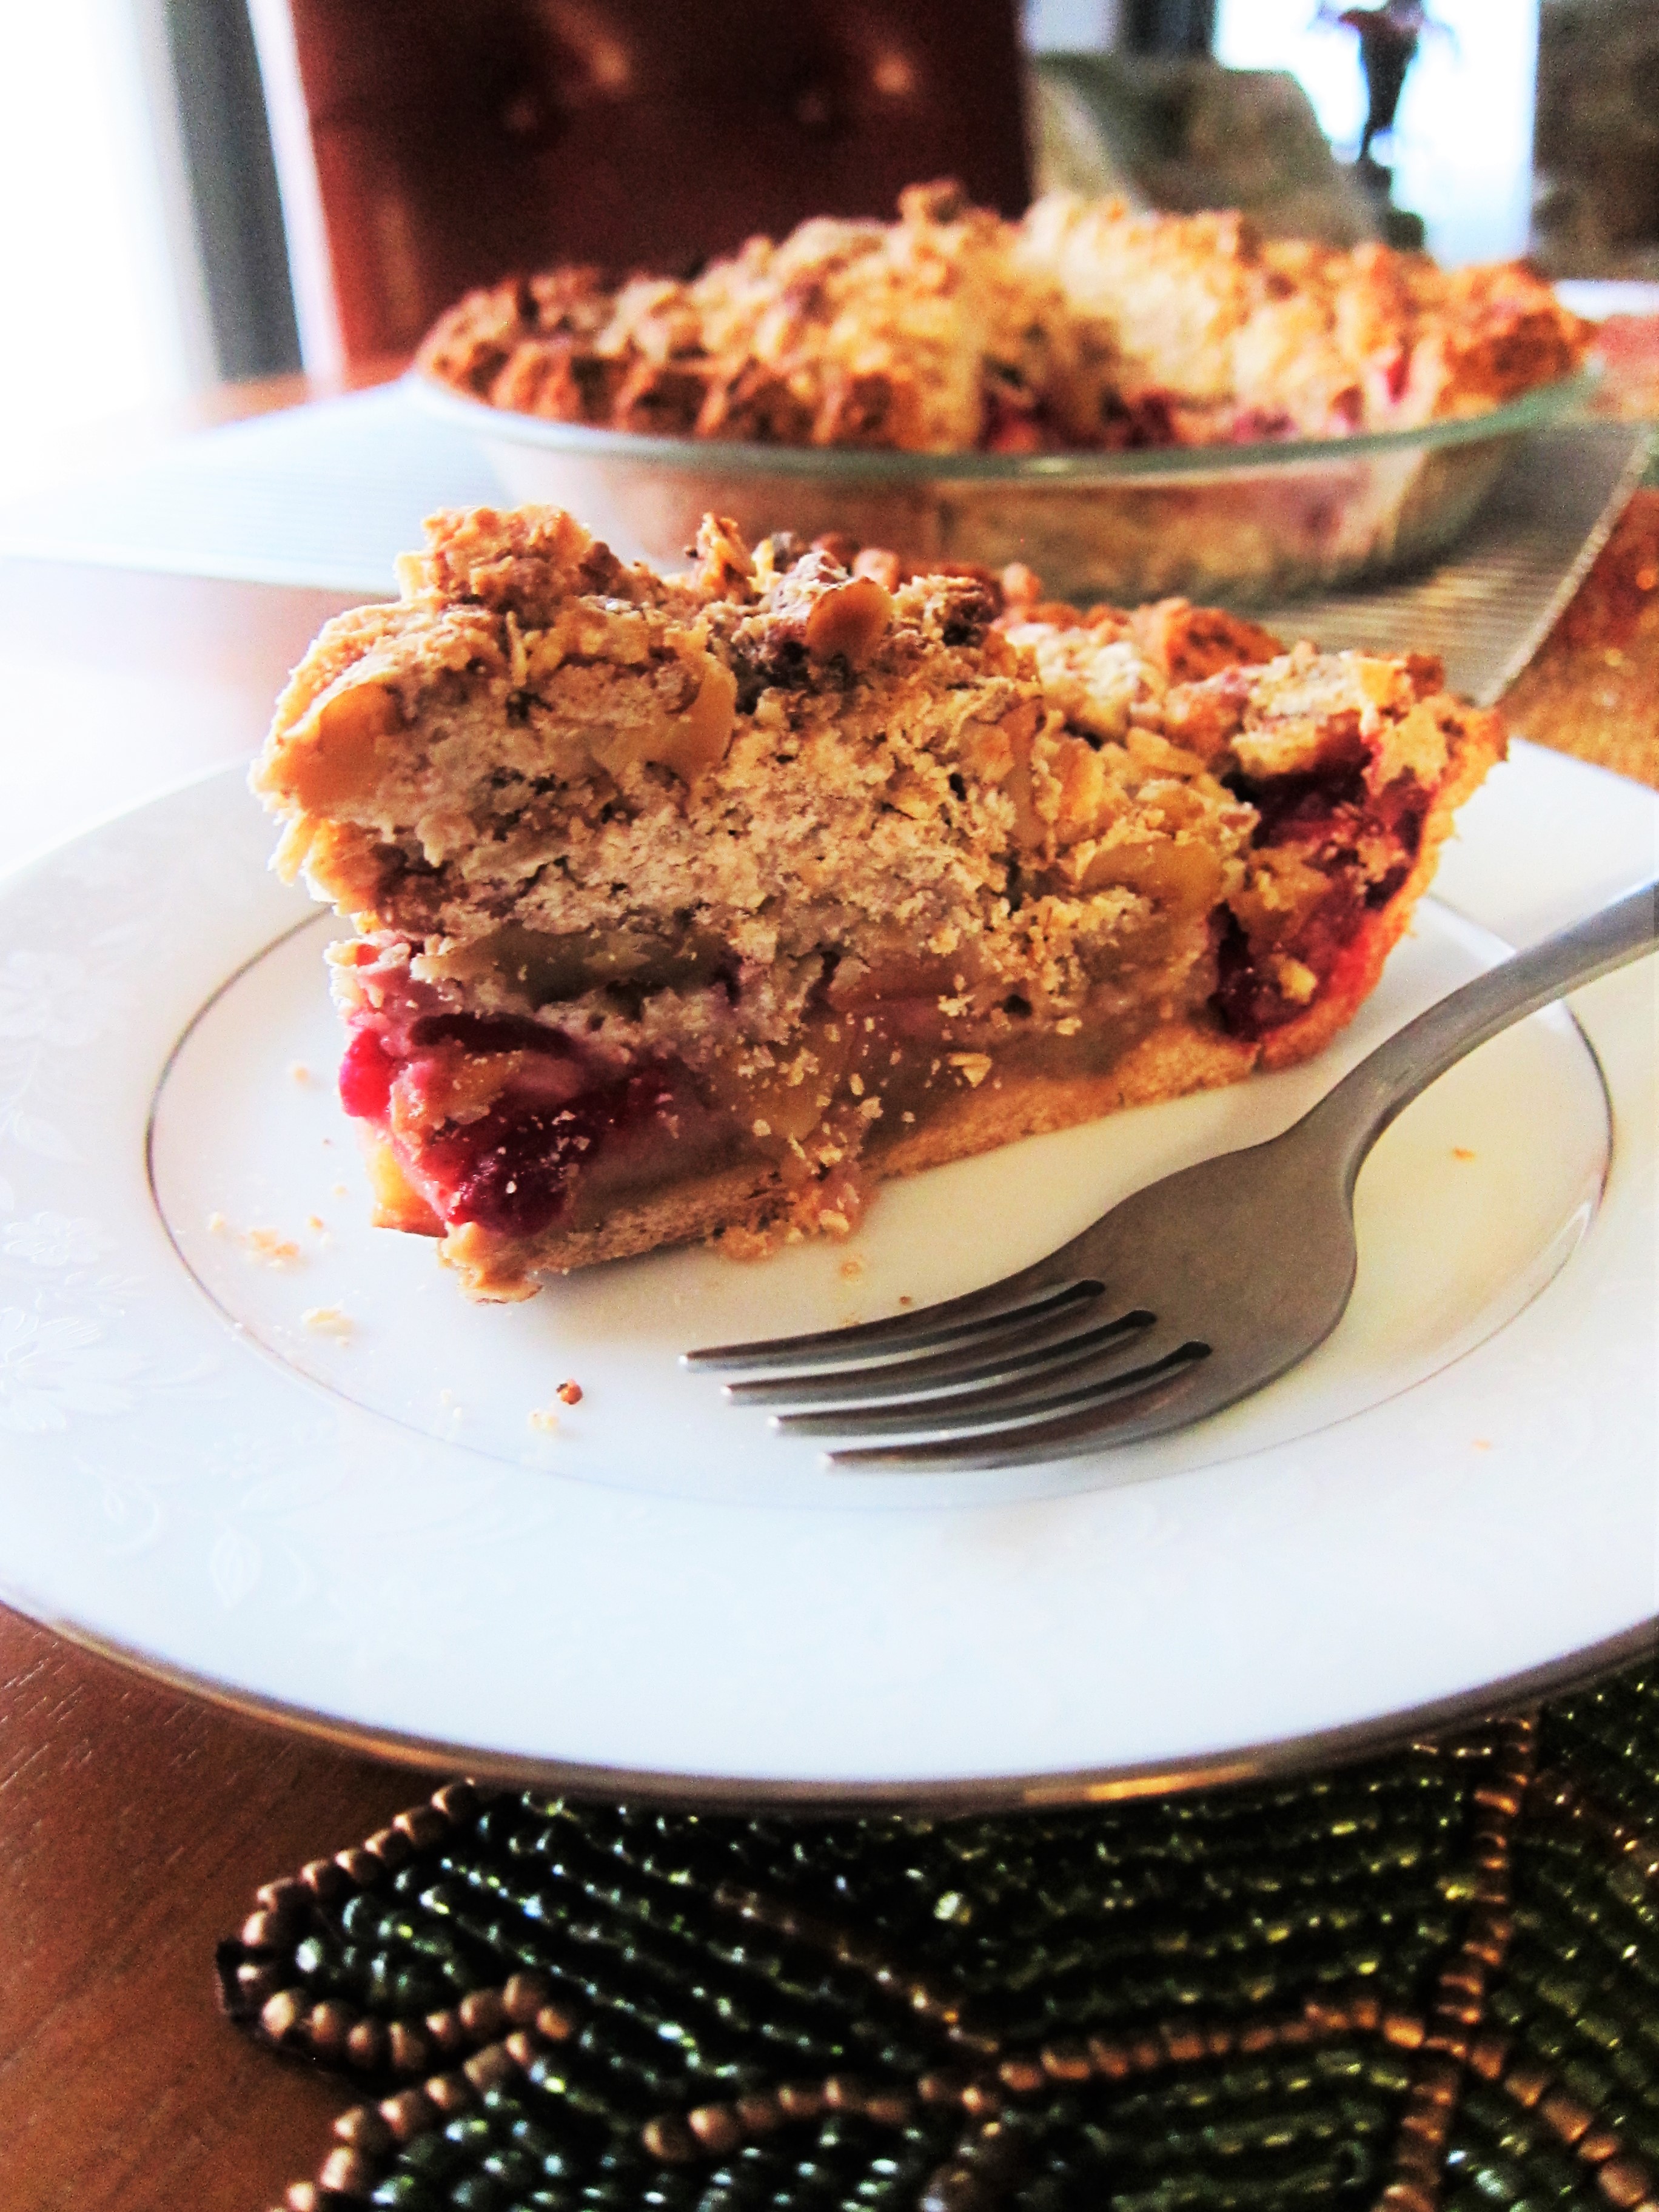
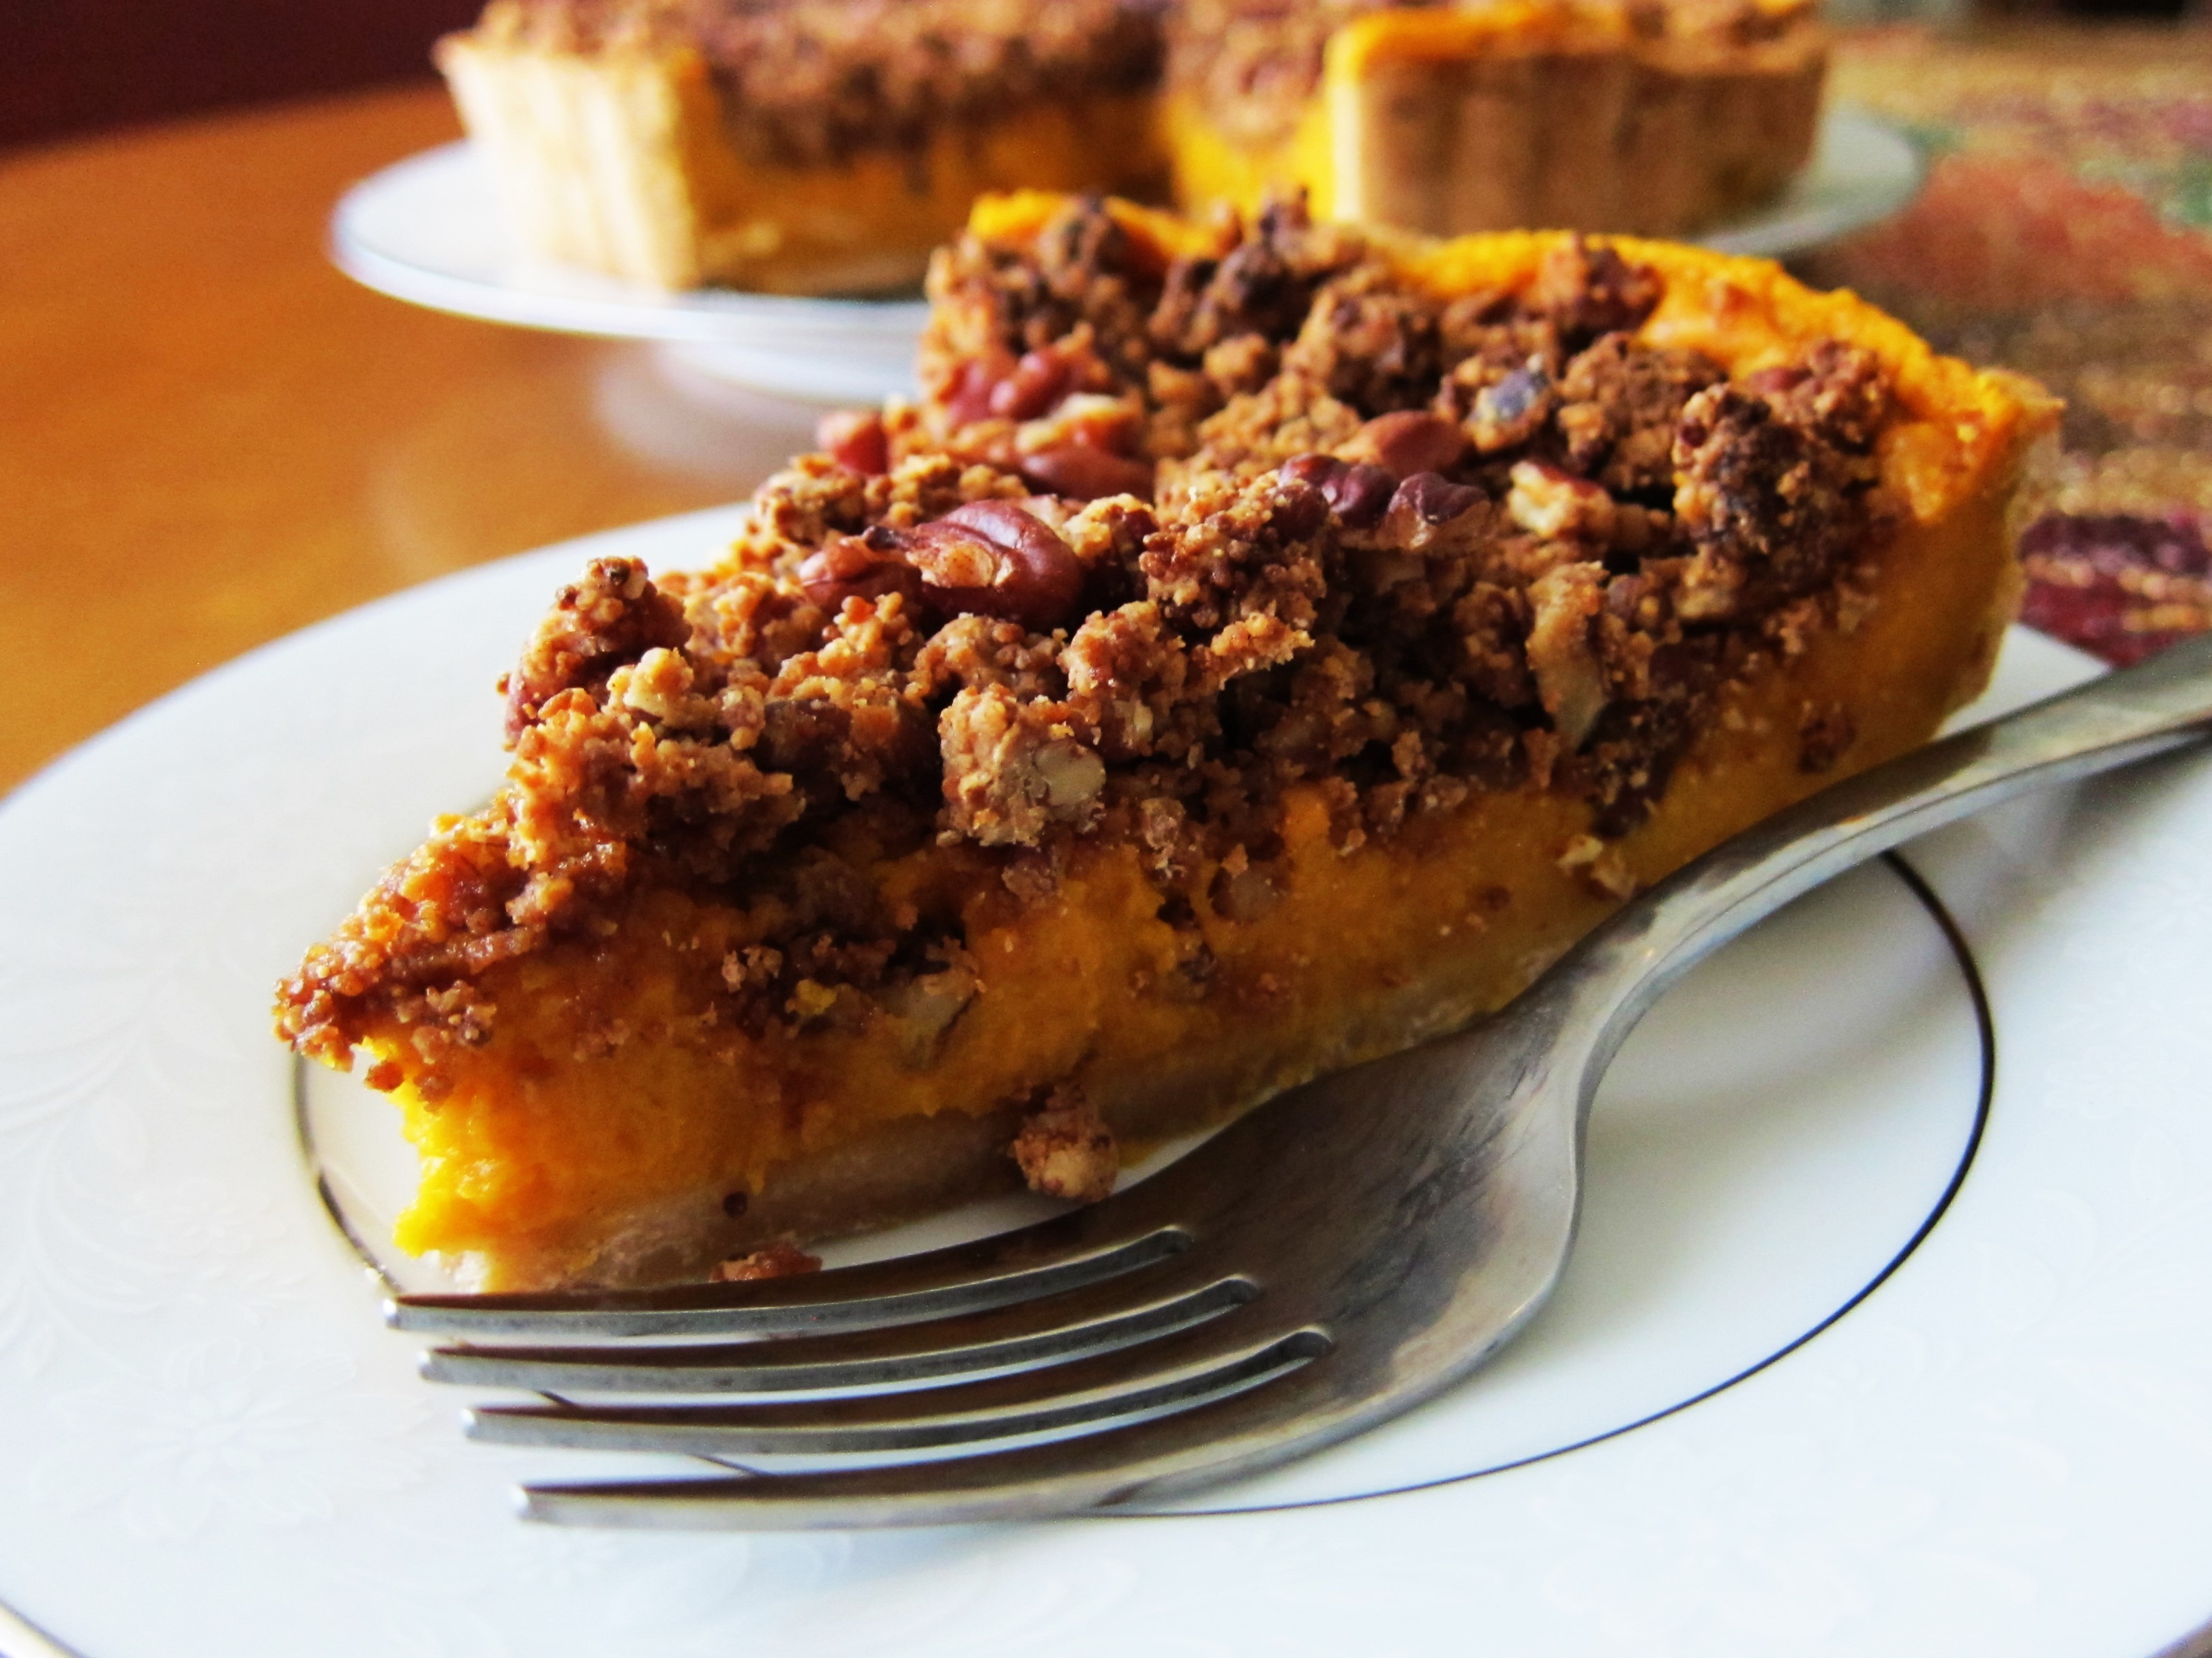
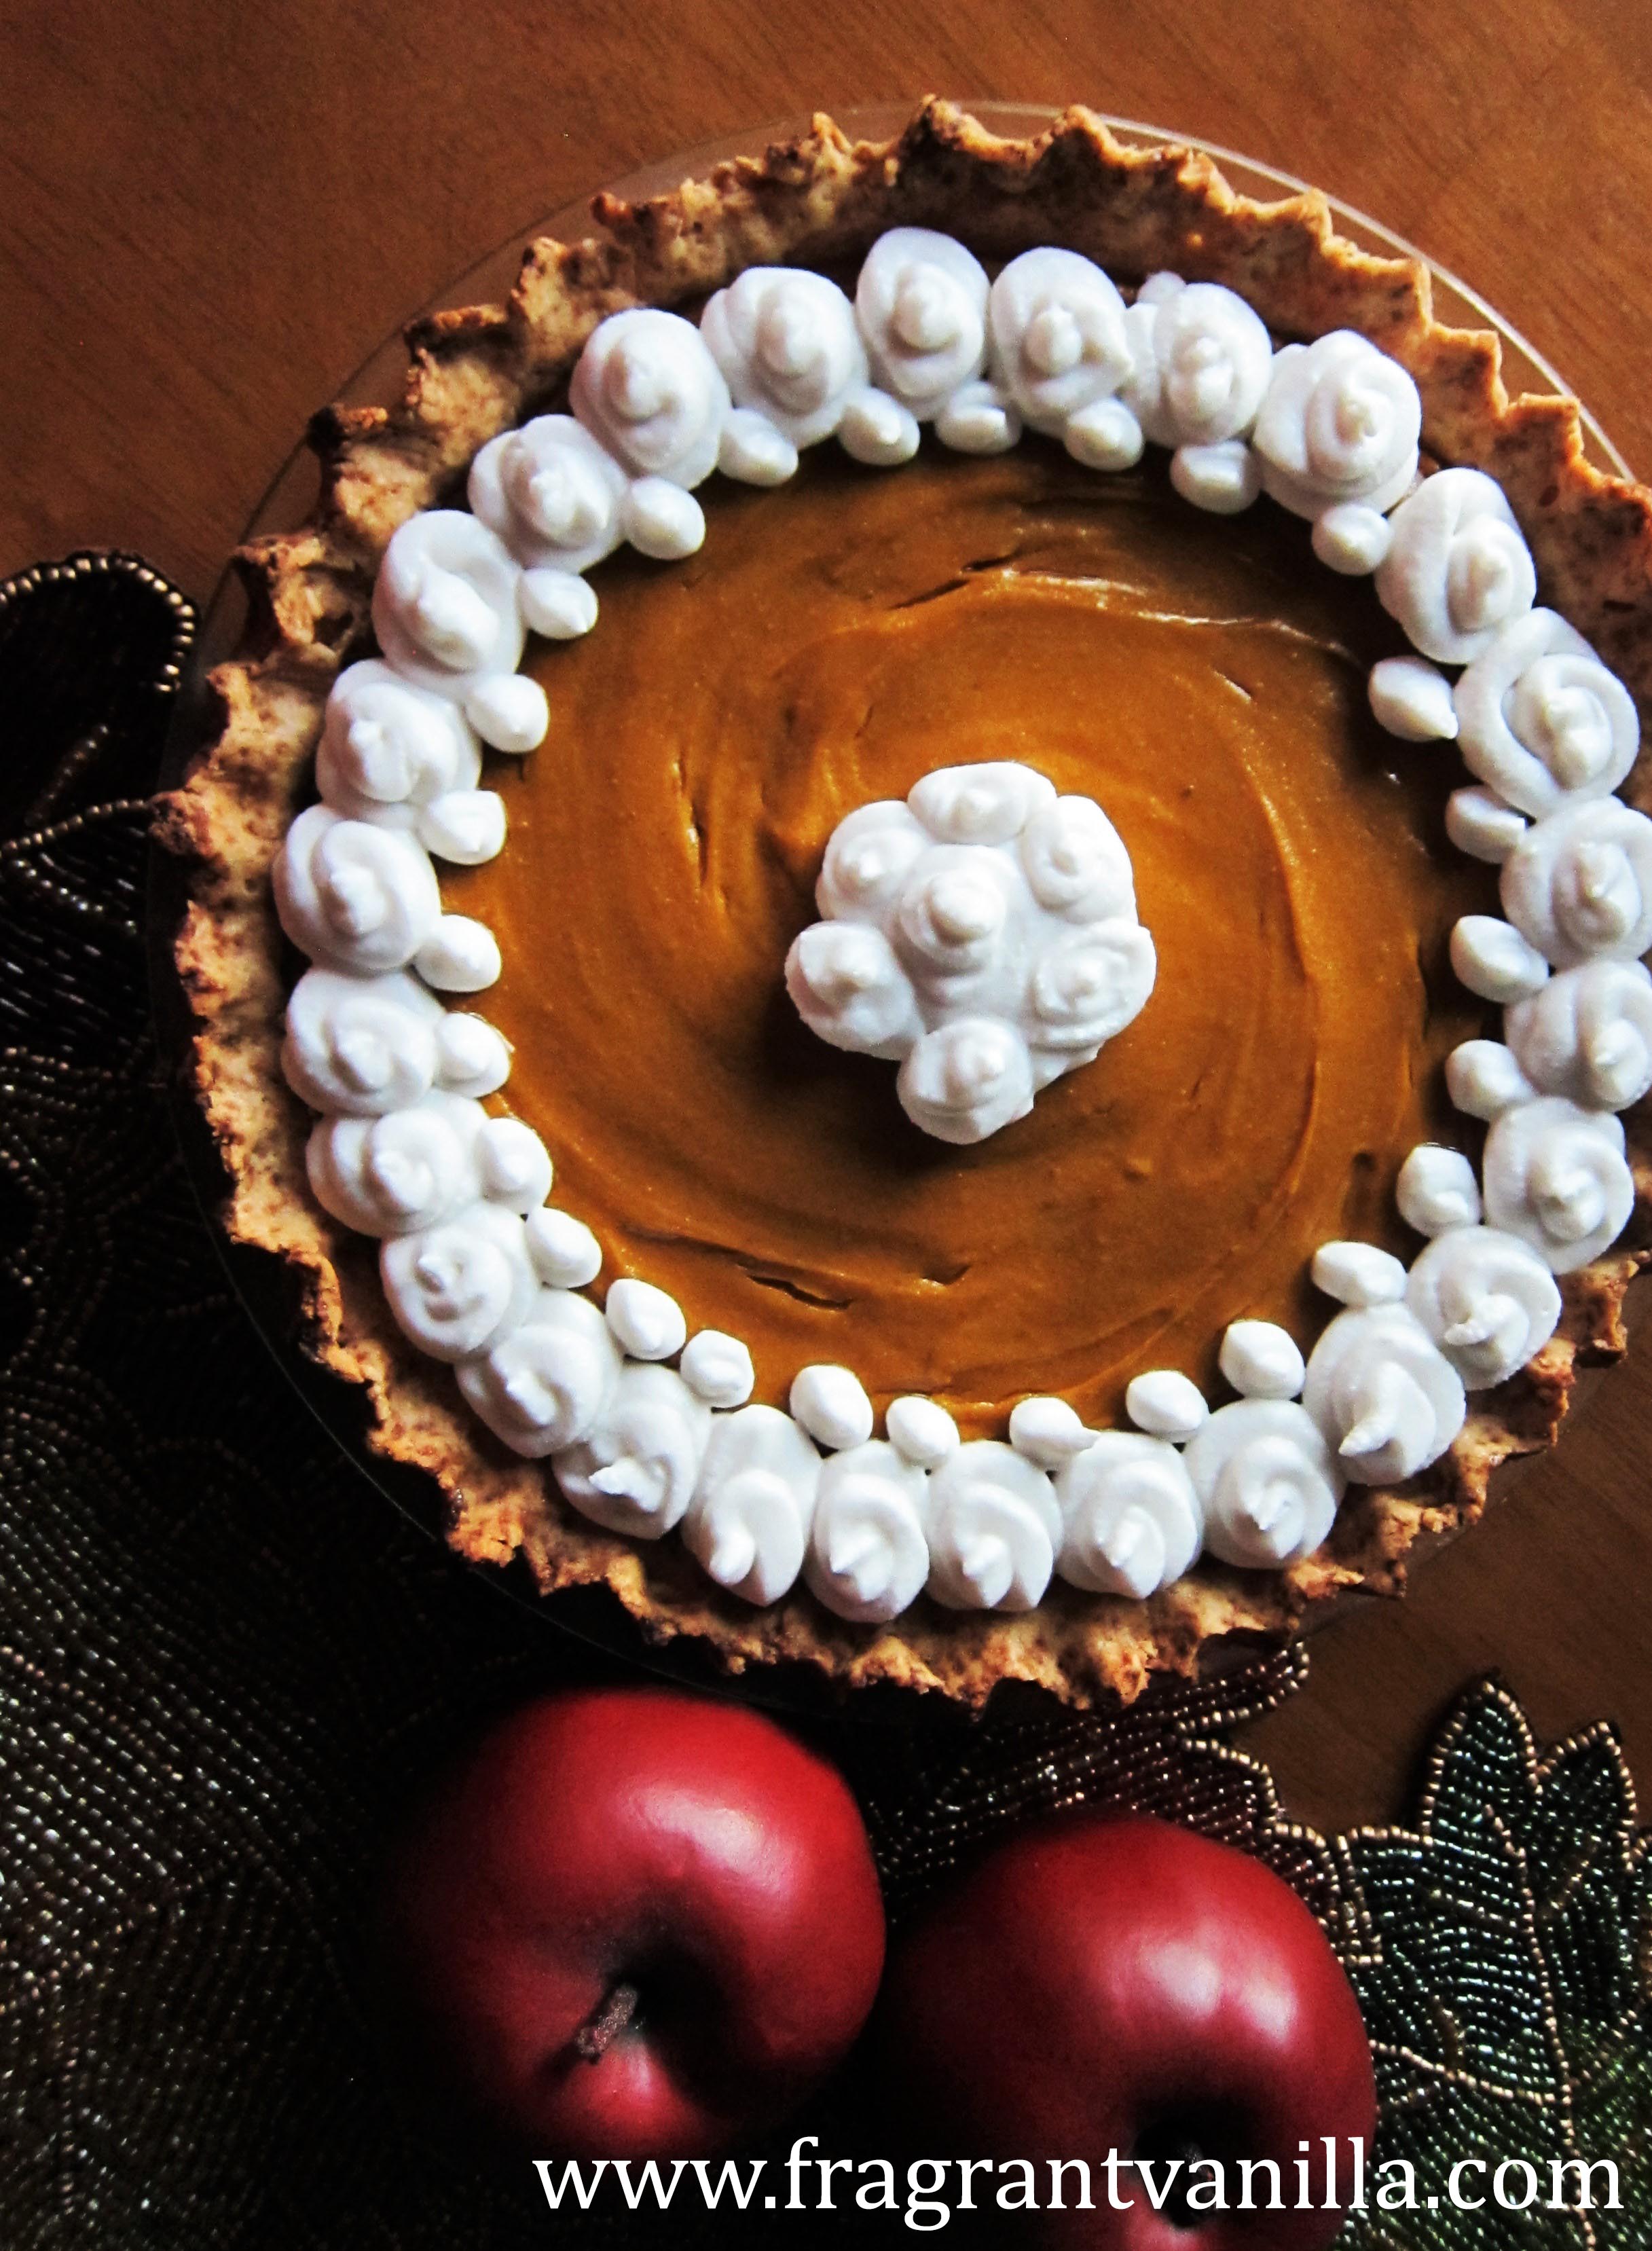
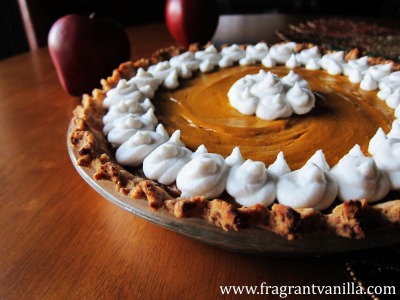
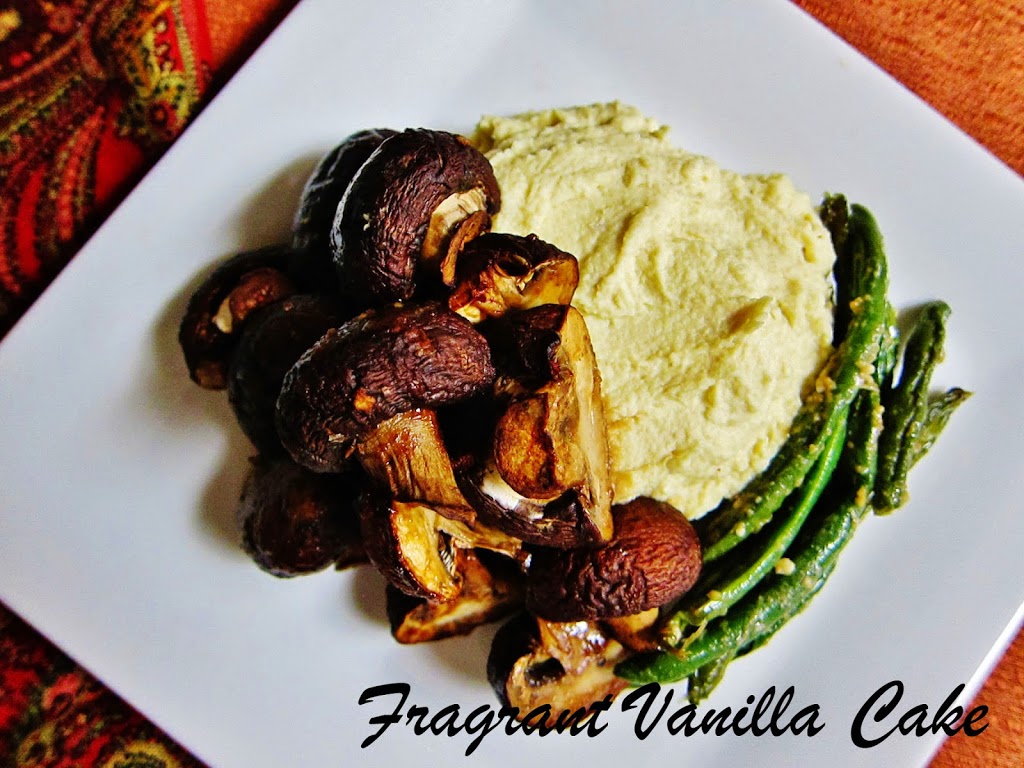
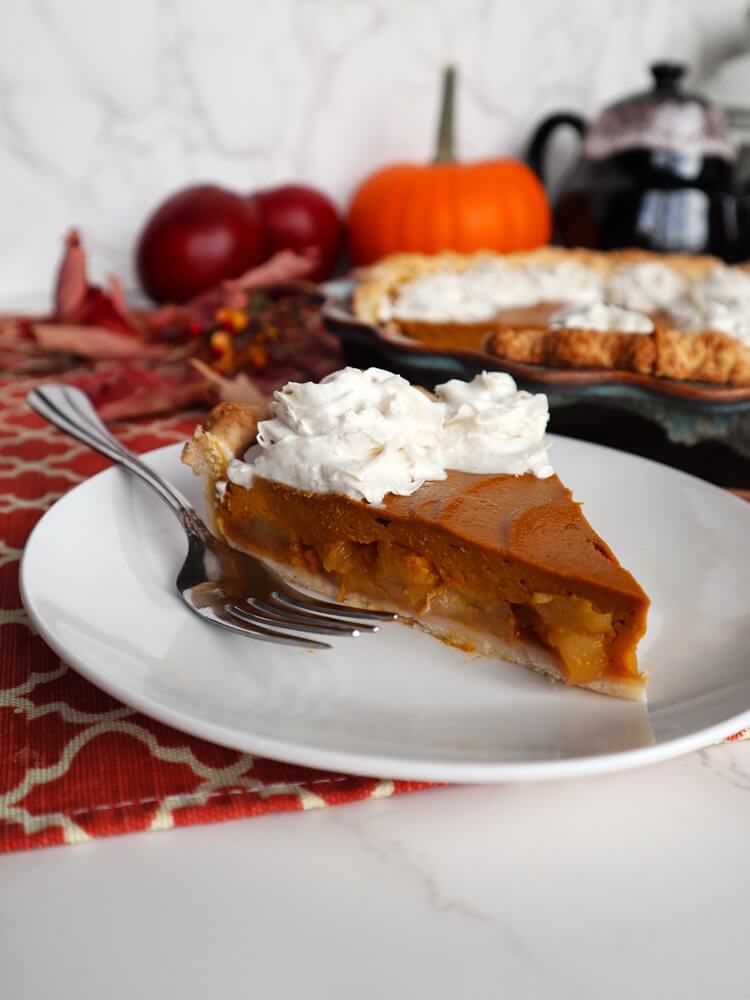
    Pumpkin and apple pie are both Thanksgiving essentials as far as I’m concerned. My Grandma always served both, along with pecan pie and when I was little I would always have a little slice of each. This year I made some pecan baklava for thanksgiving but I also wanted to have pumpkin and apple pie, so I made a Vegan Pumpkin Apple Pie last weekend and it turned out so delicious!

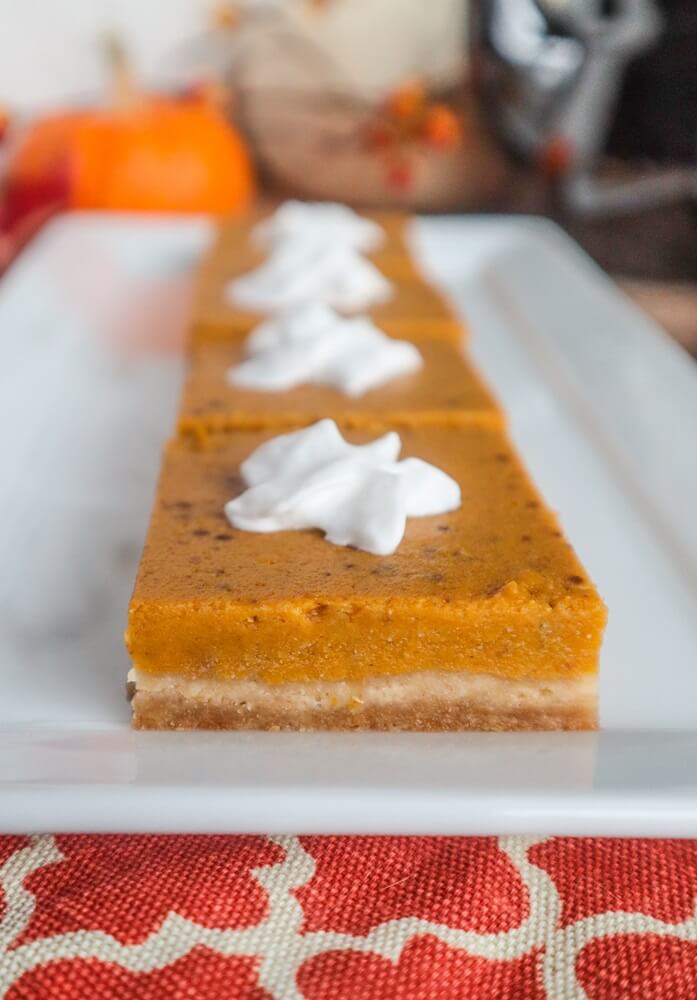
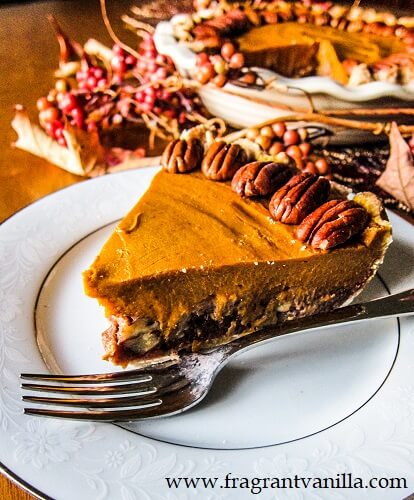
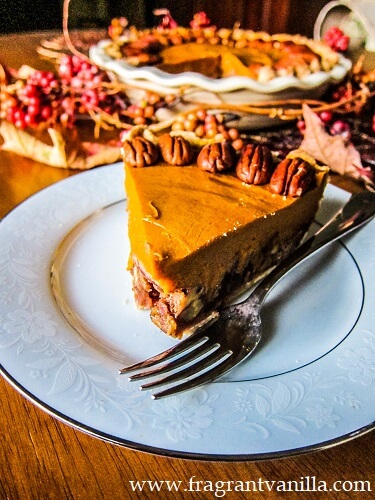
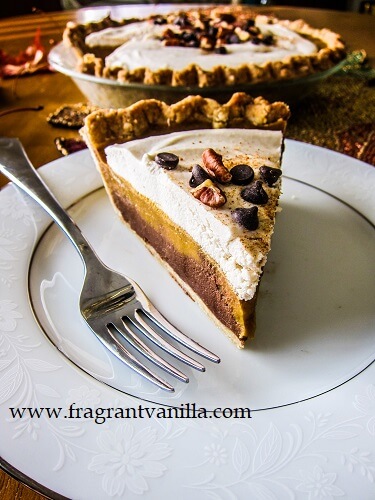
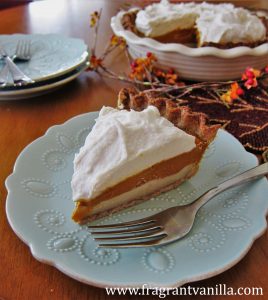
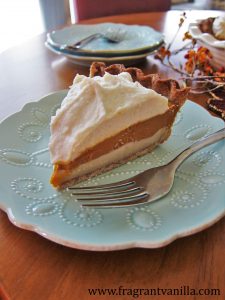
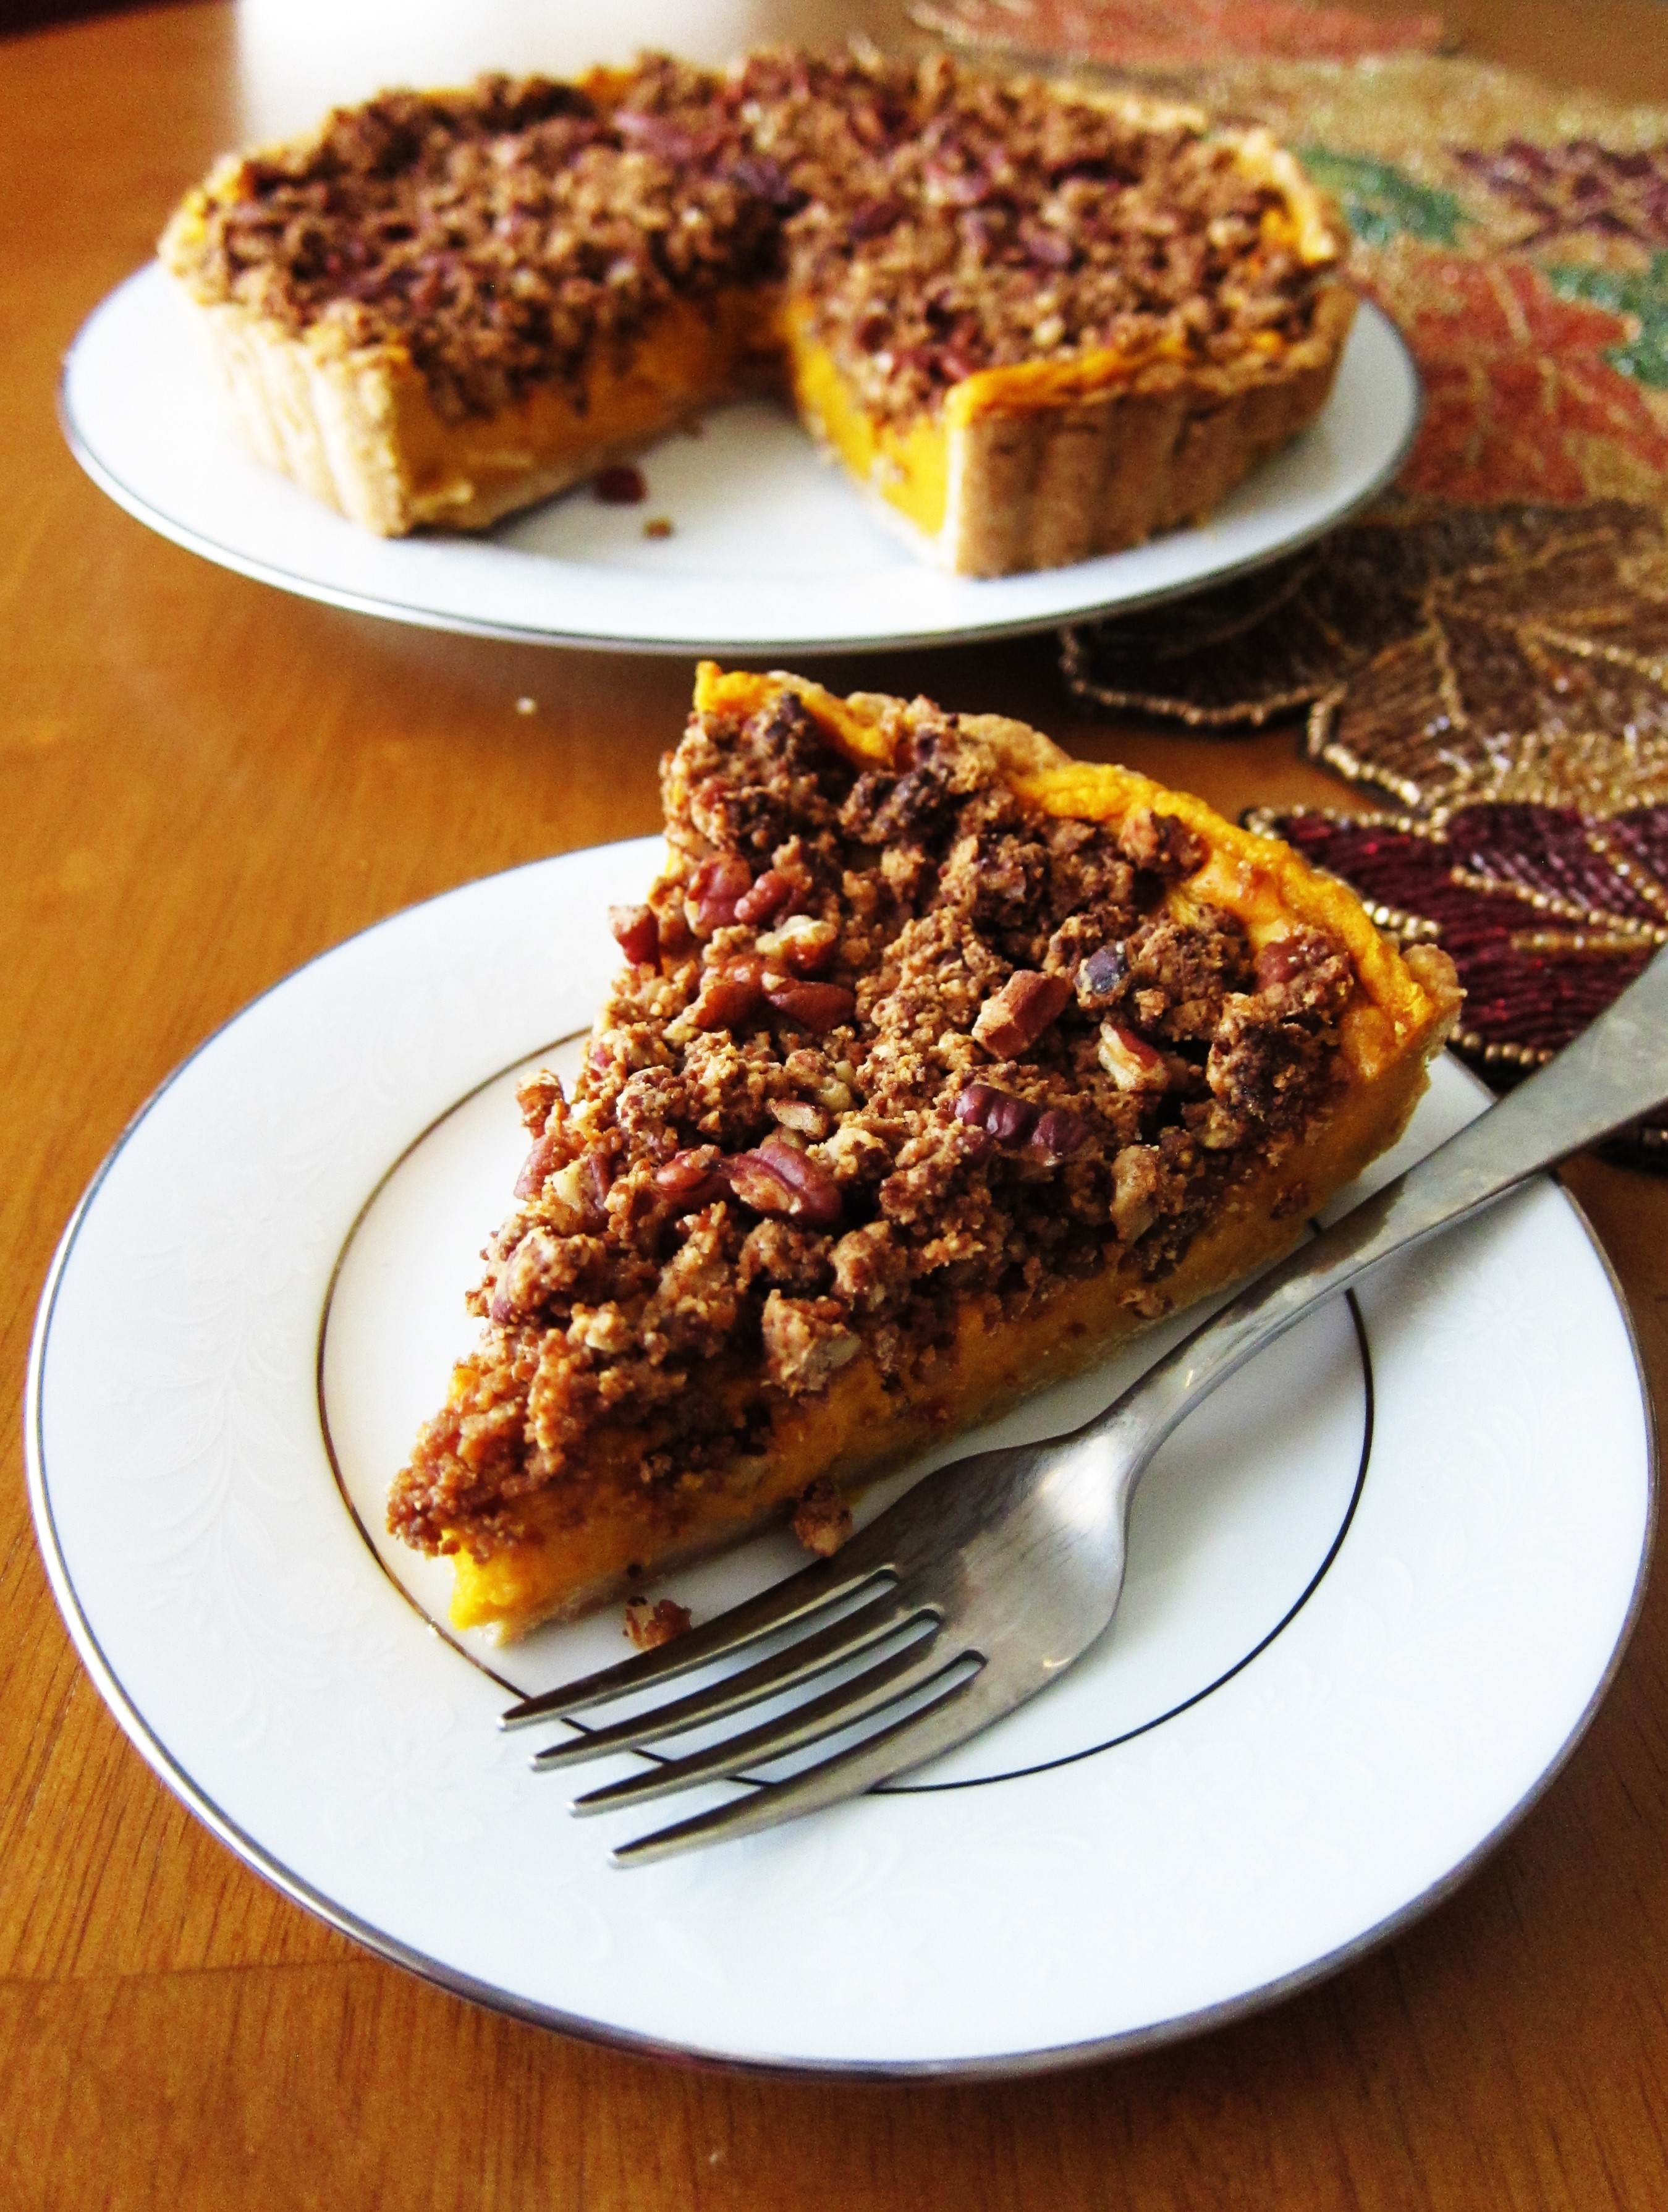
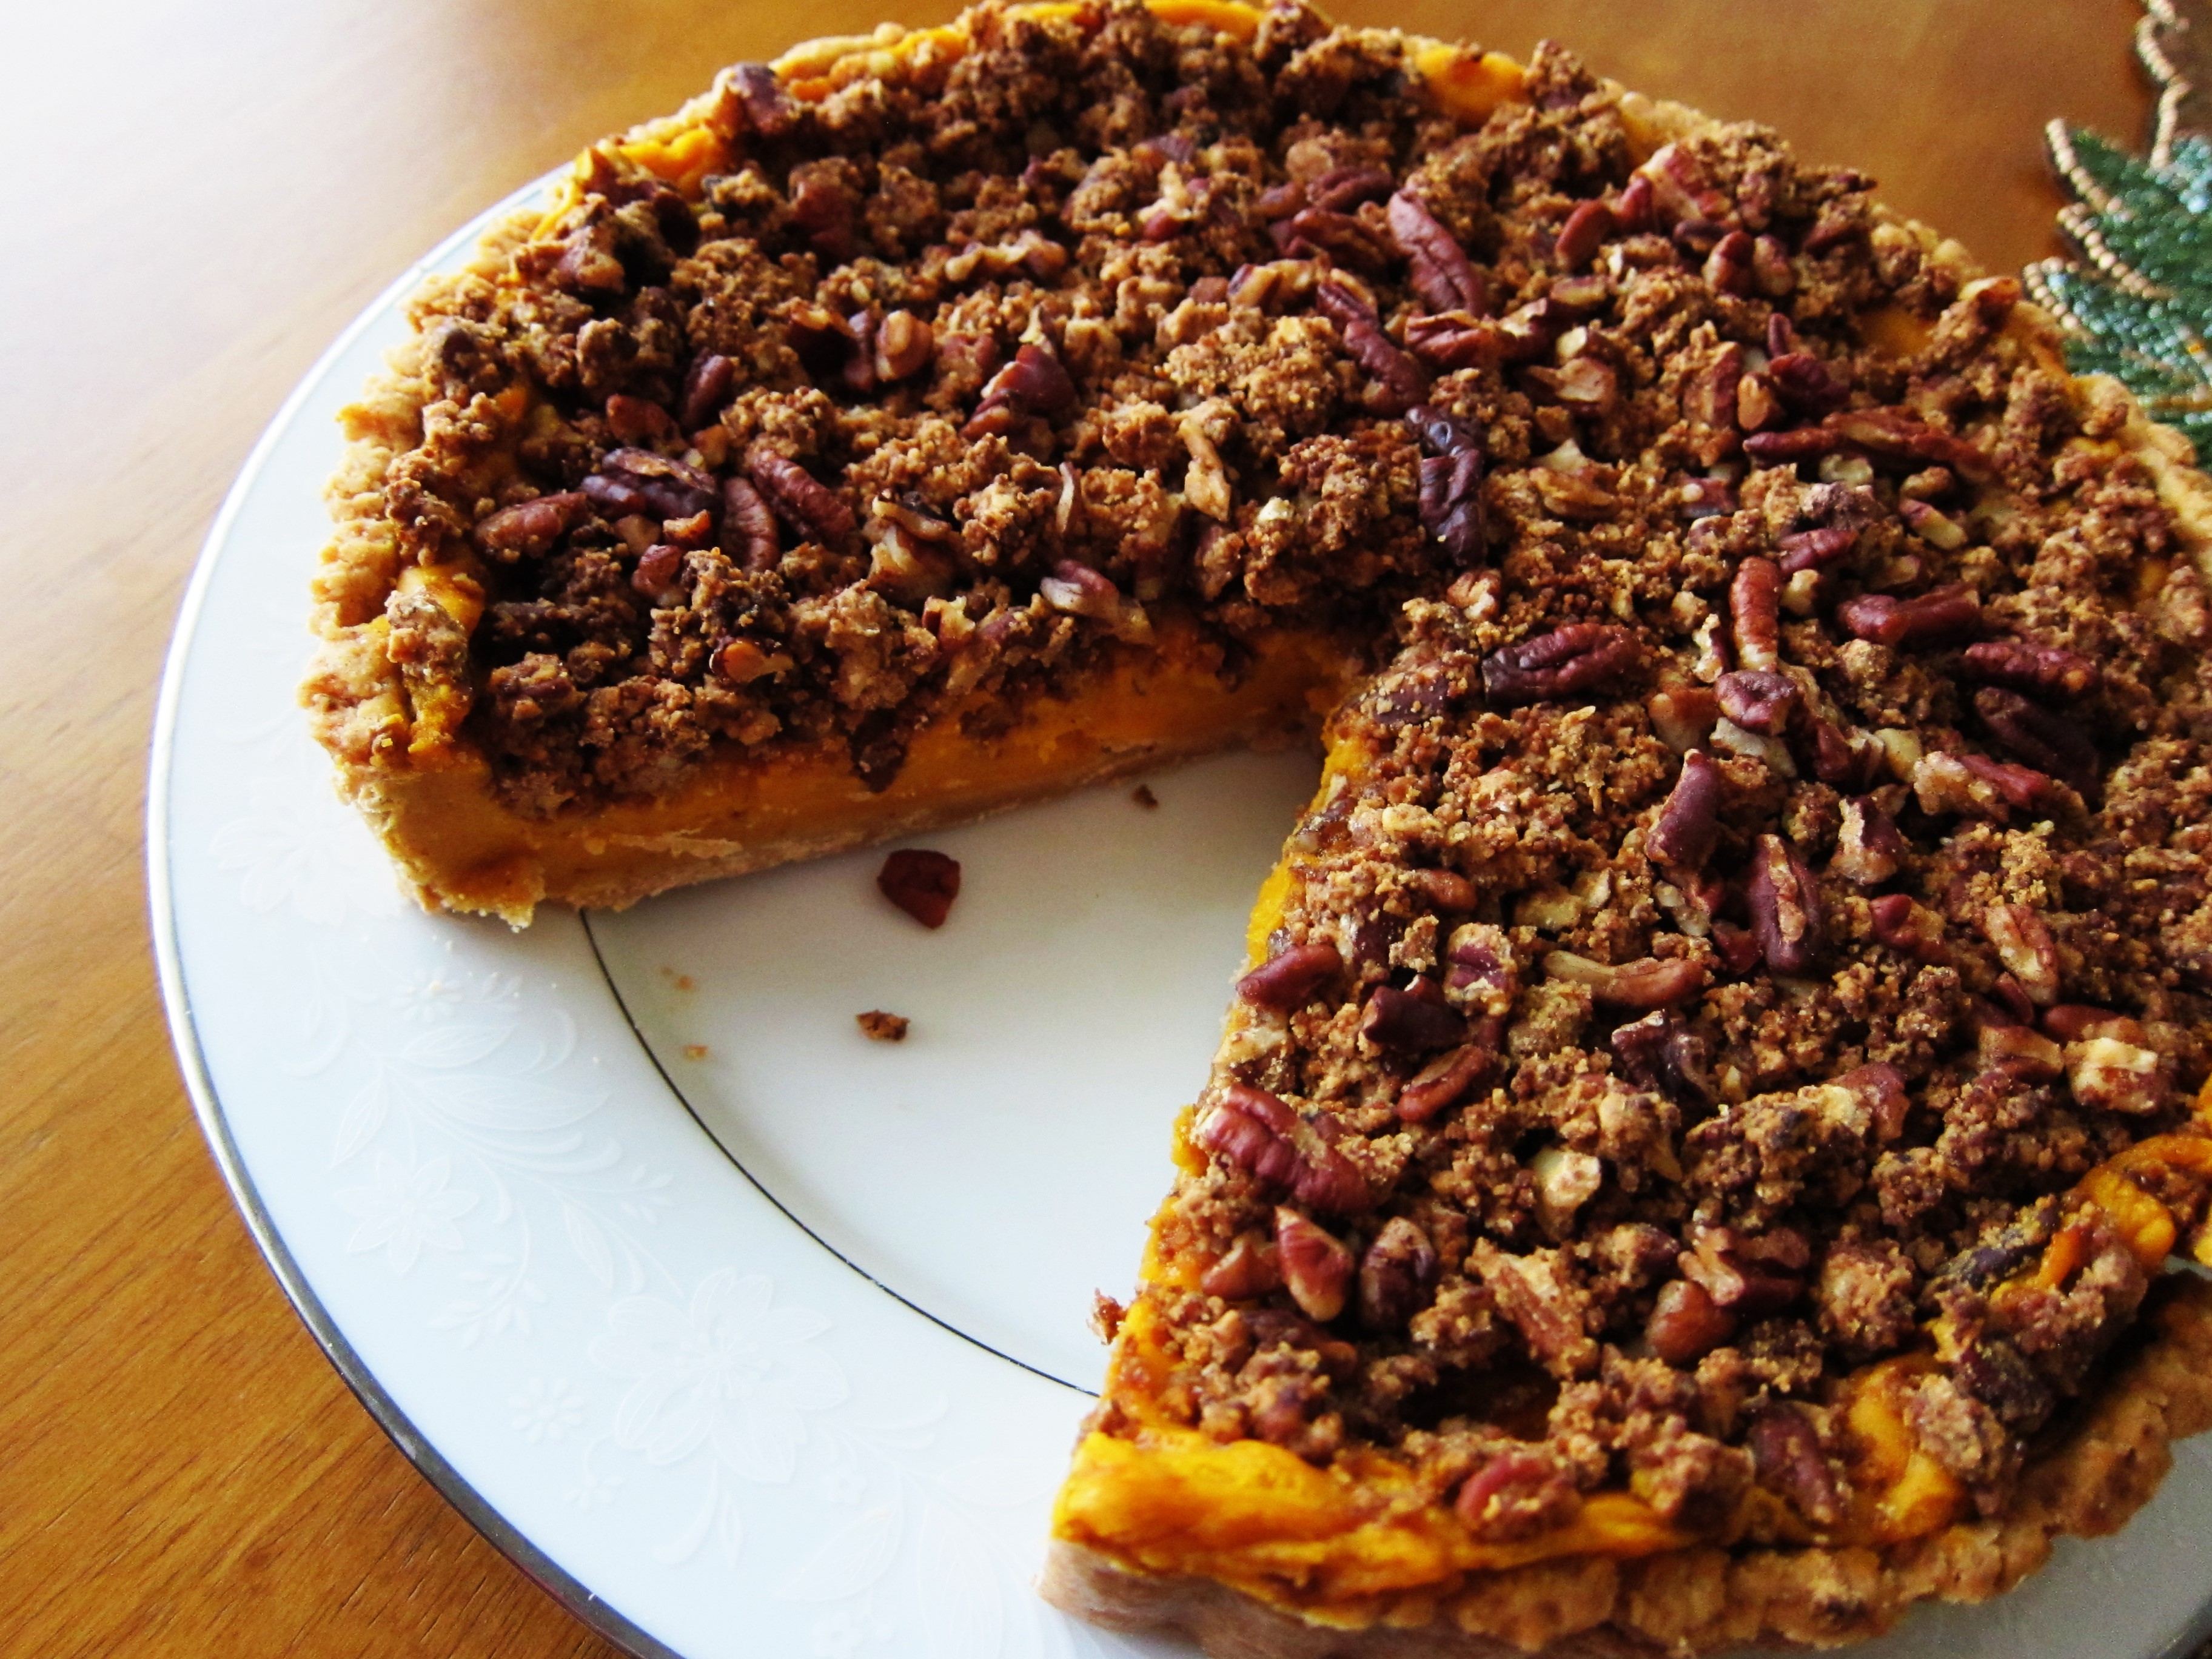
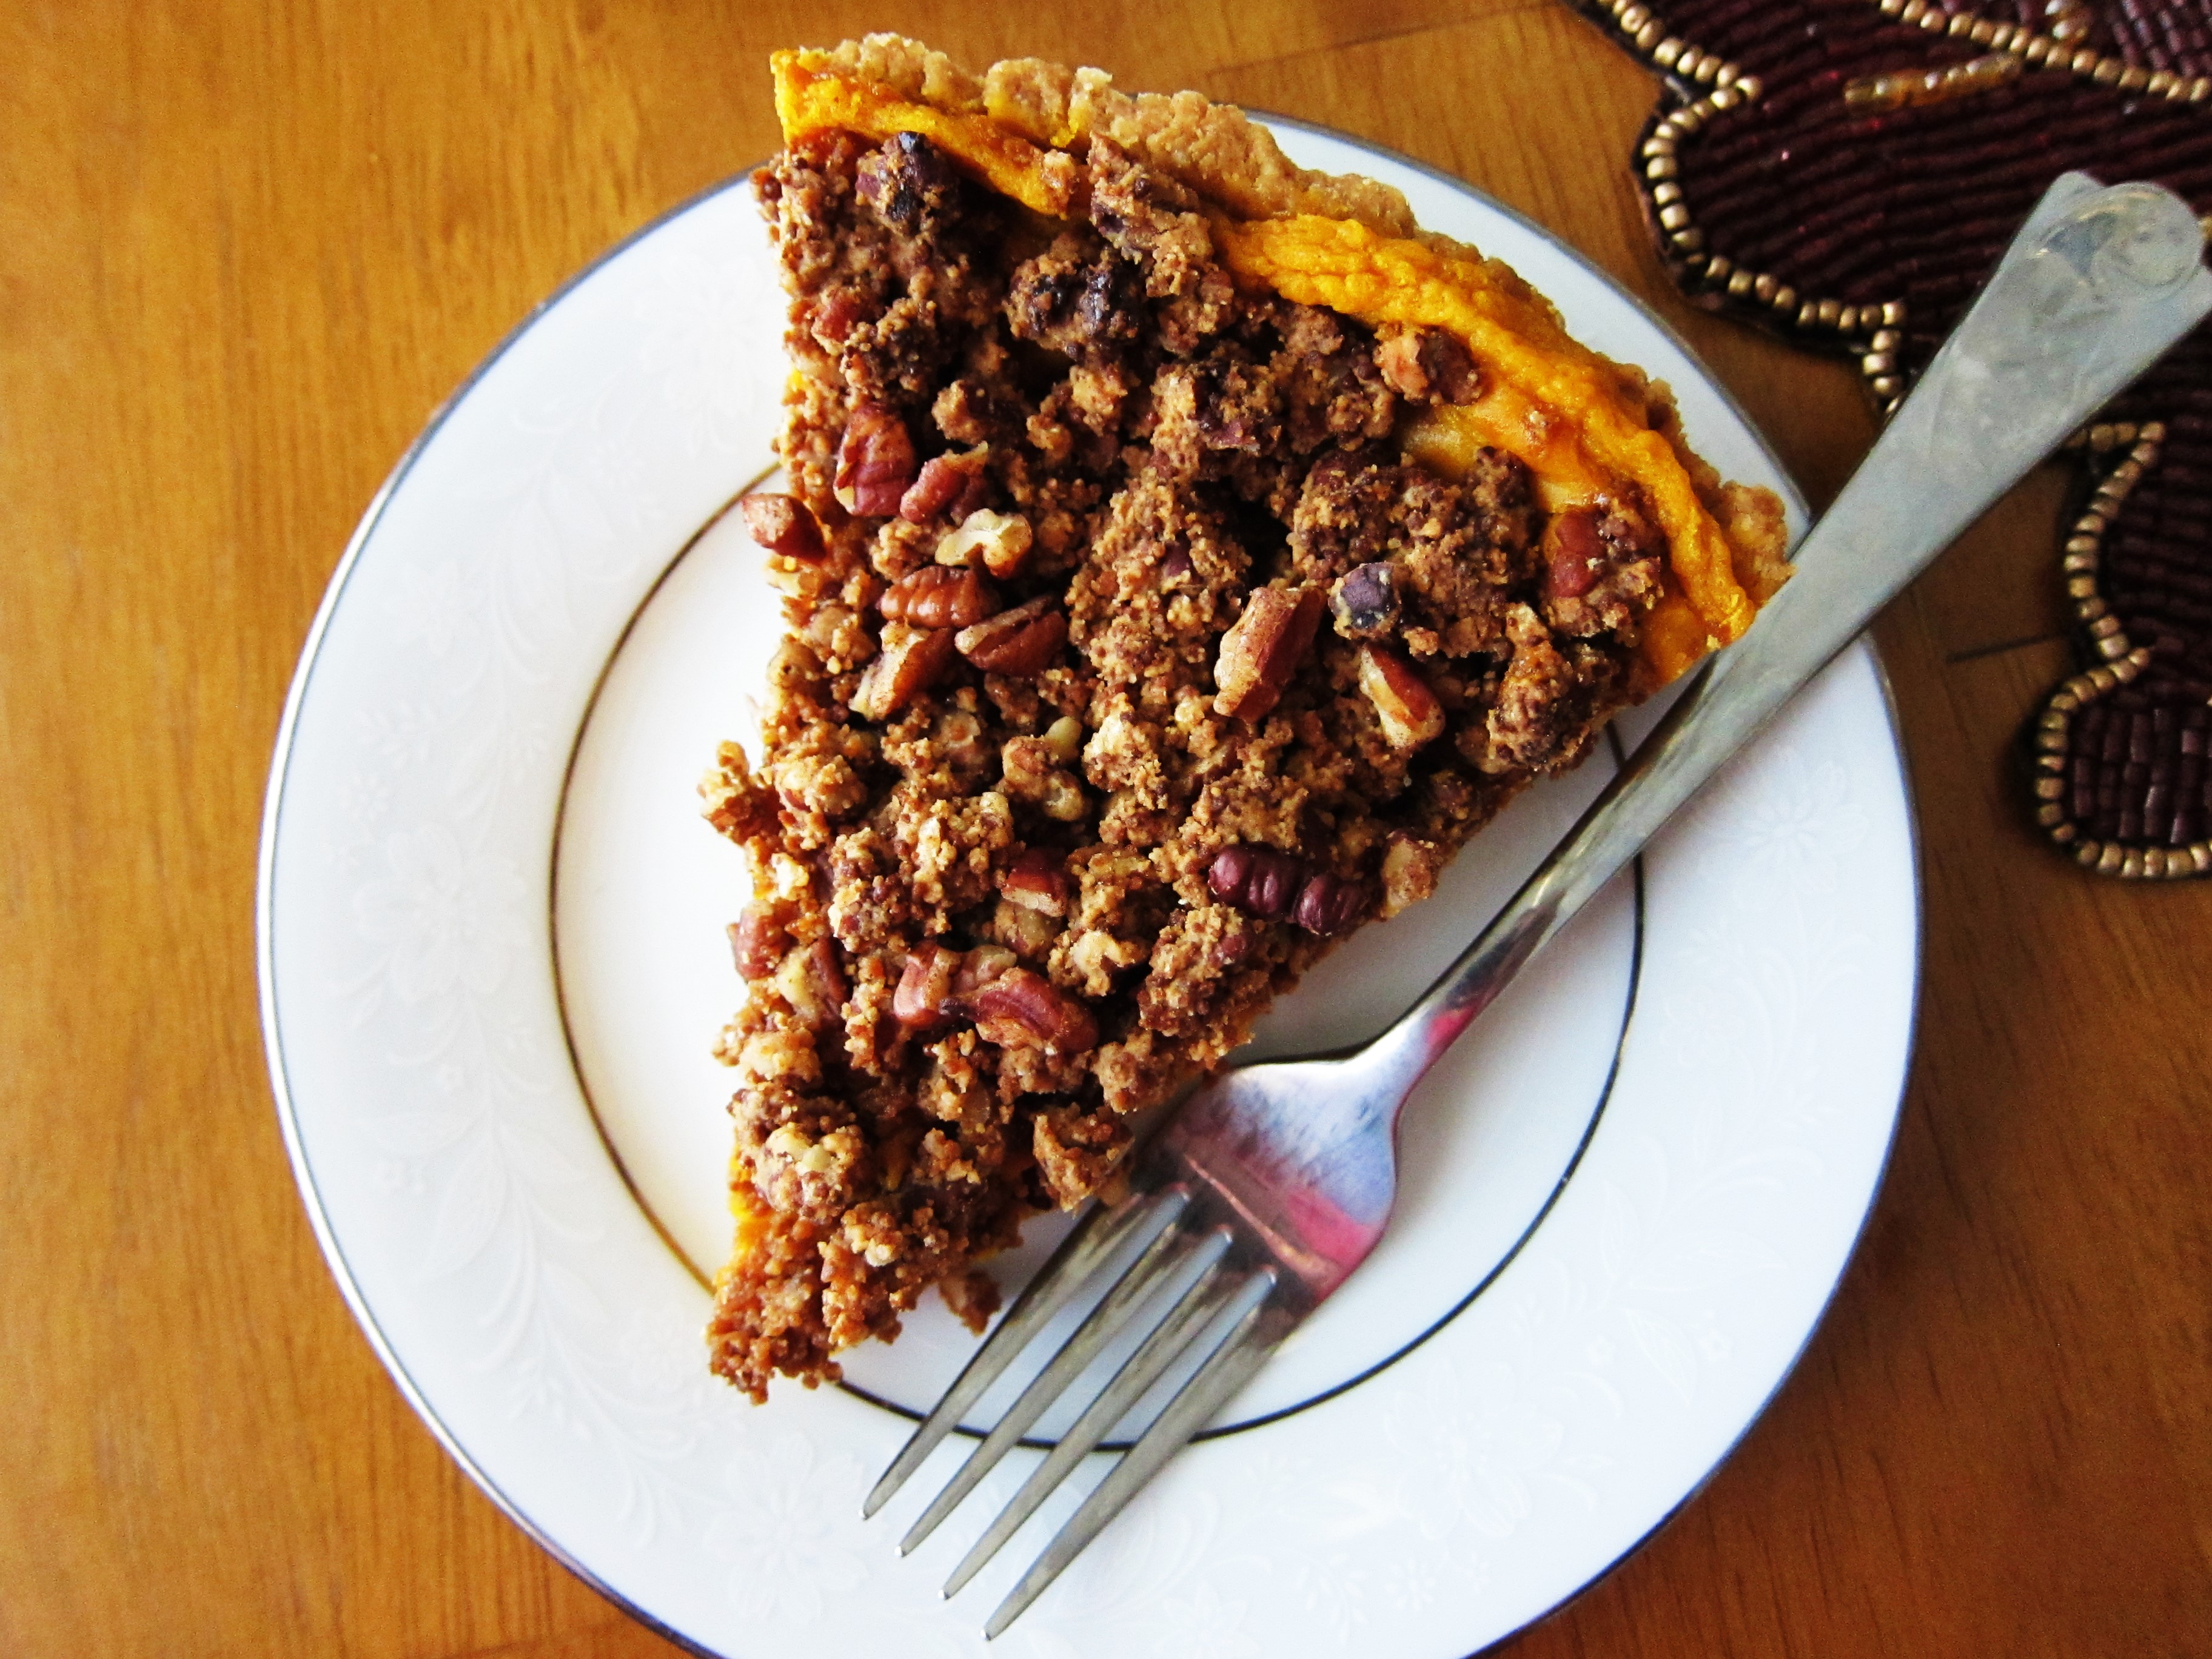
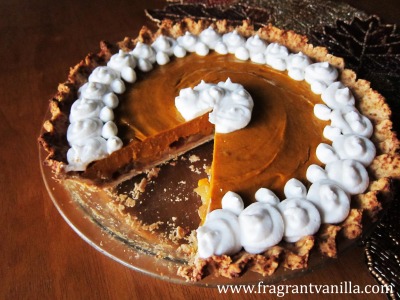
    I made a home made pie crust, then I made some apple pie filling with cinnamon and vanilla I cooked on the stove and poured that over the crust for the first layer.

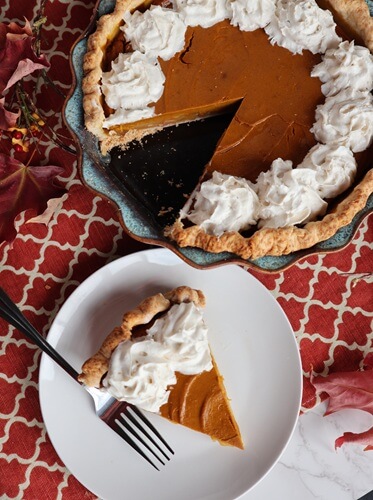
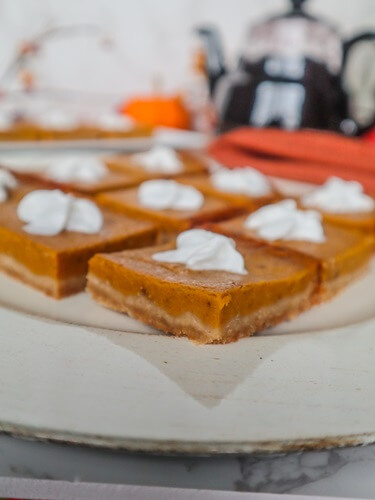
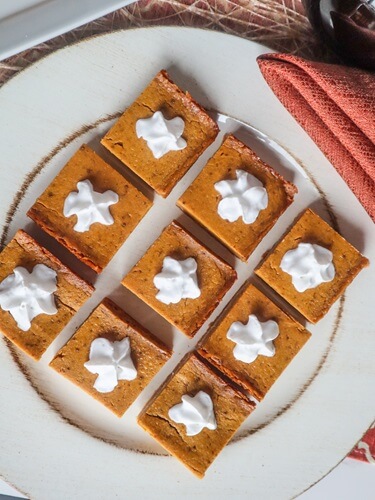
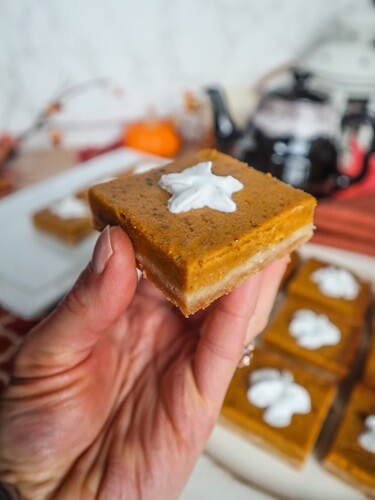
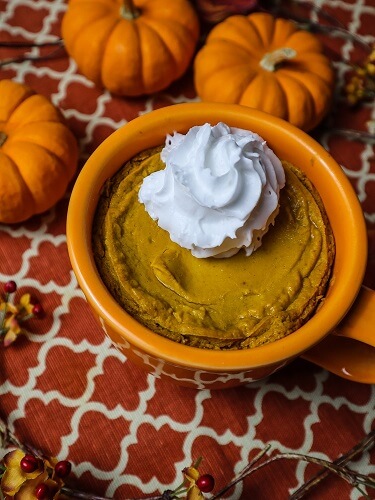
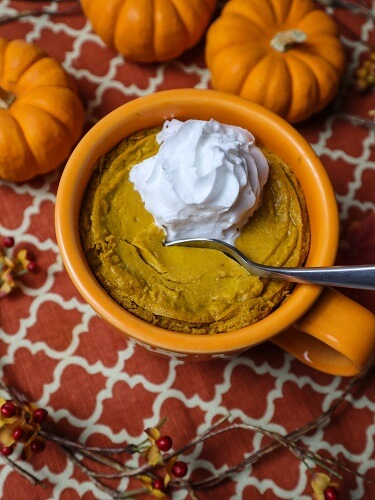
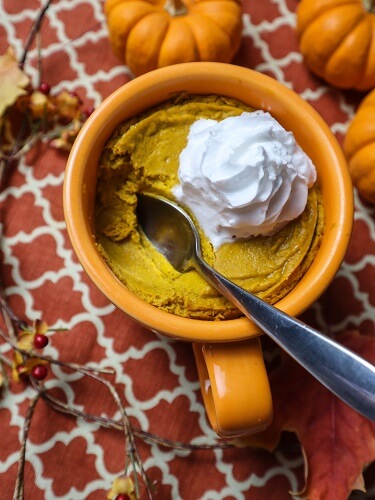
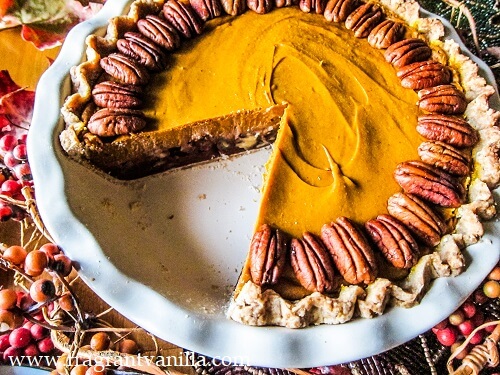
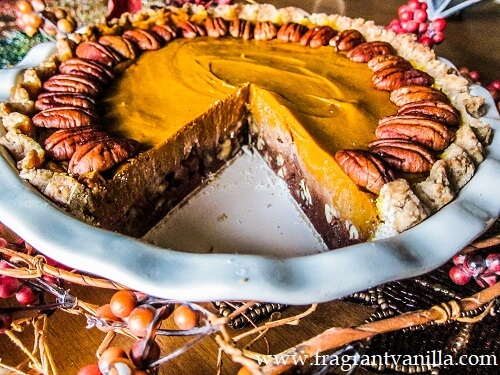
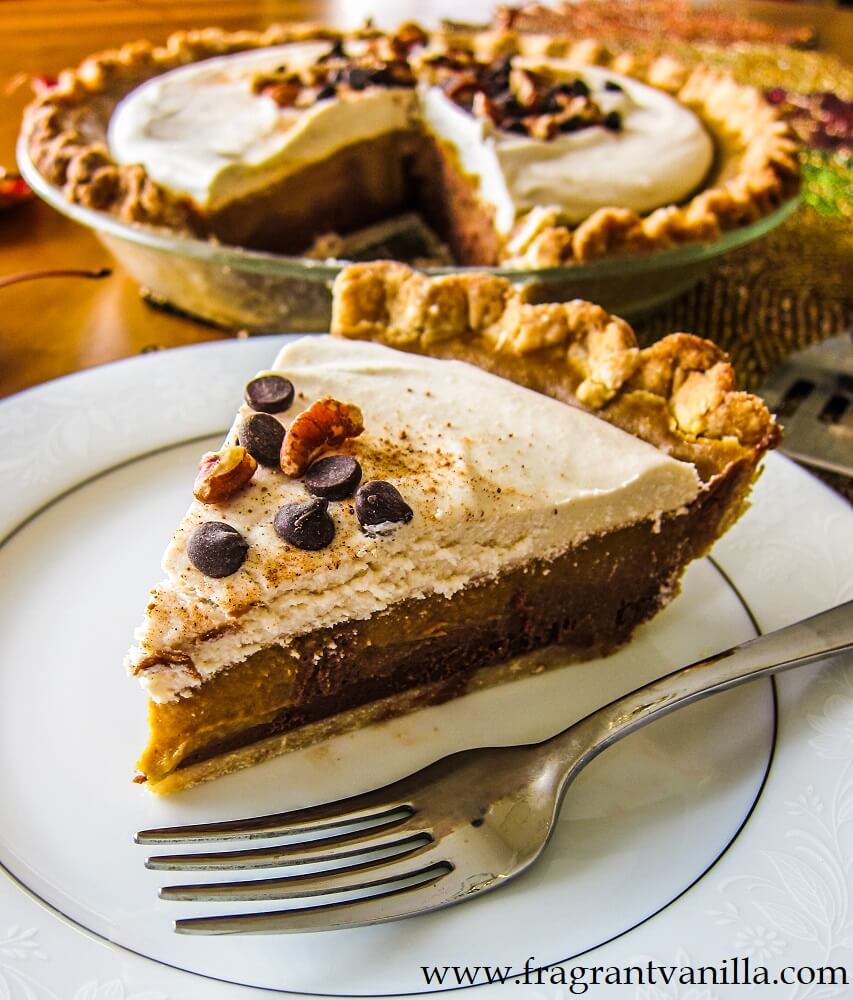
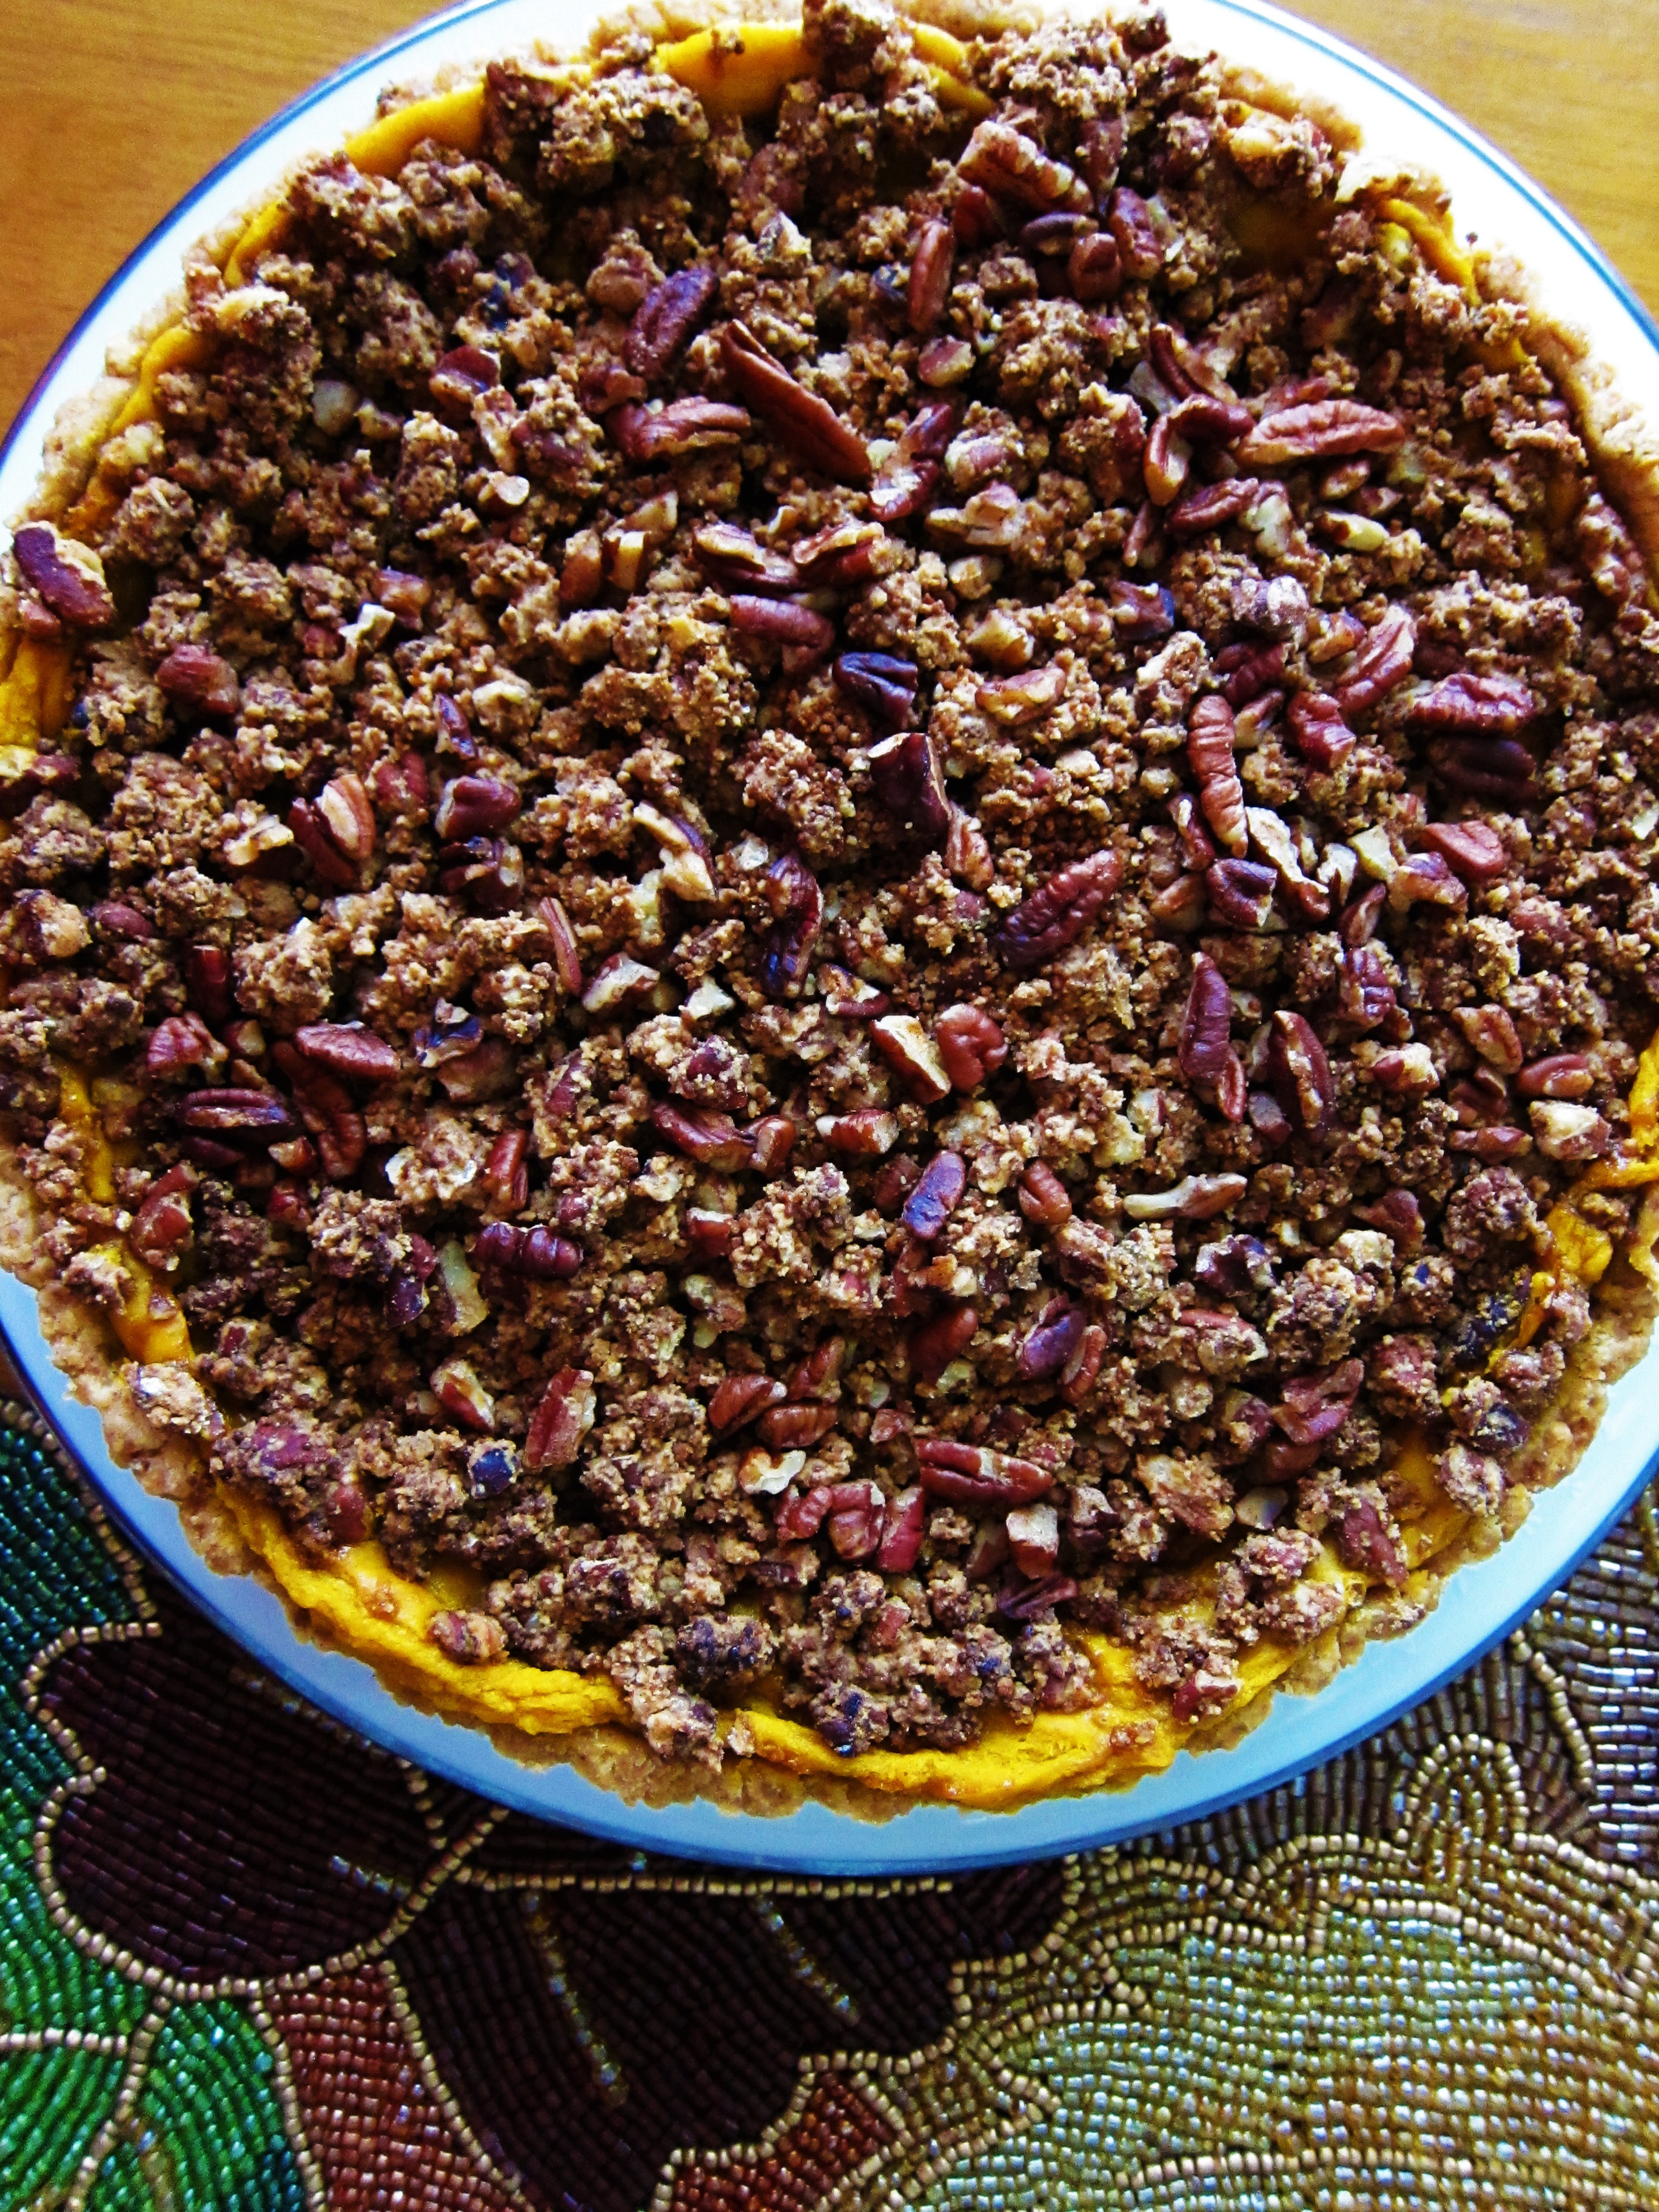
    For the second layer I made an easy vegan pumpkin pie filling that is made rich with coconut cream, and flavored with warming pumpkin pie spices and vanilla. It’s really easy to make you just blend it in a blender, pour it over the crust and bake!

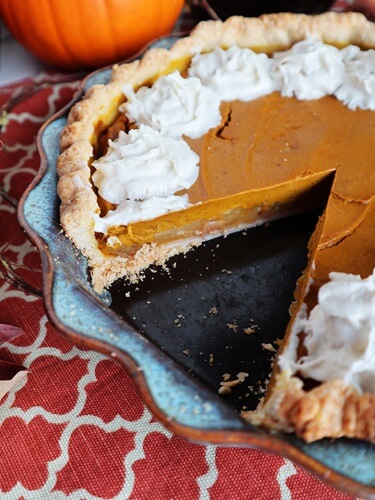
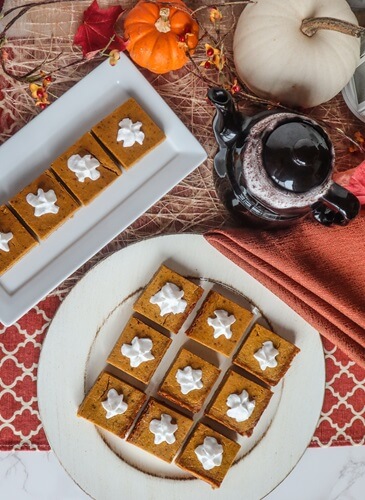
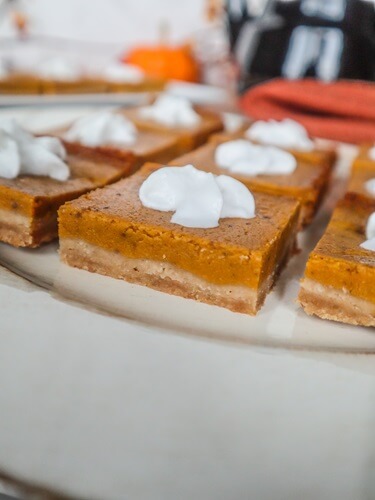
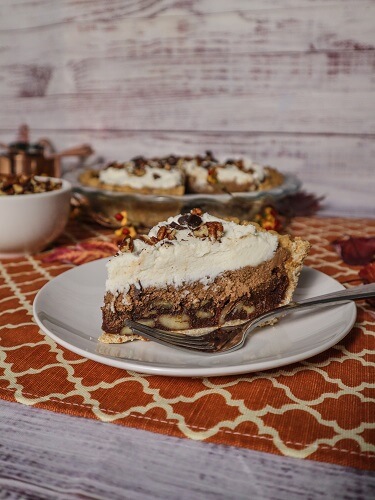
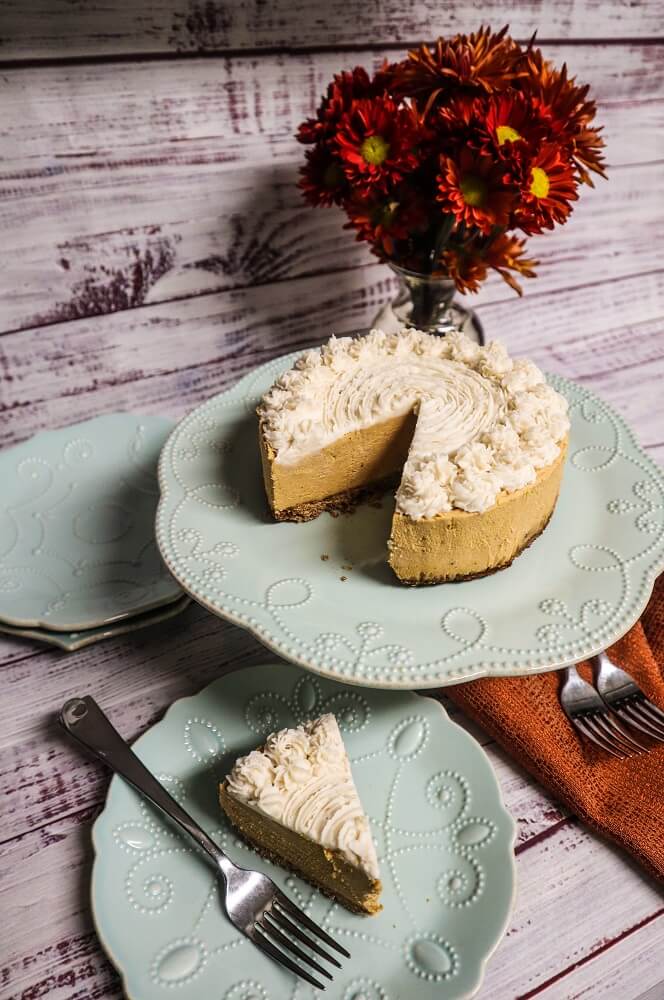
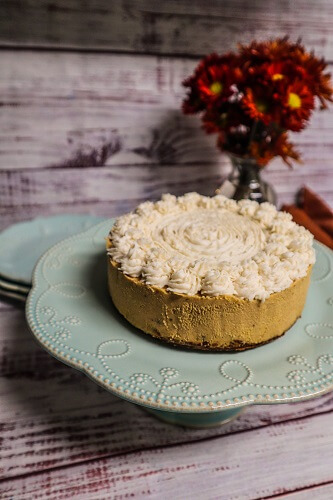
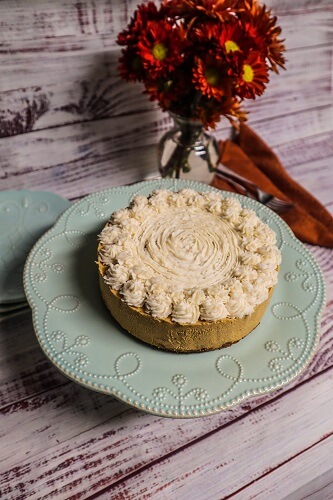
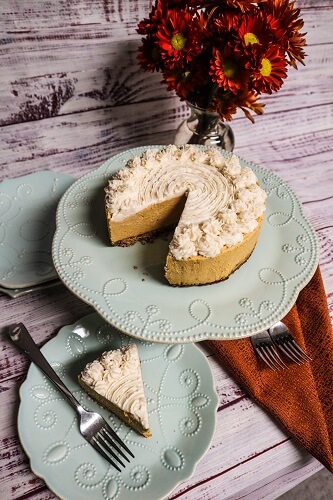
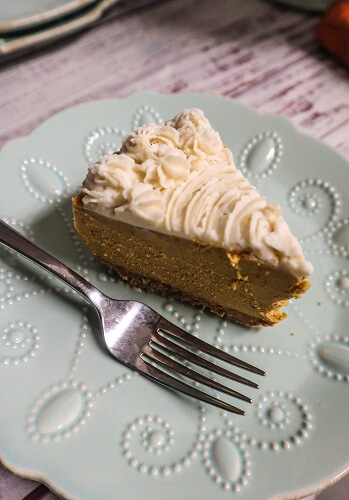
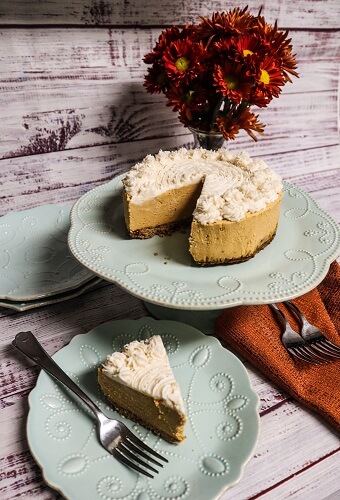
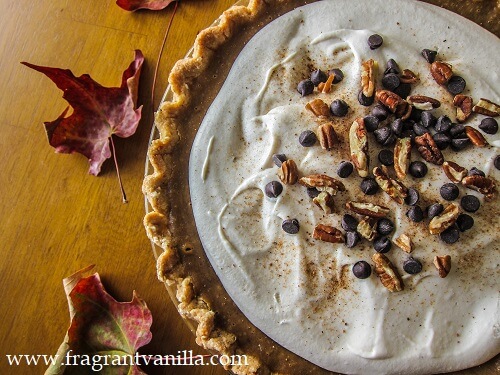
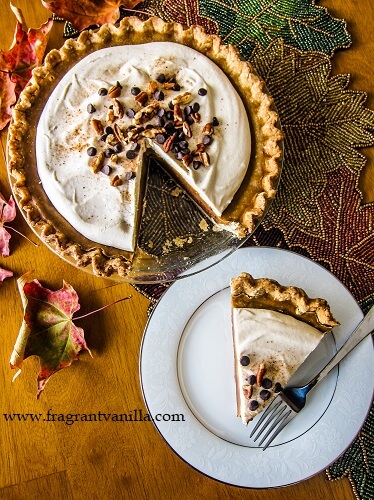
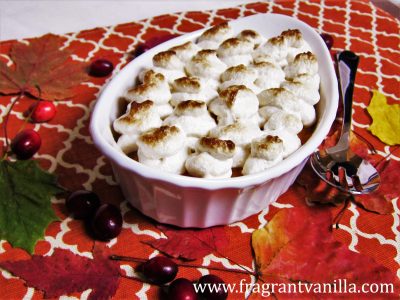
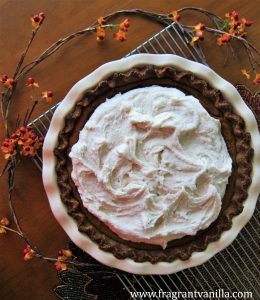
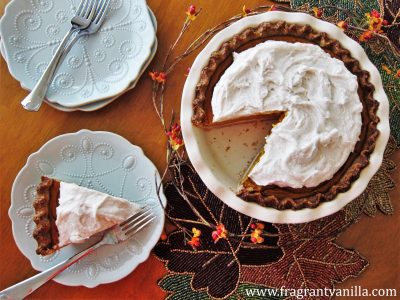
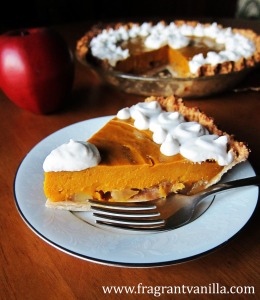
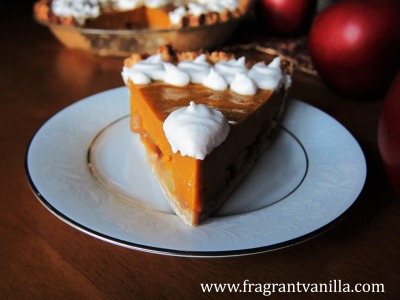
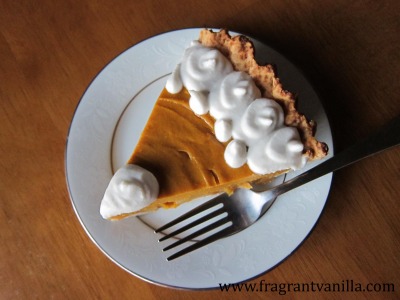
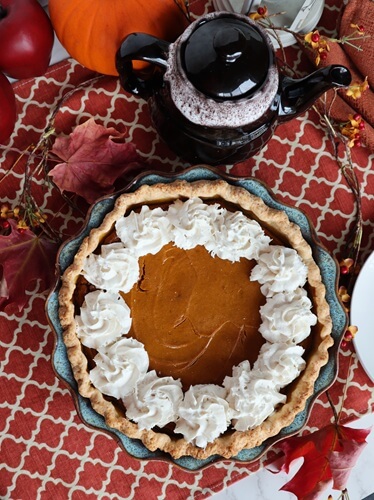
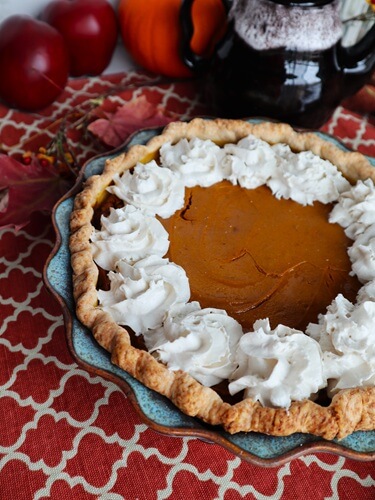
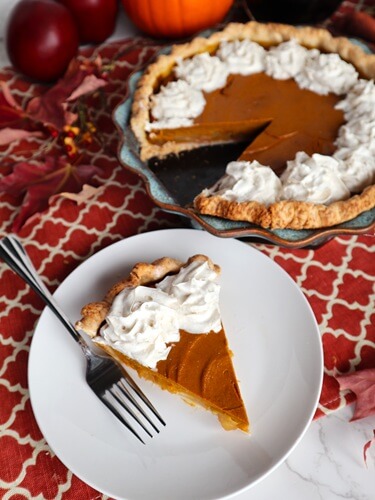
    It smelled amazing while baking! Once it cooled down, I topped it off with vegan whipped cream before serving! It is so heavenly! The perfect dessert to include with your Thanksgiving spread! If you love pie, definitely give this Vegan Pumpkin Apple Pie a try!

    Vegan Pumpkin Apple Pie

    Makes one 9 inch pie

    Crust:

    • 1 1/2 cups all purpose flour
    • 2 Tbsp granulated sugar
    • 1/4 tsp sea salt
    • 1/4 cup plus 2 Tbsp vegan butter
    • about 3-6 Tbsp cold water

    Apples:

    • 3 medium tart sweet apples, diced
    • 1 tsp cinnamon
    • 1/4 cup granulated sugar
    • pinch sea salt
    • juice of one lemon


    Filling:

    • 2 cups canned pumpkin puree
    • 1/3 cup pure maple syrup
    • 3/4 cup coconut cream
    • 2 tsp vegan butter, melted
    • 1 1/4 teaspoon ground cinnamon
    • 1 teaspoon ground ginger
    • 1 /4 teaspoon ground nutmeg
    • 1/4 tsp ground cloves
    • 1/4 teaspoon salt
    • 1 1/2 tablespoons cornstarch
    • 3/4 teaspoon agar powder


    For Serving:

    • vegan whipped cream


    Instructions:

    1. To make the crust, in a large bowl, mix together flour, sugar, and sea salt. Cut in butter with a pastry blender or 2 knives until it is in pea sized pieces. Mix in  just enough water to create a smooth dough that holds together but isn’t too sticky. Add more water if needed, and knead slightly until a smooth dough is created. Roll out into a 9 inch circle on a sheet of parchment paper, then use the paper to help you transfer it to an 8 inch pie dish.  Flute the edges, and set aside in the refrigerator.
    2. Pre-heat the oven to 375F degrees.
    3. To make the apples, place them in a sautee pan over medium heat with all of the other ingredients, cover with a lid, and cook until the apples are tender, about 10 minutes. Set aside.
    4. To make the pumpkin filling, place all ingredients in the blender and blend until smooth.
    5. To assemble the pie, scatter the apples over the crust, then pour the filling over that.
    6. Place in the pre-heated oven and bake for about  40-45 min. until the edges of the crust are lightly brown, and pie is set.  Allow to cool completely.
    7. Serve with vegan whipped cream if desired.
  • Vegan Chocolate Chip Pecan Pie Bars

    Vegan Chocolate Chip Pecan Pie Bars

    I can not believe how fast this Fall is going. It seemed like it had just started, and now it is dark outside early, the leaves have fallen off the trees and we are way into November and Thanksgiving is this week!  So I am thinking about the Thanksgiving desserts.  I don’t usually make pecan pie any other time of the year.  It was my favorite Thanksgiving dessert growing up. My Mom and Grandma were big pecan pie lovers, and I think I inherited that too.  Not that I didn’t always take a piece of the pumpkin and apple pie that we always had as well, dessert was my favorite part, and I saved room.  I was thinking about that pecan pie this week and how good it was and decided that I needed to make something similar.  So I made Vegan Chocolate Chip Pecan Pie Bars!

    One of my favorite pecan pies that I have made (I tend to make different variations to keep it interesting), was one with chocolate chips or chunks. I did not want to make a big pie right now though, so I went with pecan pie bars.  I like making bars, because they are a good thing to store in my freezer and pull out when the craving strikes.  Plus they are easy to share!

    For these, I made sort of a short bread type crust, because I figured it would go so well with the pecans. Instead of using straight flour, I used a mixture of flour and tapioca flour to give it a nice melt in your mouth texture. If you don’t have tapioca flour though, you can use cornstarch instead with good results. For the filling, instead of making a corn syrup or sugar and egg filled filling like in the original, I made a gooey vanilla date caramel.  I love date caramel!  It tastes just as good as regular to me but is way less processed. Dates are about as natural as it gets when it comes to sweetener if you blend them up yourself.

    I added plenty of pecans to this, and of course the dark chocolate chunks.  I could not wait to try these bars.  They smelled so heavenly while baking!  I had to wait until the next day though, since I was making them at night, and I wanted them to cut nicely which requires complete cooling. They turned out sooo good!  I think I like these even better than the uber sweet pecan pie I grew up eating, these have more of a true pecan flavor along with the sweet caramel!  If you are a pecan pie fan, give these Vegan Chocolate Chip Pecan Pie Bars a try!

    Vegan Chocolate Chip Pecan Pie Bars

    Makes 16

    Crust:

    • 3/4 cup organic whole wheat pastry flour*
    • 1/4 cup tapioca flour (or cornstarch would work as well)
    • 1/4 cup granulated sugar
    • 1/8 tsp sea salt
    • 6  Tbsp vegan butter (such as Earth Balance)


    Filling:

    • 1 cup soft pitted medjool dates (if they are not soft, soak them in filtered water for 30 minutes and drain well
    • before using)
    • 1/4 cup pecan butter (or raw cashew butter or almond butter)
    • 1 Tbsp maple syrup, plus more for brushing the top of the pie
    • 1/8 tsp sea salt
    • 1 tsp pure vanilla extract
    • 1/3 cup filtered water
    • 1 Tbsp coconut oil
    • 2 cups toasted pecans, plus more for top of bars
    • 3/4 cup chopped vegan dark chocolate, plus more for top of bars
    • maple syrup for brushing bars


    Directions:

    1. Preheat oven to 375F degrees.
    2. To make the crust, in a large bowl, mix together flour, tapioca flour,  sugar, and sea salt. Mix in butter and stir (or use your hands and knead) until a smooth dough is created. Press into the bottom of an 8×8 inch square pan.
    3. Place in the oven and bake for 15 minutes or until just starting to brown.  Remove from the oven.
    4. To make filling, combine all ingredients in a high speed blender or food processor except the pecans and chocolate chunks. Process until smooth, then scrape into a bowl and stir in the pecans and chocolate chunks. Spread the filling over the crust, and top with more pecans and chocolate chunks. Brush the top lightly with maple syrup. Place in the oven.
    5. Bake for about 20 minutes until it is starting to brown lightly.
    6. Remove from oven and let cool completely before serving.


    *If you prefer regular AP flour, that will work as well. Or if you would like to make these gluten free, you can swap the whole wheat flour for a gluten free flour blend like Bob’s Red Mill AP baking flour (I have had success with this brand).

  • Vegan Pumpkin Pie Bars

    Vegan Pumpkin Pie Bars

    I have been making pumpkin goodies for the last several months, and guess what?  I am not sick of them yet!  I wait all year for all things pumpkin so I enjoy them all during the fall and winter while I can!  Last week for Thanksgiving I decided to make some Vegan Pumpkin Pie Bars instead of a pumpkin pie because I thought it would be easier to share and store.  And they were! Plus sometimes when you have just eaten a large meal, a bar is the perfect size, or if you have more than one dessert like I did.

    These bars pack all of the goodness of pumpkin pie, but are a little easier to make!  When I make bars of any kind I like to line my square pans first with parchment for easy bar removal (just lift out onto a cutting board and cut). I always do this after seeing Martha Stewart do it once and how easy it makes it.  For this crust, I made a brown sugar shortbread that is really simple to make, just mix together with your hands, and press into the pan.  Or, if you preferred you could add the ingredients to a food processor, pulse them together and you would have the same affect.  I just didn’t want to dirty extra dishes so I used the old fashioned method.  I find myself doing this a lot.  I do own things like a stand mixer but often mix by hand because of convenience. This crust smelled so amazing while baking, Eric came out of the other room to ask what smelled so good and if he could have some. I told him it was just the first half of the deliciousness just wait for the filling!

    I used my pumpkin pie filling for these and it worked out perfect!  It is spiced just enough with ginger, cinnamon, nutmeg and cloves plus a hint of vanilla.  It has some full fat coconut milk for richness and I sweeten it with maple syrup. It is so delicious and also smells amazing while baking!  Once these bars were baked and cooled, I topped them off with a little vegan whipped cream.  I got the vegan whipped cream from Aldi, it comes in a can, and I prefer the almond because I find that it lasts longer, but they also have coconut.  It was the perfect addition to these pumpkin bars!  The bars themselves tasted like mini bites of delicious pumpkin pie with just the right amount of spices and sweetness with a rich buttery crust!  If you need some pumpkin pie in your life, definitely give these Vegan Pumpkin Pie Bars a try!

    Vegan Pumpkin Pie Bars

    Makes 16

    Crust:

    • 1 cup plus 2 Tbsp whole wheat pastry flour
    • 1/4 tsp sea salt
    • 1/3 cup brown sugar
    • 1/2 cup vegan butter


    Filling:

    • 2 cups organic cooked pumpkin (canned is ok too), packed
    • 1/3 cup pure maple syrup
    • 3/4 cup full fat organic coconut milk (the thick part)
    • 1 Tbsp coconut oil
    • 1 tsp pure vanilla extract
    • 1 1/4 teaspoon ground cinnamon
    • 1 teaspoon ground ginger
    • 1 /4 teaspoon ground nutmeg
    • 1/4 tsp ground cloves
    • 1/4 teaspoon salt
    • 1 1/2 tablespoons cornstarch
    • 3/4 teaspoon agar powder

    For Serving:

    • vegan whipped cream (I used almond whipped cream from Aldi)


    Instructions:

    1. Preheat the oven to 350F degrees, and line a 9×9 inch square pan with parchment
    2. In a bowl, combine the flour, brown sugar, sea salt and vegan butter and mix together, squeezing with your hands until it becomes a cohesive dough.  Press into the bottom of the prepared pan.
    3. Place in the oven and bake crust for 15 minutes until lightly browned.
    4. Meanwhile, to make the filling, in a bowl, whisk together the pumpkin, syrup, coconut oil, vanilla, cinnamon, ginger, nutmeg, cloves, sea salt, cornstarch and agar powder until completely smooth (Or you can place in a food processor and blend until smooth).
    5. Pour over the crust and smooth out.
    6. Place back in the oven and bake for about 40 minutes until lightly brown at the edges and set in the center.
    7. Remove from the oven and let cool completely.
    8. Serve with vegan whipped cream piped or dalloped onto each bar.


  • Vegan Pumpkin Cornbread

    Vegan Pumpkin Cornbread

    I make chili almost every week.  It is usually with rice on top and avocado, but last time I made it Eric told me that he prefers his with cornbread, so I said I would make some soon.  I used to always make cornbread with my chili back in the day, and serve it topped with sour cream and cheese before I went vegan.  But I didn’t always want to make bread and rice was an easier option, and now I add avocado instead of the cheese and sour cream and like it just as much.  For Eric though, I made the cornbread.  It is not that difficult to make after all, not like you have to knead it and let it rise like you would a yeast bread and that is the beauty of it.

    This time I decided to make it with pumpkin because I had an open can of pumpkin on hand and needed to use it in something.  Why not?  It is pumpkin season after all, and I love adding sneaky veggies to things.  Also, I wanted this cornbread to be fairly healthy too, so I wanted it free of refined oils and sugars.  I know some people like their cornbread super sweet and almost cake like but that is not at all how I like mine.  If I am serving it with chili especially I want it savory.  So 1 Tbsp of maple syrup for a hint of sweetness is all I needed to add.

    The pumpkin helps to keep the bread moist, so I didn’t add any oil to it.  Just full fat coconut milk for richness, and it did the trick! I made this with a combination of cornmeal and whole wheat pastry flour, because I prefer whole grain flours but if you wanted to make this gluten free, you could sub Bob’s Red Mill gluten free all purpose baking flour 1:1 for the whole wheat pastry flour.  I have had good results with this brand.

    The corn bread smelled wonderful while baking!  I haven’t made it in ages and I had forgotten about how amazing it smells.  I could not wait to try it!  But I had to wait for it to cool enough to cut and for my chili to finish cooking as well. It was perfect! Moist and fluffy, the perfect thing to break into pieces on top of your chili or dip into it (as I prefer).  I think this would even be a good thing to make to go with your Thanksgiving meal instead of rolls if you want an easy home made bread.  Either way, give it a try next time you have leftover canned pumpkin or mashed pumpkin!

    Vegan Pumpkin Cornbread

    Makes 1 loaf

    Ingredients:

    • 1 cup organic medium grind cornmeal
    • 1 cup organic whole wheat pastry flour
    • 1 1/2 tsp baking soda
    • 1 tsp baking powder
    • 1 tsp sea salt
    • 1 cup plus 2 Tbsp full fat coconut milk
    • 1/2 cup pumpkin puree
    • 1 Tbsp maple syrup
    • 1 Tbsp cider vinegar


    Instructions:

    1. Preheat the oven to 375F degrees. Oil an 8×8 inch square pan.
    2. In a large bowl, whisk together cornmeal, flour, baking soda, baking powder, sea salt.
    3. Whisk in coconut milk, squash, and maple syrup until well combined.
    4. Whisk in cider vinegar quickly until just combined, then pour into prepared pan.
    5. Bake for 15-20 minutes until lightly golden on top and a toothpick inserted into the center comes out clean. Cool a few minutes before turning out from pan.
  • Vegan Chocolate Pecan Mousse Pie 

    Vegan Chocolate Pecan Mousse Pie 

    Growing up, for Thanksgiving my Grandma always had pumpkin, pecan and apple pie for dessert.  I would always take a slice of each, but the pecan was my favorite.  It was my Grandma’s favorite and Mom’s favorite too, although there was always more left of it at the end because some of my family does not like nuts (and they were totally missing out).  More for us I guess!  I always thought of pecan pie as kind of special because you don’t really get it any other time of the year, or I didn’t at that point in my life when I was not baking my own pies.  We didn’t usually have it for Christmas, just Thanksgiving.  Well, I like to keep the pecan pie tradition going, and I know it is my Mom’s favorite so I usually try to make some.  Although it usually ends up not being traditional. Like this year, I had just received some Rawmio cacao butter and Rawmio cacao powder from Raw Guru and I wanted to incorporate them into the pie, because who doesn’t love chocolate after all.

    I have made a chocolate pecan pie before, so I wanted something a little more different and fancy.  What I decided to make was a combined version of two of my favorite holiday pies, a Vegan Chocolate Pecan Mousse Pie!  I love pecan pie, and I love a chocolate mousse or french silk pie (something we would serve at Christmas), so I went and combined the two!  Yes, this pie has a few steps to make it and takes a little time but it is so worth it!  And it was something I made after a long day at work when I was tired (over the course of two days) but it wasn’t as much work as I thought it would be.  Sometimes I like to divide my dessert making between two days if something has to cool or has a few steps (since I feel like life is busy and I have less free time).  So in this case, I baked the bottom layer and the crust, let it cool outside for a while, while I made the mousse layer, then let it sit overnight in the fridge and made the whipped cream topping.  It worked perfect!

    To make the Vegan Chocolate Pecan Mousse Pie, I made a classic coconut oil crust, which comes out rich and flakey and is always easy to make.  Next, to make the pecan pie layer, instead of using corn syrup as traditional pecan pie does, I blended up dates to make a gooey chocolaty caramel which included some of the Rawmio cacao powder.  That baked up nicely and while it cooled I made a rich chocolate mousse filling with full fat coconut milk and the cacao powder and Rawmio cacao butter to give it plenty of chocolate flavor.  If you wanted to make this with coconut butter (not oil though) instead of the cacao butter, that works as well! It was heavenly!

    For the topping, I used more coconut milk and the Rawmio cacao butter to thicken it as well.  As a side note, for the topping and filling of this pie, it is important that you use thick coconut milk that is mostly cream, like 3/4 of the can thick cream or just canned coconut cream (but not the sweetened kind) or it will not firm up.  I cannot stress this enough, and I hate to see people’s desserts not turn out because they didn’t use the proper ingredients so I needed to mention this.

    The pie looked beautiful and I could not wait to try it!  Of course I had to photograph it first (the one downfall to being a food blogger no diving right into something like a pie since it needs to look pretty for pics) and my mouth was watering the whole time.  When I showed Eric a piece while I was photographing it, he said “That pie is legit!” meaning it looks pretty impressive, which it does with its three layers.  It is totally heavenly too, and perfect for a holiday dessert!  It has a buttery crust, a crunchy, sweet and gooey pecan layer which is the perfect partner for the rich chocolate mousse and mellow creamy vanilla topping!  If you are looking for an impressive pie for the Holidays this Vegan Chocolate Pecan Mousse Pie is it!  If you are in need of cacao products, check out the Raw Guru website for the Rawmio cacao butter and powder.  They also have some amazing chocolate products and nut butters too that I love!


    Vegan Chocolate Pecan Mousse Pie 
    Makes one 8 inch pie

    Ingredients:

    Crust:

    • 1 1/4 cups organic whole wheat pastry flour
    • 2 Tbsp coconut sugar or maple sugar
    • 1/4 tsp sea salt
    • 1/4 cup plus 2 Tbsp coconut oil in its solid state
    • about 3-4 Tbsp cold water


    Pecan Filling:

    • 1 cup soft pitted medjool dates (if they are not soft, soak them in filtered water for 30 minutes and drain well
    • before using)
    • 1/4 cup pecan butter or almond butter
    • 2 Tbsp Rawmio cacao powder
    • 1 Tbsp maple syrup, plus more for brushing the top of the pie
    • 1/8 tsp sea salt
    • 1 tsp pure vanilla extract
    • 1/3 cup filtered water
    • 1 Tbsp Rawmio cacao butter or coconut oil
    • 2 cups toasted pecans


    Mousse Filling:

    • 1 15 oz can coconut cream or full fat coconut milk that is thick (you want at least 3/4 of the can to be cream or this recipe will not work)
    • 1/4 cup cacao powder
    • 1/3 cup maple syrup
    • 1 tsp vanilla
    • pinch sea salt
    • 3/4 cup melted Rawmio cacao butter or Raw Guru coconut butter


    Topping:


    Directions:

    1. Preheat oven to 375F degrees.
    2. To make the crust, in a large bowl, mix together flour, sugar, and sea salt. Cut in coconut oil with a pastry blender or 2 knives until it is in pea sized pieces. Mix in  just enough water to create a smooth dough that holds together but isn’t too sticky. Add more water if needed, and knead slightly until a smooth dough is created. Roll out into a 10 inch circle using floured parchment underneath and floured rolling pin. Transfer dough to an 9 or 9 1/2 inch pie pan (don’t worry if it tears, just patch it up and nobody will know).  Flute the edges, or crimp them.  Set aside in the refrigerator.
    3. To make filling, combine all ingredients in a high speed blender or food processor except the pecans. Process until smooth, then scrape into a bowl and stir in the pecans. Spread the filling over the crust, spreading it out evenly, and place in the oven.
    4. Bake for about 30-35 minutes until the crust is starting to brown lightly. Remove from oven and let cool completely.
    5. To make the mousse filling, combine all ingredients in a high speed blender and blend until smooth, then pour into a bowl and place in the freezer, stirring every so often until it thickens slightly, about 1/2 an hour to 45 minutes depending on the temperature it was.
    6. Pour the mousse over the pecan layer, and place in the freezer until set, at least 1 hour.
    7. To make the coconut whipped cream topping, combine all ingredients in a high speed blender until smooth, then place in the freezer until it thickens to the consistency of whipped cream, about 45 minutes to 1 hour.
    8. Spread the cream over the top of the pie, sprinkle with pecans and dark chocolate and enjoy!
  • Mini Vegan Bourbon Pecan Tartlettes 

    Mini Vegan Bourbon Pecan Tartlettes 

    This year for Thanksgiving instead of making one giant pie, I decided to make mini pecan tartlettes.  My family really hasn’t had big gatherings for Thanksgiving in years, since my Grandparents stopped being able to host years ago so we have always tried to keep it simple. Now that both of my grandparents are now gone, and we are dealing with quarantine this year it is going to be just 3 of us, so I thought I would make smaller portions, and tartlettes are perfect for that!  If I have leftovers I can easily freeze them as well for my Mom to have later (since I chose pecan pie because it is her favorite).

    Since my Mom, Eric and I all like the flavor of bourbon, I decided to make some bourbon pecan tartlettes!  I had made a large one with these same flavors years ago before I went vegan, and I have been wanting to make one ever since. This was the perfect opportunity!  I just gave them a classic coconut oil pie crust, because that is my go to, and it always turns out so delicious and buttery!

    For the filling, I used my date caramel.  Since I discovered date caramel when I was raw vegan for a few years I have never gone back to making refined sugar caramel. Date caramel is so good and it is about as natural as you can get when it comes to caramel.  Dates are nature’s candy after all! I just blend them up with some nut butter and a few other things and I could seriously eat that caramel with a spoon!  It makes amazing pie filling!

    Once the pecans and bourbon were mixed in and they were baking they filled my home with the most heavenly aroma!  I could not wait to try one, but of course they had to cool first.  They were super delicious!  That sweet gooey date caramel with a hint of bourbon and vanilla flavor was so good with the toasted pecans and buttery crust!  These will be perfect for Thanksgiving this week!

    Mini Vegan Bourbon Pecan Tartlettes 
    Makes 6 small tartlettes

    Ingredients:

    Crust:

    • 1 1/4 cups organic whole wheat pastry flour
    • 2 Tbsp coconut sugar or maple sugar
    • 1/4 tsp sea salt
    • 1/4 cup plus 2 Tbsp coconut oil in its solid state
    • about 3-4 Tbsp cold water


    Filling:

    • 1 cup soft pitted medjool dates (if they are not soft, soak them in filtered water for 30 minutes and drain well
    • before using)
    • 1/4 cup pecan butter (or almond or cashew butter)
    • 1 Tbsp maple syrup, plus more for brushing the top of the tart
    • 1/8 tsp sea salt
    • 1 tsp pure vanilla extract
    • 1/3 cup filtered water
    • 1 Tbsp bourbon
    • 1 Tbsp coconut oil
    • 2 cups toasted pecans, chopped plus more for top of tart


    Directions:

    1. Preheat oven to 375F degrees.
    2. To make the crust, in a large bowl, mix together flour, sugar, and sea salt. Cut in coconut oil with a pastry blender or 2 knives until it is in pea sized pieces. Mix in  just enough water to create a smooth dough that holds together but isn’t too sticky. Add more water if needed, and knead slightly until a smooth dough is created. Divide dough into 6 pieces, and press into the bottom and up the sides of 6 4 inch inch tart pans.  Set aside in the refrigerator.
    3. To make filling, combine all ingredients in a high speed blender or food processor except the pecans. Process until smooth, then scrape into a bowl and stir in the pecans. Spread the filling over the crusts, and top with more pecans. Brush the tops lightly with maple syrup. Place on a baking tray, then place the tray in the oven.
    4. Bake for about 25 minutes until the crust is starting to brown lightly. Remove from oven and let cool before serving.
  • Vegan Pumpkin Pie Cheesecake

    Vegan Pumpkin Pie Cheesecake

    For Thanksgiving, part of the tradition at my house is to always have some fabulous desserts. Pumpkin pie is traditional, but sometimes I like to switch it up a little bit with the pumpkin desserts.  I made some pumpkin creme caramel before and pumpkin cakes, and this year I decided that a vegan pumpkin pie cheesecake would be amazing!  Cheesecake happens to be one of my all time favorite desserts after all, so why not combine it with the classic Thanksgiving dessert!

    I have had pumpkin cheesecake before, but it was less pumpkiny and more just cheesecake flavored.  Which there is nothing wrong with, but I really wanted this one to taste like creamy pumpkin pie.  So, there would be plenty of pumpkin and spices in it!  For the crust, usually for my no bake cheesecakes, I use a no bake oat crust, but this time I decided to make a pie crust style one.  Just to kind of go with the pumpkin pie theme.  It was hard to stop sampling!

    Once the cheesecake was all set up, I topped it off with a coconut cream.  I piped mine on, but you could just spread it on if you wanted and it would be just as good! This cheesecake was sooo good!  It tasted like pumpkin pie but in cheesecake form, and the amount of aromatic spices was perfect!  The crust was nice and buttery and crunchy which I loved with the cheesecake as well!  If you are looking for a delicious dessert to make for Thanksgiving consider this cheesecake!

    Vegan Pumpkin Pie Cheesecake

    Makes 1 6 inch cheesecake

    Ingredients:

    Crust:

    • 1/4 cup plus 2 Tbsp organic whole wheat pastry flour*
    • 2 Tbsp tapioca flour (or cornstarch would work as well)
    • 2 Tbsp maple sugar
    • pinch tsp sea salt
    • 3 Tbsp vegan butter (such as Earth Balance)


    Filling:

    • 1 cup full fat coconut cream (I used the thick part of a can of Thai Kitchen organic full fat coconut milk*)
    • 3/4 cup canned pumpkin
    • 1/4 cup maple syrup
    • 1 tsp pure vanilla extract
    • 1/8 tsp sea salt (or to taste
    • 3/4 cup melted coconut butter


    Topping:

    • 1 1/4 cups canned full fat coconut milk (you want to use a brand that is at least 3/4 of the can thick cream or it will not work for this recipe, I like Thai Kitchen brand)
    • 2 Tbsp maple syrup
    • 1/8 tsp sea salt
    • 1/4 cup plus 2 Tbsp melted coconut butter (not coconut oil), warmed to liquid


    Instructions:

    1. Preheat oven to 375F degrees.
    2. To make the crust, in a large bowl, mix together flour, tapioca flour,  sugar, and sea salt. Mix in butter and stir (or use your hands and knead) until a smooth dough is created. Press into the bottom of a 6 inch round spring form pan.
    3. Place in the oven and bake for 25-30 minutes or until just starting to brown and set.  Remove from the oven, and let cool completely.
    4. Meanwhile, to make the filling, combine all ingredients in a high speed blender or food processor and blend until smooth.
    5. Pour the filling over the prepared crust and smooth the top.
    6. Place cheesecake in the freezer until it is set for about 4 hours (or overnight in the refrigerator if you are not in a hurry).
    7. Remove from the freezer, and set in the refrigerator while you make the topping.
    8. To make the topping, combine all ingredients in a high speed blender and blend until completely smooth.  Pour into a bowl and place in the freezer until the consistency of stiffly whipped cream (about 30-45 minutes depending on how warm it has gotten).
    9. Pipe or spread the topping over the cake.
    10. un-mold and enjoy!  Store any leftover cake in the refrigerator.


    *I use Thai Kitchen full fat coconut milk.  If you are using a different brand, just make sure it is the thick type, 2/3 of the can at least should be very thick cream or it will not work in this recipe.

  • Vegan Pumpkin Pie in a Mug

    Vegan Pumpkin Pie in a Mug

    I love a good pumpkin pie.  It is the essential fall dessert, and is actually somewhat healthy compared to many other pies (not that I always care, but I like to get my veggies in sometimes with dessert).  I make it in some form every year whether it be mini ones, or a fancy larger one, maybe with a pecan or apple layer on the bottom. But sometimes I just want a smaller serving of it just for myself for a few days (the mini pies make a lot of servings so those don’t quite count).  Which is where pumpkin pie in a mug comes in!  I had made one about 10 years ago that was really good, but it wasn’t vegan and I have been telling myself ever since that I need to veganize it.

    Well, I finally got around to it this year. I wanted to make something pumpkin pie that was simple and quick with not a lot of servings so I went for it, and it turned out really good!  A good pumpkin pie has to have good texture as far as I am concerned.  I have had a few that seemed overcooked and mealy in texture and I was not a fan.  So I make mine with ingredients that when blended together come out silky smooth like custard.  Which is technically what pumpkin pie filling is. For my filling I use a mixture of organic pumpkin puree (canned is fine too), coconut milk, a little coconut butter and maple syrup with just a bit of maple syrup to sweeten it.  It comes out much nicer than the pie filling I used to make that had eggs and dairy.

    The filling also had to have just the right amount of spices.  I don’t care for pies that have way too much spice so you can’t taste the flavor of the pumpkin, or ones that don’t have enough so it tastes somewhat bland. I feel like I achieved the perfect balance here, and added just the right amount of maple syrup so the sweetness is nice and balanced too.  Plus the maple goes so well with the spices.  I feel like also, because I don’t use any granulated sugar here it helps the pie come out smoother as well.

    I poured the filling into little mugs, it made 3 which is perfect because I could share one and keep 2 for myself!  They baked up beautifully and made my kitchen smell amazing.  The only bad thing about it is you can’t enjoy it until it cools down.  But I got to enjoy some after work which was a win!  I topped it with a little coconut cream and it was perfect!  I really didn’t miss the crust because the filling is my favorite part anyhow.  If you are the same way, definitely give these a try!

    Vegan Pumpkin Pie in a Mug

    Makes 3 8 oz pies

    Ingredients:

    Filling:

    • 2 cups organic cooked pumpkin (canned is ok too), packed
    • 1/3 cup pure maple syrup
    • 3/4 cup full fat organic coconut milk
    • 2 tsp coconut butter
    • 1 1/4 teaspoon ground cinnamon
    • 1 teaspoon ground ginger
    • 1 /4 teaspoon ground nutmeg
    • 1/4 tsp ground cloves
    • 1/4 teaspoon salt
    • 1 1/2 tablespoons cornstarch
    • 3/4 teaspoon agar powder


    Instructions:

    1. Preheat oven to 350F degrees.
    2. Place all ingredients in a high speed blender and blend until smooth.
    3. Pour into 3 1 cup mugs or ramekins, and place in the oven.
    4. Bake until set, about 40 minutes, then remove from the oven and let cool.
    5. Top with coconut whipped cream, and enjoy!
  • Chocolate Pecan Pie Cups

    Chocolate Pecan Pie Cups

    It was incredibly nice last weekend, so I didn’t spend much time in the kitchen. Instead, I spent lots out time outdoors, because how often is it 70F degrees in November?!  But we got snapped back to reality yesterday when it rained all day, then today when it snowed a few inches, plus ice pellets.  Winter is knocking on the door, but that means it is the perfect time to create deliciousness in the kitchen!  I am kind of on a pecan desserts kick lately.  Well, pecan pie specifically.  I made some pecan pie chocolate chunks bars last week and they were so good that I thought I might try making that flavor combination into a candy!

    I really wanted more of that gooey pecan pie filling after eating those bars, but with more of a caramel filling and chocolate ratio minus the crust (sorry crust, not that you weren’t good, but I am obsessed with the filling), so I thought making some chocolate cups sounded amazing!  I used a very similar filling to the bars.  Only I didn’t add the coconut oil and water, and I upped the maple syrup slightly since these are candies. The filling was a date caramel, my favorite caramel because it is way less processed than the kind made with sugar.

    This caramel whips up fast, and in fact I made twice the amount called for in the recipe, just so I would have extra to enjoy!  I mixed some toasted pecans into the half that I was using for the filling and it was super delicious!  This stuff is really hard to stop tasting. Luckily I had that extra caramel on the side so I had plenty left for the chocolate cups! I like chocolate cups as opposed to something you have to shape and dip sometimes because they are easier, and work well for more gooey fillings.

    These turned out so heavenly!  The caramel was rich, scented with vanilla and gooey with those crunchy toasted pecans and dark chocolate, it was hard to just eat one.  But I saved some for later so I had something to look forward to enjoying.  Needless to say, I didn’t end up sharing any of these and that doesn’t happen often!  If you are a pecan pie fan, definitely give these a try!

    Chocolate Pecan Pie Cups

    Makes 6

    Ingredients:

    Filling:

    • 1/2 cup soft pitted medjool dates (if they are not soft, soak them in filtered water for 30 minutes and drain well
    • before using)
    • 2 Tbsp pecan butter (or raw cashew butter or almond butter)
    • 1/8 tsp sea salt
    • 1 tsp pure vanilla extract
    • 2 Tbsp maple syrup
    • 1/2 cup toasted pecans, chopped


    Chocolate:

    • 1 1/2 cups chopped vegan dark chocolate


    Instructions:

    1. To make filling, combine all ingredients in a high speed blender or food processor except the pecans. Process until smooth, then scrape into a bowl and stir in the pecans.
    2. Melt the dark chocolate in the top of a double boiler until smooth.
    3. Pour enough chocolate into each of 6 silicone baking cups, or large PB cup molds to cover the bottom by 1/4 inch. Place in the freezer until firm.
    4. Spoon about 1 Tbsp of the filling into each cup on top of the chocolate trying not to touch the edges with it, and smoothing the top down a little so it doesn’t stick up too high.
    5. Pour the remaining chocolate over the fillings, and then place them in the freezer until the chocolate has set, about 20 minutes.
    6. Remove from the molds, and enjoy!


  • Vegan Chocolate Pumpkin Cake Roll

    Vegan Chocolate Pumpkin Cake Roll

    October is over and I hadn’t baked any pumpkin cake yet this year! I made other pumpkin things like pumpkin bars and cookies but no cake, my favorite thing!  It has been a bit busy this Fall, more busy than normal it seems for me.  But it is being busy with all good things like getting engaged (and starting the wedding planning process), doing activities with family and friends and working more so it is ok.  But I haven’t had as much time to bake. So I was thankful I had time this week to make my pumpkin cake!  I was going to make a classic one with cream cheese frosting but decided instead on a chocolate pumpkin cake.

    Because I am in a chocolate mood lately.  I think it is because I am enjoying some of my home made chocolate Halloween candy and it just made me want more. Plus nothing beats a rich chocolate cake!  I like pumpkin spice mocha lattes so I figured a chocolate pumpkin cake would be just as fabulous!

    For the base of this roll cake I use a batter made with dates to sweeten it.  Why dates?  They help keep the cake nice and moist along with the pumpkin so it is much easier to roll plus give it an almost brown sugar caramel like flavor.  Nothing is worse than a roll cake breaking so I try to make mine more roll-able.  If you are not a date fan, don’t worry, you can’t really taste them in this.  I personally love them though, I think they taste like nature’s candy!

    To fill the cake, I made a pumpkin cream filling with pumpkin spice and it was heavenly! So lovely with the chocolate cake on the outside!  Lastly I topped the cake off with a rich chocolate ganache.  I could not wait to try the finished masterpiece. It was sooo good!  The cake was soft and sweet and paired perfectly with the lightly spiced pumpkin cream and dark chocolate ganache! If you are a chocolate cake fan, definitely give this a try this pumpkin season!

    Vegan Chocolate Pumpkin Cake Roll
    Makes one 15 inch long rolled cake, serves 8-10

    Ingredients:

    15×10 inch jelly roll pan

    Cake:

    • 1 1/2 cups organic whole wheat pastry flour*
    • 1/4 cup unsweetened cocoa powder or cacao powder
    • 1 1/2 tsp baking soda
    • 1 tsp baking powder
    • 1/2 tsp sea salt
    • 1 Tbsp cinnamon
    • 1 tsp ginger
    • 1/2 tsp nutmeg
    • 1/2 tsp cloves
    • 1 1/4 cups packed soft medjool dates, pitted, soaked in water for 30 minutes and 1 cup of the soaking water reserved
    • 1/4 cup almond butter
    • 1 Tbsp pure vanilla extract
    • 1 cup pumpkin puree
    • 2 Tbsp apple cider vinegar


    Frosting:

    • 1 15 oz can full fat organic coconut milk  (you want a brand that is mostly the thick cream like Thai Kitchen full fat coconut milk or coconut cream or it will not work), chilled
    • 1/2 cup pumpkin puree
    • 1/4 cup maple syrup
    • 1 tsp pure vanilla extract
    • 1/2 tsp cinnamon
    • 1/2 tsp ginger
    • 1/4 tsp cloves
    • 1/8 tsp nutmeg
    • 1/4 tsp sea salt
    • 1/4 tsp cider vinegar
    • 3/4 cup melted coconut butter (warmed to liquid)


    Ganache:

    • 3/4 cup chopped vegan dark chocolate
    • 1/3 cup plus 2 Tbsp full fat coconut milk


    Directions:

    1. Preheat the oven to 350F degrees and position rack in center of oven.
    2. Line a 15 x 10 inch jellyroll pan with parchment paper.
    3. Coat parchment paper and pan sides lightly with oil so that the cake doesn’t stick.
    4. Whisk flour, cocoa powder, baking powder, baking soda, spices and sea salt in a large bowl to blend well.  Set aside.
    5. Place dates, reserved water, almond butter, pumpkin puree, and vanilla extract into a blender, and blend until smooth, then whisk this blended mixture into the flour mixture until well blended. Whisk in the cider vinegar until bubbles form.
    6. Transfer cake batter to prepared pan and bake cake until tester inserted into center comes out clean, about 15-20 minutes.
    7. Cool cake completely.
    8. To make the filling, combine all ingredients in a high speed blender and blend until completely smooth.  Pour into a bowl and place in the freezer until the consistency of stiffly whipped cream (about 30-45 minutes depending on how warm it has gotten.  Once it is ready place in the refrigerator until ready to assemble.
    9. When ready to assemble, spread filling over the top of the cake, then roll up jellyroll style starting with the short side and using the parchment to assist you in rolling.  Be careful because the cake is fragile, but if it cracks as you roll it no worries, keep rolling.  Let chill in the freezer once rolled for a few hours before frosting.
    10. To make the ganache, melt the chocolate in the top of a double boiler, then whisk in the coconut milk until smooth.  Pour over the cake and smooth out over the top and sides (but leaving the pretty ends exposed).
    11. Chill until the ganache has firmed up, and serve!

    Keeps for up to 1 week covered in the refrigerator.

    *If you would like to make this gluten free, swap the whole wheat flour for Bob’s Red Mill Gluten Free All Purpose Baking Flour (I have tested this brand and know it works, but have not tried other brands so I am not sure if they would turn out the same).

  • Vegan Chocolate Hazelnut Silk Pie

    Vegan Chocolate Hazelnut Silk Pie

    Pumpkin, pecan and apple were always staples at Thanksgiving growing up, and I made pumpkin and apple pies before Thanksgiving this year earlier in the season, but this year I decided to make a chocolate hazelnut pie specifically for Thanksgiving.  I was thinking something similar to French silk pie but with hazelnut because chocolate sounded so good to me at the time, and Raw Guru had sent me some of their Dastony Hazelnut Butter.  My family liked the idea too so I went for it!  I have a confession to make, I have decided I am not making much in the way of food for Thanksgiving this year, since we are going out to dinner the following weekend, but I am making dessert!  I get a little bit burnt out on making Thanksgiving food since I work in a deli and it is really busy this time of the year making all of the Thanksgiving dishes.  So I like a break on the actual holiday sometimes.

    But back to the pie which is the important part of this post!  I wanted it similar to French silk, so a classic buttery tasting pie crust.  For that, I used my classic coconut oil pie crust.  It has just 5 ingredients, whole wheat pastry flour, coconut oil, coconut sugar, and sea salt plus cold water.  It always tastes nice and rich, and bakes up nicely.  If you wanted to make it gluten free, you could swap Bob’s Red Mill gluten free all purpose baking flour for the whole wheat pastry.  I have tried it before with good results (but I have not tested other brands so I can’t say the same for how they would turn out).

    For the filling, it needed to be rich and delicious almost like a chocolate mousse with hazelnut so I used a combination of full fat coconut milk (mostly cream) combined with the Dastony Hazelnut butter, and coconut butter for a crave worthy concoction.  Once I added the maple syrup and cacao powder it was heavenly!  I could not stop tasting it!  It is really easy to make though, you just buzz everything in the blender and pour it into the crust and chill.

    Lastly, I wanted to top it off with some coconut whipped cream and hazelnuts to make it pretty.  I could not wait to try it!  I had to wait until the next day for it to chill but it was well worth the wait.  It was crave worthy!  Rich, smooth chocolate hazelnut filling (way better than any Nutella I ate growing up), a buttery tasting crust and vanilla whipped coconut cream and crunchy hazelnuts!  Just the sort of thing you want to go back for a second slice of!  If you are in the mood for something rich and chocolaty, definitely give this a try!

    Vegan Chocolate Hazelnut Silk Pie

    makes one 8 inch pie

    Crust:

    • 1 1/4 cups organic whole wheat pastry flour*
    • 3 Tbsp maple sugar or coconut sugar
    • 1/4 tsp sea salt
    • 1/4 cup plus 2 Tbsp coconut oil in its solid state
    • about 3-6 Tbsp cold water


    Filling:


    Cream Topping:


    Garnish:

    • toasted hazelnuts


    Instructions:

    1. To make the crust, in a large bowl, mix together flour, sugar, sea salt, and spices. Cut in coconut oil with a pastry blender or 2 knives until it is in pea sized pieces. Mix in  just enough water to create a smooth dough that holds together but isn’t too sticky. Add more water if needed, and knead slightly until a smooth dough is created. Roll out into a 10 inch circle on a sheet of parchment paper, then use the paper to help you transfer it to an 8 inch pie dish.  Flute the edges, and set aside in the refrigerator until solid.
    2. Pre-heat the oven to 350F degrees. Place foil inside the pie crust, and weight down with pie weights or dried beans.  Place the pie in the oven and bake for 30 minutes, then remove the weights and foil and bake 10-15 minutes more or until lightly browned. When it is done baking, let cool completely.
    3. For the filling, combine all ingredients in a high speed blender and blend until smooth. Pour into the crust.
    4. Place in the freezer until set, about 2 hours.
    5. Meanwhile, for the cream topping, combine all ingredients in a blender and blend until completely smooth. Pour into a bowl and place in the freezer until it is thick like whipped cream (whisking every so often), about 20-30 minutes.
    6. Once the cream is ready, place it in a pastry bag and pipe around the sides of the pie (and serve with the extra if desired) or just spread it over the top in the center.  Garnish with hazelnuts, enjoy!

    Pie keeps up to 1 week in the refrigerator, covered or in a container.

    *If you wanted to make the crust gluten free, you could swap Bob’s Red Mill gluten free all purpose baking flour for the whole wheat pastry. I have tried this brand and know it will turn out well.

    *For the coconut milk, you want the kind that is 3/4 full of cream in the can, or it will not work and turn out runny, I used Thai Kitchen full fat milk, but their unsweetened canned coconut cream would work as well.

  • Vegan Pumpkin Cake Roll with Cream Cheese Filling

    Vegan Pumpkin Cake Roll with Cream Cheese Filling

    Cake rolls and jelly roll cakes were something that intimidated me for a long time growing up.  So for a long time I was scared to make one, until finally a couple of years ago I made a vegan chocolate chestnut yule log for Christmas and it wasn’t that bad.  In fact, it turned out fabulous!  I have since made a few other cake rolls, but it has been a while so I decided to make one last weekend.  I have been wanting to make a pumpkin cake roll for a while since I saw a non vegan one on Pinterest, and I knew I could make it just as delicious!

    Don’t let the idea of a rolled cake intimidate you (like it used to for me), I found that this cake was actually a lot easier and less fussy to make than a layer cake that needs to be frosted!  For the batter, I wanted something that would remain nice and soft when rolled, so along with the pumpkin I used dates to sweeten it, and  to keep it moist.  They give it an almost caramel like flavor and I love the idea of healthier fruit sweetened cakes.  This batter is easy to make, you just need a blender to make it nice and smooth. I added in plenty of pumpkin spices as well, and it tasted amazing even before I baked it.

    It smelled heavenly while baking!  Kinda like pumpkin pie, but sweeter.  I put it out in the garage to cool once it was done (since it is about 32F degrees right now out there) so I could frost it faster and it did the trick!  It was ready in about 45 minutes, normally it would have been a few hours.  Meanwhile I had to make a filling that was fit for such a delicious flavorful cake!  I wanted to make a vegan cream cheese frosting type filling and I had recently received some Dastony Raw Cashew Butter from Raw Guru so I figured that would make the perfect addition to my frosting to give it the cream cheese flavor.

    I added it to full fat coconut milk with a bit of maple syrup, and it tasted just like cream cheese frosting!  The cake rolled up nicely and I could not wait to try it!  But first, I dusted it with a little bit of coconut “powdered sugar” to make it pretty.  Yes you could use regular powdered sugar but I don’t have that on hand.  The cake was super delicious as well!  It was soft and light lightly spiced with the flavor of pumpkin and caramel and the rich cream cheese frosting was the perfect thing to pair it with!  If you are in need of a pretty dessert for Thanksgiving definitely give this a try, it is good for making ahead of time, and in fact better if you let it sit covered overnight before serving.

    Vegan Pumpkin Cake Roll with Cream Cheese Filling
    Makes one 15 inch long rolled cake, serves 8-10

    Ingredients:

    15×10 inch jelly roll pan

    Cake:

    • 1 1/2 cups organic whole wheat pastry flour*
    • 1 1/2 tsp baking soda
    • 1 tsp baking powder
    • 1/2 tsp sea salt
    • 1 Tbsp cinnamon
    • 1 tsp ginger
    • 1/2 tsp nutmeg
    • 1/2 tsp cloves
    • 1 1/4 cups packed soft medjool dates, pitted, soaked in water for 30 minutes and 1 cup of the soaking water reserved
    • 1/4 cup almond butter
    • 1 Tbsp pure vanilla extract
    • 1 cup pumpkin puree
    • 2 Tbsp apple cider vinegar


    Frosting:

    • 1 15 oz can full fat organic coconut milk  (you want a brand that is mostly the thick cream like Thai Kitchen full fat coconut milk or coconut cream or it will not work), chilled
    • 1/2 cup Dastony raw cashew butter
    • 1/4 cup maple syrup
    • 1 tsp pure vanilla extract
    • 1/4 tsp sea salt
    • 1/4 tsp cider vinegar
    • 3/4 cup melted coconut butter (warmed to liquid)


    To finish:

    • 1/2 cup finely shredded dried coconut
    • 1 Tbsp maple sugar or coconut sugar


    Directions:

    1. Preheat the oven to 350F degrees and position rack in center of oven.
    2. Line a 15 x 10 inch jellyroll pan with parchment paper.
    3. Coat parchment paper and pan sides lightly with oil so that the cake doesn’t stick.
    4. Whisk flour, baking powder, baking soda, spices and sea salt in a large bowl to blend well.  Set aside.
    5. Place dates, reserved water, almond butter, pumpkin puree, and vanilla extract into a blender, and blend until smooth, then whisk this blended mixture into the flour mixture until well blended. Whisk in the cider vinegar until bubbles form.
    6. Transfer cake batter to prepared pan and bake cake until tester inserted into center comes out clean, about 15-20 minutes.
    7. Cool cake completely.
    8. To make the filling, combine all ingredients in a high speed blender and blend until completely smooth.  Pour into a bowl and place in the freezer until the consistency of stiffly whipped cream (about 30-45 minutes depending on how warm it has gotten.  Once it is ready place in the refrigerator until ready to assemble.
    9. When ready to assemble, spread filling over the top of the cake, then roll up jellyroll style starting with the short side and using the parchment to assist you in rolling.  Be careful because the cake is fragile, but if it cracks as you roll it no worries, keep rolling.  Let chill in the freezer once rolled for a few hours before serving.
    10. To make the coconut powdered sugar, buzz the coconut and maple sugar in a high speed blender until fine, then sift over the finished cake just before serving.

    Keeps for up to 1 week covered in the refrigerator.

    *If you would like to make this gluten free, swap the whole wheat flour for Bob’s Red Mill Gluten Free All Purpose Baking Flour (I have tested this brand and know it works, but have not tried other brands so I am not sure if they would turn out the same).


  • Vegan Sweet Potato Casserole and Vegan Sweet Potato Maple Cake with McCormick Spices!

    Vegan Sweet Potato Casserole and Vegan Sweet Potato Maple Cake with McCormick Spices!

    This post is sponsored by McCormick® but the content and opinions expressed here are my own.

    There are so many things to be excited about around the holidays!  Seeing friends and family you might not normally see the rest of the year because they live far away, the celebrations, and of course the amazing food!  I have to say, ever since I was a little kid, the food has always been pretty important to me, even when I did not make it myself.  I loved helping my Mom and Grandma in the kitchen, preparing the meals and desserts for the holidays!  I am so happy I get to continue the tradition of making food for my loved ones around the holidays, even if my Grandmas are no longer around to celebrate with me.  I know they would love the things I am making.  Good recipes start with good ingredients, which is why I love McCormick® Spices.  They are really good quality (they know a thing or two about making spices since they have been around for over 100 years) and they are affordable which is important to me!  Also, you can find them at Walmart, which is where I bought mine, in the baking aisle with all of the other seasonings and baking goodies!  I don’t know about you, but it is one of my favorite aisles.  Maybe I am biased because I love to bake!

    I picked up some McCormick® vanilla (one of my most used ingredients in my recipes), nutmeg and cinnamon at Walmart. I planned on making a dish that my family loves, Sweet Potato Casserole!  We have always been fond of sweet potatoes, and although back in the day my Grandma used to make the casserole with the marshmallows, our tastes have changed a bit and we now prefer it a little simpler and less sweet (but still plenty sweet enough).  It is really simple to make, and so good!  I just take sweet potatoes or yams and roast them into sweet flavorful perfection in the oven, then scoop out the flesh and mash it until it is light and fluffy with a bit of McCormick® cinnamon, nutmeg and maple syrup, then top it off with crunchy pecans and a little bit of maple sugar!  When it is all baked and the topping is all crispy it is heavenly!  The perfect side dish for your holiday meal!  Recipe follows post.

    If you happen to have leftovers from the casserole, I also have a delicious Maple Sweet Potato Cake that I made with them.  Don’t have time to make something right away with them?  Put them in a container and freeze them for later.  Just thaw before using in your recipe.  I love leftover sweet potatoes in general, there is so much you can do with them.  Make pancakes, muffins, bread, or the cake that I just mentioned if you want to be a little more over the top.  I love making cakes, so of course that is what I chose.  Not only that, it is perfect for Holiday entertaining as well!  Who doesn’t love cake?  I know my family does.  My Grandma and Mom passed down their love of maple to me, so that is what gave me the idea to pair the sweet potatoes with maple in this!  Not only that, I already had the McCormick® spices and flavors on hand I would need for it!  So wins all around!

    I know some people like to make pie for the holidays, and we do as well, but I like cake even more because it just seems so festive!  For this one, I made a flavorful batter with the leftover mashed sweet potatoes, plus maple sugar and of course McCormick® cinnamon, nutmeg and vanilla for an aromatic cake.  Let me tell you, it fills your home with the most heavenly aroma! What you get is a soft, moist but light and fluffy cake with a slight caramel maple flavor and sweet spices!  It would be good on its own, but I decided to make a luscious faux cream cheese frosting for it!

    That has always been my favorite type of frosting after all.  I was so happy when I figured out how to veganize it!  I use a coconut cream base with a bit of cashew butter to give it a nice texture along with maple syrup to sweeten, and this time I added some McCormick® pure vanilla extract to it!  Like I said earlier in the post, it is my most used flavor ingredient in my recipes.  The frosting was heavenly alone but I knew it would be even better on the cake!  Once it was all frosted and ready to go we couldn’t wait to try it!  It was sooo good, the soft sweet spiced cake with a hint of sweet potato and maple flavor plus the luscious creamy frosting!

    I hope you give these recipes a try this holiday season, my family loved them and I have a feeling you will too!  Definitely check out the McCormick® Spices next time you are in Walmart, or on their website HERE. They are just what you need for making super delicious holiday recipes, and so convenient!

    Vegan Sweet Potato Casserole

    Serves 8-10

    Sweet Potatoes:


    Topping:


    Instructions:

    1. Preheat the oven to 425F degrees.
    2. Prick sweet potatoes with a fork all over, and place in the oven on a baking sheet. Roast until tender, about 1 hour. Remove from the oven and cool until cool enough to handle.
    3. Remove the skins, place in a bowl, and add the maple syrup, coconut milk, McCormick Sea Salt, and McCormick® Ground Cinnamon and Nutmeg. Mash together with a potato masher or a large fork, and then place in an oiled 8 or 9 inch square baking dish (or two smaller casserole dishes).
    4. Sprinkle the pecans over the top, drizzle with the maple syrup and mix together the sugar and McCormick® Ground Cinnamon and sprinkle over the casserole.
    5. Lower the oven temperature to 375F degrees, and place the dish in. Bake for 20 minutes until warmed through and the topping is toasted and lightly brown.
    6. Remove from the oven and cool slightly before serving.
    7. Enjoy!

    Keeps refrigerated for up to 1 week, when kept in an airtight container and the leftovers are perfect for using in my maple sweet potato cake recipe (see below)!


    Vegan Maple Sweet Potato Cake
    Makes 1 6 inch 2 layer cake
    2 6 inch cake pans
    Cake:


    Frosting:


    Instructions:

    1. Preheat the oven to 350F degrees and position rack in center of oven.
    2. Line two six-inch-diameter cake pans with 2-inch-high sides with parchment paper. Coat parchment paper and pan sides lightly with oil.
    3. Whisk flour, baking soda, McCormick® Ground Cinnamon, McCormick® Ground Nutmeg, McCormick® Sea Salt, and sugar in a large bowl to blend well.
    4. Whisk sweet potato, pecan butter, McCormick® Maple Extract, McCormick® Vanilla Extract, and water together in small bowl to blend well, then whisk into the flour mixture until well blended.
    5. Whisk in cider vinegar until pale bubble swirls form in the batter and it is well combined (but don’t over mix).
    6. Fold in pecans.
    7. Transfer cake batter to prepared pans and bake cakes until tester inserted into center comes out almost clean with a few moist crumbs attached, about 25-30 minutes.  Remove from oven.
    8. Cool cakes completely in pan on rack, about 1 hour. Cut around sides of pans to loosen. Turn cakes out onto platter; peel off parchment paper.
    9. Meanwhile, to make the frosting, combine all ingredients but the coconut butter, in a high speed blender or food processor and blend until smooth.  With the motor running, add the coconut butter and process a minute more (if it starts to get lumpy at all during the process it is just the fat separating because it is 2 different temperatures.  Just continue to blend until it is smooth, and it will get warm so it will just have to chill longer).
    10. Pour the frosting into a bowl and let sit in the freezer until the consistency of whipped cream, whisking every 15 minutes (this may take anywhere from 15 minutes to hour to an hour depending on how warm it has gotten and which appliance you used).
    11. When ready to frost, place one cake layer on a plate. spread frosting about 1/2 inch thick over the first layer, then top with the second. Spread remaining frosting over the top and down the sides of the cake. You can tint the remaining frosting with natural food coloring if you wish and decorate the top, or just decorate with pecans.
    12. Refrigerate for at least 1 hour before serving.

    Store any leftover cake in the refrigerator, keeps in an airtight container for up to 1 week.

  • Vegan Pumpkin Maple Creme Caramel

    Vegan Pumpkin Maple Creme Caramel

    When I was in high school, my Mom and I went on a trip to Europe.  When we were eating lunch in a small cafe, I tried my first creme caramel. When I ordered it, I am not sure what I was expecting but it was not like anything I had eaten before.  I think I was expecting it to be like creme brulee and be a little warm or something, but I was surprised when it was cool.  A silky smooth vanilla custard with sweet caramel and it was delicious even if it wasn’t what I thought it would be!  But surprisingly I never attempted to make my own at home until last year as much as I love making all kinds of desserts.  I guess maybe because it wasn’t something I had made before I thought it would be difficult but it wasn’t at all.

    So last year I made a vegan eggnog creme caramel, because Eric wanted it for his birthday last year.  Well, it has been almost a year since I made that, and so I figured why not make it again?  Except a little different.  This time I decided to make a pumpkin creme caramel because tis the season for pumpkin, and I thought this might be a nice little alternative to pumpkin pie for Thanksgiving in a few weeks.  Also, I was craving something creamy and pumpkiny but I just make some pumpkin pie in a mug last weekend and didn’t want to make the same thing again.

    This is really easy to make.  In fact, it is even simpler than the last one I made because I used maple syrup instead of the usual dissolving sugar in syrup.  I just took it and reduced it slightly to thicken it and it worked perfect!  Plus, I knew the flavor of maple would be amazing with the pumpkin and spices. For the base, I used coconut cream because I wanted these to be rich and creamy.  I added in pumpkin puree, and a little maple syrup as well as pumpkin pie spices and the base tasted wonderful after I cooked it even before it was chilled!

    I had to wait overnight to enjoy them, but it was so worth it!  They turned out super delicious!  Rich, creamy vanilla pumpkin spice filling and that sweet salted maple caramel on top!  Totally heavenly!  I shared some with Eric because it was his idea to make them last year and he loved these as well!  These would be perfect for Thanksgiving if you don’t want to make pie or other more complicated desserts, and they chill overnight so they are good for making ahead of time.  I hope you are all having a wonderful November so far!

    Vegan Pumpkin Maple Creme Caramel
    Makes 4

    Ingredients:

    4 1 cup ramekins

    Caramel:

    • 1/4 cup plus 2 Tbsp maple syrup
    • 1/8 tsp sea salt


    Custard:

    • 1 1/2 cups unsweetened coconut cream
    • 1/4 cup pumpkin puree
    • 2 Tbsp maple syrup
    • 1/2 tsp ginger
    • 1/2 tsp cinnamon
    • 1/4 tsp cloves
    • 1/8 tsp nutmeg
    • 3/4 tsp agar powder
    • 1 Tbsp cornstarch


    Instructions:

    1. Set 4 one oz ramekins on a tray.
    2. In a small saucepan, combine the maple syrup and salt and bring to a boil, then lower the heat to a simmer whisking every so often.  Let cook for about 5 minutes until it reduces to about 1/4 cup or a little over 1/4 cup.  Remove from heat, and pour into  the bottoms of the ramekins.
    3. To make the cream, combine all ingredients in a saucepan and bring to a simmer.
    4. Heat until it comes to a boil, then cook for about 1-2 minutes, whisking constantly until just thickened, then pour into the prepared ramekins over the caramel.
    5. Place the tray of ramekins in the refrigerator until chilled completely.  For at least 2 hours, or overnight.
    6. Once the custards have set and you are ready to serve, place a plate on top of each one, then flip it over.  If they are sticking at all, run a knife along the sides to loosen being careful not to disturb the custard.
    7. Enjoy!  Refrigerate any leftovers.


  • Vegan White and Green Bean Casserole

    Vegan White and Green Bean Casserole

    Casserole sounds so sophisticated, but in Minnesota we usually call things baked in the oven hot dishes.  So I find it funny that we don’t call green bean casserole green bean hot dish here! Green bean casserole is a Holiday staple, it was pretty much at every Thanksgiving and Christmas when I was little.  But I haven’t had it in many years because It usually isn’t vegan, and I am not a fan of using cream of mushroom soup in things.  Surprising I haven’t veganized it until now, but this year after Thanksgiving my Mom asked me if I could veganize them for her.  Also, she had a specific recipe she wanted me to veganize that had a mixture of green beans and white beans.  Because one can never have too many beans, and they have always been a big part of cooking for me and my Mom.  We used to always use them in soups and stews growing up, as well as on salads, or with pasta.  Pretty much a lot of our meals.  White beans were what we used the most, so this recipe is fitting for her.

    I veganized the recipe as well as made a few upgrades to make it even more delicious.  The original recipe had a bechemel sauce, but I made a creamy sauce from coconut milk and cashew butter with garlic, shallots, white wine, nutritional yeast, a touch of lemon and thyme.  It was super flavorful and delicious and you would swear that it had dairy in it!  It was perfect with the green and white beans, and tasted so much better than any cream of mushroom soup would have.

    Instead of the usual fried onions, the recipe I was veganizing had bread crumbs on top.  But I decided just bread crumbs were kind of boring, and so I used my home made bread crumbs mixed with hazelnuts and nutritional yeast.  It made for a satisfying crunchy topping!  The casserole turned out super delicious!  The green bean casserole I grew up eating was just ok.  But this one was so incredibly good.  I consider this a full meal in and of itself.  I mean, you have protein and fiber from the beans, plus they are a vegetable, and why not eat them in a creamy sauce like mac and cheese and call it a dinner?  Well, my Mom loved it as well, and I think this might end up being something that we make every year for the Holidays!  If you are still looking for a delicious side dish for this Christmas and Holidays, definitely consider this!

    Vegan White and Green Bean Casserole
    Serves 2-4

    Ingredients:

    • 2 tsp avocado oil, or olive oil
    • 2 small shallots, diced
    • 2 garlic cloves, minced
    • 1/2 tsp dried thyme
    • 2 Tbsp white wine
    • 3/4 cup full fat coconut milk at room temperature
    • 3/4 cup raw cashew butter*
    • 2 Tbsp nutritional yeast
    • 1 tsp lemon juice
    • 1/2 tsp sea salt (or to taste)
    • 1/4 tsp freshly ground black pepper
    • pinch of cayenne (optional)
    • 1 1/2 cups cooked cannelini beans
    • 16 oz frozen green beans, thawed (or fresh green beans, blanched)


    Topping:

    • 1 cup breadcrumbs
    • 1/2 cup chopped hazelnuts
    • 2 Tbsp nutritional yeast
    • 2 Tbsp avocado oil
    • 1/4 tsp sea salt


    Instructions:

    1. Preheat the oven to 375F degrees.
    2. In a large ceramic pan, heat the oil, and add the onions.  Sautee until soft and tender, about 10 minutes. Add the garlic, thyme and white wine and cook until the wine has evaporated.
    3. Whisk together the coconut milk, brazil nut butter, nutritional yeast, lemon juice, pepper, and cayenne in a bowl, then pour over the onions and cook until heated.
    4. Add the beans, and stir to combine.  Pour into a 2 quart oven proof baking dish.
    5. Mix the breadcrumbs with the hazelnuts, nutritional yeast, avocado oil and sea salt in a bowl for the topping.
    6. Sprinkle the breadcrumbs over the top of the beans, and place in the oven.  Bake until the top is browned, about 10-15 minutes.
    7. Serve!


  • 30 Vegan Savory Thanksgiving Recipes

    30 Vegan Savory Thanksgiving Recipes

    Sometimes I feel like people think that vegans don’t get to enjoy good food on holidays like Thanksgiving.  But on the contrary, we feast just like the omnivores!  There is just as much delicious vegan food out there as there are is food containing animal products and I never feel deprived with what I cook on holidays.  I also love bringing vegan dishes to gatherings and having those who think that vegan food is gross actually end up loving them.  If you are still looking for ideas for what to serve your family or bring to a gathering, this post is for you!  I am sharing my Thanksgiving worthy dishes that I would be proud to have on my table.  Of course I can’t make them all, but I want you to have lots to chose from!  Whether you are feeding a small family, or a large one there is something or everybody here.  Some are raw, some are cooked, most are gluten free and all are delicious!  So, enjoy, I hope you are inspired!

    Cranberry-2BRelish-2Band-2BChevre-2B1

    Pine Nut Chevre with Cranberry Pear Relish

    Vegan Pumpkin Cranberry Chevre 

    Greens-2BSalad-2B1

    Lemony Autumn Greens Salad

    Vegan Pumpkin Cornbread

    Sweet and Tangy Roasted Brussels Sprouts 

    Sweet and Spicy Roasted Brussels Sprouts

    Mushroom Wild Rice Casserole

    Butternut Squash Cranberry Casserole 

    Vegan Green and White Bean Casserole 

    Root Vegetable Mash 

    Vegan Creamed Spinach 

    Vegan Sweet Potato Casserole 

    Sweet and Spicy Asian Roasted Brussels Sprouts 

    IMG_1437

    Sweet and Spicy Double Squash Salad

    Pom-2BPilaf-2B2

    Raw Pomegranate Almond Couscous

    Vegan Squash Cornbread Stuffing 

    Cranberry Apple Wild Rice Stuffing 

    Vegan Sweet Potato Casserole

    Jalapeno-Cheddar-Taters

    Vegan Jalapeno Cheddar Mashed Potatoes

    Chickpea Cutlets in Mushroom Gravy 

    008

    Festive Quinoa Stuffing

    Savory Lentil and Wild Rice Stuffed Squash 

    Vegan Sweet Potato Lasagna 

    Lentils-in-mushroom-gravy-with-sweet-and-gold-mashed-potatoes-1

    French Lentils in Mushroom Gravy with Sweet and Gold Mashed Potatoes

    0071

    Apple Stuffed Squash

    Vegan Lentil Walnut Meatloaf

    Vegan-Tater-Tot-Hotdish-3

    Vegan Tater Tot Hotdish

    Mushroom-Meatballs

    Vegan Mushroom Walnut “Meatballs” with Gravy and Mashed Potatoes

    Vegan-Shepards-Pie

    Vegan Shepard’s Pie

    TGD-2B1

    Raw Miso “Roasted” Mushrooms and Green Beans with Rich Parsnip Puree


  • Vegan Chocolate Hazelnut Swirled Pumpkin Pie

    Vegan Chocolate Hazelnut Swirled Pumpkin Pie


    I made a double chocolate pecan pie last weekend, and saved half in the freezer for Thanksgiving, and I thought I should make a pumpkin pie too, since it wouldn’t be right not to have both.  I don’t know about you, but when I was a kid, I thought that the dessert was the best part of the Thanksgiving meal, and I would always have a slice of each pie.  Usually pumpkin, pecan and apple. Now I usually make the apple pies earlier in the Fall and just make pecan and pumpkin because they seem more special and Thanksgiving exclusive.  This year I seem to have a chocolate theme going on.  I made the pecan pie with the chocolate I mentioned earlier and Raw Guru sent me some Dastony hazelnut butter and I was inspired to make some chocolate hazelnut pecan pie.  Their hazelnut butter is super silky and perfect for using in desserts.  Plus I figured “nutella” and pumpkin sounded amazing together so why not try it?!

    First, I made my classic pie crust using gluten free flour and coconut oil for the fat.  This always turns out good for me, and the coconut oil gives it a nice sweetness that is perfect for pie.  For the hazelnut part, I wanted a combination that was rich, creamy and delicious so I whisked together the hazelnut butter with some coconut cream and cacao powder plus a little maple syrup to sweeten and it was heavenly!  Before being baked, it tasted like smooth hazelnut mousse. Sooo good.  Yes, I always have to sample all of the elements of my desserts to make sure they are good before baking.  I am mainly testing to see if they are sweet enough or spiced enough in the case of the pumpkin part of this pie, plus it is kind of a little treat that only the baker gets to enjoy.  Same thing with licking the bowls. Best part of baking next to enjoying the finished product. You may be wondering how you get a pumpkin pie to set up without eggs, well for this one it is a combination of cornstarch and agar powder and it works wonders once the pie cools.  It sets up beautifully into a smooth custard.

    This pie smelled heavenly while baking.  The aromas of chocolate, nuts and spice filling my kitchen!  Unfortunately I had to wait until the next day to enjoy it because I baked it at night and it had to cool completely and set.  But it was well worth the wait!  This was seriously one of the best pumpkin pies I have tried/made.  I know I say that every year, but this was amazing!  A silky smooth texture, a layer of rich creamy chocolate filling, and sweet spiced pumpkin filling in a buttery tender crust!  Sooo good!  This is so much better than I remember pumpkin pie tasting when I was younger.  It was probably my least favorite of the 3 we always ate (pumpkin, pecan, apple), but now I think they are all tied. If you haven’t made your pumpkin pie for Thanksgiving yet, consider making this one.  I have a feeling you and your family will love it!

    Vegan Chocolate Hazelnut Pumpkin Pie
    Makes one 9 inch pie

    Crust:


    Chocolate filling:


    Filling:

    • 2 cups organic cooked pumpkin (canned is ok too), packed
    • 1/3 cup pure maple syrup
    • 3/4 cup full fat organic coconut milk
    • 2 tsp coconut oil
    • 1 1/4 teaspoon ground cinnamon
    • 1 teaspoon ground ginger
    • 1 /4 teaspoon ground nutmeg
    • 1/4 tsp ground cloves
    • 1/4 teaspoon salt
    • 1 1/2 tablespoons cornstarch
    • 3/4 teaspoon agar powder


    Instructions:

    1. To make the crust, in a large bowl, mix together flour, sugar, sea salt, and spices. Cut in coconut oil with a pastry blender or 2 knives until it is in pea sized pieces. Mix in  just enough water to create a smooth dough that holds together but isn’t too sticky. Add more water if needed, and knead slightly until a smooth dough is created. Roll out into a 10 inch circle on a sheet of parchment paper, then use the paper to help you transfer it to an 8 inch pie dish.  Flute the edges, and set aside in the refrigerator.
    2. Pre-heat the oven to 350F degrees.
    3. To make the chocolate filling, whisk together all ingredients until smooth and set aside.
    4. To make the pumpkin filling, place all ingredients in the blender and blend until smooth.
    5. To assemble the pie, pour most of the chocolate hazelnut filling layer over the crust (reserving about 1/4 cup), then pour the pumpkin filling over that.  Drop the remaining chocolate filling over the pumpkin filling in about 1/2 tsp amounts and swirl with a knife to create a pretty design.
    6. Place in the pre-heated oven and bake for about 1 hour and 20- 1 hour and 30 min. until the edges of the crust are lightly brown, and pie is still jiggly in the center but set at the edges (it will firm up once cool).  Allow to cool completely, then chill in the refrigerator for a few hours at least before serving (I chilled mine in the refrigerator overnight).
    7. Store any leftovers in the refrigerator.


  • Vegan Double Chocolate Pecan Pie 

    Vegan Double Chocolate Pecan Pie 

    One important tradition for Thanksgiving in my family is pecan pie. I know pumpkin and apple are the most popular, but my Grandma and Mom’s favorite pie was always pecan. I have to agree.  It is pretty decadent and delicious and I consider it special because I only got to enjoy it for Thanksgiving.  No other time of the year. So now every year I make a pecan pie.  Since I like to switch things up a bit though when it comes to recipes, it is not my Grandma’s pecan pie, it is even better.  And I know my Grandma would approve because when she was still alive, she always loved my desserts that I would share with her, especially ones involving pecans and caramel.  I know Thanksgiving isn’t here quite yet, but I decided to bake a pecan pie last weekend.  I decided to enter the Tresomega “Organics For Life” Blogger Recipe Challenge contest, and I decided what better recipe than a fabulous pecan pie featuring their coconut oil!

    After all, coconut oil is essential to my flaky tender pie crusts.  When I first switched over to a vegan diet, I used buttery sticks for my pie crusts because I thought they would be closer to butter. But I actually discovered that coconut oil is perfect for pie crust and it doesn’t have preservatives in it that you usually find in those sticks, also I am not keen on canola or palm oil which are often found in butter substitutes.  I like to keep things as unprocessed as possible.  Coconut oil gives your crust a lovely sweet flavor and tender texture.

    For this pie, I made my classic pie crust and it was the perfect base for the gooey pecan pie filling.  I decided to be decadent this time and make a double chocolate pecan pie.  So I made a date caramel filling with a touch more of the coconut oil and some pecan butter for richness plus a little cacao powder to make it chocolaty.  It was so good, almost like a fudge caramel!  In addition to the pecans, since this is double chocolate pie I stirred in vegan chocolate chips. I could not wait to try this pie!

    It smelled amazing as it baked.  Like caramel and chocolate heaven!  It was a bummer I had to let it cool overnight because I made it pretty late, but it was well worth the wait.  This pie is pure decadent delicious goodness!  Rich, gooey chocolate caramel filling, crunchy pecans and chocolate chips in a buttery crust!  You won’t even miss the sugar and corn syrup that you would find in regular pecan pie, this is plenty sweet.  You would never guess that it is vegan, gluten free and refined sugar free!  If you love pecan pie for the Holidays as much as I do, definitely give this version a try!  I have a feeling your family will love it even if they aren’t all vegan.

    Vegan Double Chocolate Pecan Pie 
    Makes one 8 inch pie

    Ingredients:

    Crust:

    • 1 1/4 cups all purpose gluten free flour
    • 2 Tbsp coconut sugar or maple sugar
    • 1/4 tsp sea salt
    • 1/4 cup plus 2 Tbsp Tresomega virgin coconut oil in its solid state
    • about 3-4 Tbsp cold water


    Filling:

    • 1 cup soft pitted medjool dates (if they are not soft, soak them in filtered water for 30 minutes and drain well
    • before using)
    • 1/4 cup pecan butter
    • 2 Tbsp cacao powder
    • 1 Tbsp maple syrup, plus more for brushing the top of the pie
    • 1/8 tsp sea salt
    • 1 tsp pure vanilla extract
    • 1/3 cup filtered water
    • 1 Tbsp Tresomega virgin coconut oil
    • 1 cup toasted pecans, plus more for top of tart
    • 1 cup vegan chocolate chunks, plus more for top of tart


    Directions:

    1. Preheat oven to 375F degrees.
    2. To make the crust, in a large bowl, mix together flour, sugar, and sea salt. Cut in coconut oil with a pastry blender or 2 knives until it is in pea sized pieces. Mix in  just enough water to create a smooth dough that holds together but isn’t too sticky. Add more water if needed, and knead slightly until a smooth dough is created. Roll out into a 9 inch circle using floured parchment underneath and floured rolling pin. Transfer dough to an 8 inch tart pan or pie pan (don’t worry if it tears, just patch it up and nobody will know).  Set aside in the refrigerator.
    3. To make filling, combine all ingredients in a high speed blender or food processor except the pecans and chocolate. Process until smooth, then scrape into a bowl and stir in the pecans, and chocolate. Spread the filling over the crust, and top with more pecans and chocolate. Brush the top lightly with maple syrup. Place in the oven.
    4. Bake for about 35-40 minutes until the crust is starting to brown lightly. Remove from oven and let cool before serving.
  • Sweet and Spicy Roasted Brussels Sprouts

    Sweet and Spicy Roasted Brussels Sprouts

    One of my all time favorite items to make in the Fall is roasted brussels sprouts.  They are like savory candy honestly.  Tender on the inside, crispy and salty on the outside…sooo good!  I make them all the time at work with just a little olive oil and sea salt and they are amazing.  I could seriously eat a giant bowl of them and be happy.  Funny because as a kid I thought brussels sprouts were gross.  Probably because my Grandma steamed them for Thanksgiving and they were kind of mushy and stinky (they are a cruciferous vegetables after all).  I would take some just because I felt like I needed to take a little of everything but they were definitely not my favorite. It all depends on how you cook them though!  They are so delicious when roasted to crispy perfection!  So that is mainly how I make them.  Sometimes I will add them halved to a stir fry, but I don’t over-cook them.

    My Mom gave me a bag of them that she had picked up at Trader Joes and asked me to try making a side dish with Asian flavors that could be used for Thanksgiving with them.  Of course I was down for that, I do enjoy them after all!  So I created a simple dish that was easy to make, and I was enjoying delicious roasted brussels sprouts in about 45 minutes! I wanted them to be salty, sweet and have a little kick to them.  So I combined some home made chili oil, maple syrup, tamari, lime juice and garlic as a sort of marinade, tossed the brussels sprouts with that, and roasted them to flavorful perfection.

    They turned out so good!  Sweet, spicy, salty and tender. I think these would make a perfect Thanksgiving side dish!  I shared them with my Mom and she approved as well.  I think that if people served these instead of steamed brussels sprouts a whole lot more people would learn to love them!  I will definitely be making these again soon! Speaking of Thanksgiving side dishes, what is your favorite?  Mine were always mashed potatoes and stuffing, but of course now I can add brussels sprouts to the list!

    Sweet and Spicy Roasted Brussels Sprouts
    Serves 4

    • 2 Tbsp chili oil
    • 3 Tbsp maple syrup
    • 2 Tbsp tamari
    • 1 Tbsp lime juice
    • 2 garlic cloves, minced
    • 2 lbs fresh organic brussels sprouts, trimmed
    1. Preheat the oven to 350F degrees, and oil a sheet pan.
    2. Add all ingredients to a bowl, and toss the brussels sprouts until coated in the mixture.
    3. Spread out on the sheet pan, place in the oven and roast until the brussels sprouts are tender, about 45 minutes.
    4. Remove from the oven, and enjoy!


  • Vegan Sweet Potato Pecan Pie

    Vegan Sweet Potato Pecan Pie

    We always had 3 different types of pie at Thanksgiving gatherings at my Grandparent’s house when I was little.  It was always apple, pecan and pumpkin.  I would always take some of each as was tradition, but really the pecan was my favorite.  It was my Mom’s favorite and my Grandma’s favorite too, so maybe that was hereditary.  I mean, I could enjoy apple pie at other times of the year, because it was something my Mom liked to make, but pecan we only enjoyed that one day of the year.  There was just something about that gooey caramelly nutty pecan goodness that was amazing.  I still feel that way, but I now make my pecan pies refined sugar free.  No corn syrup in sight, I usually do a date caramel now, because I love fruit sweetened deliciousness.  In fact I think for the past 10 years or so I have made pecan pie in some form for Thanksgiving, because my Mom always requests it.  Grandma is no longer around, but if she were, I know she would love them.  Well, this year my Mom asked me to make a sweet potato pecan pie to bring to Thanksgiving.

    Of course I was happy to make one!  It sounded good to me too!  Sweet potatoes are my favorite in any form, and I love them in desserts.  Plus, I think that they are even more delicious in pie than pumpkin because they have a naturally sweeter flavor.  Not that I don’t like pumpkin pie, it is a classic, but I just prefer sweet potatoes if I have a choice.  And, they can be used in the same manor. Just FYI, if you ever want a pumpkin style pie but only have yams or sweet potatoes on hand, if you cook them and puree them they can be swapped for an even more delicious pie.  For this pie, I wanted a gooey layer of pecan pie on the bottom.  Just like the traditional stuff.  So I made a sweet gooey date caramel with pecan butter and stirred in plenty of chopped pecans.  It was so good I wanted to keep sampling it, but I had to stop so that there would be enough for the pie.

    For the filling, I used my pumpkin pie recipe, and it was super delicious even before being baked.  It tasted like delicious sweet potato pudding.  As the pie baked it filled my home with the most heavenly aroma!  Spice and caramel and a buttery smell from the crust….I was super excited!  But, I  had to wait until it cooled which was unfortunately overnight since I made it in the evening.  Once I was able to try it though, it was simply heavenly!  The crunchy pecans suspended in gooey caramel filling and creamy spiced sweet potato filling on top of the buttery crust were just what I was hoping for!  I am proud to share it with my family, and you would never know it is vegan because it tastes like it is rich and traditional.  If you are looking for a new pie to make this Holiday season, give this a try!

    Vegan Sweet Potato Pecan Pie

    Makes one 9 inch pie

    Crust:


    Pecan Layer:

    • 2 cups soft, pitted medjool dates
    • 1/2 cup pecan butter (or almond butter if you can not get pecan)
    • 1/4 cup filtered water
    • 3 Tbsp maple syrup
    • 1 Tbsp coconut oil
    • 1 tsp pure vanilla extract
    • 2 cups chopped pecans


    Filling:

    • 2 cups cooked sweet potato (canned is ok too), packed
    • 1/3 cup pure maple syrup
    • 3/4 cup full fat organic coconut milk
    • 2 tsp coconut oil
    • 1 1/4 teaspoon ground cinnamon
    • 1 teaspoon ground ginger
    • 1 /4 teaspoon ground nutmeg
    • 1/4 tsp ground cloves
    • 1/4 teaspoon salt
    • 1 1/2 tablespoons cornstarch
    • 3/4 teaspoon agar powder


    1. To make the crust, in a large bowl, mix together flour, sugar, sea salt, and spices. Cut in coconut oil with a pastry blender or 2 knives until it is in pea sized pieces. Mix in  just enough water to create a smooth dough that holds together but isn’t too sticky. Add more water if needed, and knead slightly until a smooth dough is created. Roll out into a 10 inch circle on a sheet of parchment paper, then use the paper to help you transfer it to a 9 inch pie dish.  Flute the edges, and set aside in the refrigerator.
    2. Pre-heat the oven to 375F degrees.
    3. To make pecan filling, blend all of the ingredients except the pecans in a blender until smooth, then stir in the pecans.  Pour into the crust and smooth the top.
    4. To make the sweet potato filling, place all ingredients in the blender and blend until smooth.
    5. Pour the sweet potato filling over the pecan layer and smooth out the top.
    6. Place in the pre-heated oven and bake for about  50 min. until the edges of the crust are lightly brown, and pie is set.  Allow to cool completely before serving (I chilled mine overnight in the refrigerator).
    7.   Store any leftovers in the refrigerator.


  • Butternut Squash and Cranberry Casserole

    Butternut Squash and Cranberry Casserole

    Squash is one of my favorite things ever, and I get super excited when it comes into season.  There was a point in my life when I was younger when I used to eat it almost every day for pretty much the Fall and Winter seasons in different ways for dinner. My skin even started to take on a little squash like hue that my Mom called my “squash tan”.  I don’t go quite to that extreme now, but I do enjoy it a couple of times a week.  After all, it is not around all year (well at least not the good tasting kind that only come when in season) so it is special and deserves to be enjoyed.  I love it stuffed, roasted in cubes in salads, or even mashed sometimes.  I can’t believe as a little kid I thought it was gross because I had been told that it was by a family member and I didn’t want to try it.  I was missing out.  I started to enjoy it though, when my Mom served the roasted kind stuffed with apples.  It turned me around and got me over my fear.  I have mostly  been roasting it cubed up this year for salads because it gets nice and crispy, but sometimes I roast it cut in half, which is what I did the other night when I happened to have a lot of extra squash.  I thought I could use it for other recipes.  You know, you can replace canned pumpkin in desserts with it, and it tastes even more sweet and delicious!  But this time I decided to make a savory side fit for the Thanksgiving table.

    Everyone makes sweet potato casserole, and that is fine, I love sweet potatoes, but I thought why not make a squash casserole?  I have not seen one before (I am sure they are out there, I have just never tried one), and I thought it would be delicious.  I also had a package of cranberries in my refrigerator waiting to be used in a recipes, so I decided to make this a double layer casserole with the cranberries.  I cooked them into a jammy sauce.  Not that nasty stuff from the can type of sauce, but the good kind that can only come from real cranberries.  I like them a little chunky.  Trust me, butternut squash and cranberries are a delicious combination for those that are skeptical.  Plus you get two of your Thanksgiving sides in one!

    Lastly, I wasn’t going to leave the casserole just like that, because in Minnesota casserole, (or really “Hot Dish” as we call it), should have some sort of crispy topping sprinkled on top that can be browned.  So, I made an oat streusel.  The whole thing smelled amazing while baking! Kind of like dessert, but it is definitely a savory Thanksgiving side.  It was super delicious!  The squash was sweet and delicious, the cranberries slightly tart, aromatic with orange and jammy, and the struesel was the perfect touch, crunchy and satisfying.  If you are looking for a new dish to try this Thanksgiving, give this a go!

    Butternut Squash and Cranberry Casserole
    Serves 12

    Ingredients:

    Squash:

    • 2 large butternut squash, halved
    • 1 tsp cinnamon
    • 2 Tbsp maple syrup
    • 1/4 tsp sea salt


    Craberries:

    • 2 7.5 oz packages fresh organic cranberries
    • 1/2 cup maple syrup (or to taste)
    • 1/4 cup orange juice
    • 1/4 tsp sea salt


    Topping:

    • 1/2 cup gluten free rolled oats
    • 2 Tbsp gluten free all purpose flour
    • 1/4 cup coconut sugar
    • 1/4 tsp sea salt
    • 1/2 tsp cinnamon
    • 2 Tbsp coconut oil


    Instructions:

    1. Preheat the oven to 400F degrees and oil a sheet pan, or line it with parchment.
    2. Cut the squash in half lengthwise and remove the seeds.  Place cut side down on the tray, and place in the oven.  Roast for about an hour until the squash is tender.  Remove from the oven and scoop out the flesh into a bowl.
    3. Add the maple syrup, cinnamon, and sea salt, and mash the squash with them until there are not any big lumps.  Spoon into an 8×8 square pan, or two smaller casserole pans (which is what I did).
    4. To make the cranberries, combine them with the syrup, orange juice, and sea salt in a saucepan and bring to a boil.  Lower to a simmer and cook until the cranberries are tender and thickened, about 15 minutes.  Remove from heat, and pour over the squash in the pan.
    5. To make the topping, combine all ingredients in a bowl, and mix together with your hands until it is small clumps that hold together when squeezed.  Scatter over the cranberries evenly.
    6. Place the pan (or pans) in the oven and bake until the topping is browned about 15-20 minutes.
    7. Remove from the oven and serve!
  • Vegan Triple Layer Chocolate Pumpkin Pie

    Vegan Triple Layer Chocolate Pumpkin Pie

    I do my best thinking on my runs.  Which is why they are so important and an essential part of my life.  If I am trying to sort out a problem, it is a good time to just be inside my own head and try and figure out a way to fix it.  Or, maybe I am just stressed out, it seems to melt it away because I feel like I am taking my frustrations out on the ground.  I am one of those types of people who likes to do a lot of thinking and weigh out the options before making a big decision.  But it isn’t all serious stuff, I also come up with some of my best recipes this way.  And, how I came up with the idea to make a super decadent pumpkin pie.  I loved cream pies growing up, or things like french silk chocolate pie, so I thought, why not make a pumpkin pie in that fashion?  I dreamed up 3 layers of pumpkin deliciousness.  I am one of those people who can’t just make things the way they are traditionally made all the time.  I have to tweak it and make it even more exciting.  Pumpkin pie just as is with no whipped cream or anything is kind of boring, but add in a layer of creamy chocolate filling and fluffy whipped cream too and it is exciting.

    I used my usual classic coconut oil gluten free pie crust for this, because it always turns out buttery and delicious.  I  suppose I could have just made this a no bake pie, but I went for the baked version.  For the filling first, I made a chocolate silk layer.  A rich concoction of coconut milk and cashew butter with rich cacao.  It was good even before I baked it.  I used my classic pumpkin pie filling next in the pie after that, filled with just the right amount of aromatic spices. The pie smelled wonderful while baking, and I thought to myself it was a shame I had to wait until the next day to enjoy it.  Because it was evening when I made it and it had to chill.

    Once it had chilled I made a fluffy coconut whipped cream to top it off.  It was a beautiful sight.  I love whipped cream on a pie.  The chocolate layer reminded me of chocolate silk pie, and it paired perfectly with the spiced pumpkin for a fall twist.  The whipped cream was just enough to balance out the intensity of the chocolate and spices.  It was simply heavenly!  If you are looking for a beautiful pie to serve for Thanksgiving, consider this one!

    Vegan Triple Layer Chocolate Pumpkin Pie

    Makes one 9 inch pie

    Crust:


    Chocolate filling:

    • 3/4 cup thick organic coconut milk (the thick kind from the top of a chilled can)
    • 3/4 cup cashew butter
    • 3 Tbsp maple syrup
    • 1/8 tsp sea salt
    • 1/4 cup cacao powder


    Filling:

    • 2 cups organic cooked pumpkin (canned is ok too), packed
    • 1/3 cup pure maple syrup
    • 3/4 cup full fat organic coconut milk (the thick kind from the top of a chilled can)
    • 2 tsp coconut oil
    • 1 1/4 teaspoon ground cinnamon
    • 1 teaspoon ground ginger
    • 1 /4 teaspoon ground nutmeg
    • 1/4 tsp ground cloves
    • 1/4 teaspoon salt
    • 1 1/2 tablespoons cornstarch
    • 3/4 teaspoon agar powder


    Coconut Whipped Cream:

    • 1 15 oz can full fat organic coconut milk (the thick kind from the top of a chilled can)*
    • 3 Tbsp maple syrup
    • pinch sea salt
    • 1 tsp pure vanilla extract
    • 1/2 cup plus 2 Tbsp coconut butter, warmed to liquid


    Instructions:

    1. To make the crust, in a large bowl, mix together flour, sugar, sea salt, and spices. Cut in coconut oil with a pastry blender or 2 knives until it is in pea sized pieces. Mix in  just enough water to create a smooth dough that holds together but isn’t too sticky. Add more water if needed, and knead slightly until a smooth dough is created. Roll out into a 10 inch circle on a sheet of parchment paper, then use the paper to help you transfer it to an 8 inch pie dish.  Flute the edges, and set aside in the refrigerator.
    2. Pre-heat the oven to 375F degrees.
    3. To make the chocolate filling, whisk together all ingredients until smooth and set aside.
    4. To make the pumpkin filling, place all ingredients in the blender and blend until smooth.
    5. To assemble the pie, pour the chocolate layer over the crust, then pour the filling over that.
    6. Place in the pre-heated oven and bake for about  50 min. until the edges of the crust are lightly brown, and pie is set.  Allow to cool completely, then chill in the refrigerator for a few hours (I chilled mine in the refrigerator overnight).
    7. For the whipped cream, combine all ingredients in the blender and blend until smooth, then pour into a bowl. Place in the freezer, and allow to chill for about 30-45 minutes until the consistency of whipped cream.
    8. Spoon the whipped cream on top of the cake and spread almost to the sides.  Serve!  Store any leftovers in the refrigerator.


    *If your coconut milk is especially runny (since some brands vary in texture), you may want to add a few Tbsp more coconut butter.

  • Vegan Cheesy Potato Casserole

    Vegan Cheesy Potato Casserole

    My Mom used to make a really delicious cheesy potato casserole when I was young to serve at family gatherings. Usually brunch type occasions, like when she hosted Easter at our house, or maybe a Christmas special request from me.  I used to ask her to make it a lot because it was so good!  I think it filled most of my plate when it was served over all else.  I could have cared less about the meat of course, and I always took my token amount of veggies, and a roll, but the potatoes were the star to me.  I mean, what’s not to like about layers of creamy cheese and potatoes!  I have been saying to myself for a while now, you have to make a vegan version.  So this past week, I finally got around to it.  I had extra potatoes on hand, and some cheese sauce left over from some mac and cheese that I had made, so it was perfect!  My Mom used to use frozen hash browns in hers, but I decided to be a little different with mine since I don’t think I have ever bought frozen hash browns, and I had fresh potatoes to use up.

    I guess this was sort of in the style of a cheesy potatoes one of my coworkers at the deli used to make, crossed with my Mom’s potatoes. My coworker always just used large diced potatoes in her casserole and a little kick.  My Mom’s was more mellow and just creamy and delicious.  Combining the two ended up being awesome.  Of course both of these dishes had tons of cheese, butter, flour and cream.  I think my Mom’s had heavy cream in fact, because this dish was considered a treat.  But my cheesy potatoes actually have a healthy cheese sauce made from a secret ingredient that gives them their lovely yellow color.  Winter squash!  I like to hide veggies in my dishes, and lighten things up with them, so that was the idea here.  I guess I can’t bring myself to make vegan mac and cheese without including veggies in the sauce, so why would I not include them with the potatoes?  Don’t worry, the sauce is super delicious.  I added cashew butter to give it a little richness and volume so it has more of the texture of cheese, along with things like miso, nooch (nutritional yeast), salt, mustard and garlic to give it a wonderful savory flavor.  It may sound like a weird combo but it is so good once it is done!

    Once combined with the cooked potatoes it is bomb!  I could eat a giant bowl of these potatoes (just like I used to when I was little), but I would not feel bad about doing so or get a tummy ache after because these are so much healthier than the original version.  I love recreating old dishes from my childhood and making them vegan!  Often times they turn out even better!  If you are looking for a delicious side dish, or maybe you are just craving potatoes and cheese, which is totally legit too, give these a try!

    Vegan Cheesy Potato Casserole

    Serves 6-8

    Cheese Sauce:

    • 2 cups mashed cooked butternut squash or sweet potato*
    • 1 cup hot filtered water (or as needed)
    • 1/3 cup raw cashew butter or almond butter
    • 1 medium garlic clove
    • 2 tsp yellow mustard or stone ground mustard
    • 1 Tbsp apple cider vinegar
    • 1 Tbsp white miso (optional)
    • 1/4 cup plus 2 Tbsp nutritional yeast
    • 1/8 tsp cayenne pepper
    • 3/4 tsp sea salt (or to taste)


    Potatoes:

    • 3 lbs yukon gold potatoes, cut into 1 inch cubes
    • filtered water
    • sea salt


    Topping:

    • 3 Tbsp nutritional yeast
    • paprika for sprinkling


    Instructions:

    1. To make the cheese sauce, combine the squash, water, cashew butter, garlic, mustard, cider vinegar, yeast, cayenne, sea salt and turmeric in a high speed blender and blend until smooth and the consistency of cheese (if it is too thick add a little more water).  Set aside.
    2. Preheat the oven to 375F degrees.
    3. To make the potatoes, put them in a large pot, and cover with filtered water by 1 inch.  Add a few tsp sea salt to the water.  Bring to a boil, and then lower to a simmer.  Allow the potatoes to cook until tender, about 10-12 minutes.  Drain, then add back to the pot.
    4. Stir in the cheese sauce, then pour into a baking dish.
    5. Sprinkle the potatoes with the nutritional yeast, and place in the oven for about 15 minutes.  Sprinkle with paprika and serve!

    *To cook the squash, I like to roast them in the oven.  Cut one medium squash in half top to bottom, and remove the seeds.  Place cut side down on a sheet pan lined with parchment and bake for about an hour at 400F degrees or until tender.  Remove from oven and let cool before removing the skin and mashing.

  • Vegan Mini Chocolate Cinnamon Pecan Pies

    Vegan Mini Chocolate Cinnamon Pecan Pies

    mini-chocolate-cinnamon-pecan-pies-3

    Ever since Thanksgiving, when I had made a really good pecan tart with chocolate chunks and coconut, my Mom has been asking me to make her a pecan pie or tart with cinnamon and dark chocolate.  Well, I did not get it made for Christmas.  Luckilly there were plenty of other good desserts to go around.  But I did get it made before New Years!  I don’t go back on promises, and it sounded good to me as well!  I decided to make mini pies though, because my Mom is a big fan of mini desserts.  She always told me, if you make the desserts small, you can have more than one, and you can have several different kinds.  This was applied to the many batches of Christmas cookies we used to make, but I think it can apply to these little pies as well, especially if they are being served as part of a Holiday spread or New Years Eve buffet.

    mini-chocolate-cinnamon-pecan-pies-4

    These were pretty easy to make, I used my classic gluten free coconut oil pie crust, because it always turns out perfect for me, and tastes good but also allows the flavors of the filling to shine.  For the filling, I used a date caramel with a hit of chocolate in two forms to make it extra good, cocoa powder, and dark chocolate chips.  I included plenty of pecans as well as pecan butter and was it ever delicious!  I could have eaten that with a spoon. But luckily I restrained myself and most of it made it into the crusts.

    mini-chocolate-cinnamon-pecan-pies-2

    They smelled amazing while baking!  I could not wait to try them, but of course they had to cool a bit.  I recommend eating these warm, even if it is slightly more difficult to get them out of the pan at that stage.  Because the filling is gooey and amazing when they are not completely cool.  These are decadent, chocolaty, and sooo good!  They were just as good as I imagined, and my Mom loved them as well which was the important part since they were her idea.  These would be perfect as part of a New Years Eve buffet, because they are small and easy to serve!

    mini-chocolate-cinnamon-pecan-pies

    Vegan Mini Chocolate Cinnamon Pecan Pies
    Makes 16

    Ingredients:

    Crust:


    Filling:

    • 2 cups soft pitted medjool dates (if they are not soft, soak them in filtered water for 30 minutes and drain well before using)
    • 1/2 cup raw pecan butter (almond butter will also work if you do not have pecan)
    • 2 Tbsp maple syrup
    • 1/4 tsp sea salt
    • 2 tsp pure vanilla extract
    • 1/2 cup filtered water
    • 2 Tbsp coconut butter or oil
    • 1/2 tsp cinnamon
    • 1 Tbsp plus 1 tsp unsweetened cocoa powder
    • 1 1/2 cups toasted pecans, plus more for pie tops
    • 1/2 cup vegan chocolate chips

    Instructions:

    1. To make the crust, in a large bowl, mix together flour, sugar, and sea salt. Cut in coconut oil with a pastry blender or 2 knives until it is in pea sized pieces. Mix in  just enough water to create a smooth dough that holds together but isn’t too sticky. Add more water if needed, and knead slightly until a smooth dough is created. Roll out into a rectangle using floured parchment underneath and floured rolling pin. Cut into 16 circles.
    2. Oil a muffin pan well with coconut oil and fit the dough circles into the holes. Shape the edges that stick out if desired (I fluted mine).
    3. Preheat oven to 375F degrees.
    4. To make filling, combine all ingredients in a high speed blender or food processor except the pecans. Process until smooth, then scrape into a bowl and stir in the pecans and chocolate chips. Spoon the filling into the crusts in the pie tin, and top with more pecans to make the tops look pretty.
    5. Place pies in the oven. Bake for about 30 minutes until the crusts are starting to brown lightly. Remove from oven and let cool on a wire rack until warm (if you want them warm when serving so the chocolate is nice and gooey) or cooled (for easier removal).

    mini-chocolate-cinnamon-pecan-pies-1

  • Vegan Coconut Chocolate Chunk Pecan Tart

    Vegan Coconut Chocolate Chunk Pecan Tart

    pecan-coconut-chocolate-chunk-tart-5

    My Mom used to ask me to make nut tarts for nearly every Holiday a while back, and they were always a hit!  They are her favorite, and they were pretty darn delicious so I was happy to make them!  We made all sorts of different kinds, pecan chocolate chunk, pine nut caramel, macadamia coconut…and they were all crave worthy!  The secret to why these were so good was the butter and brown sugar.  Loads of it.  So needless to say, it has been a while since I have made any.  I don’t know why I have never veganized them, but I decided to this week, just in time for Thanksgiving, because I knew my Mom would appreciate it.

    pecan-coconut-chocolate-chunk-tart-6

    I saw a recipe for coconut chocolate chunk pecan pie on Pinterest, and that was my inspiration.  It wasn’t vegan at all, but I knew I could make an even better version!  I made it in tart form though, because it bakes up faster but tastes just as good.  The filling for this pie had to have caramel of course, because that is what makes a pecan pie so good.  Since the days when I used to make those tarts, I have discovered date caramel.  It has been my go to caramel for a while now, and my body feels so much better indulging in it than the caramel with dairy and refined sugar I used to eat.  Dates are about as natural as you can get after all when it comes to sweeteners. So I made a delicious date caramel for the filling!

    pecan-coconut-chocolate-chunk-tart-1

    Once the pecans, coconut and chocolate were added, I knew this was going to be delicious!  It smelled amazing while baking, and I couldn’t wait to try it!  But of course, I had to wait until it cooled properly first, which was hard.  It turned out super delicious and my Mom loved it too!  I think I like this tart even better than the ones I used to make!  This would be a perfect dessert addition to your Holiday table!

    pecan-coconut-chocolate-chunk-tart-2

    Vegan Coconut Chocolate Chunk Pecan Tart
    Makes one 8 inch tart

    Ingredients:

    Crust:

    • 1 1/4 cups all purpose gluten free flour
    • 2 Tbsp coconut sugar or maple sugar
    • 1/4 tsp sea salt
    • 1/4 cup plus 2 Tbsp coconut oil in its solid state
    • about 3-4 Tbsp cold water


    Filling:

    • 1 cup soft pitted medjool dates (if they are not soft, soak them in filtered water for 30 minutes and drain well
    • before using)
    • 1/4 cup pecan butter
    • 1 Tbsp maple syrup
    • 1/8 tsp sea salt
    • 1 tsp pure vanilla extract
    • 1/3 cup filtered water
    • 1 Tbsp coconut butter or oil
    • 1 cup toasted pecans, plus more for top of tart
    • 1/2 cup vegan chocolate chunks, plus more for top of tart
    • 1/2 cup large flake coconut, plus more for top of tart


    Directions:

    1. Preheat oven to 375F degrees.
    2. To make the crust, in a large bowl, mix together flour, sugar, and sea salt. Cut in coconut oil with a pastry blender or 2 knives until it is in pea sized pieces. Mix in  just enough water to create a smooth dough that holds together but isn’t too sticky. Add more water if needed, and knead slightly until a smooth dough is created. Roll out into a 9 inch circle using floured parchment underneath and floured rolling pin. Transfer dough to an 8 inch tart pan (don’t worry if it tears, just patch it up and nobody will know).  Set aside.
    3. To make filling, combine all ingredients in a high speed blender or food processor except the pecans, coconut and chocolate. Process until smooth, then scrape into a bowl and stir in the pecans, coconut and chocolate. Spread the filling over the crust, and top with more pecans, coconut and chocolate. Place in the oven.
    4. Bake for about 30 minutes until the crusts are starting to brown lightly. Remove from oven and let cool completely before serving.

    pecan-coconut-chocolate-chunk-tart-4

  • Vegan Creamed Spinach

    Vegan Creamed Spinach

    My Mom and I were recently out to one of our favorite restaurants, one known for creatively using seasonal veggies, and she ordered the creamed spinach.  She said it was really good, but of course it had dairy in it, so I couldn’t try it.  But, she said “I bet you can recreate this at home using vegan ingredients, and it would be even better!”  She has confidence in my veganizing and cooking skills.  Of course I was all for it, I love making new (or old classic) recipes for people who want them without the animal products.  So, I went for it!  Something like cream is not hard to recreate when you have cashews and coconut milk on hand.  No, this is not a low fat recipe because that is not what she wanted.  Yes, I know you could use some sort of veggie pureed in the sauce if you wanted it to be but I will leave that for another day. Cashews and coconut milk are darn delicious and are staples of vegan mac and cheeses and fettuccini alfredos everywhere!

    creamed-spinach-3

    The creamed spinach she had at the restaurant had parmesan cheese in it, so I decided to give this a little cheesy flavor along with the richness by adding a little miso, nutritional yeast and lemon juice for zip!  A touch of garlic, and voila!  Cheesy creamy deliciousness ready for the spinach!  Now 18 oz of spinach might seem like a lot mind you (it is like 3 bags baby spinach), but it wilts down to practically nothing, and this does serve 4 people.  If you want to get a lot of spinach in fast, this is definitely a way to do it.  I think Popeye would be proud.  Just take care not to overcook it, you don’t want to lose those nutrients!

    creamed-spinach-1

    This is sooo good!  It better than just regular creamed spinach that most people make, not only because it is vegan, but because it is delicious!  My Mom was excited about it, and she much approved!  I think this would be a good addition to your Thanksgiving or Holiday table.  You could just make the cream part ahead of time, reheat and add the spinach at the last minute before serving.  Because one can never have too many veggie dishes on the table for the Holidays right?

    creamed-spinach

    Vegan Creamed Spinach
    Serves 4-6

    • Ingredients:
    • 1 1/4 cups organic coconut milk
    • 1/2 cup raw cashew butter
    • 1 garlic clove, minced
    • 2 Tbsp nutritional yeast
    • 1 tsp white miso
    • 1/2 tsp lemon juice
    • 1/4 tsp sea salt or to taste
    • 1 Tbsp arrowroot powder dissolved in 1 Tbsp filtered water
    • 18 oz  organic baby spinach leaves

    Directions:

    1. In a medium saucepan, combine the coconut milk and cashew butter and heat until almost simmering and they are combined.
    2. Add the garlic, yeast, miso, lemon juice and sea salt and cook until combined.
    3. Add the arrowroot and cook until thickened slightly.  Remove from heat.
    4. Add the spinach in batches until it is all wilted down (taking care not to overcook it).
    5. Pour into a dish, and serve!


  • Vegan Sweet Potato Casserole

    Vegan Sweet Potato Casserole

    sweet-potato-casserole-4

    Like any mid-western cook, my Grandma would always serve a sweet potato casserole with Thanksgiving.  As much as I loved my Grandma’s cooking, it was probably my least favorite thing and I politely would just take a small spoonful.  Now, I am sure some sweet potato casseroles are good, and they use real yams, but this one had the syrupy canned ones, loads of butter and brown sugar and was sickeningly sweet.  Now I know my Grandma had enough other dishes to make and it was a lot of work, so I don’t blame her for using canned sweet potatoes.  Since this was the only type of sweet potatoes I had ever tried in my life, the canned ones on Thanksgiving, up until I was in college, I didn’t really like sweet potatoes.  Then I found a recipe I wanted to try from a cookbook at the library, and it was a simple roasted mashed sweet potato with a dash of lime and sea salt.  It was so good I fell in love and I have been in love with them ever since.  In fact yams are almost a daily occurrence in my kitchen.  Yam fries and stuffed yams are my favorite.

    sweet-potato-casserole-3

    But…I have never really made my own vegan version of sweet potato casserole.  Even though I know I can adjust the levels of sweetness and whatnot to make it to my liking.  I guess I wasn’t real big on the store bought mini marshmallows that topped the original one off either, but I saw a sweet potato casserole made on a cooking show recently that used a meringue instead of the potatoes and that sounded way better.  I had a vegan aquafaba meringue recipe that would be perfect!  And my Mom had recently asked me if I could make something like this, so it all worked out.

    sweet-potato-casserole-2

    I roasted the sweet potatoes until they were all nice and flavorful, then mashed them with some maple syrup, spices, a dash of lime juice and sea salt and they tasted sooo good!  I made my aquafaba meringue marshmallows, and topped them off and it all smelled so good when it emerged from the oven!  OMG…it was so tasty!  Way better than the sweet potato casserole of my childhood.  If my Grandma were still alive today I think she would have loved and appreciated this if I brought it to Thanksgiving dinner (because now I would be bringing dishes and helping her since I cook now).  My family approved, and I think yours will too!  This is an indulgent dish because of course it is a little sweet, but it is actually low in fat and worth indulging in for a special occasion! Do you have any family classic Thanksgiving recipes that you have veganized?

    sweet-potato-casserole-1

    Vegan Sweet Potato Casserole
    Serves 8-10

    Sweet Potatoes:

    • 6 large sweet potatoes
    • 3 Tbsp maple syrup (or to taste)
    • 1/4 tsp chipotle powder or 1/8 tsp cayenne
    • 2 Tbsp lime juice
    • 1 tsp cinnamon
    • 1/4 tsp sea salt (or to taste)

    Marshmallows:

    • 1 cup aquafaba*
    • 1 Tbsp xanthan gum or guar gum
    • 1 tsp cream of tartar
    • 1 cup powdered xylitol, maple sugar or coconut sugar**
    • 1/4 tsp sea salt (if your chickpea liquid has no salt)
    • 1 tsp pure vanilla extract

    Directions:

    1. Preheat the oven to 400F degrees.
    2. Cut the yams in half lengthwise, and set cut side down on an oiled sheet pan.  Place in the oven and roast for about an hour to an hour and 15 minutes until they are very tender.  Remove from the oven (but leave it on) and allow to cool until cool enough to handle.  Scoop out of the skins into a bowl, and mash with the maple syrup, chipotle, lime juice, cinnamon, and sea salt.  Spoon into an oiled casserole dish (9×9 inch will work, but I spooned mine into 3 smaller ones.  Just use what you have).  Set aside.
    3. Meanwhile, In a food processor (which is what I used, or you may use a stand mixer with a whisk attachment), whip up the chickpea liquid until it has reached pretty stiff peaks. This will take about 2 minutes in the food processor.  Add the guar gum and cream of tartar and process until incorporated.  Add the sea salt and sugar and with the motor running, a little at a time through the feed tube (so you do not deflate it), then allow to process until the sugar is completely dissolved and the meringue is smooth, shiny and thick.  Add the vanilla, and blend until uniform in color.
    4. Turn on the broiler.
    5. Pipe marshmallows over the top of the sweet potatoes, then place the casserole under the broiler for about 2 minutes until the meringue is toasted and starting to brown on top (watch it closely, it could easily burn fast).

    *Aquafaba is the liquid from cooked or canned chickpeas.  If you are using liquid from the cooked, you want to make sure it is thick, not watery.

  • Vegan Pumpkin Cream Cheese Pie

    Vegan Pumpkin Cream Cheese Pie

    pumpkin-cream-cheese-pie-4

    I can not believe how beautiful it has been here lately!  It was 60F degrees yesterday, and normally it is 40.  I will take it, the snow will fly here soon enough! It is Minnesota after all. So, I took full advantage yesterday, a nice 10 mile run to enjoy the beautiful morning and rising sun, and a nice hike at a local state park in the afternoon with Eric.  It is kind of nice to get off of the paved trails sometimes and walk through the woods with all of the fallen crunchy leaves.  All of that activity made my hungry, so luckily the day before I had made a delicious pie to indulge in later that night.  It was a new pie recipe, indulgent, and to be honest, it would be just perfect for Thanksgiving.  It was a special pumpkin pie with a layer of cream cheese, then a layer of regular pumpkin pie, and topped off with fluffy billowy whipped cream.  OMG was it GOOD!!!

    pumpkin-cream-cheese-pie-1

    I had seen a photo of a pie like this on Pinterest, and it looked amazing and perfect, but it was not vegan or healthy by any stretch.  It was filled with things like cool whip (i.e. chemicals and fake stuff), dairy, loads of sugar and butter.  So, I decided that I needed to make this beautiful pie vegan and healthier so I could enjoy it!  It was not hard to make, I just used my classic pie crust recipe, usual pumpkin pie filling, and a coconut milk and cashew mixture for the cream cheese, and topped it off with the whipped cream I always make (one that doesn’t melt so much at room temperature).  Yes, it is a few steps, but I made the bottom part  the night before, and the topping the next day to make it easier (and this is what I would do if I were serving it for the Holidays too).

    pumpkin-cream-cheese-pie-3

    OMG was it ever heavenly!  It was even better than I had dreamed, and I am sure way better than that pie in the picture was.  I love veganizing stuff!  If you are looking for the perfect Thanksgiving pie, give this a try.  You and your guests will be happy you did!  to be honest, when I was little pumpkin pie was never my favorite at Thanksgiving, but this pie would have won me over and changed my mind.

    pumpkin-cream-cheese-pie-2

    Vegan Pumpkin Cream Cheese Pie

    Makes one 9 inch pie

    Crust:


    Cheesecake:

    • 3/4 cup thick organic coconut milk (from the top of a chilled can)
    • 3/4 cup cashew butter
    • 2 Tbsp maple syrup
    • 1/8 tsp sea salt
    • 1 tsp pure vanilla extract
    • 1/2 tsp cider vinegar
    • 2 Tbsp arrowroot starch or cornstarch


    Filling:

    • 2 cups organic cooked pumpkin (canned is ok too), packed
    • 1/3 cup pure maple syrup
    • 3/4 cup full fat organic coconut milk
    • 2 tsp coconut oil
    • 1 1/4 teaspoon ground cinnamon
    • 1 teaspoon ground ginger
    • 1 /4 teaspoon ground nutmeg
    • 1/4 tsp ground cloves
    • 1/4 teaspoon salt
    • 1 1/2 tablespoons cornstarch
    • 3/4 teaspoon agar powder

    Coconut Whipped Cream:

    • 1 15 oz can full fat organic coconut milk, chilled*
    • 3 Tbsp maple syrup
    • pinch sea salt
    • 1 tsp pure vanilla extract
    • 1/2 cup plus 2 Tbsp coconut butter, warmed to liquid


    1. To make the crust, in a large bowl, mix together flour, sugar, sea salt, and spices. Cut in coconut oil with a pastry blender or 2 knives until it is in pea sized pieces. Mix in  just enough water to create a smooth dough that holds together but isn’t too sticky. Add more water if needed, and knead slightly until a smooth dough is created. Roll out into a 10 inch circle on a sheet of parchment paper, then use the paper to help you transfer it to an 8 inch pie dish.  Flute the edges, and set aside in the refrigerator.
    2. Pre-heat the oven to 375F degrees.
    3. To make the cream cheese, whisk together all ingredients until smooth and set aside.
    4. To make the pumpkin filling, place all ingredients in the blender and blend until smooth.
    5. To assemble the pie, pour the cheesecake layer over the crust, then pour the filling over that.
    6. Place in the pre-heated oven and bake for about  50 min. until the edges of the crust are lightly brown, and pie is set.  Allow to cool completely.
    7. For the whipped cream, combine all ingredients in the blender and blend until smooth, then pour into a bowl. Place in the freezer, and allow to chill for about 30-45 minutes until the consistency of whipped cream.
    8. Spoon the whipped cream on top of the cake and spread almost to the sides.  Serve!  Store any leftovers in the refrigerator.

    *If your coconut milk is especially runny (since some brands vary in texture), you may want to add a few Tbsp more coconut butter.

  • Vegan Roasted Squash Black Bean Tacos Recipe with GOODFOODS Guacamole

    Vegan Roasted Squash Black Bean Tacos Recipe with GOODFOODS Guacamole

    roasted-squash-and-black-bean-tacos-4

    Vegans love their avocadoes.  So, it comes of no surprise that we scope out the best guacamole!  Because sometimes we want to just grab it and go, not sit and scoop out avocadoes and add all of the seasonings.  This is why I am happy I discovered GOODFOODS guacamole!  I picked some up at Super Target (in the deli area of the store) earlier this week, two different varieties, Chunky Guacamole and Pineapple Poblano Guacamole.  They other varieties to try as well, which I will be picking up next time, because I love my guac!  Why did I pick this brand?  Well, simple, it is made with good ingredients.  Nothing you can’t pronounce, no preservatives, chemicals or additives.  Just avocadoes, and veggies (or fruit if you get the pineapple) which is really important to me!  I want to be putting good things into my body and GOODFOODS guacamole fits the bill!  This stuff is packed with nutrients to keep you feeling good, and it is always fresh, never heated because they use a special process. Not only is it made with good ingredients, but these guys care about the environment as well, they compost all of their avocado skins and pits and hope to become a zero waste to landfill facility! It is not often you hear about companies that do that.

    roasted-squash-and-black-bean-tacos-3

    Their guacamole is wonderful for snacking with chips, but it is also good for Holiday entertaining.  Whip out a container of this for your guests with some chips and veggies, and I can guarantee they will be happy.  So easy! My Grandma always used to set out tables of snacks before our Holiday meals while she prepared them, and this would have been a good and healthy addition.  I always love it when snacks are healthy, guilt free, AND good. But not only is it a good snack for the Holidays, it is going to be a part of my main dish as well!  So, how does guacamole fit into my Thanksgiving meal?

    roasted-squash-and-black-bean-tacos

    Well, although this is a wonderful time of the year, the beautiful season, getting together with friends and loved ones you haven’t seen in a while, and good meals.  But it can also be kind of stressful if you are the host for Thanksgiving (or any other Holiday meal) and you have to prep and cook all of the food.  I don’t know about you, but I would rather focus on the spending time with the people I love part.  Which is why in past years I have simplified my Thanksgiving meal with one great main dish, maybe a side and dessert.  Now, I know it is traditional to cook a meal with many different dishes, but I am a little non-traditional and creating new traditions is ok too.  So, this year I am going with something a little creative, but everybody loves, tacos.  I mean, who doesn’t love tacos?!  You can be creative with them, fill them with all sorts of different ingredients and toppings, and even use seasonal ones!  Which is what I am doing.  Roasted Squash and Black Bean Tacos with GOODFOODS guacamole to top them off, which I am sharing the recipe for at the end of the post!  Because in my opinion ALL good tacos contain guacamole, and I love that I can just open a container, and not have to make it myself.  These tacos are pretty simple to make, and would go great with either of the GOODFOODS guacamoles that I bought, the Pineapple Poblano if you are extra feeling festive or the Chunky Guacamole if you want it more traditional.  Also, I might add, this Thanksgiving meal will leave you feeling good, and not in a food coma.  So you can spend quality time with your family after dinner as well!

    roasted-squash-and-black-bean-tacos-1

    If you are not into the whole serving tacos on Thanksgiving day thing, how about the next day if you have guests staying over that you need to feed in between shopping on black Friday?  Either way get yourself some GOODFOODS guac!  I encourage you to find some GOODFOODS guacamole in your area!  You can locate a store near you that carries them on their website HERE. They are in many stores including Target, Costco and Walmart among others, it is not hard to get your hands on.  Make this guacamole part of your Holidays!  Share the Goodness with GOODFOODS!

    roasted-squash-and-black-bean-tacos-5

    Vegan Roasted Squash Black Bean Tacos Recipe with GOODFOODS Guacamole
    Serves 6

    Ingredients:

    Squash:

    • 2 large butternut squash, peeled and diced
    • olive oil
    • sea salt to taste


    Beans:

    • 2 cups cooked black beans
    • 1 Tbsp olive oil
    • sea salt to taste
    • 1 Tbsp chili powder
    • 1 tsp cumin
    • 1/8 tsp chipotle powder
    • 1 garlic clove, minced


    Assembly:


    Directions:

    1. Preheat the oven to 400F degrees.
    2. Toss the squash with just enough olive oil to coat then spread out on a sheet pan, and sprinkle with sea salt. Place in the oven and roast for about 30 minutes until the squash is tender and starting to brown at the edges.
    3. Meanwhile, toss the black beans together with the olive oil, spices and garlic and set aside.
    4. When the squash is done roasting, to assemble the tacos, spoon some of the beans and squash onto each tortilla, then sprinkle with cranberries, top off with GOODFOODS Guacamole, sprinkle with some scallions, garnish with cilantro, and drizzle with hot sauce.  Serve!


  • Vegan Italian Walnut Stuffed Mushrooms

    Vegan Italian Walnut Stuffed Mushrooms

    From time to time, my Mom brings me veggies and asks me to make something with them for her, or to veganize a classic recipe and I am more than happy to do so!  She has been trying to eat more plant based lately, and I am proud of her for that!  She brought me some mushrooms this week, and asked if I would make stuffed mushrooms for her because they were so beautiful.  They sounded good to me to, so I was all for it!  This Italian restaurant we used to go to had stuffed mushrooms, and I thought I would make something similar to those.  Those mushrooms tasted good, but my Mom had said they would be better with a less bready stuffing.  They also had cheese, so I had to figure out how to give them a cheesy flavor as well.

    italian-walnut-stuffed-mushrooms-2

    I decided on a walnut stuffing, because in the past I have made walnut meat for things (in my fully raw days) and it is always a hit.  It is usually a substitute for beef, but I thought it would be good here because it would taste similar to meat balls.  I mixed in my typical Italian herbs along with some arugula, tomato paste and some nutritional yeast to give it a cheesy flavor, and it did taste like really good meat balls (but better since it was vegan).  I knew these guys were going to be good!

    italian-walnut-stuffed-mushrooms-1

    I stuffed all of the mushrooms, popped them into the oven, and couldn’t wait to try them once they were baked.  They smelled amazing while baking, enough to make anyone really hungry.  They tasted even better than I had hoped, but most importantly, my Mom thought they were delicious as well!  These would make a great appetizer for a Holiday party! But they make a wonderful snack, or light dinner with a salad as well.

    italian-walnut-stuffed-mushrooms

    Vegan Italian Walnut Stuffed Mushrooms
    Serves 6 as an appetizer

    Ingredients:

    • 1  1/4 cups raw walnuts
    • 1/4 cup nutritional yeast
    • 1/2 tsp dried basil
    • 1/2 tsp dried oregano
    • 1 garlic clove
    • 1/4 tsp sea salt, or to taste
    • 2 Tbsp tomato paste
    • 1 hanful arugula or spinach
    • 8 oz crimini mushrooms, stems removed


    Directions:

    1. Preheat the oven to 400F degrees, and line a sheet pan with parchment.
    2. Combine the walnuts, yeast, basil, oregano, garlic and sea salt in the food processor and process until chopped and walnuts are small pieces. Add the tomato paste and arugula and pulse until blended and arugula somewhat chopped.
    3. Spoon into the mushroom caps so that they are heaped full.  Place in the oven, and bake for about 30 minutes until the mushrooms are tender.  Remove from the oven, garnish with basil, and serve!


  • Vegan Cranberry Pear Pie with Walnut Crumble Topping

    Vegan Cranberry Pear Pie with Walnut Crumble Topping

    IMG_1570
    When I was little, I thought cranberries came in a can, jiggled and nothing more.  I was not a big fan, and usually didn’t take any on Thanksgiving.  They just seemed to me like they were part of the tradition but nobody really ate them.  Thank goodness I have since been exposed to good cranberries.  I love buying fresh ones this time of the year and making them into something delicious.  Especially when used in a baked dessert where they can be allowed to become almost jammy.  So when I saw some at the store last week, I had to pick them up.
    IMG_1574
    I decided to bake one of those delicious desserts, a vegan cranberry pear pie.  Pears are sweet, cranberries are tart, so it is the perfect pairing! I am on a huge pie kick lately.  My favorite is with a crumble topping. It is a bit less fussy, and even more delicious and crunchy. I am a big texture person so the jammy filling with a crunchy topping is perfect in my book.  Especially when paired with coconut whipped cream or ice cream.
    IMG_1575
    I used an equal of cranberries and pears in the filling to balance it out nicely.  Some orange zest and juice joined the show since it is a lovely flavor with cranberry. I was getting excited about this!  I made a crunchy walnut crumble topping, and I knew this was going to be good.  Once it was smelling all wonderful and baked to jammy perfection I could not wait to dive in.
    IMG_1577
    I always have to cut myself a pretty large piece.  It was wonderful.  Sweet, tart, crunchy, melt in your mouth, heavenly.  No reason to be sad about summer fruit being out of season when you have this type of deliciousness!  Cranberries to the rescue!  This would be the perfect addition to a Holiday table!
    IMG_1578
    Vegan Cranberry Pear Pie with Walnut Crumble Topping

    Makes 1 9 inch pie

    Crust:
    1 1/2 cups all purpose gluten free flour
    3 Tbsp coconut sugar
    1/4 tsp sea salt
    6 Tbsp coconut oil, in its solid form
    about 2-3 Tbsp cold water

    Filling:
    3 cups diced ripe pears
    3 cups fresh or frozen organic cranberries (if they are frozen, thaw them first, and drain off any liquid)
    juice and zest of one small orange
    1/4 cup coconut sugar
    2 Tbsp arrowroot powder or all purpose gluten free flour
    2 tsp pure vanilla extract
    1/4 tsp cinnamon
    pinch sea salt

    Topping:
    3/4 cup gluten free all purpose flour
    3 Tbsp coconut sugar
    1/4 cup melted coconut oil
    1/2 cup gluten free rolled oats
    3/4 cup chopped walnuts
    pinch sea salt

    To make the crust, in a large bowl, mix together flour, sugar, sea salt.  Cut in coconut oil with a pastry blender or 2 knives until it is in pea sized pieces.  Mix in just enough water to create a smooth dough that holds together but isn’t too sticky.  Add a 2-3 Tbsp water as needed, and knead slightly until a smooth dough is created.
    Roll out into about a 9 inch round using parchment underneath and floured rolling pin.  Place dough into an 8 inch pie pan and fit to edges (being careful since gluten free dough is more fragile). If it tears, no worries, just press it back together and patch it up. Flute the edges, or crimp with a fork. Set aside in the refrigerator.
    To make the topping, combine all ingredients in a bowl, and mix together and squeeze together until it is clumping up a bit.  Set aside.

    Pre-heat the oven to 400F degrees. In a large bowl, toss together the filling ingredients. Spoon into crust.  Scatter the topping over that. Bake for 1 hour in the middle rack of the oven until pears are cooked through, cranberries have burts and it is and bubbling (after 15 minutes check it and if it is getting too dark, tent it with foil for the rest of the time in the oven).

    Remove from oven and let cool until warm, and top with some ice cream or coconut vanilla whipped cream and enjoy!


  • Vegan Squash Cornbread Stuffing

    Vegan Squash Cornbread Stuffing

    IMG_1547

     I have made lots of traditional Thanksgiving foods in the past, but oddly enough, I have never actually made stuffing. Which is kind of weird since I did love my Grandmother’s stuffing, and it was one of my favorite things at Thanksgiving.  So, this year I decided to make some.  I am really not a big bread person, but when I do eat bread 99% of the time it is home made.  I wanted a gluten free bread for this, and I decided on cornbread since it is a quick-bread and fast to make. My favorite cornbread recipe is actually a squash cornbread.  It is lower in fat than most, and it makes a perfect partner for chili.  So I used that recipe for this.

    IMG_1549

    I added in the usual suspects, celery, onions, and garlic, and mushrooms to give it an earthy flavor.  Thyme, rosemary, and sage of course had to be present, and I used my own flavorful home made veggie stock.  When I make my stock, it has lots of onions and garlic, and a bit of celery…so good.  I work in a deli so I have lots of veggie trimmings to use in stock.  Anyways, once this stuffing was all baked into delicious goodness I could not wait to try it.  It smelled amazing.  I like the contrast of the crisp bits on top with the soft stuffing beneath.  Crave worthy.  I think this would have passed Grandma’s taste test.  It was delicious!

    IMG_1550

    Vegan Squash Cornbread Stuffing

    Serves 6-8

    1 loaf squash cornbread (recipe follows), diced

    1 Tbsp olive oil

    4 stalks celery, sliced

    1 onion, diced

    1 1/2 cups crimini mushrooms, sliced

    3 garlic cloves, minced

    1 tsp dried thyme

    1 tsp dried rosemary

    1/2 tsp dried sage

    1 1/2 cups flavorful veggie stock (or as needed)

    sea salt to taste

    Pre-heat the oven to 400F degrees.  Spread the bread cubes out on a sheet pan, and toast in the oven for about 10 minutes until a little dry.  Remove from the oven and set aside in a large bowl.

    Meanwhile, in a skillet over medium heat, heat the olive oil, and add the celery, onions, and mushrooms.  Sautee until tender, about 10 minutes, then add the garlic and herbs and sautee a minute more.  Add 1 cup of the stock to deglaze and scrape up any brown bits. Pour this mixture over the bread in the bowl, and toss gently to mix together. Pour into an 8 inch square oiled baking dish.  Drizzle the top with a little olive oil (optional, if you are toasting the top). Place in the oven, cover,  and bake for about 30 minutes until heated through, removing the foil for the last 10 minutes if you want to brown the top and get it crispy.  Serve warm.

    Vegan Squash Cornbread

    1 loaf

    1 cup medium grind cornmeal

    1 cup all purpose gluten free flour

    1 1/2 tsp baking soda

    1 tsp baking powder

    1 tsp sea salt

    1 cup coconut milk

    1/2 cup squash or pumpkin puree

    2 Tbsp coconut oil

    1 Tbsp maple syrup

    1 Tbsp cider vinegar

    Preheat the oven to 375 degrees. Oil an 8×4 inch pan with coconut oil. In a large bowl, whisk together cornmeal, flour, baking soda, baking powder, sea salt. Whisk in coconut milk, squash, coconut oil, and maple syrup until well combined. Whisk in cider vinegar quickly until just combined, then pour into prepared pan. Bake for 15-20 minutes until lightly golden on top and a toothpick inserted into the center comes out clean. Cool a few minutes before turning out from pans.


  • Vegan Sweet Potato Tart with Cinnamon Pecan Streusel Topping

    Vegan Sweet Potato Tart with Cinnamon Pecan Streusel Topping

    IMG_1403

    I love, love, love sweet potatoes and yams. One of my all time favorite things is to roast them until they are intense in flavor and then just enjoy them with a squeeze of lime and sea salt, or to make fries out of them with a little olive oil and sea salt.  So good.  Almost like dessert even though it is savory.  I made a sweet potato casserole last week with maple pecan topping and it was so good I decided to make a pie in a similar fashion.  Just a little sweeter of course since this was to be dessert and not just a side dish.

    IMG_1404

    I had about 2 cups of cooked sweet potatoes, so that pie became a tart, but it was still just as good.  I used my usual gluten free pie crust, because I wanted all of the attention to be on the filling and it is a perfect blank palette.  For the filling, a bit of maple syrup, cinnamon and vanilla to flavor and it was so good. Sweet potatoes are so good to begin with, they don’t need much added to create dessert.

    IMG_1406

    I topped it off with a crunchy pecan streusel topping, and it smelled amazing while baking.  Like spiced brown sugar and sweet potatoes, an aroma that I wouldn’t mind wearing around like a perfume it smells so wonderful.  It tasted wonderful too once I allowed to cool and was able to dive in.  Sooo good.

    IMG_1408

    This would be a nice alternative to pumpkin pie for Thanksgiving!  Or, if you happen to roast up some yams and have extra, you know what to do with them now!

    IMG_1407

    Vegan Sweet Potato Tart with Cinnamon Pecan Streusel Topping

    Makes one 8 inch tart

    Crust:

    1 1/4 cups all purpose gluten free flour

    2 Tbsp coconut sugar or maple sugar

    1/4 tsp sea salt

    1/4 cup plus 2 Tbsp coconut oil in its solid state

    about 3-6 Tbsp cold water

    Filling:

    2 cups cooked yams or sweet potatoes, packed

    1/3 cup pure maple syrup

    1 cup full fat coconut milk

    2 tsp pure vanilla extract

    2 tsp coconut oil

    1/4 teaspoon ground cinnamon

    1/4 teaspoon salt

    1 1/2 tablespoons cornstarch

    3/4 teaspoon agar powder

    Topping:

    2 Tbsp coconut oil in its solid state

    2 Tbsp coconut sugar

    1/3 cup gluten free all purpose flour

    1/2 cup chopped pecans

    1/2 teaspoon ground cinnamon

    To make the crust, in a large bowl, mix together flour, sugar, and sea salt. Cut in coconut oil with a pastry blender or 2 knives until it is in pea sized pieces. Mix in  just enough water to create a smooth dough that holds together but isn’t too sticky. Add more water if needed, and knead slightly until a smooth dough is created. Roll out into a 9 inch circle on a sheet of parchment paper, then use the paper to help you transfer it to an 8 inch tart pan (if it rips, just patch it and press back into shape).  Set aside in the refrigerator.

    Pre-heat the oven to 375F degrees.

    To make the filling, place all ingredients in the blender and blend until smooth, then pour into the prepared crust.

    In a bowl, mix together the streusel ingredients with your hands until they clump up (it helps to squeeze them together with your fingers).  Sprinkle the streusel over the pie.

    Place in the pre-heated oven and bake for about  40-45 min. until the edges of the crust are lightly brown, and tart is set.  Allow to cool completely.

    Serve with coconut whipped cream if desired.


  • Vegan Mini Pecan Pies

    Vegan Mini Pecan Pies

    IMG_1357 (2)

    Pecan pie was always my Mother and Grandmother’s favorite dessert when it came to Thanksgiving desserts. My Grandma would always serve apple, pumpkin and pecan, and the pecan was always the pie that had some left over because most people in my family are not huge nut fans and prefer the apple and pumpkin.  I always had to have a slice of each type of pie.  It was Thanksgiving after all, and that was what I had really been looking forward to all day, the desserts.  I enjoyed the pecan.  I mean what is not to love about caramelly pie filled with delicious rich pecans in a buttery crust?!  I guess I am biased though because I love pecans and other types of nuts.

    IMG_1359

    I have never actually baked a vegan pecan pie, and I am in Thanksgiving recipes mode so I decided I had to this year.  But I didn’t want a giant one at the time, so I went for mini pecan pies using a muffin pan as my pie pan. I was crossing my fingers that they would come out of the pan intact since I secretly always worry when I make pies in a not removable bottom pan but they came out beautifully!  Instead of the usual corn syrup and brown sugar that go into the crust, I used a date caramel laced with pecan butter.  Pretty much what I make my caramel out of but thicker.  OMG was it ever good.  I mixed the pecans into this, and it made the perfect filling.

    IMG_1361

    I used my gluten free coconut oil pie crust recipe, because it is my favorite lately and the flaky crust was perfect with the sweet filling.  These were even better than I remember pecan pie.  The best part is you don’t have to cut pieces of pie with these, you get your own cute little pie!  These can be made ahead, so I think they would be perfect for Thanksgiving.

     IMG_1364

    Vegan Mini Pecan Pies

    Makes 16

    Crust:

    2 1/2 cups all purpose gluten free flour

    1/4 cup coconut sugar or maple sugar

    1/2 tsp sea salt

    3/4 cup coconut oil in its solid state

    about 6-7 Tbsp cold water

    Filling:

    2 cups soft pitted medjool dates (if they are not soft, soak them in filtered water for 30 minutes and drain well before using)

    1/2 cup pecan butter

    2 Tbsp maple syrup

    1/4 tsp sea salt

    2 tsp pure vanilla extract

    1/2 cup filtered water

    2 Tbsp coconut butter or oil

    1 1/2 cups toasted pecans, plus more for pie tops

    To make the crust, in a large bowl, mix together flour, sugar, and sea salt. Cut in coconut oil with a pastry blender or 2 knives until it is in pea sized pieces. Mix in  just enough water to create a smooth dough that holds together but isn’t too sticky. Add more water if needed, and knead slightly until a smooth dough is created. Roll out into a rectangle using floured parchment underneath and floured rolling pin. Cut into 16 circles.  Oil a muffin pan well with coconut oil and fit the circles into the holes. Shape the edges that stick out if desired (I fluted mine). Preheat oven to 375F degrees. To make filling, combine all ingredients in a high speed blender or food processor except the pecans. Process until smooth, then scrape into a bowl and stir in the pecans. Spoon the filling into the crusts in the pie tin, and top with more pecans to make the tops look pretty. Place in the oven. Bake for about 30 minutes until the crusts are starting to brown lightly. Remove from oven and let cool on a wire rack until warm.

    IMG_1363


  • Vegan Butternut Squash Apple Pie

    Vegan Butternut Squash Apple Pie

    butternut-squash-and-apple-pie-4

    Eric recently made his own pumpkin pie from scratch (like roasting the pumpkins and all). His turned out so cute, he made mini ones, and it made appreciate the fact that he can bake if he wants to.  I can’t say I can say that about any other guys I have had in my life so I consider it impressive. It got me wanting to make my own similar pie.  But with squash, because I actually like squash better than pumpkins.  I made a squash pie a long time ago before I was vegan and it was so good!  It was time to try again.

    butternut-squash-and-apple-pie-3

    I am really picky when it comes to squash I like to buy and eat. The two I like the best are kabocha and butternut. Both really sweet squash varieties that bake up nicely.  I used butternut for my pie this time. I haven’t made a straight up pumpkin type pie in a while, so I was looking forward to this! But I wanted to add another element to it as well.  I have been really craving apple pie lately, so I made a layer of apple pie on top of the crust before the squash filling.

    butternut-squash-and-apple-pie

    I used haralsons for that, my favorite baking apple introduced to me by my Mom who made the best apple pie when I was younger.  The squash filling was sweetened with maple syrup, made rich with coconut milk, and it had all the spices I use in my pumpkin pie.  It smelled delicious while baking with all of the warm aromatic spices filling the kitchen.

    butternut-squash-and-apple-pie-2

    It tasted even better!  I always used to have pumpkin and apple pie on thanksgiving anyhow, so if you made this for Thanksgiving you would just have to cut yourself one piece.  The butternut squash is even sweeter and silkier than pumpkin which I love.  If you have butternut squash and apples on hand you should really give this a go.  You might find that you want to serve it for Thanksgiving this year!

    butternut-squash-and-apple-pie-1

    Vegan Butternut Squash Apple Pie

    Makes one 8 inch pie

    Crust:

    1 1/4 cups all purpose gluten free flour

    2 Tbsp coconut sugar or maple sugar

    1/4 tsp sea salt

    1/4 cup plus 2 Tbsp coconut oil in its solid state

    about 3-6 Tbsp cold water

    Apples:

    3 medium tart sweet apples, diced

    1 tsp cinnamon

    1/4 cup coconut sugar

    pinch sea salt

    juice of one lemon

    Filling:

    2 cups cooked butternut squash, packed

    1/3 cup pure maple syrup

    3/4 cup full fat coconut milk

    2 tsp coconut oil

    1 1/4 teaspoon ground cinnamon

    1 teaspoon ground ginger

    1 /4 teaspoon ground nutmeg

    1/4 tsp ground cloves

    1/4 teaspoon salt

    1 1/2 tablespoons cornstarch

    3/4 teaspoon agar powder

    To make the crust, in a large bowl, mix together flour, sugar, sea salt, and spices. Cut in coconut oil with a pastry blender or 2 knives until it is in pea sized pieces. Mix in  just enough water to create a smooth dough that holds together but isn’t too sticky. Add more water if needed, and knead slightly until a smooth dough is created. Roll out into a 9 inch circle on a sheet of parchment paper, then use the paper to help you transfer it to an 8 inch pie dish.  Flute the edges, and set aside in the refrigerator.

    Pre-heat the oven to 375F degrees.

    To make the apples, place them in a sautee pan over medium heat with all of the other ingredients, cover with a lid, and cook until the apples are tender, about 10 minutes. Set aside.

    To make the squash filling, place all ingredients in the blender and blend until smooth.

    To assemble the pie, scatter the apples over the crust, then pour the filling over that.

    Place in the pre-heated oven and bake for about  40-45 min. until the edges of the crust are lightly brown, and pie is set.  Allow to cool completely.

    Serve with coconut whipped cream if desired.


  • Raw Miso “Roasted” Mushrooms and Green Beans with Rich Parsnip Puree

    Raw Miso “Roasted” Mushrooms and Green Beans with Rich Parsnip Puree

    People assume that because I have a blog and make lots of food that I will be slaving away all day in the kitchen on Thanksgiving.  Nothing could be further from the truth!  In reality, I want to enjoy my day as well, spending time with the ones I love and not in the kitchen.  I mean, I spend all day in a kitchen at work, and to me Thanksgiving is a day off, a day of rest.  Really, I want to be lazy.  So most likely I will be making something simple, like this dish I made last week after work when I thought some comfort food might be good.  Mashed potatoes sounded amazing, but I opted for parsnips instead, creating a rich puree enhanced with buttery pine nuts for something even better.  They were a little sweet, which I enjoyed.  I am a big fan of parsnips though, especially in raw applications with their wonderful flavor.  I made some “roasted”crimini mushrooms and green beans as well which had the most intense crave worthy flavor and they paired perfect with the parsnips!  I think this would make the perfect simple Thanksgiving dinner, or part of it.  You could make accompaniments for a more elaborate meal, and even use portabello mushrooms if you wanted something more meaty.  It was perfect for a weeknight as well though, with little fuss required!


    Raw Miso “Roasted” Mushrooms and Green Beans with Rich Parsnip Puree
    Serves 2

    1/4 cup Nama Shoyu
    1/4 cup olive oil
    2 Tbsp white miso
    1 clove garlic, minced
    10 crimini mushrooms, halved
    2 cups fresh green beans, trimmed

    Parsnip Puree:
    4 cups parsnips
    1/2 cup raw pine nuts, soaked for 2 hours and drained
    2 Tbsp nutri yeast
    sea salt to taste
    filtered water as needed

    Whisk together the nama shoyu, oil, miso, and garlic in a small bowl.  Toss the mushrooms and green beans with it, then spread out on a lined dehydrator tray and dehydrate for 3-4 hours at 115F until softened.
    Meanwhile, to make the parsnip puree, combine all ingredients in a high speed blender and blend until smooth, adding a Tbsp or two of water as needed.  Place in a bowl and warm in the dehydrator for 30 minutes or so if desired, and serve with the mushrooms and green beans.