Tag: chickpeas

  • Vegan Instant Pot Chickpea Chili

    Vegan Instant Pot Chickpea Chili

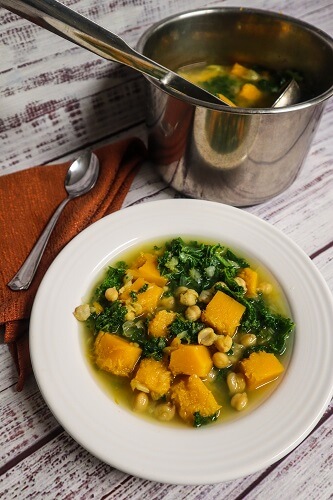
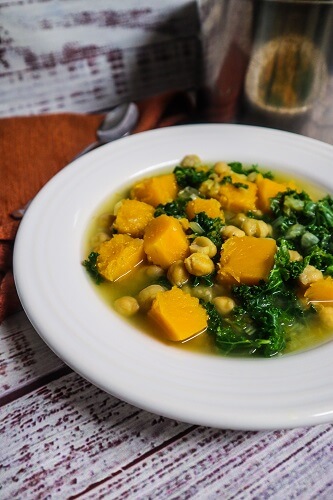
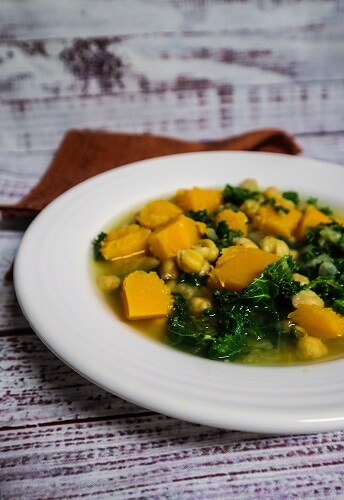
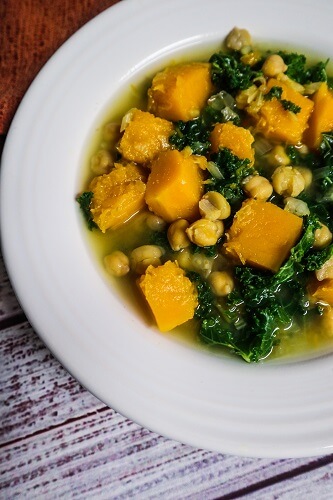
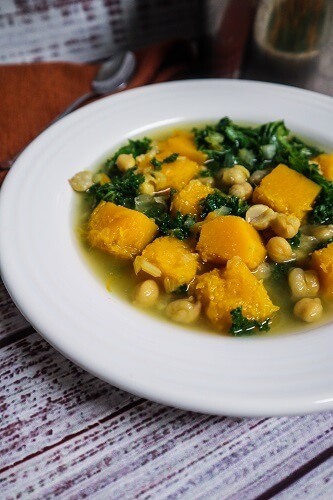
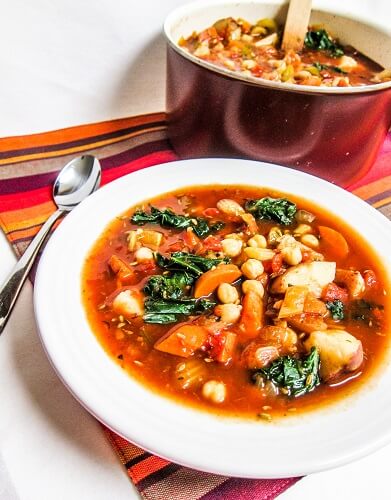
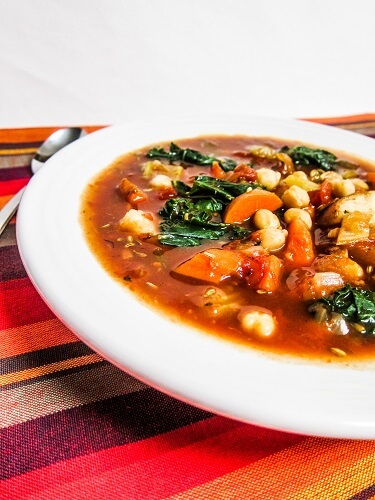
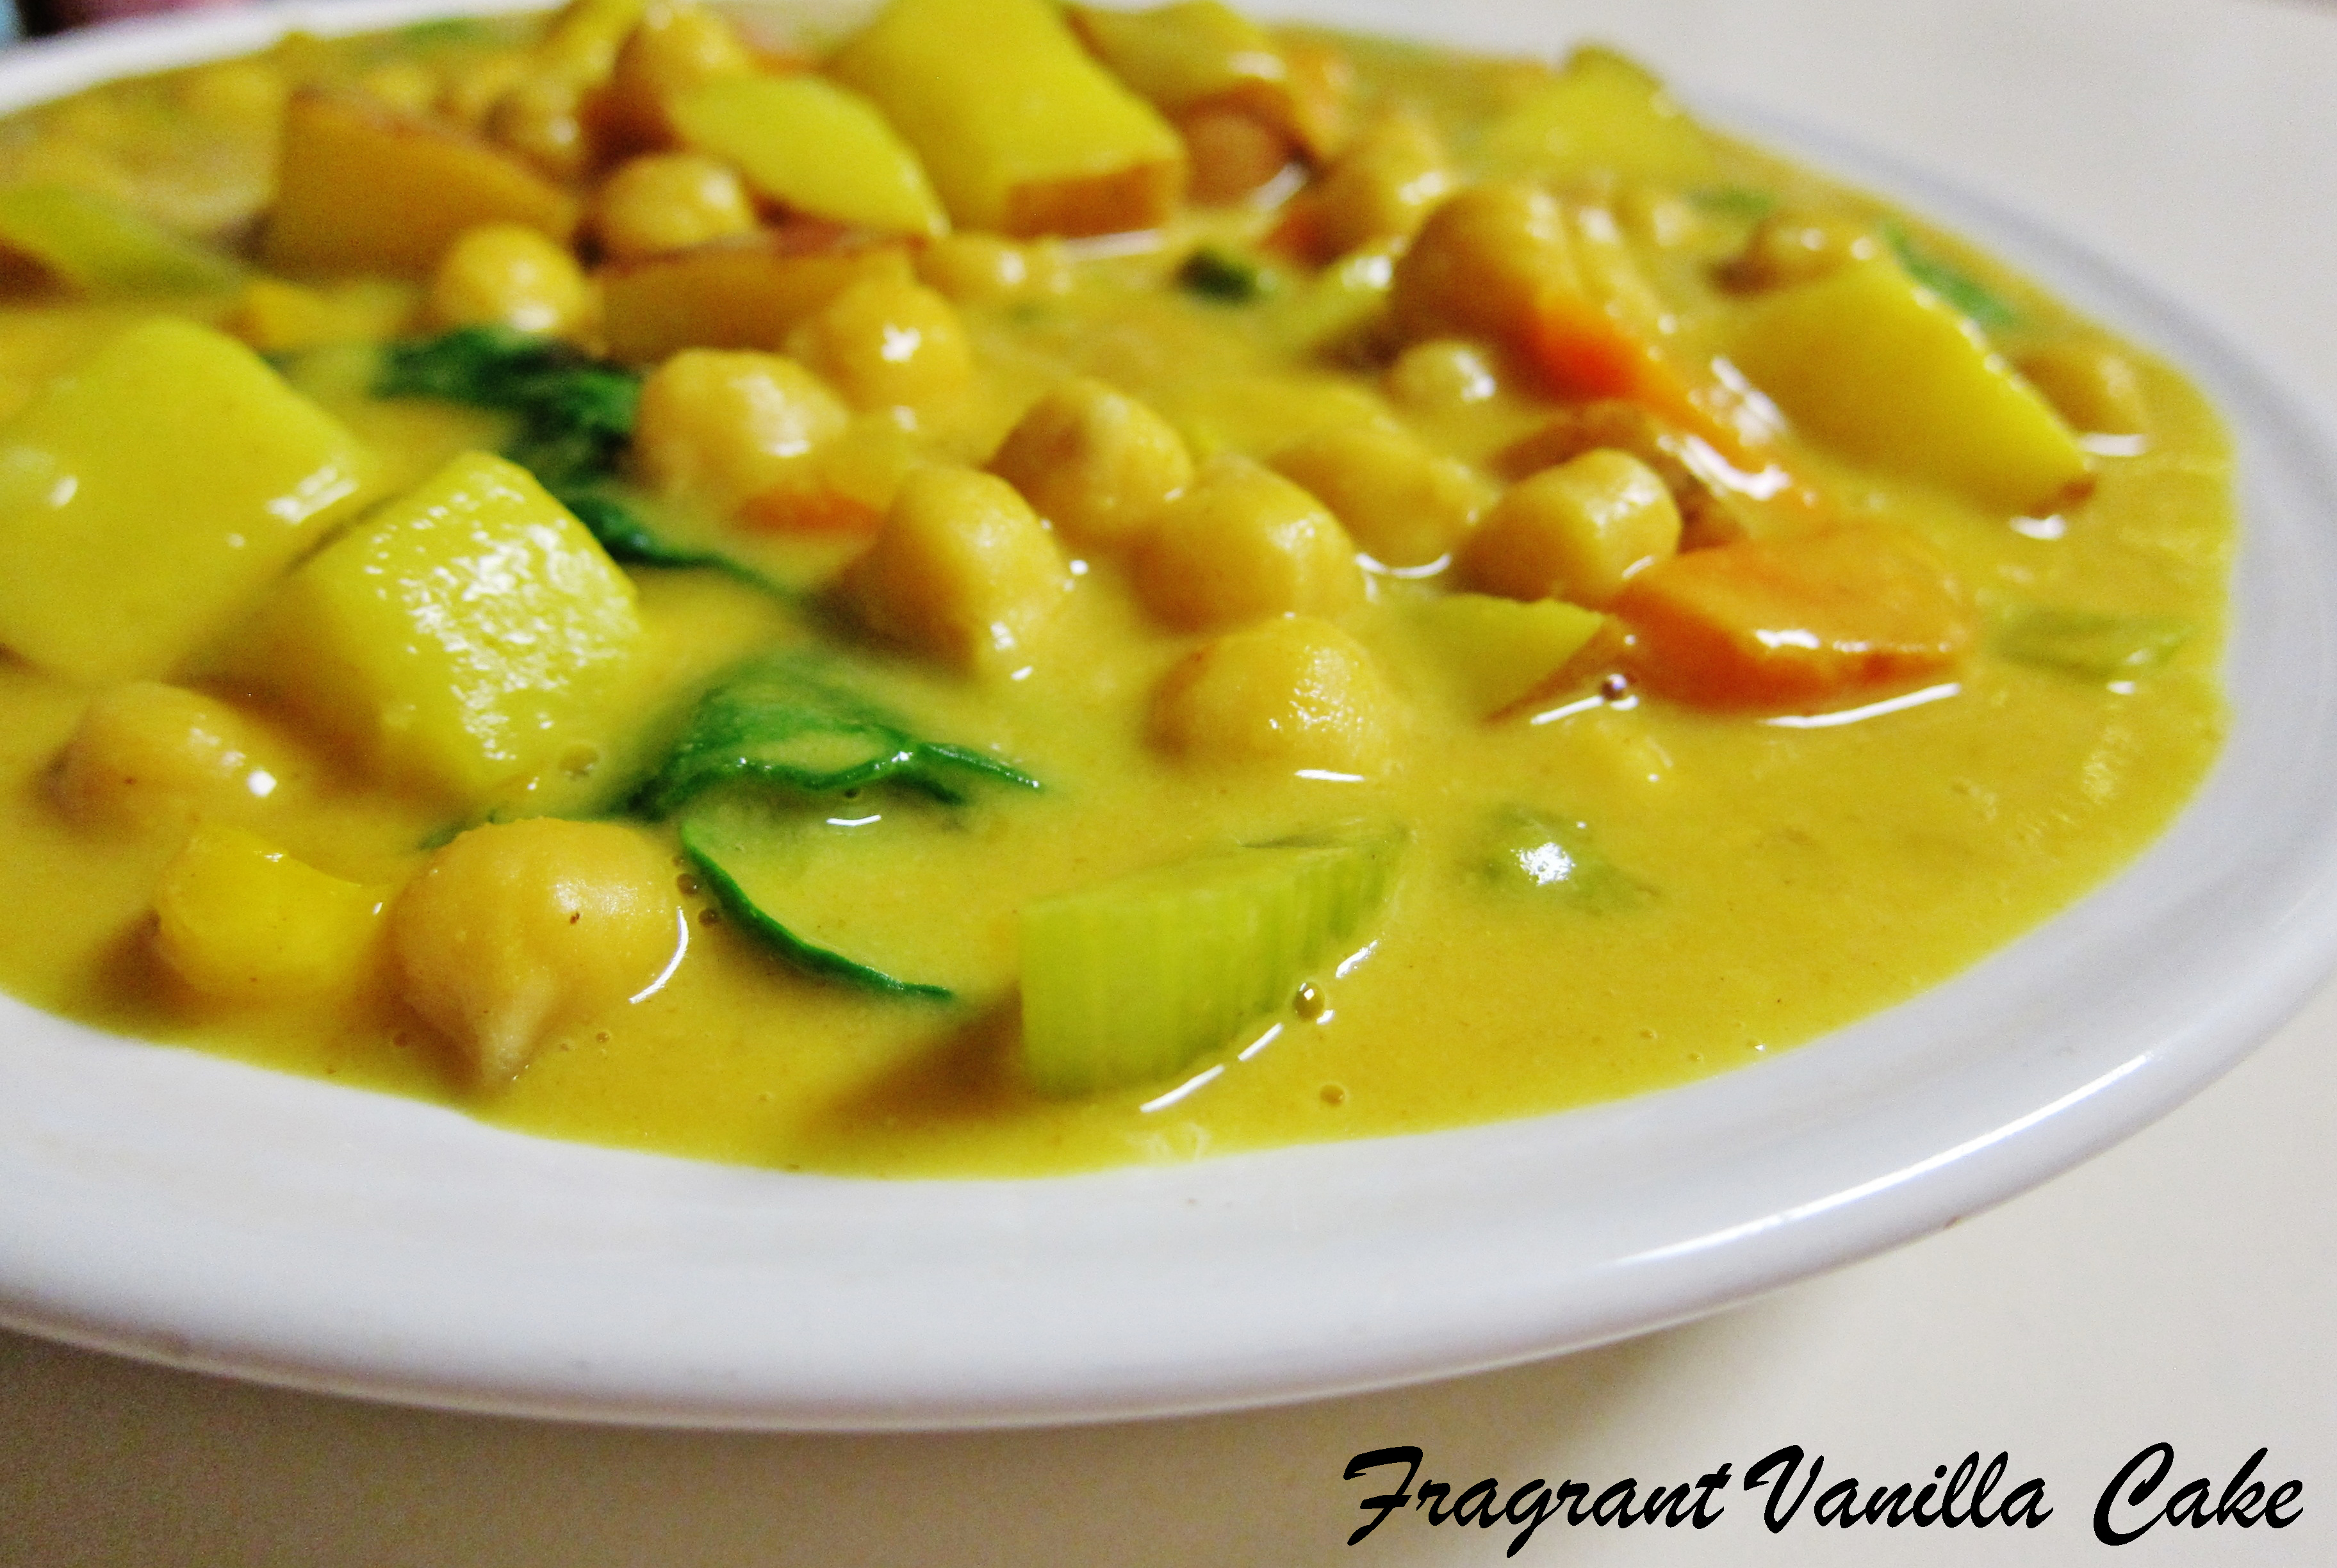
    I have always loved chili.  My family didn’t really make it, they just made regular soup and stew usually.  But my friend’s Dad that lived next door to us made the best chili, and the ingredients in it were grown in their garden.  It was spicy, since they grew hot peppers, but it was so good! Now, as an adult I make my own vegan chili and I enjoy it so much I make it every week for a few meals.  I vary the recipe somewhat, but this is my latest version which I discovered by using what I had on hand.  Vegan Instant Pot Chickpea Chili!  Yes, I always use my Instant pot since it makes it super easy and that way I can walk away and do other things while it is cooking and not burn it.

    I start off with celery, onions, jalapenos and garlic in my chili.  I am not a big fan of carrots in my soup, since I feel like they flavor it too sweet in a weird way, but I like the savory celery and onions.  I like jalapeno in the chili to add a little kick.  But sometimes I will use even hotter peppers like habaneros if I have those.  I use plenty of canned tomatoes in my chili as well, and I like the combination of oregano and cilantro for my herbs.

    I like to add plenty of spices as well.  Cumin, coriander, and chili powder are always staples in my chili, but I have begun to add turmeric recently and I really enjoy it in there!  I have mostly made my chili with black beans or pinto beans in the past, but I had chickpeas on hand when I came up with this recipe so that is what I used, and I really loved them in here! Lastly, a splash of apple cider vinegar and some sea salt and the combination of flavors in this are really delicious!

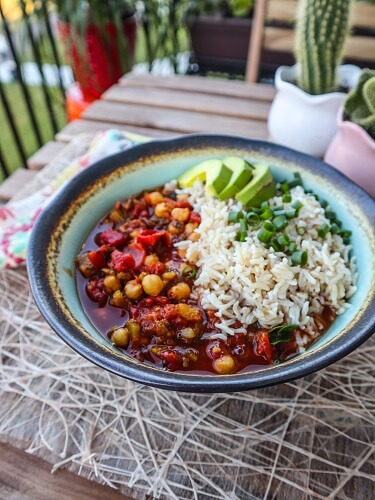
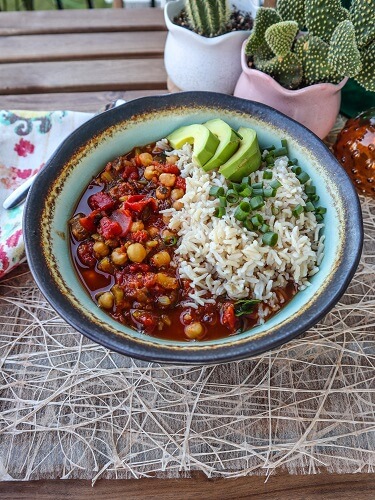
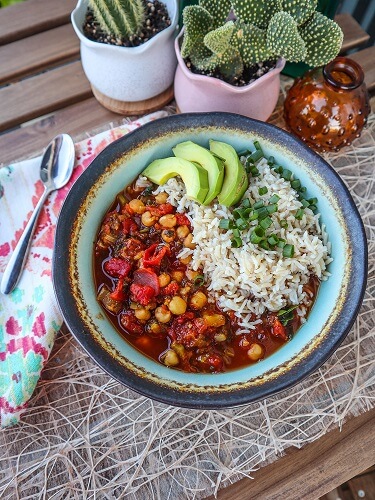
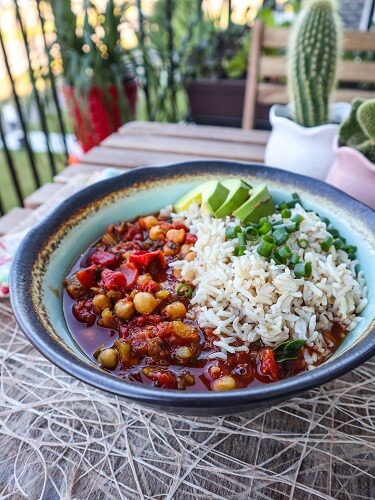
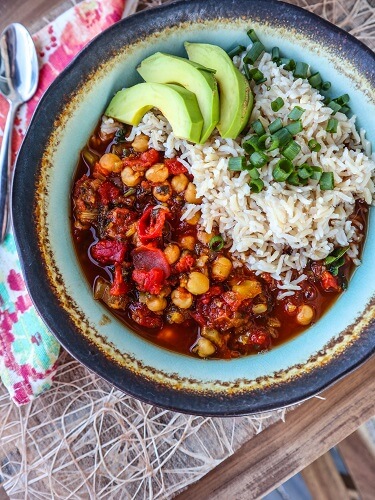
    I have always enjoyed topping my chili with things too, it used to be cheese and sour cream, but I now like to do brown rice, avocado and green onions.  It is so delicious and this is my favorite savory meal as of lately.  If you are looking for something to make for dinner, this Vegan Instant Pot Chickpea Chili is delicious! I have also included directions below if you want to make it the old fashioned way not in an instant pot as well.

    Vegan Instant Pot Chickpea Chili
    Serves 2-3

    Chili:

    • 1 yellow onion, diced
    • 1 jalapeno, minced
    • 1 small bunch celery, sliced
    • 2 garlic cloves, minced
    • 1 small bunch cilantro, chopped
    • 3 cups diced tomatoes (canned are fine)
    • 1/2 tsp sea salt or to taste
    • 1 tsp chili powder
    • 1/2 tsp ground coriander
    • 1 tsp ground cumin
    • 1 tsp dried oregano
    • 1/2 tsp turmeric
    • 1 Tbsp cider vinegar
    • 1 1/2 cups cooked chickpeas
    • cooked brown rice for serving (I used jasmine rice)
    • Sliced avocado for serving
    • sliced green onions for serving


    Instructions:

    1. In an Instant Pot, combine all ingredients but the beans.
    2. Put on the lid, and set to the soup/broth setting for 40 minutes with the keep warm setting turned off. (Alternatively, if you are not using an Instant pot and are cooking on the stove, add to a regular pot, bring to a boil, and lower to a simmer with the lid on.  Cook on low heat for about 20 minutes or until the veggies are getting tender.)
    3. When the Instant Pot is done cooking, let it set until the pressure valve goes down by itself, then open it and add the beans and stir in.
    4. Remove from heat, and serve with the rice in bowls topped off with the avocado slices and green onions.


  • Butternut Squash, Chickpea and Kale Soup

    Butternut Squash, Chickpea and Kale Soup

    The weather is starting to cool off here, I am seeing a touch of color starting on some of the maple trees, and I am getting the comfort food cravings.  So I thought I would make some warming soup last week.  We had a few rainy days here, and it was just the thing to warm me up.  Especially the day Eric and I decided to go for a bike ride then got rained on half way through and had to ride an hour in the cold rain. I made some butternut squash, chickpea and kale soup!  One thing I am super excited about right now is squash coming into season. It is one of my favorite veggies ever!

    For this I used half my butternut squash for soup and I used the other half to roast and stuff for dinner another day.  I love making home made soup. I don’t think I have actually bought any soup at the store, especially canned since my Mom taught me to make soup when I was in college.  The flavor is so much better, and there is just no comparison.  Plus most soup is pretty cost effective to make anyhow, especially if it lasts for a few meals!  This one did for us!

    This is really simple to make!  I used my favorite soup base, which is just celery, onions and garlic with a little thyme.  If you use a flavorful broth for this, it makes it even more delicious. I used some home made broth, but you can use store bought if there is one you like!  After the less tender veggies simmered, I added the squash and let it cook for the last 10 minutes or so just so it didn’t get too mushy. Lastly the beans and kale. I like to add the kale at the last minute so that it retains more nutrients.  This is something I do often, add greens to my soup at the last minute to add extra goodness!

    This soup turned out super delicious! I served it with some home made bread to dunk in it, and the broth was nice and flavorful. I love the sweet squash with the other savory veggies!  Which fall vegetable or fruit are you most excited about?  I love the squash but I am also excited for apple season!

    Butternut Squash, Chickpea and Kale Soup
    Serves 3-4

    Ingredients:

    • 1 tsp olive oil
    • 1/4 cup diced red onion
    • 4 stalks celery, sliced
    • 2 garlic cloves, minced
    • 1 tsp thyme
    • 1/4 tsp red pepper flakes
    • 1/2 tsp sea salt
    • 4 cups flavorful vegetable stock
    • sea salt
    • 4 cups cubed butternut squash
    • 1 1/2 cups cooked chickpeas
    • 2 cups fresh kale, torn into small pieces


    Instructions:

    1. Heat the olive oil in a medium pan.
    2. Add onions and celery and sauté until tender.
    3. Add the garlic, tomatoes, thyme, sea salt, pepper, and filtered water.
    4. Bring to a simmer, and allow to cook until the veggies are very soft and the flavor has melded, about 20 minutes.
    5. Add the squash to the pot, and let cook for about 10-15 minutes.
    6. When the squash is tender, stir in the beans and kale until kale has just wilted.
    7. Serve!


  • Roasted Sweet Potato Kale Salad 

    Roasted Sweet Potato Kale Salad 

    A lot of the time the recipes I make depend on what I already have on hand.  Because I hate wasting things, and I also like saving money and saving a trip to the store.  I had a leftover sweet potato on hand from making a sweet potato lasagna for Christmas, and I wanted to make something for lunch with it.  I thought about yam fries as a side for something else, or maybe roasted and mashed but then I remembered how much I like sweet potatoes roasted and in a salad.  We make a few salads at my work with roasted sweet potato salads and they are always so good!  I mean, I just love how they get all tender on the inside and crispy on the outside plus so flavorful when roasted!

    So, I made a kale salad and included them.  I had kale and cabbage on hand, so I used those as the base. My philosophy when it comes to greens is I can never have too much.  So pretty much most days for lunch I have a pile of greens (either kale, arugula, or spinach) with other veggies and some beans or tempeh mixed in.  This salad would be that way too. I also added in chickpeas for a little more protein and texture because why not.  For some reason really like chickpeas paired with sweet potatoes.

    The crunchy kale and cabbage and tender sweet potatoes needed a delicious dressing to coat them.  I thought about a vinaigrette, the tangy sweetness would be good with the veggies, but then I decided on a nut butter based dressing.  This is actually what I use most often, I usually make a good sized batch then keep it in the refrigerator for my salad for the week.  But for this salad I whipped up a smaller batch.  I like it because it tastes like a traditional creamy dressing but without the dairy.

    For this one I used a combination of ingredients that made it taste almost cheesy, almost like a ranch but without the herbs.  It was delicious!  Even better of course when mixed into the salad!  It was lovely with all of the different colors, but most importantly It was sooo good!  I loved the combination of textures and flavors it had!  Next time you feel like making a salad, give this a try!

    Roasted Sweet Potato Kale Salad 

    Serves 2-4

    Ingredients:

    • 1 medium sweet potato, cut into 1 inch cubes
    • 2 tsp olive oil
    • sea salt
    • 1 large bunch kale, washed and torn into bite sized pieces
    • 1 cup shredded purple cabbage
    • 3/4 cup cooked chickpeas (canned is fine, just rinse them well and drain well)
    • 1/2 cup cashew butter or almond butter (tahini will also work for nut free)
    • 1/4 cup lemon juice
    • 1/4 cup filtered water (or as needed)
    • 3 Tbsp nutritional yeast
    • 2 tsp white miso
    • 1 garlic clove, minced
    • 1/2 tsp sea salt (or to taste)
    • 1/4 tsp pepper


    Instructions:

    1. Preheat the oven to 375F degrees, and oil a sheet pan.
    2. Toss the sweet potatoes with the olive oil, spread out on the sheet pan and sprinkle with sea salt.
    3. Place in the oven and roast for about 30-45 minutes until tender (depending on your oven).  Remove from the oven and let cool to room temperature.
    4. In a large bowl, combine the kale, red cabbage, chickpeas and sweet potatoes.
    5. In a smaller bowl whisk together cashew butter, lemon juice, water, yeast, miso, garlic, sea salt and pepper until smooth (adding a little more water if it seems too thick to pour).
    6. Pour the dressing over the salad, and toss to coat.
    7. Serve!
  • Vegan Chickpea Blondies

    Vegan Chickpea Blondies

    I think I use chickpeas in more recipes than any other bean. I am always making hummus, and salads with chickpeas and I even add them to cheesecake recipes instead of cashews as a nut free version. I recently made black bean brownies, so I figured why not make chickpea blondies?! I make so many other things with them, and they are a pretty neutral flavor so they go good in things that are vanilla flavored. Plus I love adding ingredients with fiber and protein to my desserts for an added boost so long as I can’t taste them.

    These blondies were really simple to make, you just blend the first part in the blender then mix in the rest and pour into a pan, that simple. For the batter though, in a regular blondie recipe I would have used coconut oil but in this one I used avocado oil because it has a more buttery flavor, and it will stay soft when cooled down (coconut oil desserts sometimes get too hard when refrigerated or too cool).

    To keep these nice and moist also I used some aquafaba because why not since I was already using chickpeas in the recipe. If you don’t know what aquafaba is it is chickpea liquid. Either canned or home made. If your chickpeas are already drained though, no worries, you can also use a flax egg for the recipe instead if you would like.

    The dough tasted super delicious, and they baked up beautifully! They smelled amazing too as I pulled them from the oven. Just like chocolate chip cookies. Honestly these are best when you enjoy them while still warm and the chocolate chips are gooey! They have a nice soft texture and a vanilla caramel like flavor throughout. Next time you have some chickpeas on hand and are in the mood for something sweet give these a try!

    Vegan Chickpea Blondies

    Makes 16

    • 1/2 cup avocado oil
    • 1 cup maple sugar or coconut sugar
    • 1 cup cooked chickpeas
    • 3 Tbsp aquafaba (the liquid of canned chickpeas)* or 1 Tbsp flax seed mixed with 3 Tbsp filtered water
    • 1 tsp pure vanilla extract
    • 1 1/4 cups organic whole wheat pastry flour
    • 1/2 tsp baking soda
    • 1/8 tsp sea salt
    • 3/4 cup vegan dark chocolate chips

    Instructions:

    1. Preheat the oven to 350F degrees, and line an 8×8 inch square pan with parchment.
    2. To make the dough, add the the oil, coconut sugar, chickpeas, flax and water mixture and vanilla to a high speed blender or food processor and process until smooth.
    3. Scrape the mixture into a large bowl.
    4. Add the flour, soda, and salt and mix until smooth.
    5. Stir in the chocolate chips.
    6. Pour into the bottom of the 8×8 inch pan and spread with a offset spatula or knife until the top is even, and place in the oven.
    7. Bake for 25-30 minutes or until done in the center and lightly brown.
    8. Remove from the oven and let cool before cutting into bars. When ready to cut, just lift them out with the parchment onto a cutting board and cut into 16 bars.
    9. Enjoy!
  • Cake Batter Dessert Hummus

    Cake Batter Dessert Hummus

    I admit when I first heard about dessert hummus or using beans in dessert recipes I was completely skeptical. How could that possibly taste good? Would it still be beany flavored? But you know what? I am now a huge fan. I love using beans in my dessert recipes like my nut free cheesecakes, brownies and dessert hummus. They add protein and fiber which we all need, and they give the things I use them in a nice texture. I think I actually make dessert hummus now more than regular savory hummus at home. Earlier this week, I decided to make some cake batter hummus.

    Eric and I had been at a local ice cream shop over the weekend and had some vegan birthday cake ice cream, so I thought why not cake batter hummus?! I have always loved the flavor and aroma of vanilla birthday cake hence the name of my blog. My Grandma often times added a touch of almond extract along with the vanilla to her cake and cookie recipes so I do that as well and consider it birthday cake flavor for my recipes. Since she did make birthday cakes for family members and even let me help decorate some of them.

    This hummus is super simple to make. I always keep cooked chickpeas on hand for things like this and other recipes. I just cook a big pot, then freeze them in portioned out containers for later use. So I just took some of those and blended them up with some coconut milk and Dastony cashew butter from Raw Guru to make it nice and creamy and some dates to sweeten it. Because dates are about as natural and unprocessed as you can get when it comes to sweeteners.

    It was super delicious but of course it needed the vanilla and almond as well to be cake batter flavored. Also it needed the sprinkles. Because I think every birthday cake I had growing it up had some form of sprinkles. They just make everything seem more special even if they don’t have much flavor themselves! This hummus is good with a spoon of course, but I think my favorite thing to pair it with is strawberries! It is sooo good! You could even use it as a healthier frosting for something! If you are in the mood for some cake batter, give this a try!

    Cake Batter Dessert Hummus
    Makes about 3 cups

    Ingredients:

    • 1 1/2 cups cooked chickpeas
    • 1 1/4 cups pitted medjool dates, soaked in filtered water for 30 minutes and drained
    • 1 cup filtered water (or as needed)
    • 1 Tbsp pure vanilla extract
    • 1 tsp almond extract
    • 1/4 tsp sea salt
    • 1/2 cup Dastony raw cashew butter or raw almond butter
    • 2 Tbsp vegan sprinkles

    Instructions:

    1. Combine all ingredients but the sprinkles in a high speed blender or food processor and blend until smooth (adding a little more water if necessary). 
    2. Stir in the sprinkles.
    3. Enjoy! Keeps in the refrigerator for 2 weeks in a sealed container.
  • Chocolate Chip Cookie Dough Dessert Hummus

    Chocolate Chip Cookie Dough Dessert Hummus

    I am a huge hummus fan. I know, it is a stereotype that all vegans love hummus, and I fit into it I guess. But I like to have some on hand at all times for snacking on so I make it a lot. I love the classic hummus with chickpeas as the base, and lots of tahini and lemon and a little cumin and sea salt and garlic. But dessert hummus makes me really happy too. I mean, what other snack gives you dessert with lots of protein and fiber? I have made quite a few different types, but surprisingly never chocolate chip cookie dough until last week.

    Chocolate chip cookie dough is one of my favorite flavor profiles for desserts so kind of surprising I hadn’t but it was about time! Yes, I still use chickpeas as a base even though people tend to think of them as savory, but when they are blended all up into a dessert, they are a nice neutral base. I have even used them in cheesecake and ice cream before.

    In this recipe, I blended them up with medjool dates to sweeten the hummus and give it that sort of caramel like brown sugar sort of flavor that real chocolate chip cookie dough has, as well as added some pecan butter which also has an almost caramel like flavor and the hummus blended up all smooth, rich and delicious! I added in a little vanilla and a touch of sea salt as well and it smelled amazing and tasted even better.

    Lastly it needed the chocolate chips to be chocolate chip cookie dough, and those made it even more heavenly! It turned out sooo good! I used it for dipping my strawberries into and that was amazing, and I also ate some with a spoon. If you are a cookie dough fan, give this a try! It is better for you than traditional cookie dough, and just as delicious!

    Chocolate Chip Cookie Dough Dessert Hummus
    Makes about 3 cups

    Ingredients:

    • 1 1/2 cups cooked chickpeas
    • 1 1/4 cups pitted medjool dates, soaked in filtered water for 30 minutes and drained
    • 1 cup filtered water (or as needed)
    • 1 Tbsp pure vanilla extract
    • 1/4 tsp sea salt
    • 1/2 cup pecan butter or almond butter
    • 1/2 cup vegan chocolate chips

    Instructions:

    1. Combine all ingredients but the chocolate chips in a high speed blender or food processor and blend until smooth (adding a little more water if necessary). 
    2. Stir in the chocolate chips.
    3. Enjoy! Keeps in the refrigerator for 2 weeks in a sealed container.
  • Roasted Garlic Scape Hummus

    Roasted Garlic Scape Hummus

    About 10 years ago, I was shopping at a local co op that I made the trip to every weekend, and I came across an odd item in the produce. They looked like a bunch of green electrical cords or something, but they were obviously plants. What they were was garlic scapes, as I soon discovered when I read the sign near them. I was curious as to what they tasted like, so I brought some home and googled some recipes so I knew what types of things people used them in. I experimented a bit and bought them for a few weeks (until the season ended, since it is short), and I liked them best roasted. They get all crispy and yummy and snack-able when roasted. But they also make a great thing to add into your pesto. Garlic scape pesto is amazing. I get a bit excited now when I see them, because I know I won’t have too many chances to buy them since the season is short so I always buy a bunch when I can.

    I was at the Northeast Minneapolis Farmer’s Market last weekend, and I was lucky enough to score some there. The first thing I decided to make was hummus. I hadn’t made any in a while, and I was craving it. I like to include it in my lunches for dipping veggies, or to eat as a snack with chips. I figured roasted garlic scapes would make it super delicious!

    So I roasted them for a little while in the oven before adding them to the recipe. This has a whopping 2 cups of them, so it is packed with their lovely flavor. If you haven’t had them, they are not as strong as garlic cloves, they are a bit more mellow and sweet. Roasting them intensifies the flavor even more!

    I combined them with some classic hummus ingredients like chickpeas for the base, tahini to make it creamy, and a bit of lemon juice and sea salt to bring out the flavor of the scapes and it was super delicious! If you get your hands on some garlic scapes, definitely give this a try!

    Roasted Garlic Scape Hummus
    Makes about 2 cups

    Ingredients:

    • 2 cups garlic scapes, cut into 2 inch pieces
    • 1 tsp avocado oil or olive oil
    • 1 1/2 cups cooked chickpeas
    • 1/2 cup tahini
    • 1/4 cup lemon juice
    • 1/2 tsp sea salt
    • 1/2 cup filtered water

    Instructions:

    1. Preheat the oven to 375F degrees.
    2. Toss the garlic scapes with the oil and spread out on a lightly oiled sheet pan. Place in the oven and roast until tender, about 20 minutes.
    3. Remove from oven and let cool.
    4. Combine the scapes, and all other ingredients in a high speed blender or food processor and blend until smooth (adding a little more water if necessary). 
    5. Serve!
    6. Keeps in the refrigerator for 2 weeks in a sealed container.
  • Roasted Spring Vegetable Buddha Bowl

    Roasted Spring Vegetable Buddha Bowl

    I tend to eat the same 4 things every week for dinner. Unless I am creating a new recipe then I will vary what I make. But the rest of the time when I make the same things it is mostly just because I know what I like, and because it ends up being a no brainer to make those recipes once I do it so many times. One of those items I make all the time is buddha bowls. I sometimes use different vegetable ingredients based off of what time of the year it is and what is in season or what I have on hand. I switch off quinoa and brown rice for the grain usually. But my current favorite is this one involving Spring vegetables.

    I get kind of excited about the different types of produce that can be found in the store in the Spring, Summer and Fall. But in the Spring I feel like I have been kind of deprived for a while of all of the super fresh vegetable type stuff since here in Minnesota we can’t really grow anything unless it is indoors. So it is awesome to see things like asparagus and radishes. I like to eat radishes raw but the other day when I made this bowl I thought to myself, how would they be roasted? The answer to that is super delicious. They kind of lose that peppery bite that they have and become a bit sweeter, kind of similar to roasting turnips.

    I combined them with asparagus, which I could not resist buying since it is so springy. As well as carrots, chickpeas and avocado in my bowl over brown rice and it was sooo good! But the part that made it really all come together was the creamy pumpkin seed butter sauce that I put over it all. I made it with Dastony Pumpkin Seed Butter from Raw Guru and you would swear it had dairy or cream or something in it it is nice and rich tasting.

    I added a little cumin, chipotle, lemon garlic and salt to it so that it was similar to a classic tahini dressing, but it was even more delicious since the pumpkin seeds don’t have that bitterness that tahini sometimes has. This bowl was so good I will probably be making it for the rest of Spring. If you are in need of a hearty healthy dinner that tastes like comfort food, give this a try!

    Roasted Spring Vegetable Buddha Bowl
    Serves 2-3

    • 2/3 cup brown jasmine rice
    • 1 1/3 cups filtered water
    • 2 cups sliced carrots
    • 2 cups asparagus, cut into 2 inch pieces
    • 2 cups radishes, quartered
    • avocado oil
    • sea salt

    Sauce:

    • 1/2 cup Dastony pumpkin seed butter
    • 1/4 cup lemon juice
    • 1/4 cup filtered water (or as needed)
    • 1 garlic clove, minced
    • 1 tsp ground cumin
    • 1/8 tsp dried chipotle pepper
    • 1/4 tsp sea salt or to taste

    To assemble:

    • organic greens, such as arugula, spinach or spring mix
    • 1 1/2 cups cooked chickpeas
    • 1 avocado, diced

    Instructions:

    1. Place rice and water in a medium saucepan and bring to a simmer. Reduce to a low simmer, cover and cook until all the water is absorbed about 25-30 minutes, or when the rice is tender.
    2. Meanwhile, to cook the veggies, preheat the oven to 400F degrees. Toss the veggies with just enough oil to coat them lightly, then spread out on a sheet pan and sprinkle with sea salt Place in the over and roast until they are tender and starting to brown, about 25-30 minutes. Remove from the oven.
    3. Whisk together the sauce ingredients, adding water to achieve your desired consistency.
    4. To assemble, put some greens into the bottom of each bowl, then top with the rice, the chickpeas, the veggies, and avocado. Drizzle the sauce over the contents of the bowl. Serve!
  • Vegan Triple Chocolate Cheesecake

    Vegan Triple Chocolate Cheesecake

    It’s my 9 year blogaversary! 10 years ago, I randomly decided to start a blog to share recipes with friends and family since I was always posting them on Facebook anyhow. Little did I know that I would still be doing it 10 years later, or be reaching this many people! I have had fun with it though, and it’s been a pleasure sharing with you all! So here’s to another year of new recipes! I figured I would make something good to celebrate my blogaversary, and I decided on something chocolate despite the name of my blog.

    I am in a chocolate sort of mood lately. I made some raspberry almond butter cups earlier this week, and some turmeric white chocolates, and some peanut butter cups, and I really enjoyed them all, but I wanted something a little more decadent and bigger like a cake for the weekend. I didn’t feel like baking though, so I went for a no bake cheesecake! To be honest, I have never baked a vegan cheesecake because all of the ones I make are no bake and it is so much easier! They turn out all perfect and creamy without the use of the oven. This one was going to be all chocolate.

    Not just dark chocolate though, even though it is my favorite when it comes to chocolate bars. I was envisioning 3 different layers of chocolate in the cake. I was recently asked if I could make a French silk cheesecake, and this was kind of that, only better because that would have only had 2 layers only one of which would have been chocolate. This one would have white chocolate, milk chocolate and dark chocolate layers.

    For the base of the whole thing, I used a combination of full fat coconut cream and chickpeas. Now you may be thinking that it sounds odd to put chickpeas in a cheesecake, but they are my equal swap for cashews (which are standard in a lot of vegan cheesecakes). The cake is already pretty rich thanks to the coconut milk, so the chickpeas taste the same as cashews in the cake when combined with it. Also, this makes the cake nut free for those who have allergies. I added in some melted cacao butter to give it a white chocolate flavor along with the coconut butter to thicken the cake and it was a heavenly cheesecake base. Just a touch of vanilla as well to give it that amazing white chocolate scent.

    For the chocolate layers I added in some cacao powder and dark chocolate chips, and they were amazing as well. I knew this was going to be good! It turned out beautiful! But it needed some decoration on top so I had some fun with some vegan dark chocolate I had on hand and made some shapes. OMG was the cheesecake ever good! It was silky smooth! The dark chocolate layer really rich and intense, the milk one more mellow, and the white chocolate more sweet with the aroma of vanilla! All together a heavenly combination! If you are in the mood for something of the chocolate variety, give this a try! It would be perfect for upcoming Valentine’s Day!

    Vegan Triple Chocolate Cheesecake
    Makes one 6 inch cake

    Crust:

    • 1/4 cup finely shredded coconut
    • 1/2 cup organic gluten free rolled oats, or quinoa flakes
    • 1/4 cup pitted medjool dates (if not soft, soak them in filtered water first and drain well)
    • 1/8 tsp sea salt

    Filling:

    • 1 1/2 cups full fat coconut cream (I used the thick part of a can of Thai Kitchen coconut cream, but their full organic full fat coconut milk will also work*)
    • 1 cup plus 2 Tbsp cooked chickpeas
    • 1/4 cup plus 2 Tbsp maple syrup
    • 1 1/2 tsp pure vanilla extract
    • 1/8 tsp sea salt (or to taste)
    • 1/2 cup plus 1 Tbp coconut butter (NOT OIL), warmed to liquid
    • 1/4 cup plus 2 Tbsp cacao butter warmed to liquid (or additional coconut butter if unavailable)
    • 4 Tbsp cacao powder or unsweetened cocoa powder (divided)
    • 2 Tbsp vegan dark chocolate chips or chocolate chunks

    Instructions:

    1. Oil a 6 inch spring form pan, and line the bottom with parchment paper.
    2. To make the crust, place all ingredients in a food processor, and process until crumbs and starting to hold together (if they are not holding together when squeezed, add a few tsp filtered water and blend). Press into the bottom of the prepared pan.
    3. Meanwhile, to make the filling, combine all ingredients but the cacao powder and chocolate chips in a high speed blender or food processor and blend until smooth.
    4. Divide the filling mixture between 3 bowls. Pour one back into the blender along with 1 Tbsp cacao powder and blend until smooth. Pour back into the bowl and set aside.
    5. Pour the next bowl into the blender and add the remaining 3 Tbsp cacao powder and the chocolate chips and blend until smooth. Pour this layer over the crust in the pan, and put in the freezer for 10 minutes to set the layer.
    6. Pour the second layer (the one with 1 Tbsp cacao powder) over the first layer in the pan, then set in the freezer for 10 minutes.
    7. Pour the remaining vanilla filling over the other layers in the pan, then place bac
    8. Place back in the freezer to set for about 4 hours (or overnight in the refrigerator if you are not in a hurry).
    9. Remove from the freezer, un-mold and enjoy!  Store any leftover cake in the refrigerator.

    *I use Thai Kitchen full fat coconut milk.  If you are using a different brand, just make sure it is the thick type, 2/3 of the can at least should be very thick when chilled.

  • Tuscan Chickpea Vegetable Soup 

    Tuscan Chickpea Vegetable Soup 

    We make soup like crazy in the deli I work in this time of the year, so you would think I would hate making soup at home. But that is not the case at all!  I love soup just as much as the customers do, I just prefer to make a big batch for myself and eat it for a few days (less work to get dinner on the table later in the week is always a good thing).  I tend to be boring and monotonous with my soup that I make though, often times it is the same two soups every week.  What can I say, I know what I like.  But This week I decided to be a little different and make a soup very similar to one that I make at work, a Tuscan bean soup. It is actually my recipe that I make at work, that I first made at home back when I was just out of college, but I haven’t made it in a really long time and I have never shared it on my blog before surprisingly.  I decided to make it this week mostly because I was making dinner for me and Eric and I think he is getting just a little sick of chili every week.

    This soup is actually pretty easy to make too.  It requires a little cooking time, but it is ready to enjoy in under an hour.  I have to say too, it is even better the next day if you let it all sit together overnight.  I love that this soup is loaded with good veggies!  Although I consider it essential for my soups to be mostly veggies.  I am not a fan of soups that are mostly completely broth, or just a cream base and pureed. I have to have chunky veggies in there!  This soup is so aromatic while it cooks, the scent of Italian herbs, basil, oregano, and rosemary fill the air along with sweet tomatoes and garlic.  I know some people hate garlic but I love it, and we all need it to stay healthy this time of the year.

    This soup always turns out super delicious.  Not only that, I love the heartiness of it, without it being heavy at all.  At the end, I even stirred in kale because I like to try to get greens with at least once of my meals every week.  And stirring them into your soup at the last minute when you pull it off the stove (so they don’t get over cooked) is a great way to get a bunch in (since they wilt and you can fit more).  If you are in need of some healthy comfort food, give this a try!

    Tuscan Chickpea Vegetable Soup 
    Serves 3-4

    Ingredients:

    • 1 tsp olive oil
    • 1/4 cup diced red onion
    • 2 stalks celery, sliced
    • 2 large carrots, cut in half and sliced
    • 2 garlic cloves, minced
    • 1 tsp dried basil
    • 1/2 tsp fennel seed
    • 1 tsp dried oregano
    • 1/4 tsp red pepper flakes
    • 1/2 tsp sea salt
    • 1 Tbsp balsamic vinegar
    • 3 cups crushed canned tomatoes or fresh roasted*
    • 2 cups flavorful vegetable stock
    • sea salt
    • 3 cups diced potatoes
    • 2 cups cooked chickpeas
    • 2 cups fresh kale, torn into small pieces


    Instructions:

    1. Heat the olive oil in a medium pan.
    2. Add onions, carrots and celery and sauté until tender.
    3. Add the garlic, tomatoes, herbs, sea salt, pepper, vinegar, and filtered water.
    4. Bring to a simmer, and allow to cook until the tomatoes are very soft and the flavor has melded, about 30 minutes.
    5. Add the potatoes to the pot, and let cook for about 10-15 minutes.
    6. When the potatoes are tender, stir in the chickpeas and kale until kale has just wilted.
    7. Serve!


    *To roast the tomatoes, cut them into 2 inch wedges, and spread them out on a parchment lined baking sheet.  Place in a 400F degree oven and roast for about 30-45 minutes until tender and starting to brown at the edges. Remove from oven and you are ready to use them in this recipe.

  • Moroccan Roasted Carrot Hummus

    Moroccan Roasted Carrot Hummus

    One of my favorite things to make at work (in a health food store deli) is hummus.  It is not my usual job, I am the one who makes salads, vegan soups and vegan hot bar, but when I have all of my stuff done, and they need help making hummus, I always volunteer.  We make really good hummus, red pepper and regular, and of course, we always have to taste test it to make sure it is fit for the customers.  Which is why I love to make it.  It has plenty of lemon juice, sea salt, and a little bit of a kick, which is the way I love it, and the way I usually make it at home.  A few days back my coworker was making it and I said to myself, you know what sounds good for dinner?  Hummus with a big plate of veggies.  So, that is exactly what I made when I got home.  I decided to make a new flavor of hummus though, because I like to keep it interesting.  Raw Guru had recently sent me some Dastony Sesame Tahini so, it was the perfect time to make hummus!  Their tahini is super smooth and creamy, not bitter like tahini sometimes is.  So, it made for some rich and delicious hummus!

    I decided to make a Moroccan roasted carrot hummus, because I was in the mood for something with plenty of spices and I had carrots on hand.  When deciding what to make, I almost always try to just use what I have on hand at home already.  This way I never waste food, and I save money which is a win all around.  I roasted the carrots until they were tender in the oven, bringing out their sweet flavor, and then combined them with cooked chickpeas for the bulk of the hummus.  I always have cooked chickpeas on hand for things like this, because I cook up a big batch, then freeze them in portions so that they are ready to use. It is more cost effective than using canned, plus I think they taste a little better.  I added  the smooth Dastony Sesame Tahini to the hummus, and it was so silky smooth!  All it needed were the aromatic spices.   I chose garlic, cumin, paprika, cinnamon, coriander and turmeric.  Also some cayenne for heat.  It smelled sooo good!

    I could not wait for dinner!  I just had to cut up all of my veggies.  It didn’t take long because I am a veggie chopping expert, and I was hungry for that hummus!  The flavor was delicious!  A little sweet from the carrots, and the blend of aromatic spices a bit warming with that rich tahini texture…it was sooo good!  I ate the whole plate of veggies and hummus.  This is one of my favorite Summer meals, and I always have to make it a few times.  But if I am not ambitious about cutting that many veggies, the hummus just makes the perfect afternoon snack with some cucumber slices after work.  I hope you are all having a fabulous Summer so far, if you are a hummus fan like me, give this one a try!

    Moroccan Roasted Carrot Hummus
    Makes about 2 1/2 cups

    Ingredients:

    • 2 large organic carrots, cut into 1 inch pieces
    • olive oil
    • 1 1/2 cups cooked chickpeas
    • 1/2 cup Dastony Sesame Tahini
    • juice of 2 large lemons (1/4 cup)
    • 1 garlic clove, minced
    • 1/2 tsp Raw Guru Himalayan salt or sea salt (or to taste)
    • 2 tsp ground cumin
    • 1 Tbsp smoked paprika
    • 1/8 tsp cayenne (or more if you like spicy)
    • 1/4 tsp cinnamon
    • 1/2 tsp coriander seed
    • 1/2 tsp turmeric
    • filtered water as needed


    1. To roast the carrots, preheat the oven to 400F degrees.
    2. Toss the carrots with just enough olive oil to lightly coat them, and spread out on an oiled sheet pan.  Place in the oven and roast until the carrots are tender, about 30-40 minutes.  Remove from oven and let cool.
    3. Place the carrots in a high speed blender or food processor, along with all of the other ingredients, and blend until smooth, adding filtered water as needed to create a smooth consistency.
    4. Enjoy!  Keeps in an airtight container in the refrigerator for up to 2 weeks.


  • Italian Pasta and Chickpea Soup 

    Italian Pasta and Chickpea Soup 

    So apparently Winter is never going away here.  They are predicting even more snow, even though it is mid April and the tulips should be blooming by now.  I am so over it.  Last year the first week of April I was wearing shorts outside.  So, I am not quite into the light Spring food yet, I am in comfort food mode until it warms up.  Which will probably be another month from the looks of it.  The soups are flying out of  the deli I work in, and I feel like soup making and serving is non-stop.  I can’t blame people, I feel the same way about soup right now.  So a few nights back I made myself a big pot of warming comforting soup.  I was in the mood for something with Italian flavor because I had made one at work and it just tasted and smelled so good I wanted my own. I had all of the ingredients on hand as well, so it was perfect!  I love it when I don’t have to go shopping for things to make dinner.

    It was really pretty simple to make as far as soups go. I have made my own soup ever since my Mom taught me how to make soup when I was in high school.  She had gotten this soup book and we would pick different recipes and make them together.  I thought that was pretty exciting, and it taught me a lot. It was useful knowledge when I decided I wanted to cook for a living.  My favorite soups out of that book were the Italian ones, so that is what we made most often, and those memories are what I based my Italian soup I made this week off of.  One called pasta e fagioli, or beans with pasta.  It had plenty of vegetables in the base, it was flavorful thanks to the herbs and alliums, and it was definitely comfort food. This one came together in about 45 minutes and it was just as delicious!

    The only things I changed were I swapped the usual white beans we used to use for chickpeas, and used elbow pasta instead of little alphabet shaped pasta I loved so much when I was younger, just because that is what I had on hand.  If you are making this for yourself, feel free to add in your favorite vegetables, or pastas or use a different bean.  Because that is what cooking at home is all about, making it work for you, and using what you like and have on hand!

    Italian Pasta and Chickpea Soup 

    Serves 3

    Ingredients:

    • 1 tsp olive oil
    • 1/4 cup diced red onion
    • 2 stalks celery, sliced
    • 2 carrots, cut in half and sliced
    • 2 garlic cloves, minced
    • 1 tsp dried basil
    • 1/2 tsp fennel seed
    • 1 tsp dried oregano
    • 1/4 tsp red pepper flakes
    • 1/2 tsp sea salt
    • 3 cups crushed canned tomatoes or fresh roasted*
    • 2 cups filtered water
    • 1 Tbsp balsamic vinegar
    • sea salt
    • 4 oz gluten free elbow pasta
    • 1 1/2 cups cooked chickpeas
    • 1/4 cup chopped fresh parsley


    Instructions:

    1. Heat the olive oil in a medium pan.
    2. Add onions, carrots and celery and sauté until tender.
    3. Add the garlic, tomatoes, herbs, sea salt, pepper, vinegar, and filtered water.
    4. Bring to a simmer, and allow to cook until the tomatoes are very soft and the flavor has melded, about 30 minutes.
    5. Add the pasta to the pot, and let cook for about 5 minutes.
    6. When the pasta is cooked, stir in the chickpeas and fresh parsley.
    7. Serve!


    *To roast the tomatoes, cut them into 2 inch wedges, and spread them out on a parchment lined baking sheet.  Place in a 400F degree oven and roast for about 30-45 minutes until tender and starting to brown at the edges. Remove from oven and you are ready to use them in this recipe.

  • Vegan Double Chocolate Cheesecake (Nut Free)

    Vegan Double Chocolate Cheesecake (Nut Free)

    Since that nut free Vanilla Raspberry Swirl Cheesecake I made last weekend turned out so good, I decided that this weekend I needed to make a chocolate one for all of you chocolate lovers out there.  You know who you are, the people who can never resist anything chocolate, and always choose it over vanilla.  Eric (my boyfriend) is like that.  In fact, the first dessert I ever made for his Birthday was a raw Mexican chocolate cheesecake. I don’t hate on chocolate just because I usually have a thing for vanilla.  In fact this week I have been craving something decadent and chocolaty so it is a win for everyone me making the chocolate cheesecake this weekend.  I didn’t want to make anything that was too difficult either, and vegan cheesecakes are usually pretty straight forward.  What mattered to me here was that the cheesecake be rich, decadent and still be healthier than traditional cheesecake.  I think I achieved all of that.

    For the crust, I my usual go to crust of oats, coconut and dates but with cacao powder this time to make it rich and sort of raw brownie like.  It was the perfect base for the richness to come.  The filling is a little unusual.  Like the other nut free cheesecake I made last weekend, I included chickpeas in this one for the creamy filling instead of my usual go-to cashews.  And you know what?  You can not even tell the difference once it is all blended up.  Once you add in the cacao powder you would never even know that they are in there!  Also, this cheesecake is completely fruit sweetened as well as an added bonus, because I used dates this time instead of maple syrup.  Dates are nature’s candy, and I love using them in desserts.  Anyways, back to that cheesecake filling…it was delicious even before I poured it into the crust.  Like a dreamy chocolate mousse that I could eat out of a bowl.  I decided to stir vegan chocolate chips into it to make it even more delicious!

    Since I made the cheesecake at night, I had to wait until the next day for it to set, but it was well worth the wait!  I topped it off with a gooey chocolate ganache, and I could not wait to dive in!  It was rich, delicious and everything I imagined it to be!  Perfect for all of you chocolate lovers out there.  I think this might be the perfect Valentine’s dessert if you and your significant other love chocolate.  So if you are going out to dinner, skip the dessert and make your own, because it is much more fun to make your own, and then you will have leftovers for later too!  And, nothing beats cheesecake leftovers!

    Vegan Double Chocolate Cheesecake (Nut Free)
    Makes one 8 inch cake

    One 8 inch spring form pan 

    Crust:

    • 1/2 cup finely shredded coconut
    • 1/2 cup gluten free organic rolled oats
    • 1/2 cup pitted medjool dates (if not soft, soak them in filtered water first and drain well)
    • 1/4 cup raw cacao powder or unsweetened cocoa powder
    • 1/4 tsp sea salt


    Filling:


    Ganache:


    Instructions:

    1. Oil an 8 inch spring form pan, and line the bottom with parchment paper.
    2. To make the crust, place all ingredients in a food processor, and process until crumbs and starting to hold together (if they are not holding together when squeezed, add a few tsp filtered water and blend). Press into the bottom of the prepared pan.
    3. Meanwhile, to make the filling, combine all ingredients but the chocolate chips in a high speed blender or food processor and blend until smooth.  Stir in the chocolate chips.
    4. Pour the filling over the prepared crust.
    5. Place cheesecake in the freezer to set for about 4-5 hours (or overnight in the refrigerator if you are not in a hurry).
    6. Remove from the freezer, un-mold and set in the refrigerator while you make the ganache.
    7. In the top of a double boiler, melt the dark chocolate and whisk in the coconut milk until smooth.  Pour over the top of the cake, and let it drip down the sides. Place in the refrigerator until it is more set, about 30 minutes.  Enjoy!
    8. Store any leftover cake in the refrigerator.


    *I use Thai Kitchen full fat coconut milk.  If you are using a different brand, just make sure it is the thick type, 2/3 of the can at least should be very thick.

  • Caramelized Onion Hummus

    Caramelized Onion Hummus

    Sadly last weekend my favorite team, the Minnesota Vikings lost their chance at getting to the Super Bowl.  Now, that may not seem like such a big deal to most, but of course we are hosting the Super Bowl here in Minnesota this year, so it would have been cool to have a team finally play in their home stadium for the big game.  Since that has never happened before.  But we had a really rough heartbreaking game and lost our chance.  It’s ok though, we still had a really good season, and I am still looking forward to watching the big game taking place in my home stadium.  Not from the stadium of course, because no way I could afford that, but in the comfort of my own home, which is really how I would prefer it.  Because I can be all comfy and make good snacks.  Everyone is in Super Bowl snack mode, and so I thought, what would I like to eat for the big game?  Well, I definitely would want some chips along with delicious things to dip them in.  I would already be making my Roasted Squash Nacho Cheese, and guacamole and salsa of course are a must, but why not something with a little protein and substance too?  Like a savory hummus!  I am a huge hummus fan.  I mean, it goes great with veggies for a snack, or dropped onto the top of a salad, or as a sandwich spread, or with chips of course.  So I figured I could get multiple uses out of it besides just snacking on for the big game.

    I love classic hummus with plenty of cumin, garlic, lemon and cayenne.  But I wanted something a little different this time.  You know that caramelized onion dip that everyone loves that is packed with onion flavor and loaded with dairy?  Well that was a favorite of mine with chips growing up.  So I thought why not make a hummus with those flavors.  So, I got some onions and garlic caramelizing on the stove and my house smelled like pure savory heaven. Yes, I actually do enjoy the smell of cooking onions, it is so comforting.  Once they were all caramelized browned and happy, I combined them with chickpeas and some cashew butter to make it extra rich and smooth in the blender.  All it needed was a little miso, sea salt and balsamic vinegar and it was sooo good!

    It smelled amazing even before I tasted it, but the flavor was rich and mellow.  It tasted of sweet onions and garlic, not harsh like the raw ones, but a savory flavor that was craveable, kind of like the flavor in the base of a good French onion soup. The balsamic added just a tad of acidity that it needed to cut the sweetness, and the miso a savory note.  All in all it was even better than I imagined it to be.  It is amazing with any kind of chips.  I happened to have corn chips on hand, because they are my favorite, but I have a feeling it would be amazing with ruffled potato chips, the way I used to always eat that onion dip with when I was little.  If you are a hummus lover like me, give this a try!

    Caramelized Onion Hummus
    Makes about 2 cups

    Ingredients:

    • 2 medium yellow onions, sliced
    • 8 garlic cloves, sliced
    • 1 Tbsp avocado oil or olive oil
    • 1 1/2 cups cooked chickpeas
    • 1/2 cup raw cashew butter
    • 1 Tbsp white miso
    • 2 tsp balsamic vinegar
    • 1/2 tsp sea salt
    • 1/2 cup filtered water


    Instructions:

    1. In a non-stick ceramic pan, combine the onions, garlic, and avocado oil over medium heat.  Cook over medium heat, stirring every few minutes until the onions and garlic are caramelized and nice and golden brown (about 15 minutes).  If at any time they stick a little to the pan, just add a couple of Tbsp filtered water.  Once they are caramelized remove from heat.
    2. Combine the onions, and all other ingredients in a high speed blender or food processor and blend until smooth (adding a little more water if necessary).  Keeps in the refrigerator for 2 weeks in a sealed container.


  • Vegan Raspberry Swirled Vanilla Cheesecake (Nut Free)

    Vegan Raspberry Swirled Vanilla Cheesecake (Nut Free)

    I have probably made over 200 cheesecakes since I started to love them at a young age.  I enjoyed them as a kid, but I never ate them very often because they were for special occasions in my family.  Then by the time I was in college, I was buying a slice at a local co-op bakery every weekend as a treat after my cross country races as a treat because they were so good.  I was hooked.  But then I thought to  myself, I like to bake.  Why not make my own?  So I did, and the weekend tradition was baking a cheesecake.  My cheesecakes were the best I had ever had too and I loved that I could make whatever flavor I felt like at the time.  Then I decided to go vegan and I thought I would never enjoy it again.   Boy was I wrong though.  One of my friends asked me to make him a raw cheesecake, and I was skeptical that it would be as good as the dairy ones I was used to in the past.  But it turned out amazing!  I started making cheesecakes again, and I was in love with vegan cheesecake.  In fact I have over 150 recipes for cheesecake in various forms on my blog, all of which are vegan.  So that just tells you how much I have to have it  in my life.  I don’t make it every weekend now, because I try to branch out and make other fabulous things like regular cakes and pies.  But when I do make it, I get pretty excited.  I have been wanting to make a nut free cheesecake for a while now, since before the Holidays and I finally got a chance last weekend.

    I do have some other nut free cheesecakes on my blog, and they are super delicious but they are raw cheesecakes and require the cracking open of coconuts.  Which I know not all of you want to do, and those darn coconuts can get spendy.  You need about 4 per cake and it is a lot of work.  So, I wanted to come up with a different nut free cheesecake base.  I came up with chickpeas and canned coconut milk.  Ok, I know it sounds like a weird and disgusting combination but trust me on this one.  Chickpeas work wonders in creating a silky smooth texture if you have a high speed blender.  I actually got the idea when I was making dessert hummus.  And, I have used chickpeas in an ice cream cake before so I knew it would work.  You can not taste them at all, and in fact, when mixed with the coconut milk, coconut butter, maple syrup and vanilla it tastes just like delicious vanilla cream.  I thought about making a plain vanilla cheesecake and just topping it off with berries, but instead I decided to swirl the berries in.

    Because then you get delicious hidden bites of berries throughout the cake.  I used a raspberry jam this time, because it is Winter here and fresh berries are super expensive.  Plus, Eric’s Dad gave us some of the best tasting raspberry jam ever and I wanted to use it in something special like this cake.  I just made a simple oat coconut date crust as a base for the cake and it was perfect!  The cheesecake turned out so good you would not even know it was vegan or had chickpeas in it.  The tart raspberry was the perfect partner for the sweet luscious vanilla scented creamy cheesecake!  The best part about this cake is it doesn’t require baking and it is relatively easy if you have a high speed blender.  So, if you are in the mood for cheesecake, give this baby a try!

    Vegan Raspberry Swirled Vanilla Cheesecake (Nut Free)
    Makes one 8 inch cake

    Crust:

    • 1/2 cup finely shredded coconut
    • 1/2 cup gluten free organic rolled oats
    • 1/2 cup pitted medjool dates (if not soft, soak them in filtered water first and drain well)
    • 1/4 tsp sea salt


    Filling:


    Instructions:

    1. Oil an 8 inch spring form pan, and line the bottom with parchment paper.
    2. To make the crust, place all ingredients in a food processor, and process until crumbs and starting to hold together (if they are not holding together when squeezed, add a few tsp filtered water and blend). Press into the bottom of the prepared pan.
    3. Meanwhile, to make the filling, combine all ingredients but the jam in a high speed blender or food processor and blend until smooth.
    4. Pour the 1/3 of filling over the prepared crust, then drop 1/4 cup of the jam over that by the tsp spreading it out so you have even little circles of it.  Swirl with a knife. Pour half the remaining filling over that, then another 1/4 cup of jam, dropping it in the same manor you did with the last 1/4 cup.  Pour the last 1/3 of the filling over that, and repeat with the jam, swirling it to make the top pretty.
    5. Place cheesecake in the freezer to set for about 4-5 hours (or overnight in the refrigerator if you are not in a hurry).
    6. Remove from the freezer, un-mold, and enjoy!  Store any leftover cake in the refrigerator.


    *I use Thai Kitchen full fat coconut milk.  If you are using a different brand, just make sure it is the thick type, 2/3 of the can at least should be very thick.

    **Make sure your jam is vegan and does not contain gelatin.  If your jam is too thick to be swirled into the cake with a knife, add a little water to it until it is.  Alternatively, if you do not want to use jam, you can make your own raspberry puree with 1 1/2 cups fresh or frozen (thawed and drained) raspberries, and 1 Tbsp maple syrup, blended in the blender.

  • Chocolate Cake Batter Dessert Hummus

    Chocolate Cake Batter Dessert Hummus

    Like any good vegan, I love hummus.  For years, I have been making different kinds of hummus to have on hand.  It is something that always has to be in my refrigerator. A lot of times, I like to add different veggies to it, to make it more flavorful or colorful, but also to add nutrients.  I also like spicy things in it as well, like plenty of chipotle, or cayenne pepper.  Savory hummus is a staple.  But recently I have been hearing about dessert hummus being all the rage.  Funny, because I was making some a few years back before it was a thing. I made peanut butter cookie dough hummus, pumpkin pie hummus and strawberry hummus among other things.  I can understand why people love it.  I mean you get a delicious dessert that is somewhat healthy and packs protein thanks to the chickpeas which are mild and can be transformed into whatever flavor you want.  When I first made it I was trying to make a sweet snack that was healthy that had substance and wasn’t just empty calories.  If you are of a similar mindset, read on.

    I have never made a chocolate dessert hummus before, so I thought why not now? Maybe then people can make some of their own instead of buying it for a high cost, and this one does not contain any refined sugar.  In fact, it is fruit sweetened thanks to gooey and delicious medjool dates!  They are my all time favorite thing when it comes to sweetening desserts, and they are about as natural as you can get too since all they are is dried and not processed.  This recipe actually has only 5 ingredients excluding sea salt and water.  So it is simple to make with things from your pantry.  Or, that is what I made it with.  The things I have on hand.  I would much rather use what I have, then have to make a trip to the store and spend more money.  All  it contains are chickpeas, dates, cacao powder, sea salt, vanilla, and almond butter plus enough water to blend it smooth.  It is that simple!

    Not only that, it is so good!  I was just going to call it chocolate hummus, but it reminded me of chocolate cake batter.  One of the all time most delicious things!  The texture and everything were similar.  So guess what?  You can make a batch of this, and feel like you are eating cake batter!  And it isn’t just a pile of sugar, it is a substantial snack when paired with fruit, toast, or crackers!  So chocolate lovers, this one is for you!  I hope you do try it, and if you make it feel free to let me know what you think!

    Chocolate Cake Batter Dessert Hummus
    Makes about 3 cups

    Ingredients:

    • 1 1/2 cups cooked chickpeas
    • 1 1/2 cups soft, pitted medjool dates
    • 1 cup filtered water (or as needed)
    • 1/3 cup cacao powder or unsweetened cocoa powder
    • 1 Tbsp pure vanilla extract
    • 1/4 tsp sea salt
    • 1/2 cup almond butter


    Instructions:

    Combine all ingredients in a high speed blender or food processor and blend until smooth (adding a little more water if necessary).  Keeps in the refrigerator for about 1 week in a sealed container.


    *Note: if you prefer sweeter, you can also add a little maple syrup too.

  • Strawberry Dessert Hummus

    Strawberry Dessert Hummus

    Sometimes I start making a recipe and it turns into something totally different.  That was what happened a few days ago when I was going to make some Vegan High Protein Cookie Dough, but I ended up making strawberry hummus instead.  How does that happen?  Well, the cookie dough base is chickpeas, so I threw those in the blender, along with some almond butter and dates.  There weren’t quite enough dates in the container I was using so I went back in the refrigerator for more and saw the large amount of strawberries in there.  Hey…I could make strawberry hummus!  I thought to myself.  I am obsessed with chickpeas and hummus and love snacking on them, so I why not make a dessert hummus and change it up from the always savory?!  So that is how I ended up with the recipe I am sharing with you now.  I ended up not even needing the extra dates because it was sweet enough with the berries.

    This is super simple, just 5 ingredients including sea salt!  You whiz it all together in the blender and voila!  Snack deliciousness!  Now you may be thinking to yourself, it sounds a bit weird, but it is actually really good.  You can’t taste the chickpeas.  To me this is actually reminiscent of raw strawberry cheesecake before it has set up, so really tasty!  Not to mention packed with strawberry flavor.

    So what do you serve this with?  Well, I honestly just ate mine with more strawberries, dipping them into it and it was heavenly that way.  But I think you could spread this on bagels cream cheese style because of how much it reminds me of strawberry cheesecake.  Or you could just eat it straight up with a spoon.  As I also did.  I love dessert hummus!  If you are in the mood for something a little different featuring strawberries, give this a try!

    Strawberry Dessert Hummus
    Makes about 2 cups

    • 1 cup cooked chickpeas
    • 1 1/2 cups organic strawberries
    • 1/3 cup pitted medjool dates (if they are not soft, soak them in filtered water for 30 minutes and drain well)
    • 1/4 cup raw almond butter
    • 1/4 tsp sea salt
    1. In a high speed blender or food processor, combine all ingredients, and blend until smooth.
    2. Enjoy!  Store unused dough in the refrigerator.
  • Vegan High Protein Cookie Dough and Vegan Cookie Dough Ice Cream

    Vegan High Protein Cookie Dough and Vegan Cookie Dough Ice Cream

    Wednesday was a really trying day at work, one of those where I feel like I take one step forward and one back every time I tried to make something. You know, not all of the ingredients were there so I had to transfer more, or I got interrupted or I had to open new containers of things.  If you work in a kitchen you get what I mean.  At the end of the day I just wanted to go for a walk outside in the sun with Eric, but it happened to be rainy and cold instead.  But It was nice to have a chat anyhow and the rain was calming.  Even though I was feeling a little better and happier, when I got home, I decided that I deserved something really good for surviving this difficult day, and I decided to make cookies.  I mean…cookie dough.  Yes, that is right, I did not bake it.  I just ate it.

    Ever since I was a little kid in my Grandma’s kitchen, I have liked cookie dough better than actual baked cookies.  I used to steal chunks of dough when she wasn’t looking and she would always tell me, “Don’t eat too much or you will get a tummy ache.” Never warnings about salmonella though. And, I never got a stomach ache.  The cookies warm from the oven were good too but the dough was my favorite.  I am still like that.  I look forward to making cookies so I can eat the dough.  I know some of you know where I am coming from and you just want to eat the dough too.

    I was going to make a no bake cookie dough I had made before just for snacking on, but I decided that I needed a little extra protein for muscle repair since I had worked out hard that morning.  I included a secret ingredient in my dough that I happen to have a lot of all the time, chickpeas!  I eat chickpeas a lot in the afternoon for a snack, so I figured I would get my snack in and combat that cookie dough craving too.  The dough actually turned out really delicious!  I sweetened it with dates, which gave it a bit of a caramelly flavor, and added in some nut butter for richness, a touch of vanilla and it was so tasty!  Even better of course once I added the chocolate chips.  Who says you can’t make cookie dough just to eat it.  This stuff is so good you will find yourself making it again and again. And, I couldn’t stop at just eating it plain, I decided to make some of it into vegan salted caramel cookie dough ice cream!  OMG was it ever delicious!  If you want to make it, simply make the cookie dough recipe below, and then make my 5 Ingredient Vegan Salted Caramel Ice Cream , stirring little pieces of the cookie dough in after the churning stage.

    Vegan High Protein Cookie Dough
    Makes about 2 cups

    • 1 cup cooked chickpeas
    • 1 cup pitted medjool dates (if they are not soft, soak them in filtered water for 30 minutes and drain well)
    • 1/4 cup raw pecan butter or almond butter
    • 2 Tbsp coconut butter (or oil will also work for this recipe), melted
    • 1 tsp pure vanilla extract
    • 1/4 tsp sea salt
    • 1/4 cup filtered water
    • 1 1/2 cups gluten free oat flour (or other gluten free flour)
    • 1 cup vegan chocolate chips
    1. In a high speed blender or food processor, combine the cooked chickpeas, dates, nut butter, coconut butter, vanilla, sea salt, water, and blend until smooth.
    2. Remove from the blender or processor, and mix in the flour and chocolate chips.
    3. Enjoy!  Store unused dough in the refrigerator.


  • Roasted Carrot and Chickpea Quinoa Bowl

    Roasted Carrot and Chickpea Quinoa Bowl

    Last week, a coworker of mine made some roasted carrot fries for the hot food bar at work, and they were pretty amazing.  I admit, carrots are not usually my go to favorite ingredient when it comes to starring roles, but I was surprised at how good it could be when prepared that way.  It got me to thinking I should roast some of the ones I had at home up to crispy perfection and include them in my dinner. I mean, I have roasted carrots before, but I usually just slice them thin and go for chips.  There was something really delicious about them being in larger chunks for the fries.  I was going to just make carrot fries for a snack, but instead I decided to cut them into little smaller chunks, roast them with spices and include them in a bowl.

    I love bowls.  No, I am not talking about the piece of dishes that you eat off of, I am talking about the composed dish that goes into it.  I love quinoa bowls, with lots of delicious toppings.  The sort of thing that you would pay a lot of money in a restaurant for but at home it can be made super affordable.  I decided to combine the carrots in one of those quinoa bowls with some vegan chevre that I had on hand, some chickpeas, and greens.  All topped off with lemon and parsley.  I was pretty hungry, so I was excited about this one.  The carrots turned out super delicious as I had tossed them not just with olive oil, but with the aromatic spices coriander, cumin and chipotle as well.  They smelled wonderful while roasting, and upon tasting them when they came out of the oven before they made it into the bowl, they were super delicious.

    Once the bowl was all composed, I was pretty pleased with it!  It turned out to be even more delicious than I imagined. I really ought to venture out more and make new dinners more often.  I do tend to get stuck in a rut and make the same things all the time, and no matter how delicious they may be new things are always exciting!

    Roasted Carrot and Chickpea Quinoa Bowl
    Serves 2-3

    Quinoa:

    • 2 cups water
    • 1 garlic clove minced
    • 1/4 tsp sea salt
    • 1 cup quinoa, rinsed


    Roasted Carrots:

    • 3 cups carrots, cut into 1 inch pieces
    • olive oil
    • sea salt
    • 1/2 tsp coriander seeds
    • 1/2 tsp cumin seeds
    • 1/4 tsp ground chipotle pepper
    • 1/2 tsp thyme


    For finishing the bowl:

    • 1 cup cooked chickpeas
    • lemon juice
    • 1/2 cup vegan chevre
    • 3 handfuls arugula
    • fresh parsley leaves for garnish


    Instructions:

    1. Place quinoa, garlic and water in a medium saucepan and bring to a boil. Reduce to a simmer, cover and cook until all the water is absorbed about 15 minutes, or when all the grains have turned from white to transparent, and the spiral-like germ has separated. Drain, and let cool.
    2. To make the carrots, preheat the oven to 400F degrees and line a sheet pan with parchment. Toss the carrots with just enough oil to coat, spices and sea salt and spread out on the pan. Place in the oven and roast for about 20-30 minutes until the carrots are tender.
    3. Spoon the quinoa into bowls, then top with the garbanzo beans, roasted carrots, chevre, arugula and parsley, and squeeze the lemon juice over it, and sprinkle with sea salt. Enjoy!
  • Mexican Chocolate Roasted Chickpeas

    Mexican Chocolate Roasted Chickpeas

    I have been wanting to make roasted chickpeas for a long time now.  I mean, I eat chickpeas all the time, in the form of hummus or to top my salads off with, or stir into soups.  So why not for a snack as well?  I admit, I do just eat plain cooked chickpeas with sea salt sometimes for a snack when I need something fast, since I keep a big container of them in my refrigerator at all times. But that is a little boring.  I wanted to make a snack with more pizazz that I could get excited about!  I thought about making some savory ones (and I will eventually) but this time chocolate sounded good.  Maybe it was because when I was buying a few things at work I spotted the Valentine’s candy display, most of which was chocolate and it got me craving some.  It being within a month of Valentines day is a good excuse to make more chocolate goodies as far as I am concerned.  At least these are healthy, with the extra protein from the chickpeas and no refined sugar and all!

    mexican chocolate chickpeas 1

    I looked at a few recipes for chocolate chickpeas, and decided to just come up with my own based on them because that is what I usually do.  I can never just make a recipe as is and leave it alone, it always ends up totally different.  Maybe that is why I am a food blogger.  Most of the recipes I saw used coconut oil along with the cocoa powder, but I decided that I like nut butter better.  I don’t use a lot of oil in my recipes if I can help it, and these were going to be Mexican chocolate chickpeas so almond fit.  Think mole sauce, it contains almonds a lot of the time.  I sweetened it with a little maple syrup, which along with the almond butter made a rich chocolate sauce.  I added some chipotle powder and cinnamon and the chickpeas tasted delicious even before I roasted them!  I always like to taste things before I bake them to make sure they meet my standards.

    mexican chocolate chickpeas 2

    They made my house smell amazing while baking!  Chocolate and spice filling the air and making me happy!  If you ever have a bad day, bake something that smells good, it totally lifts your mood! I admit I was on edge at the end of the day and kind of crabby when I decided to make this snack, but I did feel better by the end of the process.  Something about being in my own kitchen and creating things at a leisurely pace always calms me down too.  So how did they taste?  Wonderful!  You should totally try them out the next time you are craving chocolate.  With these you can get a little protein and fiber along with your chocolate and not just sugar.  I have decided that I need to roast more chickpeas and come up with more exciting flavors!

    mexican chocolate chickpeas 3

    Mexican Chocolate Roasted Chickpeas
    Serves 4

    Ingredients:

    • 2 cups cooked chickpeas
    • 2 Tbsp unsweetened cocoa powder
    • 1 1/2 Tbsp almond butter
    • 2-3 Tbsp maple syrup (depending on how sweet you want it, I used 2)
    • 1/8-1/4 tsp chipotle powder (depending on how spicy you like it)
    • 1/4 tsp cinnamon
    • 1/4 tsp sea salt


    Instructions:

    1. Preheat oven to 375F degrees, and line a sheet pan with parchment.
    2. Place the chickpeas into a bowl, and mix with all other ingredients.
    3. Spread chickpeas out on the parchment, place in the oven and roast for 25 minutes, then stir, and roast another 20.  Remove from oven and let cool before enjoying.


  • Golden Roasted Cauliflower and Chickpeas

    Golden Roasted Cauliflower and Chickpeas

    golden-cauliflower-2

    My Mom bought me a cauliflower, and asked me to make her something with it.  And, since it is prime veggie roasting season, I decided to roast it!  When I was young, she had this book for healthy recipes that heal the body, and one of them was for a curries cauliflower rich in turmeric.  I kind of decided to go off of that recipe, minus the curry.  Turmeric is an awesome spice!  In fact, I try to include it in my diet in some form every day to help decrease inflammation in my body among other things.  Usually it is in my oatmeal in the morning with a few other spices, but it is wonderful in savory dishes as well!  Plus, it gives everything such s pretty yellow color!  Since cauliflower is white, and not very colorful, I thought it would make it pop more.  Plus, I kind of feel like they are a match made in heaven.\

    golden-cauliflower-3

    I whisked some turmeric into some olive oil along with a little cinnamon for sweetness, and chipotle powder for a kick, and a little sea salt, and it was the perfect balanced mixture to coat the cauliflower with.  To make this more of a complete dish, I also added some chickpeas to roast along with it, as well as some lemons to squeeze over the final dish (allowing their flavor to intensify in the oven).  They all turned out beautifully and everything was a lovely shade of gold when I removed it from the oven.  I plated it all up, sprinkled it with toasted almonds and arugula and it was so pretty!

    golden-cauliflower-1

    Not only that, it tasted wonderful, and my Mom was super happy with it, which is what mattered since the dish was for her. It was savory, a touch sweet from the cinnamon, and that hit of lemon made it extra delicious!  The chickpeas were a little crunchy and the cauliflower tender.  This can either be a main dish, or a side dish depending on what you serve with it.

    golden-cauliflower

    Golden Roasted Cauliflower and Chickpeas
    Serves 2

    Ingredients:

    • 1 large head cauliflower, sliced thickly
    • 1  1/2 cups chickpeas
    • 1/4 cup olive oil
    • 1 1/2 tsp turmeric
    • 1/2 tsp chipotle powder
    • 1/2 tsp cinnamon
    • sea salt to taste
    • 1 lemon, halved
    • 1/4 cup chopped roasted almonds
    • 1 handful arugula

    Directions:

    1. Preheat the oven to 400F degrees.
    2. Whisk together the oil, spices, and salt in a bowl, and toss the cauliflower and chickpeas with it.
    3. Spread the cauliflower and chickpeas out on a sheet pan, along with the lemon halves.
    4. Place in the oven and roast until the cauliflower is tender and starting to brown a little.  Remove from the oven.
    5. Place the cauliflower and chickpeas on a serving plate, squeeze the lemon over them, and sprinkle the almonds and arugula over the top.  Serve!


  • Vegan Chickpea Chorizo Stuffed Yams

    Vegan Chickpea Chorizo Stuffed Yams

    I eat yams at least 4 times a week if not more.  I am addicted to them honestly, they are sooo good.  Yam fries are my favorite thing in the world, and I could live off of them if that were ok. Like for breakfast lunch and dinner and never get sick of them.  But I know it practical, and I need more in my diet than just yams.  So I try to come up with new ways to serve them or recipes to use them in.

    Vegan Chickpea Chorizo Stuffed Yams 1

    The latest recipe was chorizo stuffed yams.  Not meat chorizo, yuck.  Chickpea chorizo.  Something I have been making ever since I had a vegan tempeh chorizo at a local restaurant and loved it so much I decided to create my own version.  But using chickpeas. Because at the time I didn’t have any tempeh on hand but I did have chickpeas.  I fell in love.  This is good stuff!  I used it to top off a pizza that time.  Since then I have used it for salads and tacos as well.

    Vegan Chickpea Chorizo Stuffed Yams 2

    But I thought it would be especially good with roasted yams, so I used it to stuff them for dinner.  I topped it off with an avocado sauce to cool the heat of the chorizo and they were delicious!  If it were summer I would add diced fresh tomatoes and lettuce to top these off but since it isn’t and I didn’t have any on hand I kept them simple. And they were sooo good!  If you are looking for a new dinner idea and you love yams as much as I do, try these out!

    Vegan Chickpea Chorizo Stuffed Yams 3

    Vegan Chickpea Chorizo Stuffed Yams
    Serves 2

    2 medium yams, cut in half lengthwise

    Chorizo:
    1 medium red onion, diced
    1 tsp olive oil
    1 15 oz can chickpeas
    1 garlic clove, minced
    1 Tbsp smokey paprika
    1 tsp red pepper flakes
    1/4 tsp chipotle powder
    1 tsp cumin
    1/2 tsp ground coriander
    1/4 tsp cinnamon
    1 tsp oregano
    sea salt to taste
    1 medium organic tomato, diced

    Avocado sauce:
    1 medium avocado
    juice of one lime
    sea salt to taste
    filtered water as needed

    Preheat the oven to 375F. Place the yams cut side down on a sheet pan lined with parchment paper. Roast yams for about an hour to an hour and 15 minutes depending on how large they are.
    To make the chorizo, heat the oil in a pan, and add the onions.  Cook, stirring often until the onions are very soft and starting to brown. Add the chickpeas, garlic, spices and tomatoes and continue to cook, stirring the whole time to prevent burning.  Mash the chickpeas up with the back of a spoon and cook until heated through and tomatoes have become mush.
    Blend up all of the avocado sauce ingredients until smooth in a food processor (adding as much water is needed to make it a creamy but pourable consistency).
    To serve, spoon the chorizo over the roasted yam halves, and top with the avocado sauce.


  • Coconut Curry Roasted Romanesco with Chickpeas

    Coconut Curry Roasted Romanesco with Chickpeas

    Romanesco

    The first time I ever saw a romanesco I thought it looked like a beautiful green alien cauliflower with crazy geometric shapes.  What an awesome veggie!  I had to buy one of course, and it tasted wonderful too.  One of my favorite ways to eat them is actually roasted with a bit of sea salt.  The crispy outside with the tender inside is delicious. No, I am not just trying to educate you about romanesco (although if you never have had one, they are worth seeking out), I made a recipe with one last week that I would love to share!

    Romanesco curry 3

    My Mom brought me a romanesco a few days back, and asked me if I could make her something with coconut and curry with it.  What I came up with was pure deliciousness.  I roasted the romanesco like I had in the past, then made a silky coconut curry sauce.  It was pretty simple, just a splash of lime juice to balance it out, and some red pepper flakes for a kick.  I added in some chickpeas for protein since this was to be a main dish.

    Romanesco curry 1

    Lastly, I topped it off with crunchy coconut for even more of a textural contrast.  The romanesco was tender but a little crispy, and it tasted wonderful with the sauce and crunchy coconut. If you wanted a more substantial meal, you could serve this with a little quinoa on the side, but my Mom loved it as it was.  She said it was just what she was hoping for.  If you are looking for an easy weeknight meal this comes together quick, so it is perfect!

    Romanesco curry

    Coconut Curry Roasted Romanesco with Chickpeas

    Serves 2

    2 larger heads romanesco, broken into pieces

    coconut oil

    Sauce:

    1 15 oz can full fat organic coconut milk

    1 tsp mild curry powder

    1/4 tsp red pepper flakes

    1 garlic clove

    sea salt to taste

    2 tsp cornstarch dissolved in 2 Tbsp filtered water

    2 Tbsp lime juice

    1 cup cooked chickpeas

    toasted large flake coconut

    sliced scallions

    Preheat the oven to 400F degrees.  Toss romanesco with just enough coconut oil to coat, and spread out on the sheet pan.  Place in the oven, and roast for about 30 minutes until tender.

    Meanwhile, in a saucepan, heat the coconut milk, along with the curry powder, red pepper flakes, garlic, and sea salt and bring to a simmer.  Cook on low for 5 minutes, then add the cornstarch mixture, lime juice and chickpeas.  Cook until thickened, then remove from heat.

    Once the romanesco has finished roasting, remove to a plate, and pour the coconut chickpea mixture over it.  Sprinkle with the toasted coconut and scallions, and serve!


  • Chickpea Cutlets and Mushroom Gravy

    Chickpea Cutlets and Mushroom Gravy

    IMG_1997

    When I was little, and my Mom would make chicken, I was never a big fan of it.  Unless it was breaded.  It kind of disguised the fact that it was meat to me.  I have never been a big fan of meat in general.  When I first became vegetarian, I used to buy fake chicken cutlets though because I liked those more than the real meat I had eaten as a child.  The only problem with them though, was the long list of ingredients that were not so good for me. I haven’t eaten them in a really long time, but I was thinking about it the other day, why not try making some of my own, a healthier vegan version?  I decided to go for it, since Eric enjoys this sort of comfort food type thing, and I knew he would be my guinea pig to try it with me.

    IMG_1998

    I ended up making the cutlets from chickpeas, because they seemed like they would work well for the texture and neutral flavor.  It worked out really well!  I don’t really eat much bread, so I did not bread these with breadcrumbs but in fact, ground flax seed and nutritional yeast.  I made a mushroom gravy to serve over them because it just seemed right and they turned out really good!  They were actually really simple to make, so worth making these instead of facing the side affects of store bought in case you were wondering.

    IMG_1999

    Chickpea Cutlets and Mushroom Gravy

    serves 3

    1 1/2 cups chickpeas

    1 garlic clove

    sea salt to taste

    1 tsp thyme

    1/8 tsp cayenne pepper

    1/4 cup almond flour

    2 Tbsp white miso

    1 Tbsp nutritional yeast

    Coating:

    2 Tbsp nutritional yeast

    2 Tbsp ground flax seed

    1/4 tsp sea salt

    1/2 cup aquafaba

    Gravy

    3/4 cup mushrooms, sliced

    1 cup flavorful veggie broth

    1 garlic clove, minced

    1 Tbsp tamari

    1 Tbsp nutritional yeast

    2 tsp arrowroot starch dissolved in 2 tsp filtered water

    To make the cutlets, in a food processor, combine all ingredients but the flour and process until smooth. Add the flour and pulse to blend. It should be soft enough to form into cutlets but not too sticky.  If it is too sticky, add a little more flour.  Shape into ovals, and set aside on a plate.  Place the yeast and flaxseed, and sea salt in a bowl, and mix together. Place the aquafaba into another bowl.  Line a sheet pan with parchment.  Dip each cutlet into the aquafaba, then the yeast mixture to coat it.  Place on the parchment lined tray.  Spray with olive oil if desired (it helps it brown, I keep mine in a spray bottle).  Place in a 400F degree oven, and bake for about 20-30 minutes until heated thorough and browned at the edges.

    Meanwhile, to make the gravy, combine all ingredients but the arrowroot mixture and bring to a simmer.  Cook until the mushrooms are tender, about 10 minutes. Add the arrowroot, and cook until thickened.  Serve over the cutlets.


  • Roasted Tomatillo Hummus and Chia Hemp Flax Crackers

    Roasted Tomatillo Hummus and Chia Hemp Flax Crackers

    Roasted Tomatillo Hummus

    Most people make green sauce or salsa with tomatillos, but I decided to make hummus.  My first experience this year ever with tomatillos came when they were in my CSA box and I had no idea what to do with them since I had never worked with them before.  But I was excited to try them.  I ended up roasting them and making a sauce for enchiladas which was amazing.  I was thinking after that I wanted some more so I could make more delicious things with them.  But then when I got more I almost made a sauce again, but decided that I was craving hummus something fierce so I decided to sort of combine the two.  And what resulted was pure deliciousness. It had the flavor of delicious tomatillo sauce and hummus.  It went perfect with my flax crackers that I make weekly, so I decided I should share the recipe for those with you as well.  Besides the crackers though, I am loving this hummus with cucumbers in my lunch.  If you are lucky enough to get your hands on some fresh, local tomatillos, this is a nice change of pace for using them.

     Roasted Tomatillo Hummus 2

    Roasted Tomatillo Hummus

    Makes about 2 1/2 cups

    4 cups tomatillos, husks removed, washed and cut into wedges

    olive oil

    2 cups cooked chickpeas

    2 Tbsp sesame tahini

    1 garlic clove

    1/2 tsp ground cumin

    1/4 cup chipotle powder

    1/2 tsp sea salt (or to taste)

    1/4 cup chopped cilantro

    3 Tbsp lemon juice

    Pre-heat the oven to 400F degrees.  Toss the tomatillos with just enough olive oil to coat lightly then spread out on a sheet pan and roast for about 30 minutes or until tender and starting to brown and caramelize.  Remove from the oven and let cool.

    Combine the tomatillos and all other ingredients in a food processor and process until smooth.  Keeps for one week in a sealed container.

    Chia Hemp Flax Crackers

    Makes about 2 dozen

    1/2 cup whole flaxseeds

    3 Tbsp shelled raw hempseeds

    3 Tbsp chia seeds

    1 cup ground flaxseed

    1/4 tsp sea salt, or Himalayan salt plus additional for sprinkling

    1 1/4 cups water

    In a food processor, combine all ingredients, and process for about 1 minute until blended. Spread out onto a lined dehydrator tray very thin. Sprinkle with salt. Place in the dehydrator and dry for a few hours at 115F degrees, then score with a knife into square crackers. Place back in the dehydrator and dry for about 24 hours until very crispy. Alternatively, you may use an oven at a very low temperature, but it will take less time so check it way sooner.


  • Chipotle Chickpea Salad Sandwiches

    Chipotle Chickpea Salad Sandwiches

    Chipolte Chickpea Salad Sandwich

    I was never a huge fan of chicken salad growing up, so I am not sure where my urge to make vegan chickpea salad sandwiches came from.  Maybe because chickpeas are way more delicious to me than chicken ever was, and I can make my own plant based mayo (I was never a fan of mayo until I made the vegan type).  So, I decided to give it a try. I didn’t want just plain salad though, I wanted something kicked up a notch.  So, I ended up making a spicy chipotle mayo that was right up my alley.

    Chipolte Chickpea Salad Sandwich 1

    I made the mayo with a base of cashew and coconut to make it extra creamy, and added in plenty of chipotle for a big kick.  It was pretty tasty, and if thinned out I think it would make wonderful salad dressing for some roasted veggies as well.  But I mixed it in with my chickpeas and some chopped veggies, tossed it on some sprouted bread with tomatoes and lettuce and voila!  Something that I enjoyed way more than the chicken salad I had tried as a kid that was nothing special.  This was delicious!  And no chickens were harmed it the process which makes me happy too.

      Chipolte Chickpea Salad Sandwich 4

    Chipotle Chickpea Salad Sandwiches

    Makes 2

    Chipotle Mayonnaise:

    1 can full fat organic coconut milk
    1/2 cup raw cashew butter
    1/4 tsp sea salt
    1/2 tsp chipotle powder
    1/2 tsp ground black pepper
    1 garlic clove
    1 Tbsp cider vinegar
    1 tsp guar gum

    Salad:

    1 1/2 cups cooked chickpeas

    2 stalks celery, diced

    1 medium carrot, shredded or cut julienne

    2 scallions, sliced

    1 small bell pepper, diced

    1 tomato, sliced

    lettuce leaves

    sprouted bread, or your choice of bread

    For the mayonnaise, combine all ingredients in a blender and blend until smooth. You will have a bit extra after the recipe, so just save in the refrigerator in a jar for another use.

    To make the salad, combine the chickpeas, celery, carrots, scallions, pepper, and just enough of the mayonnaise to coat it in a bowl (you can always add more if need be).  Mix until all ingredients are well incorporated.

    Toast your bread (or at least I like to, you may leave it un-toasted if you like), then place a lettuce leaf on two of the slices, then the tomato slices, then some of the chickpea salad, then another slice of bread.  And enjoy!


  • Vegan Spicy Chorizo Veggie Pizza

    Vegan Spicy Chorizo Veggie Pizza

    Vegan Chorizo Pizza 1

    I had made some vegan pepperjack cheese last week, and I used some for quesadillas, but I wanted to make a pizza out of the rest of it.  Some sort of spicy Mexican pizza because I haven’t had a pizza like that in a while with melty cheese.  I thought long and hard all day while I was at work about what I wanted to put on it.  First, I thought lentils, but then by the time I got home I didn’t even feel like cooking those, so I ended up using the chickpeas I had cooked off in the fridge.  Not just chickpeas though thrown onto the pizza.  That would be boring and not spicy enough. So I made chickpea chorizo.  It was sooo good!  I enjoyed it so much I am going to use it on taco salad in the future.  But anyways, it was wonderful on the pizza.

    Vegan Chorizo Pizza 2

    I made a gluten free crust as the base, then scattered the chorizo about. Then I topped it off with veggies as well, some zucchini, peppers, jalapeno, and tomatoes.  Lastly the cheese.  Oooh it melted so perfectly over that pizza! I have never had vegan cheese this good. The pizza was nice and spicy thanks to all the different peppers I used in the chorizo and the jalepenos and the spicy cheese.  But that was what I was going for.  I am a sucker for spicy.  I shared some with Eric, because he shares my love of all things hot.  I am sure he would have loved it even better had I had ghost peppers to put on it.  Anyways, this is delicious!

       Vegan Chorizo Pizza 4

    Vegan Chorizo Veggie Pizza

    Makes one 14 inch pizza

    Vegan Pepperjack Cheese:

    1 15 oz can full fat organic coconut milk

    1 clove garlic, minced

    1 Tbsp red pepper flakes

    1/4 tsp ground chipotle powder

    2 Tbsp arrowroot starch

    1/4 cup plus 1 Tbsp filtered water

    3 Tbsp agar flakes or 1 Tbsp agar powder

    2 tsp lemon juice

    1 tsp sea salt or Himalayan salt

    1 Tbsp virgin coconut oil

    1 tsp guar gum

    To make the cheese, heat the coconut milk in a saucepan with the garlic and peppers, until it comes to a simmer.

    Meanwhile, dissolve the arrowroot starch in the water and set aside.

    Once the coconut milk has come to a simmer, add the agar flakes, and heat until they are dissolved (mine took about 8 minutes, if you are using the powder, it should dissolve within one minute).

    Next, add the lemon juice and sea salt to the coconut milk.

    Mix the coconut oil with the guar gum so that the guar gum does not clump up.

    Turn off the heat and add the arrowroot mixture, guar gum and coconut oil. Whisk for about 30 seconds, then pour into a silicone mold (I used a loaf pan, but if you had another shape you would like to use go ahead). Refrigerate for a few hours until firm, then pop out of the mold. You will need half the cheese for this recipe, reserve the other half for another use in the fridge, wrapped in an airtight container.  Shred the half you will be using into a bowl, and keep in the refrigerator until ready to use.

    Pizza Dough:

    1 1/2 cups gluten free all purpose flour

    1 Tbsp olive oil

    1/2 tsp sea salt

    1/2 tsp xanthan gum

    1/2 cup plus 1 Tbsp filtered water

    To make the pizza crust, combine the flour, xanthan gum and sea salt in a bowl, and whisk until well blended. Add the oil and water, and mix in until you have a soft dough.

    Turn out onto a sheet of parchment paper with a light dusting of flour, and roll out into a 14 inch circle.  Set aside.

    Chorizo:

    1 medium red onion, diced

    1 tsp olive oil

    1 15 oz can chickpeas

    1 garlic clove, minced

    1 Tbsp smokey paprika

    1 tsp red pepper flakes

    1/4 tsp chipotle powder

    1 tsp cumin

    1/2 tsp ground coriander

    1/4 tsp cinnamon

    1 tsp oregano

    sea salt to taste

    1 medium organic tomato, diced

    To make the chorizo, heat the oil in a pan, and add the onions.  Cook, stirring often until the onions are very soft and starting to brown. Add the chickpeas, garlic, spices and tomatoes and continue to cook, stirring the whole time to prevent burning.  Mash the chickpeas up with the back of a spoon and cook until heated through and tomatoes have become mush. Set aside.

    For Pizza Assembly:

    olive oil

    1/2 cup sliced small zucchini

    1/2 cup sliced mini red peppers or diced bell peppers

    1 jalapeno, sliced

    2 scallions, sliced

    Pre-heat the oven to 400F degrees.  Set a pan on the center rack with an upside down sheet pan, or a pizza stone set on it. Brush the crust with olive oil, sprinkle with sea salt, and slide the parchment with the crust on it onto the stone.

    Bake crust for 10 minutes, then remove the crust from the oven (still on the parchment). Top the crust with the chorizo spreading around evenly. Then the veggies, then the cheese, making sure it is all evenly distributed.

    Place the pizza in the oven, turn up the temperature to 475F and bake for 20-25 minutes until the cheese is bubbling and starting to brown (keep an eye on it after 15 as some ovens cook faster than others). Remove the pizza and parchment from the oven, slide pizza onto a cutting board or plate, scatter scallions over the top, slice and enjoy!

    Vegan Chorizo Pizza 3


  • Spicy Jalapeno Mint Hummus

    Spicy Jalapeno Mint Hummus

    Tahini

    Windy City Organics had sent me some nut butters to try including some Dastony Sesame Tahini.  I am pretty picky about tahini, and I have to say theirs is wonderful!  Smooth and perfect for drizzling over things like roasted veggies.  I was super excited to use it in recipes!  I was not sure exactly what I wanted to make, then one night last week, it was a super hot day and I wanted nothing more than to eat something cooling for dinner that did not need a lot of prep time.  I had just picked up my CSA box, and I was blessed with loads of beautiful produce! I thought about a raw chopped veggie salad with a tahini dressing, but what I really wanted was a giant bowl of hummus to dip my fresh veggies in. So…I ended up making hummus.  And delicious hummus it was!

    Spicy Jalapeno Hummus 1 

    I love a little spice and heat, so I was going to put some jalapenos I had sitting on my counter to use as well.  I ended up making a spicy jalapeno mint hummus. It was both cooling and spicy at the same time, a beautiful sensation.  the tahini made it extra creamy and silky.  I loaded up my plate with veggies, and dug into that hummus.  It was the perfect dinner.  My Mom used to say I eat enough veggies for a meal as a family of four would for a meal.  I think she is right, but I wouldn’t have it any other way. 

    Spicy Jalapeno Hummus 2 

    Spicy Jalapeno Mint Hummus

    Makes about 2 cups

    1 1/2 cups cooked chickpeas

    1/4 cup Dastony Sesame Tahini

    2 jalapenos, diced (and seeded if you want it less spicy)

    juice of 2 large lemons (1/4 cup)

    sea salt to taste

    2 tsp ground cumin

    3 Tbsp fresh mint leaves

    filtered water as needed

    Combine all ingredients in a food processor and process until smooth (adding filtered water as needed).


  • Garlicy Kale Salad with Roasted Potatoes and Chickpeas

    Garlicy Kale Salad with Roasted Potatoes and Chickpeas

    Kale and Potatoes 3

    I always try to think of what I can make out of ingredients I already have at home to save on money and not waste things.  So, last week I had lots of kale and potatoes.  I thought about making a soup or vegan frittata or something, but what I ended up really wanting was a salad.  It had been a really hot day, I never really cooled down from my morning run, working in a kitchen and sweating all day, so salad sounded wonderful.  You know, something that didn’t make me more hot.

    Kale and Potatoes 1

    I roasted the potatoes until they were perfect and crispy, then combined them with the kale, some cherry tomatoes, and some chickpeas for protein.  I dressed it all with this luscious garlicy lemony creamy dressing I made quickly in the blender.  It was so good I could have eaten it with a spoon, but then I would have had no dressing for my salad.  Once it was combined, it was delicious!  Just what I had been hoping for! It was so good, I had to share the recipe with you all, so you can enjoy it too!

       Kale and Potatoes

    Garlicy Kale Salad with Roasted Potatoes and Chickpeas

    Serves 2-4

    Potatoes:
    4 medium red or yellow potatoes, cut into cubes
    olive oil

    Dressing:
    1 cup raw macadamia nuts, pine nuts, or cashews, soaked for 4 hours and drained
    2/3 cup filtered water
    1/4 cup lemon juice
    1 Tbsp organic lemon zest
    1/4 tsp sea salt or to taste
    2 garlic cloves

    2 bunches kale, torn or cut into bite sized pieces
    1 cup cherry tomatoes
    1 1/2 cups cooked chickpeas (one 15 oz can drained will work)

    To prepare the potatoes, pre heat the oven to 400F degrees.  Toss the potatoes with just enough olive oil to coat, and sprinkle with sea salt.  Spread out on the pan and roast in the oven until they are starting to brown and are tender about 30 minutes.  Remove from the oven and let cool slightly.

    Meanwhile, to make the dressing, combine all ingredients in a high speed blender or food processor and blend until smooth. Set aside.

    In a large bowl combine the potatoes, kale, tomatoes, chickpeas, and dressing and toss to combine.  Serve at room temperature.


  • Sunshine Curried Chickpea Stew

    Sunshine Curried Chickpea Stew

     Chickpea Soup 2

    Love is about taking care of those who are close to you when they are having trouble taking care of yourself. We all need a little help sometimes, and you never know when it might be you that needs it.  At least that is how I feel.  Eric wasn’t feeling the greatest last week, like he might have picked up a touch of something so I thought I would make him some warming soup with things that help you stay healthy in it.  It was a little chillier day than the rest, rain falling in the afternoon, so a good day for soup.  I included plenty of veggies, some chickpeas for protein, and most importantly ginger, turmeric, alliums and hot peppers.  All for immunity and anti-inflammatory purposes.  I added in some coconut milk at the end for richness as well since this soup had no other fats in it.  It turned out delicious, warming and the most beautiful sunshine color fit to brighten anyone’s day.  Eric loved it, since he didn’t feel like cooking for himself at that point.  You never know when you will have the opportunity to help someone out, but when you do, you should take it.

    Chickpea Soup

    Sunshine Curried Chickpea Stew

    Serves 2-3

    1 small onion, diced

    2 carrots, halved and sliced

    2 celery stalks, sliced

    2 garlic cloves, minced

    2 medium red potatoes, diced

    1 yellow bell pepper, diced

    1 jalapeno, minced

    1 Tbsp fresh ginger, minced

    1 tsp turmeric

    1 tsp ground cumin

    1/2 tsp sea salt or to taste

    3 cups filtered water (or as needed to cover veggies)

    1 1/2 cups cooked chickpeas (or a 15 oz can will do)

    1/2 cup full fat coconut milk

    3 Tbsp arrowroot starch dissolved in 3 Tbsp filtered water

    Combine all ingredients but the chickpeas, coconut milk, and arrowroot in a pot and bring to a boil.  Lower to a simmer, and let cook for 20 minutes, or until the veggies are all tender and the flavors have combined.  Add the chickpeas, coconut milk and arrowroot and stir in until the coconut milk has dissolved and the soup is thickened.


  • Roasted Beet and Quinoa Salad with Chickpeas

    Roasted Beet and Quinoa Salad with Chickpeas

    Beet Salad 1

    Sometimes I just make things on the fly when I get home for dinner, and sometimes I spend my day at work thinking about them.  The salad I am sharing with you today was the latter.  Truth is I made 2 beet salads, at work, spent a chunk of my day working with beets, tasted a few and decided that was what I wanted for dinner.  Although I could eat a big pile of just plain beets, I thought a substantial salad with plenty of protein would do the trick.

    Beet Salad 3

    I was quite hungry after a busy day so I needed that.  The first thing that came to mind to pair the beets with was quinoa.  I had enjoyed a quinoa salad with beets once and it was amazing. I was going to make something even better.  I also added in chickpeas because I love them and because they are awesome with quinoa.  It needed some other flavors too, so I tossed it with lemon and fresh mint.  Simple, but so good.  All that it needed.  But I added a bit of coconut chevre I had on hand just because and it was over the top wonderful!  I shared some with Eric and it was the perfect size meal for two hungry adults.  The best part about this salad besides it tasting wonderful?  The beautiful pink color.  I love it.

    Roasted Beet and Quinoa Salad with Chickpeas

    Serves 2

    Coconut Chevre:

    1 1/4 cups young coconut meat*

    1/3 cup coconut water*

    1/2 cup plus 2 Tbsp coconut butter (not oil), warmed to liquid

    1/8 tsp sea salt

    1 tsp powdered probiotics

    4 medium sized red beets

    1 cup quinoa, rinsed

    2 cups filtered water

    1 1/2 cups cooked chickpeas

    1/4 cup lemon juice

    1 Tbsp lemon zest

    sea salt to taste

    1/2 cup chopped fresh mint

    For the chevre, combine the coconut meat, milk, sea salt, coconut butter, and probiotics in a high speed blender and blend until smooth.
    Pour into a container with a lid, and set in a warm place overnight.
    Once it has become tangy in flavor, place in the refrigerator to chill completely.

    To roast the beets, wrap them in foil, and roast them in a 400F degree oven for about an hour to an hour and a half depending on how big they are until they are tender when pierced with a knife.  Once roasted, allow to cool, peel and cut into large dice. Meanwhile, to prepare the quinoa, place quinoa and water in a medium saucepan and bring to a boil. Reduce to a simmer, cover and cook until all the water is absorbed about 15 minutes, or when all the grains have turned from white to transparent, and the spiral-like germ has separated. Drain, and set aside.

    To assemble the salad, combine all ingredients in a bowl except the chevre, and toss together until well combined.  When ready to serve, sprinkle with the chevre (you will have more left over for another use).

    *If you do not have access to young coconut meat, you may used a can of full fat coconut milk in this recipe in place of the coconut meat and water.


  • Wild Rice Salad with Chickpeas and Asparagus

    Wild Rice Salad with Chickpeas and Asparagus

    Wild Rice Salad

    Wild rice is big here in Minnesota.  It is a bit spendy, but worth it. It tastes like nothing else, sort of earthy and savory perfect for hearty dishes and it is classic to use in casseroles.  But it is not limited to warm dishes.  It makes wonderful substantial salads as well.  I made a salad last week with it since it happened to be what I saw when I opened my cupboard when looking for things to compose dinner with.  I thought it would go perfectly with the fresh tender asparagus I had bought at the store with the intention of using it in something new and delicious.  I also added in chickpeas for a bit of protein as well as walnuts and some red bell peppers and celery since you can never have too many veggies in your meals as far as I am concerned.  I tossed it with a simple dressing and it was all that it needed to be delicious.  This keeps well and makes a wonderful thing to take with you to work for lunch the next day.

    Wild Rice Salad 1

    Wild Rice Salad with Chickpeas and Asparagus

    Serves 4

    3 cups cooked wild rice

    1 1/2 cups cooked chickpeas (you may use canned)

    2 stalks celery, diced

    1 red bell pepper, diced

    2 cups asparagus, cut into 2 inch pieces

    1/2 cup raw walnuts

    2 Tbsp cider vinegar

    2 Tbsp olive oil

    1 tsp dried thyme

    1/4 tsp sea salt or to taste

    2 cloves garlic, minced

    In a large bowl, combine all ingredients, and toss together until well combined.  Serve at room temperature.

    *To cook wild rice, rinse it well, then place in a pot of water covering by a few inches and bring to a boil.  Lower to a simmer and cook until the rice begins to flower or split apart and is tender about 1 hour and 15 minutes to an hour and a half (depending on which type you have).  Cook the chickpeas in a similar fashion, they take about an hour and a half.


  • Roasted Sweet Potato and Chickpea Salad

    Roasted Sweet Potato and Chickpea Salad

    Yam and Chickpea Salad 3

    Since it is Earth Day, I thought sharing a beautiful salad was in order.  Why a salad?  Well, eating lots of veggies and going vegan instead of consuming lots of meat is good for the planet.  Did you know plant based food production uses a lot less land and water?  Or that is produces less pollution and feeds more people with less resources?  Well it does, and not only that you are leaving the animals of the world in peace to live their lives because they deserve to be happy too.  If people reduced their meat consumption it would make a huge difference for the planet.  So, even if you are not ready to go full fledged plant based, why not try it a few days a week.  And why not celebrate Earth Day with a delicious salad?!

    Yam and Chickpea Salad 1

    This salad I am sharing with you was actually my dinner last night.  I had no intention of sharing it when I started making it, but it ended up being so good I just had to.  I was going to make some yam fries, but I wanted a salad, so I decided to cube up the yams and put them on my salad.  Along with some chickpeas for protein, red bell peppers, romaine lettuce, pumpkin seeds, toasted aromatic seeds, and marjoram.  All drizzled with a creamy pumpkin seed dressing that is a staple in my fridge at all times.  OMG…was it ever delicious!  The sweet yams, briny chickpeas, savory spices and garlicky dressing were a party in my mouth. Not to mention all of the wonderful textures.  I am a textural person and this was wonderful!  I hope you try it so you can enjoy it too!  Happy Earth Day!

    Yam and Chickpea Salad 2 

    Roasted Yam and Chickpea Salad

    Serves 2

    1 large yam, diced

    olive oil

    sea salt

    Dressing:

    3 Tbsp pumpkin seed butter

    3 Tbsp filtered water (or as needed)

    1 small garlic clove, minced

    1/2 tsp cumin

    1/8 tsp ground chipotle pepper or cayenne pepper

    sea salt to taste

    Salad:

    1 cup cooked chickpeas

    1 red bell pepper, diced

    1/4 cup raw pumpkin seeds

    toasted cumin seeds and coriander seeds

    fresh marjoram leaves

    Preheat the oven to 400F degrees.  Toss the yams with just enough olive oil to coat and sprinkle with sea salt, then spread out onto the pan.  Roast for about 20-30 minutes until softened and browning at the edges.  Once the yams have finished cooking let them cool to room temperature.

    Meanwhile, to make the dressing, combine all ingredients in a bowl, and whisk together until smooth (or, I like to use an immersion blender in a tall glass measuring cup if you have that).

    To assemble the salad, scatter the greens on the bottom of the plates, then top with the chickpeas, yams, bell pepper. Drizzle with the dressing, then sprinkle with the pumpkin seeds, cumin, coriander and marjoram.

    Yam and Chickpea Salad


  • Quinoa Veggie Bowl with Lemon Almond Sauce

    Quinoa Veggie Bowl with Lemon Almond Sauce

    Quinoa Bowl
    My dinners many times come together based on what I have on hand in the kitchen.  I come up with some of my favorite things that way and it forces me to think outside of the comfortable box of the things I know well.  I recently bought some quinoa because it was on sale and because I have been craving some for a while now, and I figured now would be the time to use it on the night I wasn’t sure what to make for dinner.  I usually don’t plan out my dinners ahead of time.  What I ended up making was a quinoa bowl, with veggies and chickpeas topped off with a silky almond lemon sauce.
     Quinoa Bowl 2
    Omg was it ever good!   Satisfying and filling yet light and a balance of cooked and raw foods perfect for a Spring dinner.  I have made it a couple times since with variations on the veggies depending on what I have on hand and it is always good.  That is why I needed to share the recipe with you all. As far as I am concerned, every meal should include a plate full of colorful veggies. This is my kind of comfort food.  The kind that is healthy and delicious!
    Quinoa Bowl 1
    Quinoa Veggie Bowl with Lemon Almond Sauce
    Serves 2-3
    Ingredients:
    • 2 cups water
    • 1 garlic clove minced
    • 1/4 tsp sea salt
    • 1 cup quinoa, rinsed
    • 1 cup cooked chickpeas
    • 3/4 cup asparagus, cut into 1 inch pieces
    • 1 red bell pepper, cut julienne
    • 1 medium beet, cut julienne
    • 1 medium carrot, cut julienne
    • 3/4 cup sliced mushrooms
    • sliced jalapenos


    Sauce:

    • 1/2 cup almond butter
    • 1/4 cup lemon juice
    • 1/4 cup filtered water (or as needed)
    • 1 garlic clove, minced
    • 1 tsp ground cumin
    • 1/8 tsp cayenne pepper
    • sea salt to taste


    Instructions:

    1. Place quinoa and water in a medium saucepan and bring to a boil. Reduce to a simmer, cover and cook until all the water is absorbed about 15 minutes, or when all the grains have turned from white to transparent, and the spiral-like germ has separated. Drain, and let cool.
    2. Spoon the quinoa into bowls, then top with the quinoa and veggies.
    3. Whisk together the sauce ingredients, adding water to achieve your desired consistency. Drizzle the sauce over the veggies and bowl.  Serve!