Tag: nut free

  • Vegan Black Tahini Cookies

    Vegan Black Tahini Cookies

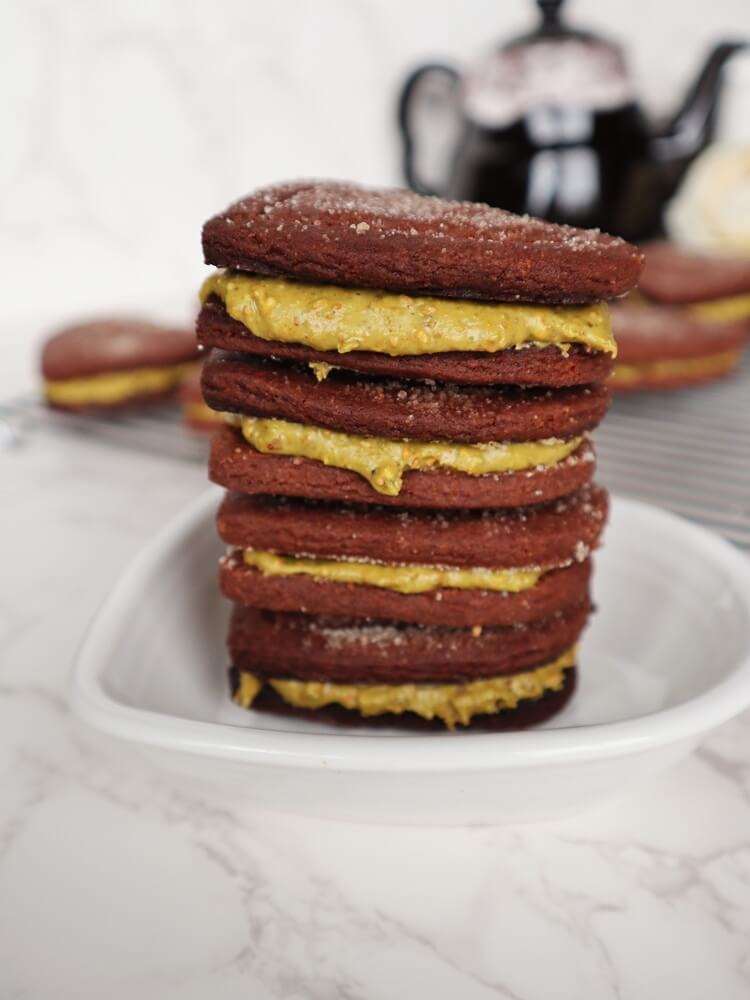
    I love tahini. I love it in hummus, or for just drizzling on my salads, or eating with a spoon. What I really love it in though, is desserts! It may sound odd using it in a dessert, but halva is a dessert and it is delicious! It has a flavor similar to peanut butter when baked into things, so I love it in things like cookies. I had a jar of black tahini I bought on hand and I was excited to use it in something delicious! It is beautiful, a rich black color and has that classic tahini flavor. Their tahini is silky smooth too, unlike some that are kind of gritty. The first thing that came to mind to make with the black tahini was some Vegan Black Tahini Cookies. I have made regular tahini cookies before, and they were amazing and I thought the black tahini would be lovely in them!

    They are really easy to make too, you just mix together all of the ingredients, shape, then bake! No fussy chilling the dough and all that jazz. As much as I like to eat cookies that take a lot of time to make, I don’t always feel like going through all that work to make them. These are just the opposite the dough is not fussy at all! The dough was also delicious. I should know, I snacked on enough of it. I have to say one of my favorite things about the cookie making process is eating the dough.

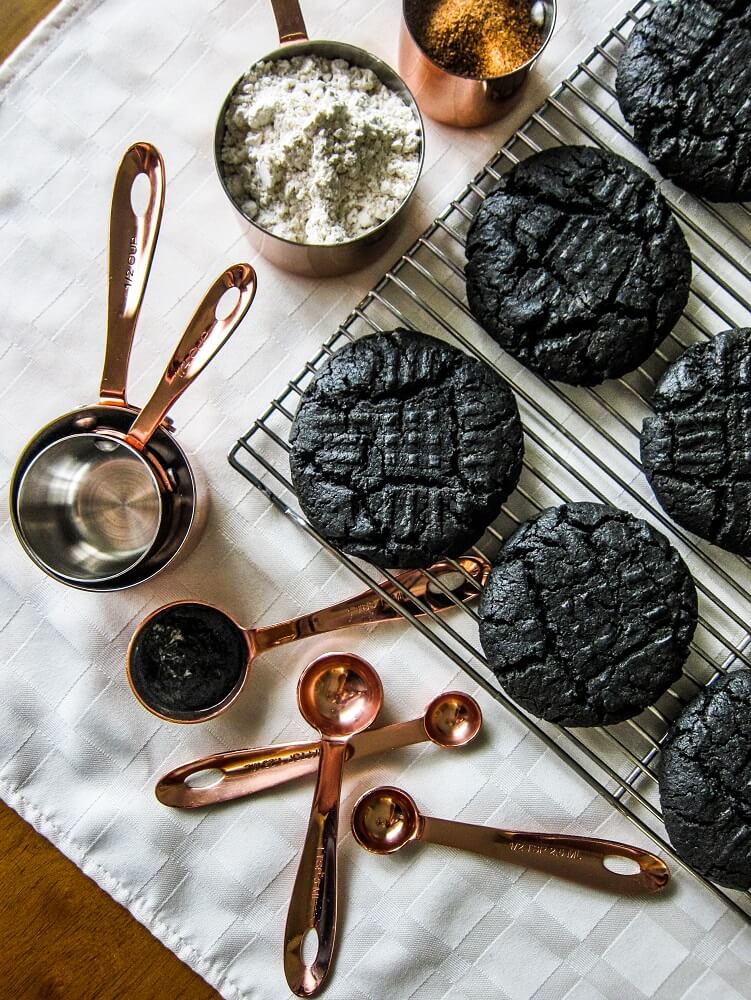
    The dough almost looked like it had black cocoa in it. It was a lovely shiny black, and it shaped beautifully. I wasn’t sure how the cookies would bake up, or if they would spread at all since it was a pretty humid warm day, but they baked up perfect! They puffed up just the right amount, and kept their shape nicely even when cooling. They smelled amazing as well. I have to admit I didn’t wait until they cooled before trying the first one. I mean cookies cooling on a rack are hard to resist!

    They were super delicious! Sweet, nutty, and soft but rich texture. Almost like peanut butter cookies but no nuts involved! I like to switch it up sometimes, because I eat so much peanut butter normally and tahini is delicious too, plus it is rich in nutrients. These cookies are prefect for those with a nut allergy as well! If you are looking to try something new and easy to make, give these a try! Also, if you like tahini, definitely try some black tahini! It is so pretty! If you are in the mood for some delicious cookies, definitely give these Vegan Black Tahini Cookies a try!

    Vegan Black Tahini Cookies
    Makes 12 cookies

    Ingredients:

    • 1 Tbsp ground flax seed
    • 3 Tbsp filtered water
    • 1 cup brown sugar (or maple sugar or coconut sugar)
    • 1 cup black sesame tahini
    • ¼ cup coconut oil, warmed to liquid
    • 1 tsp pure vanilla extract
    • 1 cup whole wheat pastry flour (AP flour will also work here)
    • ¾ baking soda
    • ½ tsp baking powder
    • ½ tsp sea salt


    Instructions:

    1. In a small bowl, whisk together the flax seeds and water. Set aside for 15 minutes.
    2. Preheat the oven to 350F degrees, and line a sheet pan with parchment.
    3. In a large bowl, with a wooden spoon, mix together the sugar, tahini,
      coconut oil, vanilla and the flax seed mixture until smooth.
    4. Mix in the flour, baking soda, baking powder, and sea salt and stir until completely combined.
    5. Shape the cookie dough into 12 balls, and spread out evenly on the pan. Flatten them slightly
      with a fork, as you would for peanut butter cookies.
    6. Place in the oven and bake for about 15 minutes until they are starting to brown slightly and are
      just set.
    7. When they are done baking, remove the pan from the oven and let cool on a rack.
    8. Enjoy!
  • Vegan Tahini Chocolate Cake 

    Vegan Tahini Chocolate Cake 

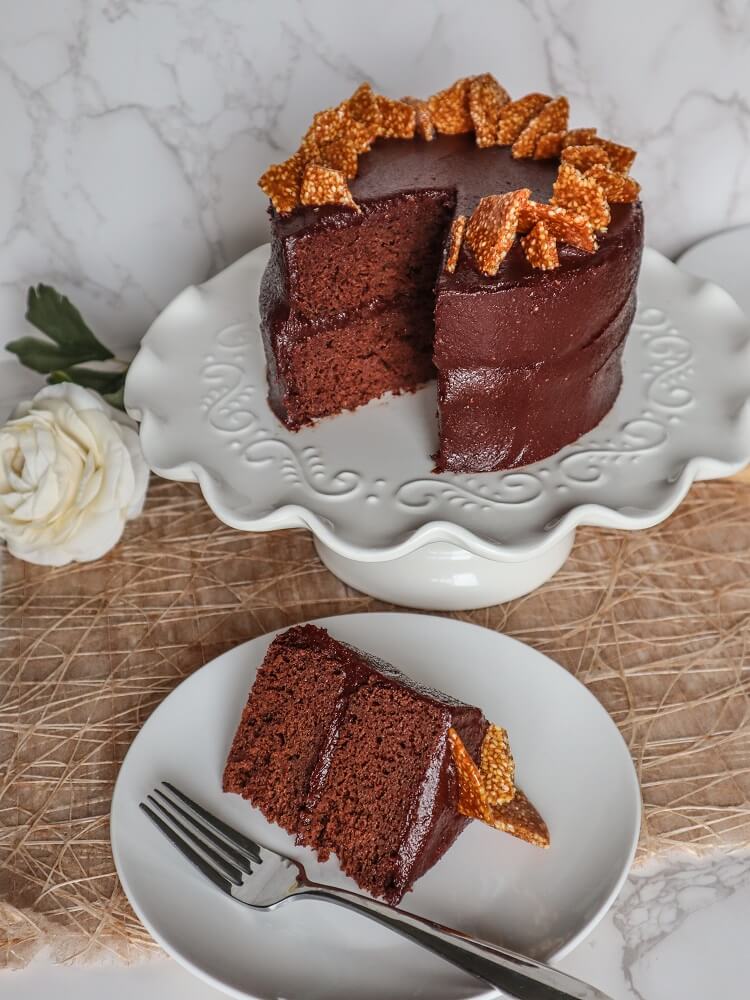
    I am a big fan of tahini.  It is good in savory applications like hummus, dressing and sauces, but it is equally good in desserts.  I had bought a bunch of tahini for making halva, and decided that a chocolate and tahini dessert will be amazing.  What I decided on was a Vegan Tahini Chocolate Cake.  Because sometimes you just crave a really good chocolate cake!  And one needs no special occasion to make a cake, everyday is a good day for cake as far as I am concerned!

    For the base, I used my date sweetened chocolate cake made rich with tahini instead of oil.  I love date sweetened cakes, because they stay nice and moist without being heavy.  Also, the dates give the flavor of the cake a caramel note.  The batter was delicious even before I baked it.  I used whole wheat pastry flour in this because it is what I have the most of on hand, but you could make this with all purpose flour as well.  Also, if you wanted to make this gluten free, you could use Bob’s Red Mill all purpose baking flour or your favorite AP flour blend for this instead.  I have tried many of my cakes and baked goods with Bob’s Red Mill before and always had success which is why I recommend that specific brand.

    The cake baked up beautifully and filled my kitchen with the most heavenly aroma like brownies.  I wanted a simple frosting for this cake that was easy to make so I went with tahini in the base as well.  I added in cacao powder and maple syrup and it made a delicious fudgy frosting!  It worked out perfect on the cake, spread nicely and didn’t involve any chilling or whipping or anything.

    Lastly, I topped the cake off with some home made sesame brittle to make it pretty. I could not wait to try it!  It was super delicious, fudgy and rich with intense chocolate flavor and a bit of nuttiness from the tahini.  Sooo heavenly!  You would never guess it was vegan, gluten free and oil free!  I shared some with family and friends and they loved it as well.  If you are a chocolate fan, definitely give this Vegan Tahini Chocolate Cake a try!

    Vegan Tahini Chocolate Cake 

    Makes one 2 layer 6 inch cake

    Ingredients:

    6 inch cake pans

    Cake:

    • 1 1/2 whole wheat pastry flour*
    • 1/4 cup cacao powder or unsweetened cocoa powder
    • 1 1/2 tsp baking soda
    • 1 tsp baking powder
    • 1/2 tsp sea salt
    • 1 1/2 cups packed soft medjool dates, pitted, soaked in water for 30 minutes and drained
    • 1/4 cup tahini
    • 2 tsp pure vanilla extract
    • 2 cups filtered water
    • 2 Tbsp apple cider vinegar


    Frosting:

    • 1 1/4 cups tahini
    • 1/2 cup maple syrup
    • 1/4 cup filtered water (or as needed)
    • 3/4 cup cacao powder
    • 1/4 tsp sea salt


    Sesame Brittle (optional):

    • 1/2 cup maple sugar (or granulated sugar)
    • 1/3 cup sesame seeds


    Directions:

    1. Preheat the oven to 350F degrees and position rack in center of oven.
    2. Oil two 6 inch round cake pans with coconut oil and line the bottom with parchment.
    3. Whisk flour, cocoa powder, baking powder, baking soda, sea salt in a large bowl to blend well.
    4. Place dates, water, tahini, and vanilla extract into a blender, and blend until smooth, then whisk this blended mixture into the flour mixture until well blended. Whisk in the cider vinegar until bubbles form.
    5. Pour the cake batter into prepared pans, and place in the oven.
    6. Bake cakes until set and a toothpick inserted into the center comes out almost clean, about 30 minutes.  Remove from oven, let cool completely, then un-mold them onto two plates, cover and set aside.
    7. To make the frosting, combine tahini, maple syrup, 2 Tbsp of the water,  the cacao powder and sea salt in a high speed blender or food processor and blend until completely smooth adding the last 2 Tbsp water if needed to create a spreadable but not runny consistency (the reason I have you add half the water first then add more if needed is because tahini can vary in texture and consistency.  Also a side note, if you end up adding too much water just add more cocoa powder to thicken the frosting).
    8. To assemble, place one cake layer on a plate, and spread about 1/2 cup frosting over it.  Place the other cake layer over that, then spread the remaining frosting on the top and down the sides of the cake.  Place cake in refrigerator while you make the brittle.
    9. To make the brittle, in a non-stick pan, melt the sugar until it is completely smooth over medium heat (this should take about 5 minutes), add the sesame seeds, stir until mixed in well, then pour onto a sheet of parchment or foil and allow to cool completely.  Once it has cooled, break into pieces and decorate the top of the cake with it.
    10. Enjoy!


    *If you would like to make this cake gluten free, you can use Bob’s Red Mill all purpose baking flour, I have used this flour with good results in my cakes.

  • Creamy Vegan Mushroom Wild Rice Soup

    Creamy Vegan Mushroom Wild Rice Soup

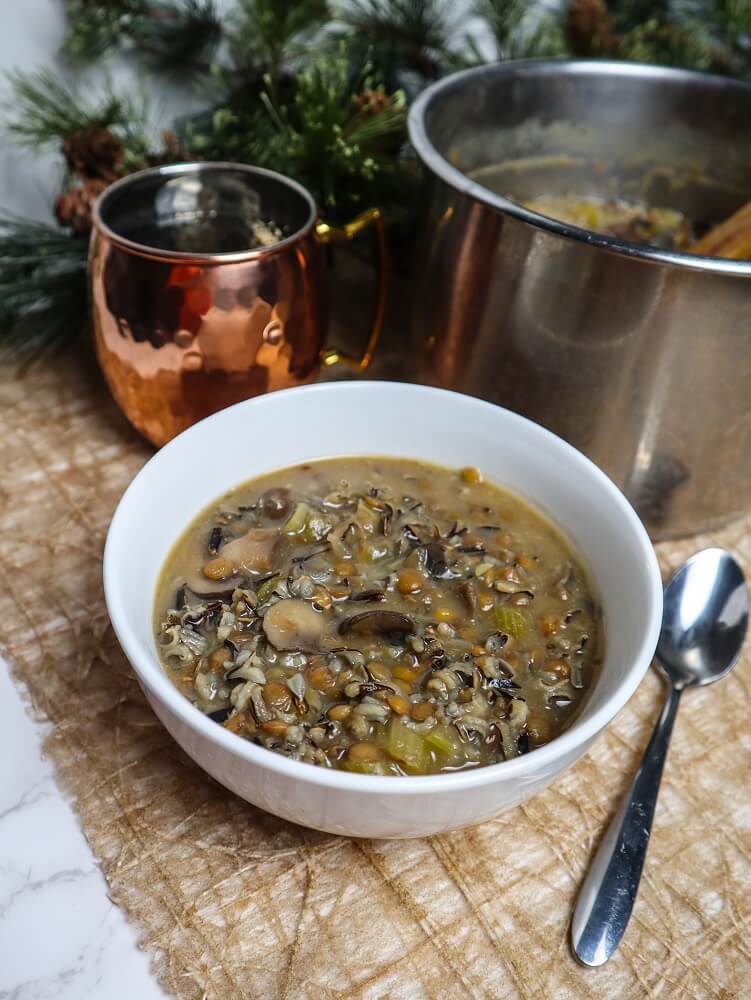
    At pretty much every restaurant in Minnesota you will find some version or other of creamy wild rice soup, usually with chicken, and everyone claims that theirs is “famous” and the “best”.  I tried a few growing up, and I never thought any of them were that great, except for the version that my Mom made, which was pretty good.  I now make my own version, Creamy Vegan Mushroom Wild Rice Soup and I think it is pretty darn delicious!  I always cook off some wild rice ahead of time because it takes a while, so it doesn’t take a super long time to make.  Some people complain about the smell of wild rice, but I actually like it.  It is an earthy delicious smell.  Something that reminds me of special salads and soups when I was little because wild rice is also considered kind of gourmet.  Or at least it was when I was little.  It is a bit more spendy than regular rice (and is actually not rice at all, it is a grain producing grass), but if you buy it in the bulk section at your health food store (which is what I do), it is cheaper.

    For the protein source in my soup, I use French lentils.  They happen to be my favorite, and they are honestly a staple in my kitchen.  I admit when I was younger I used to be intimidated by them and I thought that they were inferior to beans, but that was before I went vegan and began to discover what a great source of protein they are and how deliciously savory they are! They go awesome with the wild rice too, since they both have that sort of earthy flavor.  I keep the rest of the ingredients pretty simple, mushrooms, celery, onions, and garlic.  Thyme is my herb of choice, and actually my favorite cold weather herb.  It goes beautifully with the wild rice. At the end, I add  a bit of thickened oat milk to make this creamy and crave worthy.

    The soup is sooo good!  It was way better than any of those soups I had as a kid, and my Mom has tried this soup as well and approved!  If you are looking for a delicious soup to make for a cool day, this Creamy Vegan Mushroom Wild Rice Soup is a winner. It makes me think of chilly nights warming up by the fireplace in warm sweaters in some Northern Minnesota café.

    Creamy Vegan Mushroom Wild Rice Soup
    Serves2-3

    Ingredients:

    • 2/3 cup uncooked wild rice
    • 2 1/2 cups filtered water
    • 4 large celery stalks, sliced
    • 1 small onion, diced
    • 2 garlic cloves, minced
    • 2 cups sliced crimini mushrooms
    • 1/3 tsp sea salt or to taste
    • 1/2 tsp dried thyme
    • 2/3 cup French lentils
    • 1 Tbsp nutritional yeast
    • 1 1/2 cups plant based unsweetened milk (I used Oatly oat milk, you want to use something thicker, coconut milk would also work or soy milk)
    • 1 Tbsp arrowroot starch dissolved in 1 Tbsp filtered water


    Directions:

    1. Place the wild rice in a pot, cover with filtered water by at least 3 inches and bring to a boil. Lower to a simmer and cook until the rice has “bloomed”, about an hour to an hour and 15 minutes depending on your rice. Drain the rice and set aside.
    2. Combine the 2 1/2 cups filtered water, celery, onion, garlic, mushrooms, sea salt, thyme, and lentils in a pot and bring to a boil.  Lower to a simmer and cook for about 40-45 minutes until the lentils have are tender.  Stir in the wild rice.  Add the nutritional yeast, milk, and arrowroot mixture and cook until thickened.
    3. Serve!


  • Vegan Pumpkin Cornbread

    Vegan Pumpkin Cornbread

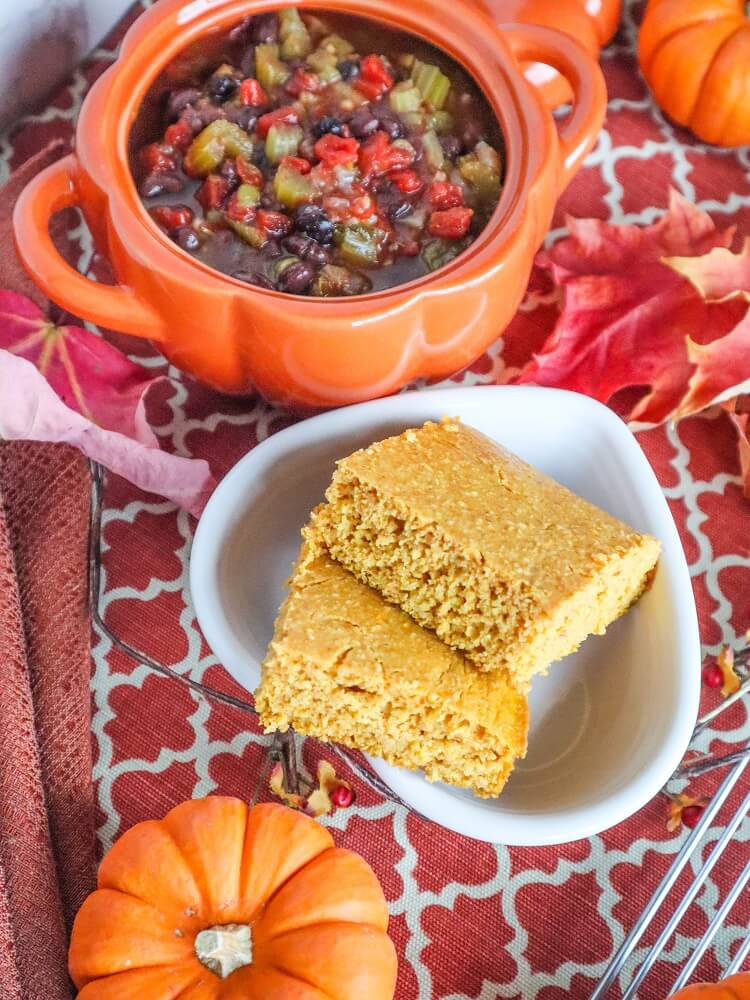
    I make chili almost every week.  It is usually with rice on top and avocado, but last time I made it Eric told me that he prefers his with cornbread, so I said I would make some soon.  I used to always make cornbread with my chili back in the day, and serve it topped with sour cream and cheese before I went vegan.  But I didn’t always want to make bread and rice was an easier option, and now I add avocado instead of the cheese and sour cream and like it just as much.  For Eric though, I made the cornbread.  It is not that difficult to make after all, not like you have to knead it and let it rise like you would a yeast bread and that is the beauty of it.

    This time I decided to make it with pumpkin because I had an open can of pumpkin on hand and needed to use it in something.  Why not?  It is pumpkin season after all, and I love adding sneaky veggies to things.  Also, I wanted this cornbread to be fairly healthy too, so I wanted it free of refined oils and sugars.  I know some people like their cornbread super sweet and almost cake like but that is not at all how I like mine.  If I am serving it with chili especially I want it savory.  So 1 Tbsp of maple syrup for a hint of sweetness is all I needed to add.

    The pumpkin helps to keep the bread moist, so I didn’t add any oil to it.  Just full fat coconut milk for richness, and it did the trick! I made this with a combination of cornmeal and whole wheat pastry flour, because I prefer whole grain flours but if you wanted to make this gluten free, you could sub Bob’s Red Mill gluten free all purpose baking flour 1:1 for the whole wheat pastry flour.  I have had good results with this brand.

    The corn bread smelled wonderful while baking!  I haven’t made it in ages and I had forgotten about how amazing it smells.  I could not wait to try it!  But I had to wait for it to cool enough to cut and for my chili to finish cooking as well. It was perfect! Moist and fluffy, the perfect thing to break into pieces on top of your chili or dip into it (as I prefer).  I think this would even be a good thing to make to go with your Thanksgiving meal instead of rolls if you want an easy home made bread.  Either way, give it a try next time you have leftover canned pumpkin or mashed pumpkin!

    Vegan Pumpkin Cornbread

    Makes 1 loaf

    Ingredients:

    • 1 cup organic medium grind cornmeal
    • 1 cup organic whole wheat pastry flour
    • 1 1/2 tsp baking soda
    • 1 tsp baking powder
    • 1 tsp sea salt
    • 1 cup plus 2 Tbsp full fat coconut milk
    • 1/2 cup pumpkin puree
    • 1 Tbsp maple syrup
    • 1 Tbsp cider vinegar


    Instructions:

    1. Preheat the oven to 375F degrees. Oil an 8×8 inch square pan.
    2. In a large bowl, whisk together cornmeal, flour, baking soda, baking powder, sea salt.
    3. Whisk in coconut milk, squash, and maple syrup until well combined.
    4. Whisk in cider vinegar quickly until just combined, then pour into prepared pan.
    5. Bake for 15-20 minutes until lightly golden on top and a toothpick inserted into the center comes out clean. Cool a few minutes before turning out from pan.
  • Vegan Winter Lentil Shepherd’s Pie

    Vegan Winter Lentil Shepherd’s Pie

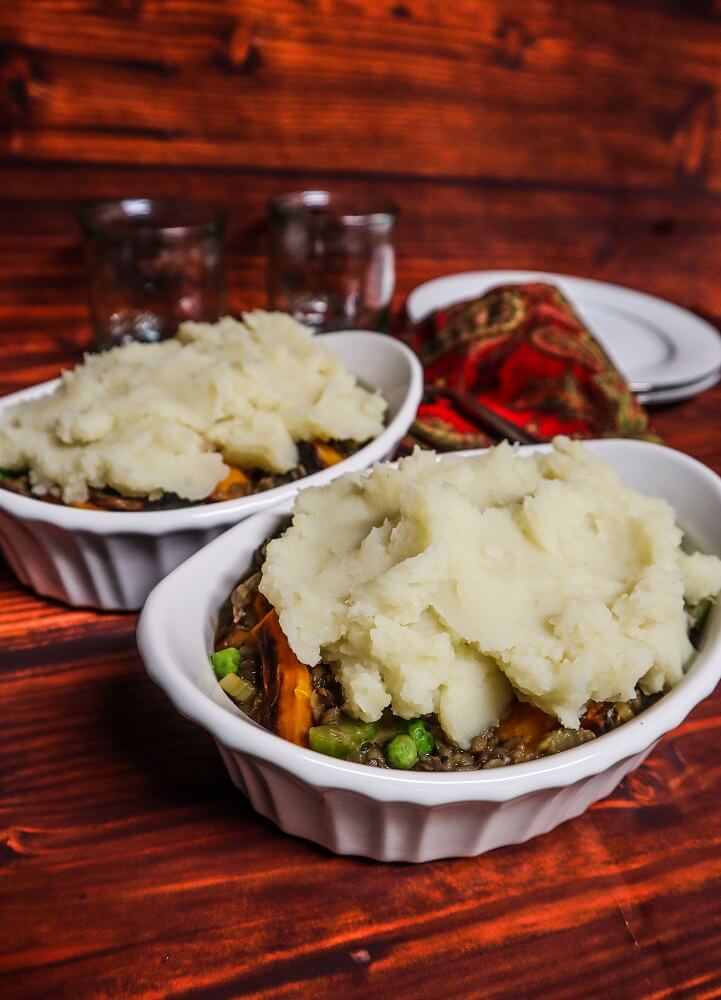
    I made shepherd’s pie for Thanksgiving this year, and I might make it again for Christmas because I love it so much! It is a dish that takes a little bit of time and love so it is for special occasions.  Since I tend to make quick recipes for dinner most of the time.  I made a new recipe with lentils this time for Christmas, and winter veggies, so I thought I would share the recipe.

    If you think that shepherd’s pie has to be rich and meat filled think again.  I remember having it as a kid with ground beef, and a generic blend of veggies like peas, corn, and carrots in a meat gravy and it was ok, but not my favorite thing.  The mashed potatoes were the only part I really enjoyed at that point.  I have never been a meat lover, always choosing veggies first even before I became vegan.  So when I make my shepherd’s pies, I use ingredients I love and veggies that add flavor instead of just being there.

    Things like leeks, squash and mushrooms plus a few others for color.  I just make the cooking broth into a sort of a gravy to keep it more simple, and it works perfect!  This time I used lentils where the meat would be.  Normally I use tempeh, but I figured I would make a recipe for those who are soy free, and I like to switch things up sometimes.  It was delicious and hearty!  I actually made a larger batch of this recipe a few days before Thanksgiving, to serve on Thanksgiving day day since I knew I wouldn’t have time to cook. These reheat beautifully in an oven.  If you are going to serve the next day, skip the oven part after assembly, cover with foil, and refrigerate.  Pop in the oven for about 45 minutes to 1 hour (uncovering the last 10-15), and you have delicious dinner!

    Vegan Winter Lentil Shepherd’s Pie

    Makes 4 Pies (or one large pie to serve 4-6)

    Ingredients:

    • 1 1/3 cups uncooked French lentils
    • filtered water

    Veggies:

    • Extra virgin olive oil
    • 2 large leeks sliced
    • 2 cloves garlic, minced
    • 2 cups diced butternut squash
    • 2 cups sliced carrots
    • 2 cups sliced celery
    • 1 tsp dried thyme
    • 1 1/2 cups crimini mushrooms, sliced
    • 1/2 cup peas (frozen is fine)
    • 2 cups flavorful veggie stock, store bought or homemade*
    • 2 Tbsp tamari
    • ¼ cup arrowroot starch dissolved in 1/4 cup filtered water


    Topping:

    • 6 russett potatoes, peeled and cut into 2 inch chunks
    • sea salt to taste
    • 1 Tbsp coconut butter (optional)
    • 1/4 cup coconut milk  (or as needed, you may also add water, and it will still be good)


    Instructions:

    1. Cover the lentils with the filtered water by a few inches. Bring to a boil, then lower to a simmer and cook until the lentils are tender, about 30 minutes.  Drain well, season with sea salt to taste and set aside.
    2. Heat the olive oil in a large stockpot, and add the leeks, garlic, thyme, squash, carrots, and celery, and cook until they have softened a bit, then add the garlic, mushrooms, peas, tamari, and stock and bring to a boil.  Lower to a simmer, and place the lid on the pot.  Let cook until the veggies are tender, about 10 minutes.  Once they are tender, add the arrowroot mixture, and let cook a few more minutes while stirring until it has thickened. Remove from the heat.
    3. Meanwhile, place the russets in a large pot of salted boiling water on the stove, and bring to a boil.  Cook until the potatoes are tender, and drain.  Add sea salt to taste, along with the coconut oil and milk and mash until soft, adding a little more milk if desired.
    4. To assemble, spoon the veggie mixture into 4 ovenproof bowls (or one big baking dish if you prefer), then top with the lentils, and lastly with the mashed potatoes.
    5. Place the pies in the oven and cook for about 10 minutes until bubbling.  Let cool slightly before serving.


    *Veggie Stock

    Makes about 1 1/2 quarts

    Ingredients:

    • 1 large onion (or about an onions worth of onion trimmings)
    • 2 stalks celery (or 2 cups celery trimmings)
    • 6 garlic cloves
    • 1 cup sliced mushrooms
    • filtered water

    Instructions:

    Add the onion, celery, garlic, and water to a 2 1/2 quart stockpot and bring to a boil.  Lower to a simmer and cook for a few hours until the veggies have released their flavors.  Strain into a container, pressing the veggies against the strainer to extract all the juices.  Let cool, and store in the refrigerator for up to a week, or freeze.


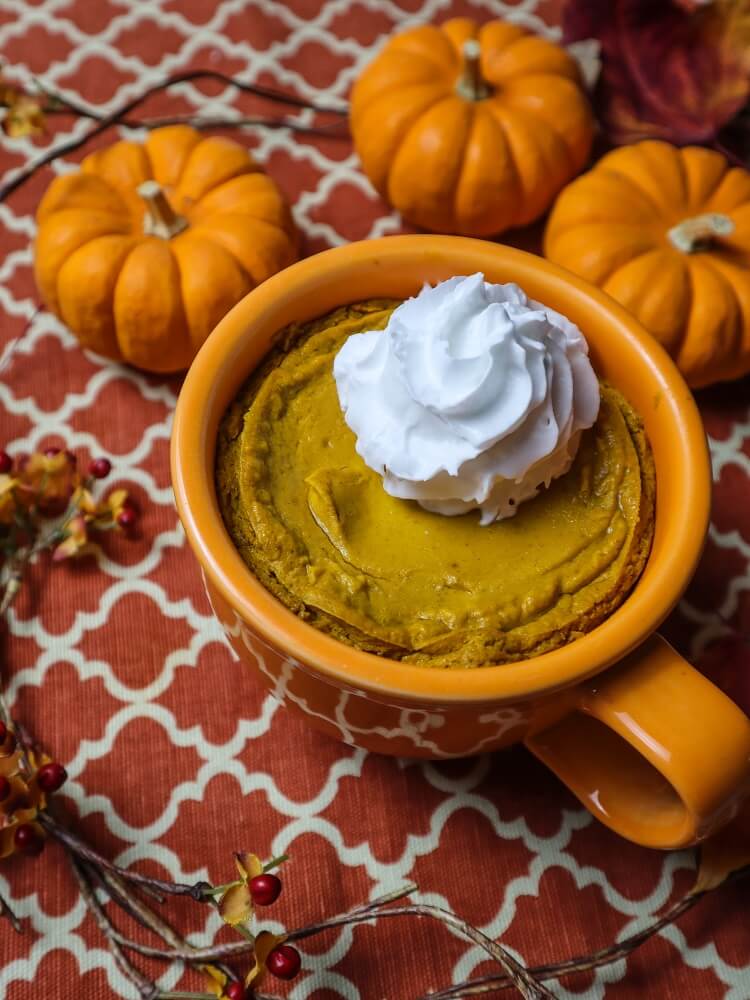
  • Vegan Pumpkin Pie in a Mug

    Vegan Pumpkin Pie in a Mug

    I love a good pumpkin pie.  It is the essential fall dessert, and is actually somewhat healthy compared to many other pies (not that I always care, but I like to get my veggies in sometimes with dessert).  I make it in some form every year whether it be mini ones, or a fancy larger one, maybe with a pecan or apple layer on the bottom. But sometimes I just want a smaller serving of it just for myself for a few days (the mini pies make a lot of servings so those don’t quite count).  Which is where pumpkin pie in a mug comes in!  I had made one about 10 years ago that was really good, but it wasn’t vegan and I have been telling myself ever since that I need to veganize it.

    Well, I finally got around to it this year. I wanted to make something pumpkin pie that was simple and quick with not a lot of servings so I went for it, and it turned out really good!  A good pumpkin pie has to have good texture as far as I am concerned.  I have had a few that seemed overcooked and mealy in texture and I was not a fan.  So I make mine with ingredients that when blended together come out silky smooth like custard.  Which is technically what pumpkin pie filling is. For my filling I use a mixture of organic pumpkin puree (canned is fine too), coconut milk, a little coconut butter and maple syrup with just a bit of maple syrup to sweeten it.  It comes out much nicer than the pie filling I used to make that had eggs and dairy.

    The filling also had to have just the right amount of spices.  I don’t care for pies that have way too much spice so you can’t taste the flavor of the pumpkin, or ones that don’t have enough so it tastes somewhat bland. I feel like I achieved the perfect balance here, and added just the right amount of maple syrup so the sweetness is nice and balanced too.  Plus the maple goes so well with the spices.  I feel like also, because I don’t use any granulated sugar here it helps the pie come out smoother as well.

    I poured the filling into little mugs, it made 3 which is perfect because I could share one and keep 2 for myself!  They baked up beautifully and made my kitchen smell amazing.  The only bad thing about it is you can’t enjoy it until it cools down.  But I got to enjoy some after work which was a win!  I topped it with a little coconut cream and it was perfect!  I really didn’t miss the crust because the filling is my favorite part anyhow.  If you are the same way, definitely give these a try!

    Vegan Pumpkin Pie in a Mug

    Makes 3 8 oz pies

    Ingredients:

    Filling:

    • 2 cups organic cooked pumpkin (canned is ok too), packed
    • 1/3 cup pure maple syrup
    • 3/4 cup full fat organic coconut milk
    • 2 tsp coconut butter
    • 1 1/4 teaspoon ground cinnamon
    • 1 teaspoon ground ginger
    • 1 /4 teaspoon ground nutmeg
    • 1/4 tsp ground cloves
    • 1/4 teaspoon salt
    • 1 1/2 tablespoons cornstarch
    • 3/4 teaspoon agar powder


    Instructions:

    1. Preheat oven to 350F degrees.
    2. Place all ingredients in a high speed blender and blend until smooth.
    3. Pour into 3 1 cup mugs or ramekins, and place in the oven.
    4. Bake until set, about 40 minutes, then remove from the oven and let cool.
    5. Top with coconut whipped cream, and enjoy!
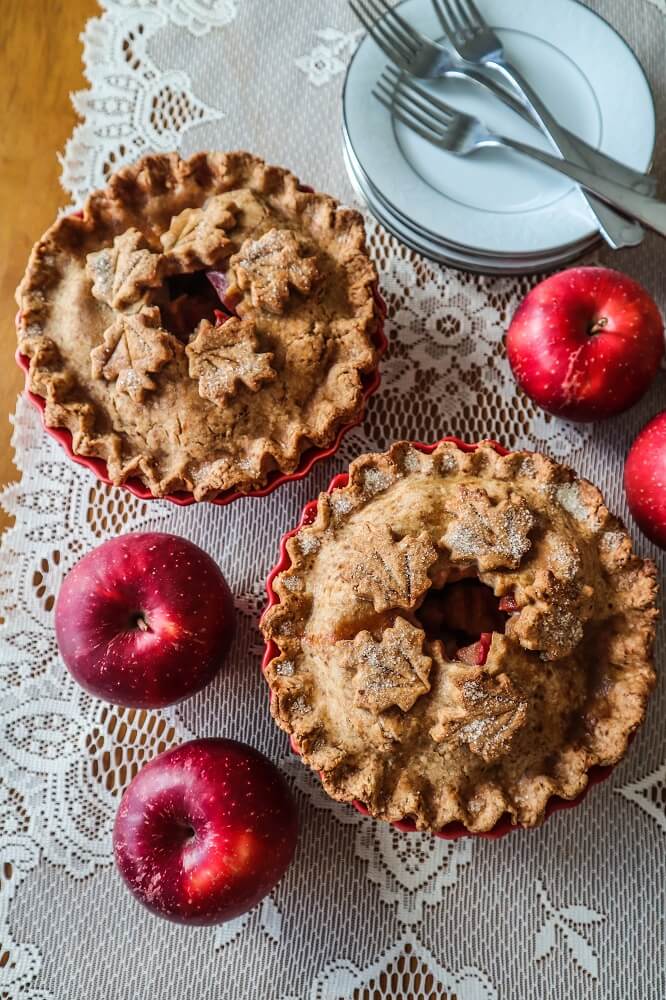
  • Individual Vegan Apple Pies

    Individual Vegan Apple Pies

    I have been enjoying lots of apples lately since we went to the apple orchard a couple of weekends ago.  Nothing beats a fresh Minnesota apple as far as I am concerned, especially for apple pie!  I made some last week, because I have been craving it and finally had the time.  My Mom always made the best apple pie when I was little.  People would always ask her to bring it to gatherings or Holidays like Thanksgiving.  She didn’t make her own pie crust usually, she used the store bought, but what made it so good were the Haralson apples and dash of lemon juice in the filling plus not as much sugar as most people use.  It was the most balanced apple pie ever with a little bit of tartness plus sweet from the apples.

    I make my apple pies the same way now.  Plenty of apple flavor.  It absolutely matters what type of apples you put into the pie you make.  I would recommend ones that taste good to you before you bake them.  If you use really mild flavored ones the pie might come out somewhat bland.  One time we had to use these frozen ones to make something at work and I think they were red delicious apples (my least favorite) and they needed a lot of doctoring up.

    I decided to make two smaller pies, because I wanted to share one and keep one for myself.  It is kind of fun after all to have your own little dessert!  I got two servings out of it though.  I made my classic pie crust, with vegan butter as opposed to coconut oil for a more pliable crust to work with for a double crust pie.  I admit I tend to make crumble top pies more because they are a little less fussy, but I felt like cutting cute shapes out of the dough this time.

    My kitchen smelled amazing while it was baking, and I could not wait to try it!  The pie turned out sooo good! I served it warm with coconut milk ice cream.  If you just want a really good classic apple pie, give this one a try!

    Individual Vegan Apple Pies
    Makes two 4 inch inch deep dish pies

    Filling:

    • 4 cups Haralson (or other tart sweet apples) cut into 3/4 inch cubes
    • 1/4 cup maple sugar (or brown sugar)
    • 1 tsp cinnamon
    • 1 tsp pure vanilla extract
    • juice of one lemon
    • a pinch of sea salt
    • 2 Tbsp organic whole wheat pastry flour


    Crust:

    • 2 1/2 cups organic whole wheat pastry flour
    • 1/4 cup coconut sugar or maple sugar
    • 1/4 tsp sea salt
    • 3/4 cup Earth Balance buttery sticks (pressed into the measuring cup), or your favorite vegan butter to bake with
    • about 6-12 Tbsp cold water


    Topping:

    • thick coconut milk
    • maple sugar


    Instructions:

    1. Preheat the oven tp 400F degrees.
    2. To make the filling, combine the apples, maple syrup, and cinnamon, vanilla, lemon juice, sea salt and flour in a bowl.
    3. To make the crust, in a large bowl, mix together flour, sugar, sea salt, and spices. Cut in Earth Balance with a pastry blender or 2 knives until it is in pea sized pieces. Mix in  just enough water to create a smooth dough that holds together but isn’t too sticky. Add more water if needed, and knead slightly until a smooth dough is created.
    4. Divide dough into 4 pieces. Roll each out into a 5 inch circle on a sheet of parchment paper, then use the paper to help you transfer two of them to two 4 inch deep dish pie plates.  Pour the apples into the pies, cut a hole in the remaining dough circles right in the center with a cookie cutter, then place them on top of the pies.  Pinch the edges down to seal them, and trim off the excess (you can roll this out and create cute shapes for the top of the pie). Flute the edges.
    5. Brush the pie with a little coconut milk, top with any extra dough shapes if you want to decorate it, and brush those with a little milk too.  Sprinkle with maple sugar, and place on a baking sheet.  Prick the crust a few times with a fork, and place it in the oven. Bake for 45 minutes, then check to see if the top is getting too brown, if it is tent with foil and place back in the oven until the pie is bubbling about another 15 minutes.
    6. Remove from the oven to a wire rack.
    7. Allow to cool completely before serving.


    *If you want to make this 1 8 inch pie instead of the two smaller pies, roll the dough into 2 9 inch circles instead of 4 and proceed the same with the recipe, just keeping in mind it might take about 15-20 minutes longer to bake.

    *If you want to make this gluten free  swap the whole wheat pastry flour for Bob’s Red Mill gluten free baking flour, or your favorite GF flour.

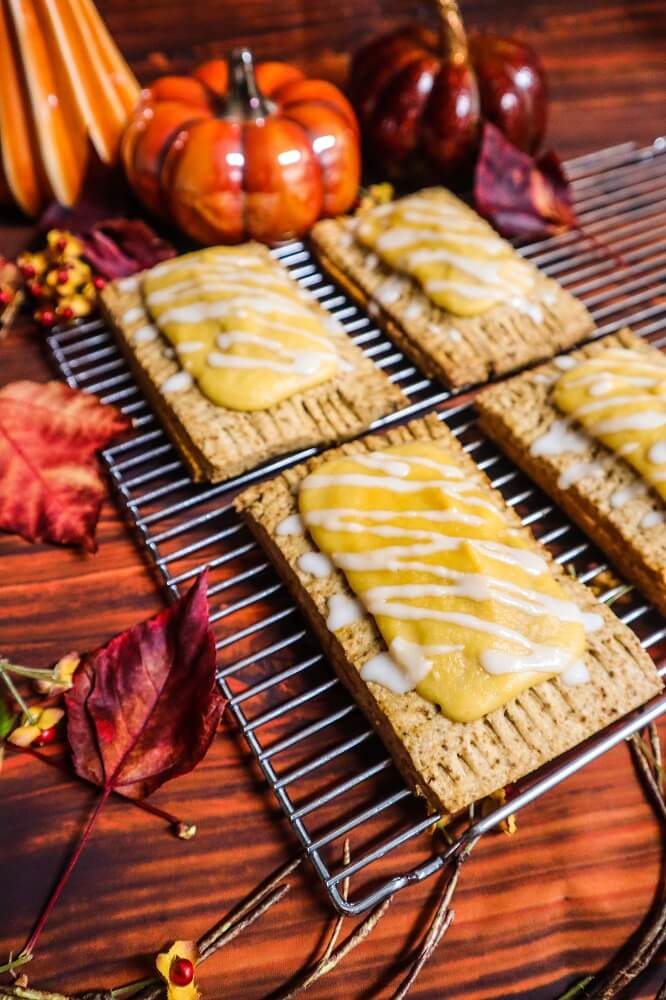
  • Vegan Pumpkin Pie Pop-Tarts

    Vegan Pumpkin Pie Pop-Tarts


    When Eric and I were walking through Target last week, some pumpkin pie pop tarts caught my eye. Now mind you, I have never really liked pop-tarts, I always thought they tasted sort of fake and not anything like real pastry with overly sweet filling.  The only ones I would tolerate were the cinnamon flavored.  But for some reason, seeing these ones at the store made me want to make home made ones.

    I knew I could make them way more delicious than the store bought ones.  Because these would have real pie crust not that fake stuff.  No, these are not low fat, but I would never eat a pop-tart for breakfast anyway…so that is not a problem.  To me this type of stuff is dessert.  I think I wanted to make them because there is just something I love about having your own individual pie, and pop tarts are sort of like hand pies.

    I filled them with something that tasted just like my usual pumpkin pie filling, a simple mixture of just pumpkin, coconut sugar and spices and it was just perfect when wrapped in the rich dough.  I topped them off with a sweet pumpkin glaze, and these were the best darn pop-tarts I have ever tasted!  If they had tasted like this when I ate them as a child I would have had them for breakfast every day.

    I don’t know about you but I have been obsessed with pumpkin and all things fall lately.  It is my favorite time of year after all, and I have to make all of the things pumpkin, spiced and apple so these pop tarts made me happy!  If you feel the same, definitely give these festive pop-tarts  a try!

    Vegan Pumpkin Pie Pop Tarts

    Makes 10

    Crust:

    • 2 1/2 cups all purpose gluten free flour
    • 1/4 cup coconut sugar or maple sugar
    • 1/2 tsp sea salt
    • 3/4 cup coconut oil in its solid state
    • about 6-7 Tbsp cold water


    Filling:

    • 2/3 cup pumpkin puree
    • 1/4 cup coconut sugar
    • 1 tsp pure vanilla extract
    • 1 tsp ginger
    • 1 tsp cinnamon
    • 1/8 tsp nutmeg
    • 1/8 tsp cloves
    • pinch sea salt


    Glaze:

    • 3 Tbsp coconut butter, warmed to liquid
    • 1 Tbsp pumpkin puree
    • 1 Tbsp maple syrup
    • pinch sea salt
    • 3-4 Tbsp filtered water or as needed


    1. To make the crust, in a large bowl, mix together flour, sugar, sea salt, and spices. Cut in coconut oil with a pastry blender or 2 knives until it is in pea sized pieces. Mix in  just enough water to create a smooth dough that holds together but isn’t too sticky. Add more water if needed, and knead slightly until a smooth dough is created.
    2. Roll out into a rectangle using floured parchment underneath and floured rolling pin. Cut into 10 rectangles.
    3. Preheat oven to 375F degrees.
    4. To make filling, mix together all ingredients. Spoon the filling onto half of the prepared little crust pieces (leaving a little boarder), and cover with the top pieces of dough (I used a small spatula to carefully move them), pressing the edges and crimping with a fork.
    5. Place on a parchment lined pan, then put into the oven. Bake for about 30 minutes until the crusts are starting to brown lightly. Remove from oven and let cool on a wire rack until warm.
    6. Whisk glaze ingredients together until smooth (adding more water if too thick, you want it to be pourable).  Spoon some of the glaze over each pop tart, and smooth it out to cover the top. Let set before serving.


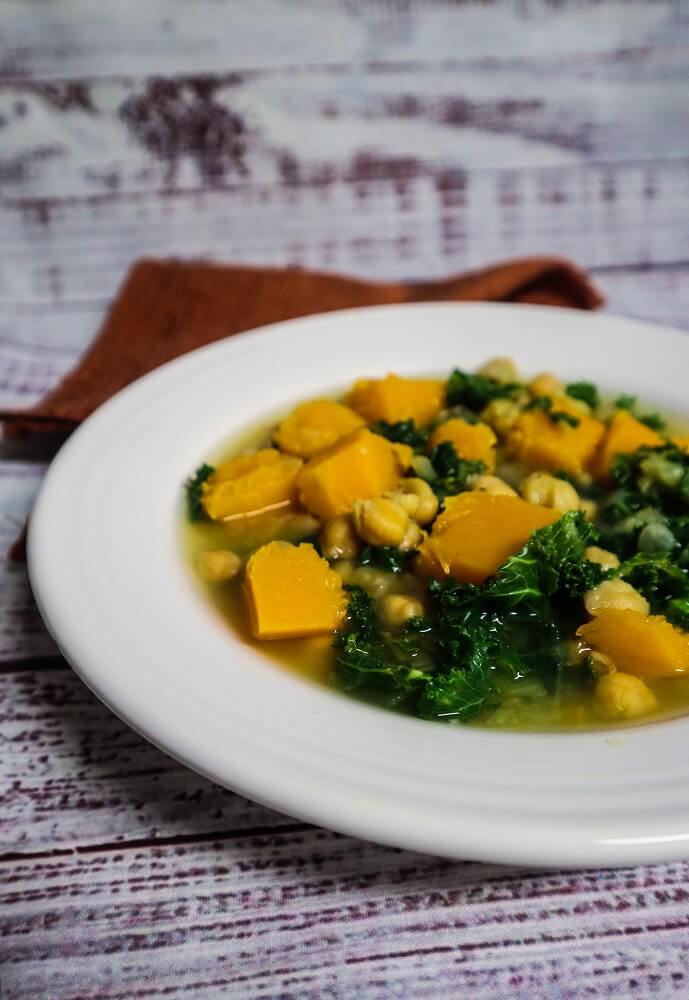
  • Butternut Squash, Chickpea and Kale Soup

    Butternut Squash, Chickpea and Kale Soup

    The weather is starting to cool off here, I am seeing a touch of color starting on some of the maple trees, and I am getting the comfort food cravings.  So I thought I would make some warming soup last week.  We had a few rainy days here, and it was just the thing to warm me up.  Especially the day Eric and I decided to go for a bike ride then got rained on half way through and had to ride an hour in the cold rain. I made some butternut squash, chickpea and kale soup!  One thing I am super excited about right now is squash coming into season. It is one of my favorite veggies ever!

    For this I used half my butternut squash for soup and I used the other half to roast and stuff for dinner another day.  I love making home made soup. I don’t think I have actually bought any soup at the store, especially canned since my Mom taught me to make soup when I was in college.  The flavor is so much better, and there is just no comparison.  Plus most soup is pretty cost effective to make anyhow, especially if it lasts for a few meals!  This one did for us!

    This is really simple to make!  I used my favorite soup base, which is just celery, onions and garlic with a little thyme.  If you use a flavorful broth for this, it makes it even more delicious. I used some home made broth, but you can use store bought if there is one you like!  After the less tender veggies simmered, I added the squash and let it cook for the last 10 minutes or so just so it didn’t get too mushy. Lastly the beans and kale. I like to add the kale at the last minute so that it retains more nutrients.  This is something I do often, add greens to my soup at the last minute to add extra goodness!

    This soup turned out super delicious! I served it with some home made bread to dunk in it, and the broth was nice and flavorful. I love the sweet squash with the other savory veggies!  Which fall vegetable or fruit are you most excited about?  I love the squash but I am also excited for apple season!

    Butternut Squash, Chickpea and Kale Soup
    Serves 3-4

    Ingredients:

    • 1 tsp olive oil
    • 1/4 cup diced red onion
    • 4 stalks celery, sliced
    • 2 garlic cloves, minced
    • 1 tsp thyme
    • 1/4 tsp red pepper flakes
    • 1/2 tsp sea salt
    • 4 cups flavorful vegetable stock
    • sea salt
    • 4 cups cubed butternut squash
    • 1 1/2 cups cooked chickpeas
    • 2 cups fresh kale, torn into small pieces


    Instructions:

    1. Heat the olive oil in a medium pan.
    2. Add onions and celery and sauté until tender.
    3. Add the garlic, tomatoes, thyme, sea salt, pepper, and filtered water.
    4. Bring to a simmer, and allow to cook until the veggies are very soft and the flavor has melded, about 20 minutes.
    5. Add the squash to the pot, and let cook for about 10-15 minutes.
    6. When the squash is tender, stir in the beans and kale until kale has just wilted.
    7. Serve!


  • Maple Pumpkin Seed Butter Cups

    Maple Pumpkin Seed Butter Cups

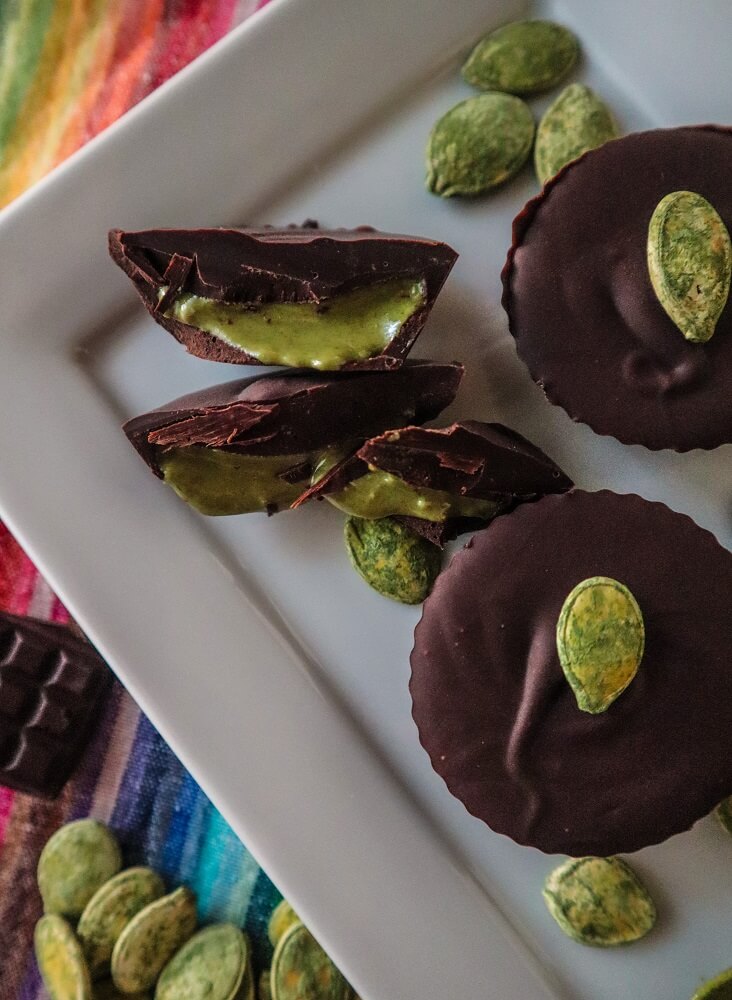
    Pumpkin seed butter is something that is totally under appreciated. I actually really like it!  Its lovely green color, slightly nutty flavor and rich texture! Raw Guru recently sent me some Dastony sprouted pumpkin seed butter and I was excited.  I tend to get stuck in the rut of eating peanut butter and almond butter or using tahini but pumpkin seed butter is actually really delicious and really healthy!  Pumpkin seeds are high in antioxidants and magnesium, and have a good amount of fiber.  I am trying to get more of a variety in the things I eat and get out of those ruts so pumpkin seed butter is the perfect thing to switch it up with.  Plus I feel like we are getting into pumpkin seed season here.  I know it is not technically fall, but September is fall as far as I am concerned.  Next month we will be carving pumpkins and toasting the seeds!  Which is actually something I look forward to every year.  My Mom used to roast the seeds when I was little for us to enjoy as a snack, so I continue on with the tradition.

    Back to that pumpkin seed butter though, I thought it would be good to include it in a recipe, especially since some of my readers may have a nut allergy and this would be suitable for them. The first thing I made is some pumpkin seed butter cups.  Because I was craving nut butter cups and I figured the beautiful green pumpkin seed butter would be perfect in some!  It has to be one of the prettiest nut butters there is.

    I could have just put it into the cups as it was just plain with a little sea salt and that would have been good, but I thought it would be even better with a touch of maple syrup added to it.  It was a delicious combination and I could have just eaten it that way with a spoon but I knew it would be even more crave worthy with the dark chocolate.  They were totally heavenly.  I love peanut butter cups, but these are just as good!  The pumpkin seed butter is rich and just sweet enough with a hint of maple flavor and the intense dark chocolate is the perfect pairing with it!

    I am one of those people who likes really intense dark chocolate with a high cacao content, so I usually mix a regular dark chocolate with some unsweetened chocolate to achieve this balance.  But if you are more of a sweet (vegan) milk chocolate person go for it with that!  That is what making things like this is about, enjoying the process of making them, modifying them to your tastes and enjoying your work!  Although, these are pretty easy not too much hard work involved.  If you get your hands on some pumpkin seed butter, give these a try!

    Maple Pumpkin Seed Butter Cups
    Makes 6 large cups

    Chocolate:

    • 1 1/2 cups vegan dark chocolate chips, or vegan dark chocolate chopped


    Filling:


    Instructions:

    1. Melt the dark chocolate in the top of a double boiler until smooth.
    2. Spoon a little chocolate into the bottoms of 6 peanut butter cup molds set on a plate or tray, filling them about 1/4-1/3 full.  Place in the freezer until hard, about 10 minutes.
    3. Mix together the pumpkin seed butter, maple syrup and sea salt until smooth.
    4. Spoon a heaping 1 tsp of the pumpkin seed butter mixture over the hardened dark chocolate layer, then pour the remaining dark chocolate over it in the cups until the pumpkin seed butter is covered, and tap the tray on the counter to level it.
    5. Place them in the freezer until set, about 20 minutes.
    6. Enjoy! Store any extra in the refrigerator.

    *If your pumpkin seed butter is particularly runny, you may want to mix a Tbsp of coconut butter with it to thicken it up a little bit.

    *If you can’t find pumpkin seed butter, you can make your own by blending up 4 cups of raw pumpkin seeds with about 1/2 tsp sea salt in a high speed blender and using the tamper to press them down into the blades until smooth.  It is a bit thicker and less spreadable than store bought, but if you want it more smooth, you can add a few Tbsp avocado oil to it while blending.

  • Flavor Fall! With Torani Sugar Free at Walmart

    Flavor Fall! With Torani Sugar Free at Walmart


    This post is sponsored by Torani but the content and opinions expressed here are my own.

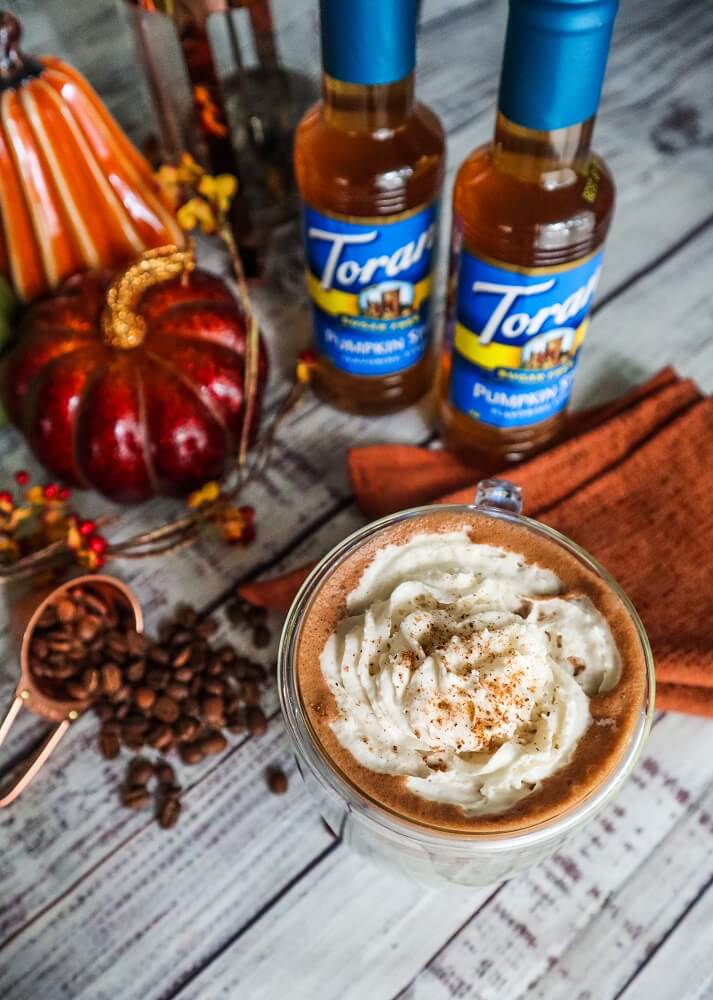
    Fall is nearly here and that means it is time for all things fall themed like pumpkin spice lattes!  Fall is my favorite season and I really look forward to sipping cozy drinks.  Although I sometimes buy them at local coffee shops, nothing compares to enjoying a well crafted latte in the comfort of my own home.  I can do just that with Torani Sugar Free Syrups!  I have been enjoying Torani Syrups in my coffee drinks for years at coffee shops, but I was happy when I discovered that it can be purchased at my local Walmart Supercenter! Just in time for Fall, Walmart will now carry two new flavors, Torani Sugar Free Pumpkin Spice Syrup and Torani Brown Sugar Cinnamon Syrup.  So I can make my own fancy drinks at home!

    If you haven’t heard of Torani Sugar Free Syrups, they are really delicious, calorie free and made with simple thoughtfully sourced ingredients. They are perfect for bringing out the best in your drinks, so that they taste like something you bought from a local barista. These fall flavors would be perfect for adding to things like cider or hot chocolate as well as coffee drinks.  The possibilities are endless for being creative!  They are easy to use, just add a couple of tablespoons to whatever drink you want to flavor!

    I decided to make myself a pumpkin spice mocha!  Normally I would stay away from a mocha in a coffee shop because they tend to use a lot of sugar, but at home I can make it sugar free with the Torani Sugar Free Pumpkin Spice Syrup! You have no idea how excited I was about that!  This drink is actually completely sugar free, but tastes just as delicious as the regular ones!  The mocha I made had a rich chocolate flavor the perfect amount of sweet pumpkin spice to balance it out. Another thing about making your drinks at home, it is a lot cheaper than always going out and buying them, which I can appreciate.

    Don’t you feel like making your own fabulous drink now? I am so happy that fall is almost here, and soon I can wear my cute cozy sweaters, and enjoy warming drinks like this pumpkin spice mocha in my own kitchen!  I don’t even have to go out if I don’t want to! Now all we need is the fall colors to start appearing on the trees, this is my favorite time of the year! If you would like to create some fabulous cafe worthy fall drinks of your own, you can find Torani Sugar Free Pumpkin Spice Syrup and Brown Sugar Cinnamon Syrup at your local Walmart Supercenter!

    Vegan Pumpkin Spice Mocha

    Serves 1

    Ingredients:


    Instructions:

    1. In a saucepan, combine the oat milk and cocoa powder over medium heat, and heat until it is just starting to simmer, and the cocoa powder is dissolved.
    2. Remove from heat, whisk in the Torani Sugar Free Pumpkin Spice Syrup, and brewed espresso until well blended.
    3. Pour into a large mug and top off with the vegan whipped cream.
    4. Serve!


  • Vegan Blackberry Crumble Pie

    Vegan Blackberry Crumble Pie

    I haven’t had more than a few days of vacation here and there for at least two years.  I have also been working all throughout the quarantine since I am an essential worker, so not a lot of time off then, so when I had an opportunity to go on a road trip vacation with Eric to see his Dad who lives in Michigan of course I went!  I haven’t even been on an actual road trip since I was in middle school so it sounded like fun. It was a fun trip, lots of outdoor state parks to visit along the way, and of course the time with his family was the best part.  While we were there his Dad, took berry picking. He makes the best fruit jams I have ever tried so he knows what is good.
    We picked a total of 10 lbs of wild blackberries together and they were the most flavorful delicious berries you can imagine! Of course nothing beats fresh picked off the bush!  We took the ones we didn’t eat home (I have been eating so many berries lately I should look like Violet Beauregarde blue from Charlie and the Chocolate Factory).  At least I know I am getting my antioxidants!
    So when I got home, I decided that a blackberry pie sounded amazing. I don’t usually get that many blackberries when I find them at the store because they are usually a bit spendy here, but since I had a large amount I could finally make a pie!  I haven’t made pie in ages also, so it was about time.  Sadly none this summer yet because of the kitchen remodel and being busy so it was about time!
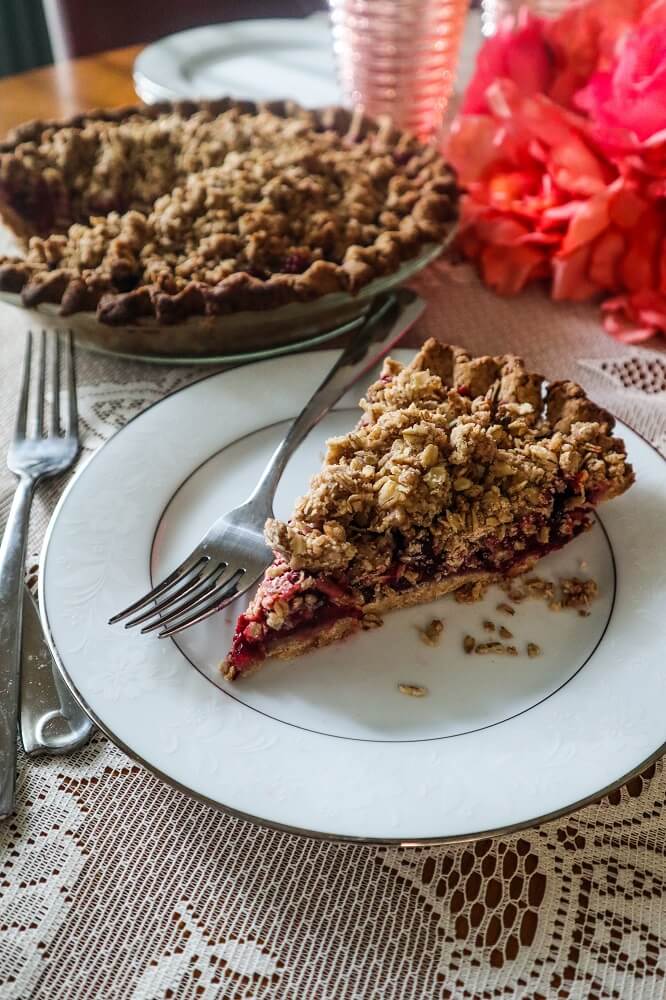
    I didn’t even need to sweeten the berries that much because they were packed full of flavor.  I just used my classic coconut oil crust, and put a nice crumble topping on the pie because it is my favorite. Double crust pies may be a little bit prettier, but nothing beats a good crunchy streusel!  This pie turned out super delicious!  I had to wait until it cooled to cut it so it would look pretty in my pictures, but it is amazing served warm with coconut milk ice cream!  I hope you all had a wonderful July!
    Vegan Blackberry Crumble Pie

    Makes 1 8 inch pie

    Crust:
    1 1/2 cups organic whole wheat pastry flour
    3 Tbsp maple sugar or coconut sugar
    1/4 tsp sea salt
    6 Tbsp coconut oil, in its solid form
    about 2-3 Tbsp cold water

    Filling:
    6 cups fresh or frozen organic blackberries (if they are frozen, thaw them first, and drain off any liquid)
    juice and zest of one small lemon
    1/4 cup maple sugar or coconut sugar
    2 Tbsp arrowroot powder or organic whole wheat pastry flour
    2 tsp pure vanilla extract
    pinch sea salt

    Topping:
    1/2 cup organic whole wheat pastry flour
    2 Tbsp maple sugar or coconut sugar
    3 Tbsp melted coconut oil
    3/4 cup gluten free rolled oats
    pinch sea salt

    To make the crust, in a large bowl, mix together flour, sugar, sea salt. Cut in coconut oil with a pastry blender or 2 knives until it is in pea sized pieces. Mix in just enough water to create a smooth dough that holds together but isn’t too sticky. Add a 2-3 Tbsp water as needed, and knead slightly until a smooth dough is created.
    Roll out into about a 9 inch round using parchment underneath and floured rolling pin. Place dough into an 8 inch pie pan and fit to edges (being careful). If it tears, no worries, just press it back together and patch it up. Flute the edges, or crimp with a fork. Set aside in the refrigerator.
    To make the topping, combine all ingredients in a bowl, and mix together and squeeze together until it is clumping up a bit. Set aside.

    Pre-heat the oven to 400F degrees. In a large bowl, toss together the filling ingredients. Spoon into crust. Scatter the topping over that. Bake for 1 hour in the middle rack of the oven until berries are all jammy and it is and bubbling (after 15 minutes check it and if it is getting too dark, tent it with foil for the rest of the time in the oven).

    Remove from oven and let cool before cutting.

  • BBQ Lentil Sloppy Joes

    BBQ Lentil Sloppy Joes

    When I was a kid, sloppy joes were a staple at just about every summer gathering or party that I went to.  Most likely because they were great for making in a crock pot and having ready ahead of time, and everyone loved them.  They actually weren’t my favorite most of the time unless someone had a really good recipe but I still would eat them as was tradition.  Now of course I have to pass most of the time because I am vegan and ground beef an option for me.  But I have come up with a recipe to make at home that I actually really love, much more than those ones I grew up eating.  I am a big fan of lentils, and I had seen other people make lentil sloppy joes so I gave it a go.

    The only putzy part about this is cooking the lentils, but luckily they cook a lot faster than most beans.  I cooked mine a day ahead of time actually to speed the process.  I like to use french lentils for this, but green lentils or brown will work as well, anything that holds its shape and doesn’t fall apart too much (like red lentils, which would not be a good option).  I made a simple sauce  for these with ingredients I already had on hand and it worked out great!

    I know some people put a lot of extra veggies in their sloppy joe mix but I just went with onions, garlic and tomatoes and kept it simple. To make it BBQ flavored and a bit tangy, I added apple cider vinegar, mustard, maple syrup for a little sweetness and some smoked paprika to give it that smokey flavor.  I don’t like my sauce super sweet, but if you are one of those people that does, feel free to add a little maple syrup. That is what cooking for yourself is all about, making recipes that are tailored to your own tastes!

    These turned out super delicious!  They were way better than the ones I grew up eating.  They had plenty of flavor, and were filling without being heavy.  I served them on buns the first day, but for leftovers the next day I served them over some brown rice and that was good as well!  So you have options here if you are not a bread person or are gluten free.  I hope you all are having a wonderful summer so far!

    BBQ Lentil Sloppy Joes

    Makes 8

    Ingredients:

    • 1 1/3 cups dried french lentils or green lentils
    • filtered water
    • 1 tsp olive oil
    • 1 medium onion, minced
    • 2 garlic cloves, minced
    • 1 6 oz can tomato sauce
    • 1 5 oz can tomato paste
    • 3/4 cup filtered water
    • 2 Tbsp cider vinegar
    • 1 Tbsp dijon mustard
    • 1 Tbsp maple syrup
    • 1 tsp smoked paprika
    • 1/2 tsp black pepper
    • 1/4 tsp sea salt, or to taste
    • 8 whole wheat buns for serving


    Instructions:

    1. In a medium pot, combine the lentils and enough filtered water to cover them by 3 inches. Bring to a boil, then lower to a simmer and cook for about 30-40 minutes or until the lentils are tender but still holding their shape. Remove from heat, drain well and set aside.
    2. In a medium saucepan, heat the onions and garlic in the oil and saute until starting to turn translucent, about 5 minutes. Add the tomato sauce, tomato paste, water, vinegar, mustard, maple syrup, paprika, black pepper, and sea salt and bring to a simmer.  Allow to cook for about 20 minutes to allow the flavors to blend.
    3. Mix in the lentils, and cook until everything is heated through.
    4. Serve the BBQ Lentils on the buns.


  • Vegan Dark Chocolate Mocha Brownies

    Vegan Dark Chocolate Mocha Brownies

    Nobody can be in a bad mood while baking brownies.  Which is why when I am feeling a bit out of sorts, I like to bake some.  Which is exactly what I did a few days back after work, because I needed a nice little pick me up. Plus they just sounded good. I have been in a bit of a chocolate mood lately.  Just being in the kitchen with that heavenly aroma radiating from the oven makes me happy.

    Raw Guru recently sent me a big container of their raw cacao powder and coconut sugar, so it was the perfect thing to make!  Some chocolate inspiration to get me going. I recently upgraded my brownie game, melting dark chocolate into the batter along with the other wet ingredients because it gives the brownies that fudgy texture that I love.  Get out of here with those cakey dry ones, I am not a fan of those at all. No, my brownies have to be rich, decadent and fudgy!  Plus I love those middle pieces with the most fudge above all else!

    These are simple to make, once you take care of melting the chocolate and adding it to them, the rest just gets all mixed together.  I thought about making these plain classic brownies, but I decided that a hint of coffee would be heavenly in them, so I added that in as well, and it made the chocolate even more intense. Funny thing is, I didn’t drink coffee for years, but just last year I fell back in love with it and now I am adding it to lots of stuff.  Oat milk lattes are my hot drink of choice lately!

    As much as I would have liked to have just dove into the pan of brownies soon after they came out of the oven (and I usually would) I had to wait for them to cool, because they may be delicious while still warm, but they are not very pretty then when you try to get them out of the pan, and I needed to take some pics for you all!  They turned out super delicious!  Nice and fudgy, rich chocolate flavor and that little hint of coffee!  If you are in a chocolate mood like I have been, definitely give them a try!

    Vegan Dark Chocolate Mocha Brownies

    Makes 16 brownies

    Ingredients:

    • 2 Tbsp ground flax seed mixed with 1/4 cup plus 2 Tbsp filtered water (allowed to sit 15 minutes to gel before using)
    • 7 oz vegan dark chocolate (about 1 1/4 cups chopped chocolate or chips)
    • 1 cup Raw Guru coconut sugar*
    • 1/4 tsp sea salt
    • 1/4 cup coconut oil, warmed to liquid
    • 1/4 cup plus 2 Tbsp avocado oil or olive oil*
    • 2 Tbsp Raw Guru cacao powder or unsweetened cocoa powder
    • 2 Tbsp strong brewed coffee
    • 2/3 cup organic whole wheat pastry flour *
    • 3/4 cup vegan dark chocolate chips


    Instructions:

    1. Preheat the oven to 350F degrees, and line an 8×8 inch square pan with parchment at the bottom.
    2. In a smaller bowl, whisk together the flax and water, and allow to sit for 10 minutes.
    3. Meanwhile, melt the chocolate in the top of a double boiler, until it is smooth.  Set aside.
    4. In a large bowl, combine the sugar, salt and oils, and whisk together until well combined, then add the flax and water mixture and whisk until blended.
    5. Add the cacao powder, coffee and melted chocolate and whisk until smooth and well blended.
    6. Add the flour and whisk until completely blended (if you don’t mix well it could separate).  Stir in the chocolate chips.
    7. Pour into the prepared pan, smoothing the top.
    8. Place in the oven, on the center rack, and bake for 30 minutes until the brownies are set (but do not overbake).
    9. Remove from the oven and let cool completely before cutting into 16 bars.


    Brownies keep for up to 1 week in an airtight container on the counter, or 2 weeks refrigerated.  They can be frozen for up to 4 months.

    *Notes:

    *If you would prefer to use granulated sugar that would work as well in this recipe.

    *If you would like to just use one type of oil in this recipe, you can use additional coconut oil instead of the avocado, just keep in  mind the brownies may be a little bit more hard at room temperature or at cooler temps.

    *If you would like to make these gluten free, you can use Bob’s Red Mill gluten free all purpose baking flour in place of the whole wheat pastry flour.  I have tried this brand and know it works well when used in brownies.

  • Vegan Lemon Poppy Seed Cookies

    Vegan Lemon Poppy Seed Cookies

    We went through a brief snowy cold week in Minnesota, and I didn’t know whether it was winter or spring for a minute.  So I have been wanting to make some desserts and spend a bit of time in the kitchen in my free time instead of just being outside and I also haven’t been quite sure what to make because of the being in between seasons.  I feel like lemon goes for both winter and spring so that is what I have been drawn to flavor wise.  And I have been in a lemon dessert mood lately.  I made a lemon cream pie for Easter, and I decided to make some lemon poppy seed cookies this week. I was always a big fan of lemon poppy seed muffins growing up, or cakes so why not cookies?  I love that tart sweet lemon flavor combined with the nice crunch of the poppy seeds.

    So I thought it would be perfect in some buttery  cookies! For the dough, I used my sugar cookie recipe and tweaked it a bit to add some fragrant lemon flavor in both zest and juice form.  Adding lemon zest to a lemon recipe makes all the difference, trust me.  So much aroma.  Just be sure to use organic lemons that aren’t sprayed.  The dough for these smelled heavenly and tasted even better.

    Eating cookie dough is one of my favorite parts of making cookies.  I have always been this way ever since I was a little kid “helping” my Grandma bake cookies and sneaking dough when she turned her back.  If she caught me she would tell me that I would get a tummy ache if I ate too much, but I never did.  At least there aren’t raw eggs my cookies now because they are vegan!

    They baked up beautifully!  They smelled amazing and I could not wait to try them!  But first I wanted to add a glaze to make them pretty and even more delicious.  I took some Dastony coconut butter from Raw Guru and mixed it with a little lemon juice and maple syrup and it was the perfect easy glaze. The cookies were sooo good!  Rich and buttery tasting with plenty of lemon flavor, those crunchy poppy seeds and sweet glaze.  It is the perfect time to get some baking in!

    Vegan Lemon Poppy Seed Cookies

    Makes 24 cookies
    Ingredients:
    Cookies:
    • 2 Tbsp ground golden flax seed
    • 1/4 cup plus 1 Tbsp filtered water
    • 1 Tbsp lemon juice
    • 2 Tbsp lemon zest
    • 1 cup virgin coconut oil, warmed to liquid
    • 1 1/2 cups maple sugar* (or coconut sugar, if you want these more yellow and less brown, you could also use granulated sugar)
    • 1 teaspoon vanilla extract
    • 1 teaspoon baking soda
    • 1/2 teaspoon sea salt
    • 1/8 tsp turmeric powder (optional for color)
    • 3 1/2 cups all purpose gluten free flour
    • 1/4 cup poppy seeds


    Glaze:

    • 1/4 cup plus 2 Tbsp coconut butter, warmed to liquid
    • 3 Tbsp lemon juice
    • 1 Tbsp maple syrup


    Instructions:

    1. In a small bowl, whisk together the flax seed, filtered water and lemon juice and zest.  Set aside in the refrigerator for 15 minutes.
    2. In a large bowl, mix coconut oil with sugar and mix until well combined.
    3. Mix in the vanilla extract and flax mixture until well combined.
    4. Add the baking soda, salt, turmeric then the flour, a cup at a time, mixing between each addition, until well combined.  Mix in the poppy seeds until evenly distributed.
    5. To bake, Preheat your oven to 350 degrees. Line 2 large baking sheets with parchment paper. Roll balls into about 1 1/2 inch balls, and place on prepared cookie sheets a couple inches apart.
    6. Place in the oven, and bake for about 15-18 minutes, until puffed and just starting to brown slightly.  Remove from the oven and let cool on the pan a few minutes, then remove to a wire rack to cool.  Repeat with remaining cookies and let cool completely.
    7. To make the glaze, whisk all of the ingredients together (if it seems too thick to drizzle, add a little more lemon juice to it).
    8. Drizzle the glaze over the cookies.
    9. Place the cookies in the freezer until the glaze is set.
    10. Enjoy!


  • Vegan Black Sesame Maple Ice Cream

    Vegan Black Sesame Maple Ice Cream

    I am a big tahini lover, I like to keep some on hand at all times for recipes both sweet and savory, or just for drizzling over things and snacking on.  We have a giant tub of it in the deli I work in for making things like hummus, and one time my coworker stated that he hated plain tahini, so I proceeded to get a spoon and eat a giant spoonful of it.  Yum, tastes good to me!  I said.  It is after all kind of like peanut butter with a less dominant flavor.  I know some brands can have a little bit of a bitter aftertaste, but even if they do I have come to love tahini of all kinds.  One of my favorite brands is Dastony Tahini from Raw Guru.

    It is the smoothest tahini I have ever tried.  Their regular tahini is really good, but they recently sent me some of their black sesame tahini and it is beautiful! I have used it to make cookies before and they were sooo good.  So I thought, why not try making a black sesame ice cream with it?  I like things like halva which is pretty much straight sweetened sesame, so why not in ice cream with a bit of coconut cream for the base mixed with the tahini then sweetened?  I also added a little maple to it, because I thought it would be a great combo.

    This was a super simple recipe to make which is always awesome as far as I am concerned.  That is if you have an ice cream maker.  If not you can still make it but it is a little more hands on, because it involves whisking it every so often in the freezer. To make the base though, you just blend everything up, pour it into the ice cream maker, and that’s it besides just pouring it into the container.  It comes out like a nice soft serve but if you want it more scoopable, you just need to let it sit a few hours.

    It turned out so good!  The ice cream was silky smooth rich and creamy with a light tahini flavor and a hint of sweet maple!  It had a beautiful color as well thanks to the black tahini!  If you have tahini on hand, and you are in the mood for some ice cream (we are approaching that season), give this a try!  If you don’t have black tahini, you can use regular tahini as well, it just won’t be this color.

    Vegan Black Sesame Maple Ice Cream  
    Makes about 3 cups

    Ingredients:

    • 1 15 oz can organic full fat coconut milk
    • 1/2 cup maple syrup (or to taste)
    • ½ cup Dastony black sesame tahini
    • 1/2 tsp sea salt
    • 2 tsp pure vanilla extract


    Directions:

    1. Combine all ingredients in a high speed blender and blend until smooth.
    2. Pour into an ice cream maker and process according to package directions.
    3. Once the ice cream has finished churning, pour it into a freezer safe container with a lid.
    4. Place the lid on, place in the freezer and freeze for about 4 hours or until firm enough to scoop. Enjoy!


    *Note, if you do not have an ice cream maker you may also freeze it this way. Pour into a bowl, and place in the freezer. Whisk once every half hour until it has frozen to the consistency of soft serve. Then continue to pour into your freezer safe container as the above directions state.

    *If your ice cream gets hard after freezing, let sit out about 15-20 minutes before scooping.

  • Vegan Lemon Cream Pie

    Vegan Lemon Cream Pie


    I hope you all had a wonderful Easter weekend!  Saturday we had beautiful warm weather here, but for Easter Sunday it was snowing and just pretty slushy and cold which was a bit weird, but it didn’t stop me from getting outside for a walk with Eric in the afternoon. It was a bit weird watching the Easter Sunday church service on TV but still nice to spend time with those closest to me.  We made a simple Easter dinner with maple dijon glazed smoked tempeh, vegan cheesy potato casserole, a green salad with blackberries and pine nuts, a lemon carrot salad, and my banana caramel rolls and it was all really good! I haven’t had an Easter meal at home with my family in years, so I enjoyed it very much!  For dessert (which we had later because we were all pretty full), I made this vegan lemon cream pie!  

    I just love lemon desserts in the spring and so I figured it would be perfect for Easter this year.  I have always liked lemon meringue pie, but I prefer a cream on top of my pie to meringue so I made a coconut cream topping instead.  Also I did this because I feel like the cream keeps nicer for a few days and I made this in advance.  For the crust, I made my classic pie crust with coconut oil because it always turns out well. You have to blind bake it with weights so it gets nice and crispy since the filling doesn’t bake in there long, but it is worth that extra effort. 

    The filling is pretty easy to make, you make it on the stove, then pour it into the crust and bake it for a short time.  It has plenty of tart lemon flavor which is super important to me when it comes to lemon desserts. I don’t like it when they are too sweet, I want to be able to taste that tart lemon but still have it be balanced.  I feel like I achieved the perfect balance this time!  Once it was all cooled, it was time for the cream!

    Coconut cream is my topping of choice for most of my pies, because it is simple and easy to make and so rich and delicious!  The sweet creamy topping is the perfect pairing for the tart lemon filling and buttery crust!  My family and I loved this pie, and I hope you do too!  Why not give it a try this spring if you have lemons on hand!  I hope you all have a wonderful week!

    Vegan Lemon Cream Pie

    makes one 8 inch pie

    Crust:

    • 1 1/4 cups organic whole wheat pastry flour*
    • 3 Tbsp maple sugar or coconut sugar
    • 1/4 tsp sea salt
    • 1/4 cup plus 2 Tbsp coconut oil in its solid state
    • about 3-6 Tbsp cold water


      Filling:

    • 3/4 cup lemon juice
    • 2 Tbsp lemon zest
    • 1/4 cup plus 2 Tbsp cup cornstarch
    • 1 3/4 cup (one 15 oz can) full fat organic coconut milk* or canned unsweetened coconut cream
    • 1/4 cup plus 2 Tbsp maple syrup
    • 1/4 tsp ground turmeric (for color, optional)
    • 1/4 tsp sea salt
    • 1 tsp pure vanilla extract


    •  

    Cream Topping:


      Instructions:

    1. To make the crust, in a large bowl, mix together flour, sugar, sea salt, and spices. Cut in coconut oil with a pastry blender or 2 knives until it is in pea sized pieces. Mix in  just enough water to create a smooth dough that holds together but isn’t too sticky. Add more water if needed, and knead slightly until a smooth dough is created. Roll out into a 10 inch circle on a sheet of parchment paper, then use the paper to help you transfer it to an 8 inch pie dish.  Flute the edges, and set aside in the refrigerator until solid.
    2. Pre-heat the oven to 350F degrees. Place foil inside the pie crust, and weight down with pie weights or dried beans.  Place the pie in the oven and bake for 30 minutes, then remove from the oven.
    3. Meanwhile, for the filling, combine all ingredients in a saucepan, and bring to a boil.  Lower to a simmer and cook until thickened. Remove from heat, and pour into the prepared pie crust. Place in the oven and bake for 15 minutes.  Remove from the oven and let cool completely, then refrigerate until chilled.
    4. To make the cream topping, combine all ingredients in a blender and blend until completely smooth. Pour into a bowl and place in the freezer until it is thick like whipped cream (whisking every so often), about 20-30 minutes.
    5. Once the cream is ready, spread over the top of the pie, and refrigerate for a few hours before serving.


    Pie keeps up to 1 week in the refrigerator, covered or in a container.

    *If you wanted to make the crust gluten free, you could swap Bob’s Red Mill gluten free all purpose baking flour for the whole wheat pastry. I have tried this brand and know it will turn out well.

    *For the coconut milk, you want the kind that is 3/4 full of cream in the can, or it will not work and turn out runny, I used Thai Kitchen full fat milk, but their unsweetened canned coconut cream would work as well.

  • Vegan Dark Chocolate Orange Brownies

    Vegan Dark Chocolate Orange Brownies

    I have been loving the combination of chocolate and orange lately.  I recently made some Chocolate Orange Hazelnut Cupcakes and they were so good, so I wanted more of that chocolate orange flavor combo. I was in the mood for some brownie baking last weekend, so it seemed like the perfect time to use it again.  I have never made chocolate orange brownies.  Which is kind of surprising because I have made just about every flavor of brownie imaginable.  I probably have at least 20 brownies on this website.  I usually go for a fudgy brownie base, with some sort of add ins swirled in, but I wanted to keep these simple and let the flavors shine.

    Normally I use cacao powder in my brownie base to give it a chocolate flavor, but I wanted to switch it up this time and use mostly melted vegan dark chocolate and just a little cacao powder to make these extra fudgy and decadent.  I am not a cakey brownie fan to be honest.  I have made a few batches that tasted good but were too cakey in the past which was a bummer because I wasn’t looking for a cake I was looking for brownies.  I think I hit the jackpot with this batch the way they turned out.

    They have about 1 1/4 cups melted dark chocolate in them so they almost have to be good.  I added in plenty of orange zest, because I wanted to be able to taste it, as well as smell it. The batter tasted amazing!  I could not stop sampling it.  That is my favorite part of brownie making after all, sampling and licking the batter from the bowl that is left over.  One of the best things about these is they are really simple to make, no beating of the batter for minutes or any of that, just a quick mix in a bowl and you have delicious brownie batter!

    They smelled amazing while baking!  We could not wait to try them.  Although I say to let them cool completely before cutting, I they are amazing while still warm too if you prefer that.  They are rich and fudgy, just how I like them with a decadent chocolate flavor and a hint of fragrant orange.  Sooo good!  Are you a center brownie person, or do you prefer the edges? I like the gooey center pieces!

    Vegan Dark Chocolate Orange Brownies

    Makes 16 brownies

    Ingredients:

    • 2 Tbsp ground flax seed mixed with 1/4 cup plus 2 Tbsp filtered water (allowed to sit 15 minutes to gel before using)
    • 7 oz vegan dark chocolate(about 1 1/4 cups chopped chocolate or chips)
    • 1 cup maple sugar or coconut sugar*
    • 1/4 tsp sea salt
    • 1/4 cup coconut oil, warmed to liquid
    • 1/4 cup plus 2 Tbsp avocado oil or olive oil*
    • 1 Tbsp cacao powder or unsweetened cocoa powder
    • 2 Tbsp organic orange zest plus 2 Tbsp orange juice
    • 2/3 cup organic whole wheat pastry flour *


    Instructions:

    1. Preheat the oven to 350F degrees, and line an 8×8 inch square pan with parchment at the bottom.
    2. In a smaller bowl, whisk together the flax and water, and allow to sit for 10 minutes.
    3. Meanwhile, melt the chocolate in the top of a double boiler, until it is smooth.  Set aside.
    4. In a large bowl, combine the sugar, salt and oils, and whisk together until well combined, then add the flax and water mixture and whisk until blended.
    5. Add the cacao powder, orange zest and juice and melted chocolate and whisk until smooth and well blended.
    6. Add the flour and whisk until completely blended (if you don’t mix well it could separate).
    7. Pour into the prepared pan, smoothing the top.
    8. Place in the oven, on the center rack, and bake for 30 minutes until the brownies are set (but do not overbake).
    9. Remove from the oven and let cool completely before cutting into 16 bars.


    Brownies keep for up to 1 week in an airtight container on the counter, or 2 weeks refrigerated.  They can be frozen for up to 4 months.

    *Notes:

    *If you would prefer to use granulated sugar that would work as well in this recipe.

    *If you would like to just use one type of oil in this recipe, you can use additional coconut oil instead of the avocado, just keep in  mind the brownies may be a little bit more hard at room temperature or at cooler temps.

    *If you would like to make these gluten free, you can use Bob’s Red Mill gluten free all purpose baking flour in place of the whole wheat pastry flour.  I have tried this brand and know it works well when used in brownies.

  • Vegan Vanilla Berry Rose Doughnuts

    Vegan Vanilla Berry Rose Doughnuts

    Since it is Valentine’s week, I am using that as an excuse to make all things pink and girly.  Yes, that includes making cards and whatnot, but desserts are part of that too.  I had already made some chocolate, so it was time to whip up something else so I have a nice variety.  I decided on doughnuts.  I just made a cake last week for my blogaversary, so I wanted something a little easier.  Baked doughnuts did the trick!  I still kind of get my cake, but no careful frosting involved and I get to enjoy them faster.

    I have been wanting to make something with white chocolate and rosewater for a while, so I thought I would include both in these.  I also wanted to include berries because they are so heavenly with that flavor combination. For the batter, I started off with a simple vanilla doughnut batter.  I used whole wheat pastry flour this time, but you could use a gluten free all purpose baking flour if you prefer that.  I added in some berry powder that I made with freeze dried berries, and a bit of rosewater and it was heavenly!

    The batter tasted amazing even before baking, and smelled even better when it was in the oven.  I could not wait to try the doughnuts, but I first had to let them cool then unmold and glaze them.  Because what’s a doughnut without a glaze or frosting?  Not a fun doughnut that is for sure.  I just love looking at all of the doughnuts with their beautiful glazes and colors.  So pretty.  This isn’t a fried doughnut like most of the ones you find in the shops, but I still wanted it to be pretty.

    Raw Guru recently sent me some of their cacao butter and coconut butter, so I figured they would be perfect for a white chocolate flavored glaze!  Since cacao butter is a must in white chocolate.  I mixed them with a little rosewater, vanilla, maple syrup and berry powder and it was just right for a glaze.  I could not wait to try the finished doughnuts!  They were sooo good!  Soft and cakey with the scent of vanilla and rosewater plus the sweet berry flavor, totally heavenly!  I hope you all have a wonderful Valentine’s Day!

    Vegan Vanilla Berry Rose Doughnuts
    Makes 6 Doughnuts

    Ingredients:

    one 6 hole doughnut pan

    Cake:

    • 3/4 cup organic whole wheat pastry flour
    • 3/4 tsp baking soda
    • 1/2 tsp baking powder
    • 1/4 tsp sea salt
    • 1/2 cup maple sugar
    • 2 Tbsp strawberry or raspberry powder*
    • 1 cups full fat coconut milk (the thick kind, I prefer Thai Kitchen brand) at room temperature
    • 1 tsp pure vanilla extract
    • 2 tsp rosewater
    • 1 Tbsp cider vinegar


    White Chocolate Icing:

    • 1/4 cup plus 2 Tbsp Tbsp melted Raw Guru coconut butter
    • 2 Tbsp melted Raw Guru cacao butter
    • 2 Tbsp maple syrup
    • 2 tsp rosewater
    • 1/2 tsp pure vanilla extract
    • 1 tsp strawberry or raspberry powder*
    • 3-4 Tbsp filtered water or as needed

    For Garnish:

    • Freeze dried strawberries and raspberries


    Instructions:

    1. Preheat the oven to 350F degrees and position rack in center of oven.
    2. Oil a doughnut pan.
    3. Whisk flour, baking soda, sea salt, and sugar and strawberry powder in a large bowl to blend well.
    4. Whisk coconut milk, vanilla extract and rosewater together in small bowl to blend well, then whisk into the flour mixture until well blended.
    5. Whisk the cider vinegar into the batter.
    6. Transfer the batter to prepared pan.
    7. Place in the oven, and bake cake until tester inserted into center comes out clean with just a few moist crumbs attached, about 20-25 minutes.  Remove from oven and let cool completely.
    8. To make the glaze, whisk together all ingredients except the water.  Then whisk in the water until smooth and uniform.  If it is a little too thick add just a few tsp more water until it is a pour-able consistency.
    9. Spoon the glaze over the doughnuts, and sprinkle with freeze dried berries.
    10. Allow glaze to set, then enjoy!

    Doughnuts keep stored in the refrigerator, covered for up to 1 week.

    Notes:

    *If you would rather use coconut sugar or even just granulated sugar for this, either will work in place of the maple sugar.

    *To make berry powder, place freeze dried berries in the blender and blend until they are a fine powder.  I get my freeze dried berries at Trader Joe’s.

    *This cake can be made gluten free by swapping out the whole wheat pastry flour for Bob’s Red Mill gluten free all purpose baking flour (this is a brand I have used before and have tested it in cakes with great results).

  • Vegan Tiramisu Cheesecake

    Vegan Tiramisu Cheesecake


    The first time I ever tried tiramisu was at an Italian restaurant with my Mom when we were on a family vacation. I wasn’t a huge fan of coffee at the time, but it still sounded interesting so I ordered some.  It was fabulous!  Layers of soft cakey lady fingers with a hint of coffee, lots of cream and a touch of chocolate.  We decided that we wanted to try to make some at home, and we made the traditional type with the ladyfingers, zabagliogne made with egg yolks and heavy cream and all.  It was a process but it turned out so good!  I still love tiramisu but I make much easier veganized versions of it now that taste just as good. 

    I have been craving tiramisu lately because I haven’t had it in so long, so I decided to make a tiramisu cheesecake.  I had recently bought some really good coffee from a local coffee roaster called Dogwood Coffee.  Eric and I love to go there and get oat milk lattes (they always have yummy seasonal ones) and so I thought I would buy some to try at home.  I got their Neon Espresso and it is sooo good!  Just a splash of oatmilk and it is perfect!  It has a chocolate like flavor and it so smooth. I figured it would be so good in my tiramisu.  

    For the base, instead of the usual cheesecake crust or lady fingers, I made a layer of vanilla cake with a hint of coffee.  Then I soaked it with a bit an espresso syrup, and dusted it with cacao powder.  Next I made the cheesecake layer.  I used my usual vanilla cheesecake base, but added the espresso to it. I use a mixture of coconut milk and chickpeas as my base, which may sound weird, but trust me you can’t taste the chickpeas at all.  They were my swap for cashews a while back to make nut free cheesecake, and I make most of my cheesecakes this way now. 

    I could not wait to try it!  To finish it off I dusted it off with a bit of cacao powder and it was perfect!  It tasted just like tiramisu, but in cheesecake form!  Creamy, with a light coffee flavor, a soft layer of espresso soaked cake on the bottom, it is so good!  Even better with a cup of coffee on the side.  If you are a fan of tiramisu definitely give this a try! 

    Vegan Tiramisu Cheesecake

    Makes one 6 inch cake

    Ingredients:

    one 6 inch cake pan

    Bottom Cake:

    • 1/4 cup plus 2 Tbsp organic whole wheat pastry flour*
    • 1/4 tsp plus 1/8 tsp baking soda
    • 1/4 tsp baking powder
    • 1/8 tsp sea salt
    • 1/4 cup maple sugar
    • 1/2 cup full fat coconut milk (the thick kind, I prefer Thai Kitchen brand) at room temperature
    • 2 Tbsp strong brewed good quality espresso 
    • 1/2 tsp pure vanilla extract
    • 1 1/2 tsp cider vinegar


    Soak:

    • 1 Tbsp strong brewed good quality espresso 
    • 1 Tbsp maple syrup
    • 1 Tbsp cacao powder or unsweetened cocoa powder 


      Cheesecake Filling:

    • 1 cup full fat coconut cream (I used the thick part of a can of Thai Kitchen organic full fat coconut milk*)
    • 3/4 cup cooked chickpeas
    • 1/4 cup maple syrup
    • 1 tsp pure vanilla extract
    • 2 tsp finely ground good quality espresso
    • 1/8 tsp sea salt
    • 1/2 cup plus 2 Tbp coconut butter (NOT OIL), warmed to liquid


      Topping:

    • cacao powder unsweetened cocoa powder for dusting
    • chopped vegan dark chocolate


      Instructions:

    1. Preheat the oven to 350F degrees and position rack in center of oven.
    2. Oil a 6 inch round baking pan and line it with parchment at the bottom so it will not stick.
    3. Whisk flour, espresso, baking soda, sea salt, and sugar in a large bowl to blend well.
    4. Whisk coconut milk and vanilla extract together in small bowl to blend well, then whisk into the flour mixture until well blended.
    5. Whisk the cider vinegar into the batter.
    6. Transfer the cake batter to prepared pan then place in the oven, and bake cake until tester inserted into center comes out clean with just a few moist crumbs attached, about 20 minutes.
    7. Remove from the oven and let cool completely.
    8. Mix together the coffee and maple syrup for the soak, then brush the cake with it generously (you may have a little left over). Dust with 1 Tbsp cacao powder. Set aside. 
    9. To make the filling, combine all ingredients in a high speed blender or food processor and blend until smooth.
    10. Pour over the prepared cake.
    11. Place cheesecake in the freezer until it is set for about 4 hours (or overnight in the refrigerator if you are not in a hurry).
    12. Remove from the freezer, un-mold and dust with cacao powder and sprinkle with dark chocolate.
    13. Enjoy!

    Store any leftover cake in the refrigerator, keeps for up to 1 week.


    *I use Thai Kitchen full fat coconut milk.  If you are using a different brand, just make sure it is the thick type, 2/3 of the can at least should be very thick cream or it will not work in this recipe.

    Notes: If you would rather use coconut sugar or even just granulated sugar for this, either will work in place of the maple sugar. If you would like to make a 9 inch round cake, double the entire recipe, and bake it in a 9 inch round pan, increasing the baking time to 40 minutes (depending on your oven). This cake can be made gluten free by swapping out the whole wheat pastry flour for Bob’s Red Mill gluten free all purpose baking flour (this is a brand I have used before and have tested it in cakes with great results).

  • Vegan Raspberry Chocolate Chunk Bread Pudding

    Vegan Raspberry Chocolate Chunk Bread Pudding

    When I have a lovely loaf of crusty bread, there are two things I love doing most with it.  Enjoying it with soup so I can dunk it in and soak up the goodness, and making bread pudding.  I usually end up doing both if it is a large loaf and I have enough.  I had a lovely loaf of sourdough bread that was getting a little dry since I had it for a few days, so I decided it was perfect for bread pudding.  Eric loves it too, so win win for both of us if I make a batch and share.  His Dad recently sent us a bunch of his home made jam, so I thought I would make a raspberry swirled bread pudding.  Back in the day my Mom and I used to go to a local restaurant that had the best raspberry bread pudding.  It was totally heavenly served warm with cool whipped cream and a sweet sauce.  I have always wanted to recreate it and now was my chance!

    It is weird, I never actually tried making home made bread pudding until this year.  Even though I have made home made bread a lot.  I was missing out!  It is so easy and so good!  In fact, the whole process of making this is done in less than 45 minutes. You could use whatever bread you like of course but it helps if it is a bit dry to soak up the batter.  I like a crusty bread also so that it holds its share somewhat and the top gets a little bit crispy.  For this one I used an organic wheat sourdough.

    For the batter I used oat milk because it is what I have on hand for my drinks like coffee and matcha lattes, but it works perfect because it is pretty neutral in flavor.  I mixed it with flax eggs, and maple and vanilla to sweeten and it was just right.  The bread soaked it up beautifully!  I put plenty of raspberry jam in the bread pudding, but I also added chocolate chunks because why not?!  Chocolate and raspberries are a match made in heaven after all!

    It smelled so good while baking!  I could not wait to try it.  It baked up beautifully into a french toast like consistency, crunchy on top and light and fluffy inside.  The gooey dark chocolate and sweet raspberries made it over the top amazing!  This would be perfect for Valentine’s Day!  Eric loved it too, the leftovers were gone in no time!  If you have some crusty bread that has sat for a few days, this is the perfect thing to make with it!

    Vegan Raspberry Chocolate Chunk Bread Pudding 

    Serves 4-6

    Ingredients:

    Bread Pudding:

    • 2 Tbsp ground flax seed, mixed with 6 Tbsp filtered water
    • 1 3/4 cups oat milk (or your favorite plant based milk)
    • 1/4 cup maple syrup
    • 1/4 tsp sea salt
    • 1 tsp pure vanilla extract
    • 6 cups lightly packed cubed sourdough bread
    • 1/2 cup chopped chocolate or chocolate chips
    • 1 cup raspberry jam
    • 2 Tbsp maple sugar (or coconut sugar)


    Instructions:

    1. Preheat the oven to 350F degrees, and oil two 1 quart baking dishes (or see bottom of post for other baking dish options).
    2. In a bowl, whisk together the flax seeds and water mixture, oat milk, maple syrup, spices, sea salt, and vanilla until well combined, then add the bread crumbs and toss to coat in the mixture.  Mix in chocolate.
    3. Transfer half of the mixture to the prepared baking dishes, (including the liquid, pour it over them). Then spoon half the jam over them by the Tbsp.  Top with the remaining bread mixture, and more jam.  Sprinkle with the maple sugar.
    4. Place in the oven on a tray, and bake for about 25-30 minutes (see bottom for other pan sizes baking times), or until the top is starting to brown and the liquid has absorbed and baked into pudding at the bottom.
    5. Remove from oven.
    6. Let cool about 10 minutes and enjoy warm!

    For 6 small ramakins: bake 15 minutes

    For 1 8×8 inch square pan or 2 quart baking dish: bake 30-40 minutes

  • Vegan Salted Caramel Chocolate Chip Cookies

    Vegan Salted Caramel Chocolate Chip Cookies

    Salted caramel anything is amazing as far as I am concerned.  There is just something about that balance between the saltiness and the caramel that I love.  Maybe also because those are two things that are often craved. Salted caramel chocolate sounds more wonderful than just chocolate, and salted caramel crème brulee more fantastic than just crème brulee.  Doesn’t it?
    My Mom, who often begs me to make some cookies for her, was telling me about some salted caramel cookies she had tried at work from Great Harvest. She said they were good, but my cookies were better. Which got me to thinking, why not make my own salted caramel cookies?  After all, most of the things I veganize end up being really good, and sometimes even better than the original.
    So, for the cookie dough, I used maple sugar which is very caramelly tasting to me and an extra pinch of sea salt over the usual I use which resulted in a caramel tasting dough.  Of course you could just use coconut sugar if you didn’t have the maple, because it has the same brown sugar affect.  The cookies would have tasted kind of caramelly on their own, but I wanted chunks of “caramel” as well so I added dates too.  Which are basically nature’s gooey caramel!  The combination was pretty darn delicious!
    Since they were chocolate chip cookies, I added some good quality vegan dark chocolate chips as well.  The dough was amazing, so I knew these were going to be good.  I sprinkled some fleur de sel on them before baking, since they were salted caramel.  I could not wait to try them, since they smelled amazing while baking!  I tried one while they were still warm and omg sooo good!  A caramel flavored spft cookie with gooey dates, and melty chocolate chips! My Mom enjoyed them as well and said that you would never be able to guess that they were vegan.  If you are a caramel fan, definitely give these a try!

    Vegan Salted Caramel Chocolate Chip Cookies
    Makes 16 large cookies

    Ingredients:

    •  2 Tbsp ground flax seed
    • 1/4 cup plus 2 Tbsp filtered water
    • 1 cup virgin coconut oil, warmed to liquid
    • 1 1/2 cups maple sugar or coconut sugar
    • 1 teaspoon vanilla extract
    • 1 teaspoon baking soda
    • 3/4 teaspoon sea salt
    • 3 cups organic whole wheat pastry flour
    • 1 cup dates, chopped into smaller pieces
    • 3/4 cup vegan dark chocolate chips


    Directions:

    1. Preheat your oven to 350F degrees.
    2. In a small bowl, whisk together the flax seed and filtered water.  Set aside in the refrigerator for 15 minutes.
    3. Meanwhile, in a large bowl, mix coconut oil with sugar and stir until well combined.  Mix in the vanilla extract and flax mixture until well combined.  Add the baking soda and salt then the flour, a cup at a time, mixing between each addition, until well combined.  Mix in the dates and chocolate chips
    4. Line 2 large baking sheets with parchment paper.
    5. To Form the cookies take about a 1 1/2 inch chunk of dough, form into a ball and on prepared cookie sheets a couple inches apart, and press down just slightly. Bake for about 12-15 minutes, until puffed and just starting to brown slightly.
    6. Remove from the oven, and let cool on the pan a few minutes, then remove to a wire rack to cool.
  • White Bean, Sweet Potato and Kale Soup

    White Bean, Sweet Potato and Kale Soup

    The weather can’t seem to decide what it is doing here lately.  It was thawing out and above 35F degrees, and then it was down to below zero then back to above freezing again. I will take the warmer days though, it is not often we see days above the teens and twenties this time of the year.  Last year we had a polar vortex and it was -60 windchill for a few days.  So I am grateful for this weather. One thing I enjoy to kind of take the chill off is warming soups.  I make at least 3 different kinds during the course of the week.  I have my favorites, but sometimes I like to come up with new ones.

    I was craving something hearty and filled with veggies and greens, and what I came up with was this white bean, sweet potato and kale soup!  I make soups like this a lot at work (not this exact one, but similar ones), and a lot of times they sound really good to me so I go home and make something similar.  I happened to have all of the ingredients for this on hand so it was perfect!  It always makes me happy when I don’t have to spend extra money to buy more ingredients.

    For the base, I went with home made veggie stock and tomatoes.  If you are wondering what I put in my stock, it is mostly onions and garlic (because they have the most flavor), plus a bit of celery. I know some people put carrots in their stock, but I find that they make it a bit too sweet for my liking. So I keep it to the other 3 veggies.  If you just keep your scraps in a bag in the freezer, later on when you have a lot you can whip up some stock with them.  Just simmer the veggies in filtered water on the stove on very low heat for about 4 hours, then strain and cool down.  Also, it is nice to portion out and freeze for later.

    Back to the soup though, I added oregano and basil to give it an Italian flavor, as well as some red pepper flakes for a little kick.  I would usually go with regular potatoes in a soup like this but I went with white fleshed sweet potatoes this time since I had them on hand.  Lastly some white beans for protein and some kale to get my daily greens in.  I try to eat a good amount of greens several times a day, so I include them in my lunch salads, as well as stir them into my soups at the last minute so they are just wilted but retain their nutrients.  This soup turned out so good!  It was dinner for a few nights, and it was nice to have something already made when I got home.  It was packed with flavor, was nice and warming and hearty and we both felt good after eating it. If you are in need of some healthy comfort food, give this a try!

    White Bean, Sweet Potato and Kale Soup
    Serves 3-4

    Ingredients:

    • 1 tsp olive oil
    • 1/4 cup diced red onion
    • 4 stalks celery, sliced
    • 2 garlic cloves, minced
    • 1 tsp dried basil
    • 1 tsp dried oregano
    • 1/4 tsp red pepper flakes
    • 1/2 tsp sea salt
    • 3 cups crushed canned tomatoes or fresh roasted*
    • 2 cups flavorful vegetable stock
    • sea salt
    • 4 cups cubed white fleshed sweet potatoes
    • 1 1/2 cups cooked white beans
    • 2 cups fresh kale, torn into small pieces


    Instructions:

    1. Heat the olive oil in a medium pan.
    2. Add onions and celery and sauté until tender.
    3. Add the garlic, tomatoes, herbs, sea salt, pepper, and filtered water.
    4. Bring to a simmer, and allow to cook until the tomatoes are very soft and the flavor has melded, about 30 minutes.
    5. Add the sweet potatoes to the pot, and let cook for about 10-15 minutes.
    6. When the potatoes are tender, stir in the beans and kale until kale has just wilted.
    7. Serve!


  • Vegan Orange Rosewater Creme Caramel

    Vegan Orange Rosewater Creme Caramel

    We are in the middle of citrus season, so I have been craving desserts with it lately.  I love all of it, lemons, grapefruits, limes and oranges.  But this time I chose the oranges because it is what I happened to have an abundance of on my counter fruit and veggie collection this week. I wanted something rich and delicious but easy to make, and so I made some creme caramel!  I was dreaming of a sweet orange creme caramel with a hint of rosewater.  I love rosewater in desserts, its aroma is unlike anything else, so heavenly!

    I recently picked up some rosewater at House of Halva in St. Paul MN, and it is some of the best rosewater I have ever had!  I was super excited because I hadn’t had any at home in a few years and I found this one for a really good price and it is good quality.  I have been adding it to my lemonade and berry kombucha and even in my vanilla lattes and it is amazing in drinks but I finally got around to including it in a dessert last weekend when I made the creme caramel.

    The best part about the creme caramel is it is easy to make.  For the custard, I used a coconut milk base because I think it makes the richest smoothest custard, and I added in a bit of orange juice and zest, plus vanilla and rosewater to make it fragrant.  A bit of maple syrup to sweeten and it is perfect!  Just a little cornstarch and agar and it makes a custard that is firm enough to hold up, but creamy when cut into.  It smelled amazing and tasted even better, even before setting.

    For the caramel I didn’t go the route of dissolving sugar in water I simply boiled down a little maple syrup with orange juice until it thickened slightly and then added some rosewater.  I could not wait to try these!  When I un-molded them the next day I was super excited!  They came out lovely, and I garnished them with some pistachios.  They were soooo good!  Creamy, rich and delicious with that heavenly scent of rosewater and sweet orange!  If you have oranges and rosewater on hand, definitely give these a try!

    Vegan Orange Rosewater Creme Caramel
    Makes 4

    Ingredients:

    4 1 cup ramekins

    Caramel:

    • 1/4 cup maple syrup
    • 2 Tbsp orange juice
    • 1 tsp rosewater


    Custard:

    • 1 3/4 cups full fat coconut milk
    • 2 Tbsp maple syrup
    • 1 Tbsp orange juice
    • 1 Tbsp orange zest
    • 3/4 tsp agar powder
    • 1 Tbsp cornstarch


    Instructions:

    1. Set 4 one cup (8oz) ramekins on a tray.
    2. In a small saucepan, combine the maple syrup and orange juice bring to a boil.  Cook for about 5 minutes, stirring constantly until it has reduced slightly.  Remove from heat, add rosewater and pour into the bottoms of the ramekins.
    3. To make the cream, combine the coconut milk, and maple syrup in a saucepan and bring to a simmer.
    4. Mix the orange juice and zest with the vanilla, agar powder, and cornstarch in a small bowl, and then whisk into the hot coconut milk.  Whisk until just thickened, then pour into the prepared ramekins over the caramel.
    5. Place the tray of ramekins in the refrigerator until chilled completely.  For at least 2 hours, or overnight.
    6. Once the custards have set and you are ready to serve, place a plate on top of each one, then flip it over.  If they are sticking at all, run a knife along the sides to loosen being careful not to disturb the custard.
    7. Enjoy!  Refrigerate any leftovers.


  • Vegan Chocolate Peppermint Lava Cakes

    Vegan Chocolate Peppermint Lava Cakes

    After a hectic week last week, I decided that I needed to bake something chocolaty.  Brownies or chocolate cake sounded good, maybe with peppermint.  I had seen someone making some peppermint brownies on a morning show I was watching and the combo of chocolate and peppermint sounded amazing at the time.  I didn’t however want to bake a big pan of brownies or make a large layer cake that would have been more work than I was willing to put in after being at work in a kitchen all day, so I went for some mini lava cakes!  I had made some similar ones before and I knew they were nice and easy and I could enjoy some delicious cake quickly. 

    Raw Guru had recently sent me some cacao powder, so it was perfect!  It was just begging to be used in a recipe like this one!  For the base, I started out with quinoa flour which is naturally gluten free.  But you could of course use whole wheat pastry flour if you prefer that and it will work just as well.  Next, I added in the cacao powder of course to make it nice and chocolaty.  For the sweetener, instead of sugar I used dates because they keep the cake nice and moist and soft but not to heavy.  You would never guess that this is fruit sweetened. 

    It also happens to be oil free, because I use full fat coconut milk instead of oil and it comes out perfect!  Lastly a good amount of peppermint was important for that holiday twist!  For the filling I made a quick ganache so it would be nice and gooey and rich inside when you cut into it to enjoy it.  They smelled amazing while baking! I could not wait to try one!  

    I only had to wait 10 minutes.  I poured some of the extra ganache over it and it was amazing!  Gooey and rich as lava cake should be with a hint of peppermint and tons of dark chocolate flavor!  The only thing that would have made this even better is if I had some vegan ice cream on hand which I did not but it was still crave worthy!  If you are a big chocolate fan, definitely give these a try!

    Vegan Chocolate Peppermint Lava Cakes

    Makes 4

    Ingredients:

    Filling:

    • 1 cup chopped vegan dark chocolate or vegan chocolate chips (I like this brand)
    • 3/4 cup full fat coconut milk 


    Cake:

    • 3/4 cups quinoa flour (or all purpose gluten free flour)*
    • 2 Tbsp Raw Guru cacao powder or unsweetened cocoa powder
    • 3/4 tsp baking soda
    • 1/2 tsp baking powder
    • 1/4 tsp sea salt
    • 3/4 cup packed soft medjool dates, pitted, soaked in water for 30 minutes and 1/2 cup of the water reserved
    • 1 tsp pure vanilla extract
    • 1 tsp peppermint extract
    • 3/4 cup full fat coconut milk (the thick part from the top of the can)
    • 1 Tbsp apple cider vinegar


    Instructions:

    1. Preheat the oven to 375F degrees and position rack in center of oven.
    2. Oil four 1 cup custard dishes or ramakins with oil.
    3. To make the ganache filling, place the chocolate and coconut milk in the top part of a double boiler, whisking them, and heat until they are melted and blended together and smooth. Turn off the heat but leave over the warm water.
    4. To make the cake batter, whisk flour, baking powder, baking soda, sea salt in a large bowl to blend well.
    5. Place dates, reserved water, peppermint, coconut milk, and vanilla extract into a blender, and blend until smooth, then whisk this blended mixture into the flour mixture until well blended. Whisk in the cider vinegar until bubbles form.
    6. Transfer half of the cake batter to prepared dishes filling them half full, then drop 2 Tbsp of the ganache into each in the center. Spoon the remaining batter over each one, place on a tray, and place in the oven.
    7. Bake cakes until they are set, but not over-baked about 15-18 minutes.  Remove from oven, let cool for about 10 minutes.
    8. Rewarm the extra ganache if it has solidified (if it is too thick or clumpy once it has warmed, whisk in a little water until it thins it will smooth out).
    9. When the cakes have sat 10 minutes, un-mold, pour the extra ganache over and enjoy warm.


    *If you prefer to use whole wheat pastry flour instead of the quinoa or gluten free flour, it can be used as well. 

  • Vegan Pumpkin Maple Creme Caramel

    Vegan Pumpkin Maple Creme Caramel

    When I was in high school, my Mom and I went on a trip to Europe.  When we were eating lunch in a small cafe, I tried my first creme caramel. When I ordered it, I am not sure what I was expecting but it was not like anything I had eaten before.  I think I was expecting it to be like creme brulee and be a little warm or something, but I was surprised when it was cool.  A silky smooth vanilla custard with sweet caramel and it was delicious even if it wasn’t what I thought it would be!  But surprisingly I never attempted to make my own at home until last year as much as I love making all kinds of desserts.  I guess maybe because it wasn’t something I had made before I thought it would be difficult but it wasn’t at all.

    So last year I made a vegan eggnog creme caramel, because Eric wanted it for his birthday last year.  Well, it has been almost a year since I made that, and so I figured why not make it again?  Except a little different.  This time I decided to make a pumpkin creme caramel because tis the season for pumpkin, and I thought this might be a nice little alternative to pumpkin pie for Thanksgiving in a few weeks.  Also, I was craving something creamy and pumpkiny but I just make some pumpkin pie in a mug last weekend and didn’t want to make the same thing again.

    This is really easy to make.  In fact, it is even simpler than the last one I made because I used maple syrup instead of the usual dissolving sugar in syrup.  I just took it and reduced it slightly to thicken it and it worked perfect!  Plus, I knew the flavor of maple would be amazing with the pumpkin and spices. For the base, I used coconut cream because I wanted these to be rich and creamy.  I added in pumpkin puree, and a little maple syrup as well as pumpkin pie spices and the base tasted wonderful after I cooked it even before it was chilled!

    I had to wait overnight to enjoy them, but it was so worth it!  They turned out super delicious!  Rich, creamy vanilla pumpkin spice filling and that sweet salted maple caramel on top!  Totally heavenly!  I shared some with Eric because it was his idea to make them last year and he loved these as well!  These would be perfect for Thanksgiving if you don’t want to make pie or other more complicated desserts, and they chill overnight so they are good for making ahead of time.  I hope you are all having a wonderful November so far!

    Vegan Pumpkin Maple Creme Caramel
    Makes 4

    Ingredients:

    4 1 cup ramekins

    Caramel:

    • 1/4 cup plus 2 Tbsp maple syrup
    • 1/8 tsp sea salt


    Custard:

    • 1 1/2 cups unsweetened coconut cream
    • 1/4 cup pumpkin puree
    • 2 Tbsp maple syrup
    • 1/2 tsp ginger
    • 1/2 tsp cinnamon
    • 1/4 tsp cloves
    • 1/8 tsp nutmeg
    • 3/4 tsp agar powder
    • 1 Tbsp cornstarch


    Instructions:

    1. Set 4 one oz ramekins on a tray.
    2. In a small saucepan, combine the maple syrup and salt and bring to a boil, then lower the heat to a simmer whisking every so often.  Let cook for about 5 minutes until it reduces to about 1/4 cup or a little over 1/4 cup.  Remove from heat, and pour into  the bottoms of the ramekins.
    3. To make the cream, combine all ingredients in a saucepan and bring to a simmer.
    4. Heat until it comes to a boil, then cook for about 1-2 minutes, whisking constantly until just thickened, then pour into the prepared ramekins over the caramel.
    5. Place the tray of ramekins in the refrigerator until chilled completely.  For at least 2 hours, or overnight.
    6. Once the custards have set and you are ready to serve, place a plate on top of each one, then flip it over.  If they are sticking at all, run a knife along the sides to loosen being careful not to disturb the custard.
    7. Enjoy!  Refrigerate any leftovers.


  • Vegan Apple Pie Cookies

    Vegan Apple Pie Cookies

    Last Sunday Eric and I visited the apple orchard with our friends. It pretty much tradition for every Minnesotan to do so (well at least everyone I know). Plus, Sunday was a beautiful fall day and the trees are at their peak colors so it was the perfect day to visit. Also, it has been raining a lot here in Minnesota, usually on the weekends so we were thankful that it was finally nice for this one so we could finally visit!  It was packed, seems like everyone has the same idea, but luckily they still had plenty of apples!  When we walked in from the parking lot in the field, we were greeted with the aroma of freshly baked apple cinnamon doughnuts and pie, and kettle corn and it made me really hungry again even though I had just eaten lunch.

    We wandered though the orchard admiring the apple trees, but since they didn’t have pick your own that day we headed to the barn to sample all of the types that they had.  They had the old Minnesota standbys like the Honey Crisp, Haralson, and Courtland, but there were also a few varieties I had never tried before and I ended up buying some of (since I have not seen them on stores) like the Pizazz and Honey Belle.  I picked up bags of the last two, because they were both flavorful, sweet just a little tart and unique.  I knew they would make some really good desserts as well as snacks later in the week.  Monday I decided to use some of them to make Apple Pie Cookies!  I love a good old fashioned apple pie and was craving some, but one large pie seemed like a lot of work so I opted for the smaller ones instead.

    I wasn’t sure whether I should go for cookie dough or actual pie crust for these, but I went with the pie crust, crossing my fingers that it would work. Because mini pies with apple crust would be so adorable.  I sautéed the apples before using them in the pies because I figured the cookies would cook better and faster if the filling was pre-cooked. Apples are kind of hard after all, and usually require a long cooking time. I actually do this with my large pies too.  The cookies smelled amazing while baking and the best part was I got to enjoy them a lot faster than traditional pie because they baked up quick!

    These are something that is best served warm out of the oven.  Not because they are not good when they are cold, they still are, but I am one of those people who has to have my apple pie slightly warm.  It brings out the flavor more!  They tasted wonderful, sweet jammy apples baked to perfection inside, a flakey buttery tasting crust, and a hint of cinnamon!  They were really a lot more forgiving to put together than traditional large apple pie, and they were the perfect recipe to showcase those Minnesota apples!

    Vegan Apple Pie Cookies

    Makes 18

    Crust:


    Filling:

    • 3 medium sweet tart sweet apples (I used pizazz apples, but you can use other apples with a lot of flavor such as honey crisp, haralson, or pink lady)
    • 3 Tbsp maple syrup
    • 2 tsp cinnamon
    • 1 tsp pure vanilla extract
    • juice of one lemon
    • a pinch of sea salt
    • 1 1/2 Tbsp arrowroot starch
    • coconut milk, for brushing
    • coconut sugar, for topping


    Instructions:

    1. To make the crust, in a large bowl, mix together flour, sugar, sea salt, and spices.
    2. Cut in coconut oil with a pastry blender or 2 knives until it is in pea sized pieces. Mix in  just enough water to create a smooth dough that holds together but isn’t too sticky. Add more water if needed, and knead slightly until a smooth dough is created.
    3. Roll dough out into a large rectangle 1/8 inch thick using parchment underneath and floured rolling pin, and cut into 36 circles with a cookie cutter, then cutting a vent hole into half of them (alternatively if you don’t want to cut a hole, you can poke the top a few times with a knife before baking instead).
    4. Preheat oven to 375F degrees. To make filling, mix together all ingredients but the arrowroot in a non-stick skillet.  Heat over medium and cook until the apples have softened, about 10 minutes, after they have softened add the arrowroot.
    5. Spoon the filling by the tsp onto half of the prepared little crust circles, and cover with the top pieces of dough with the vent hole (I used a small spatula to carefully move them), pressing the edges and crimping with a fork.
    6. Brush crust with a little coconut milk, and sprinkle with sugar. Bake for about 30 minutes until the crusts are starting to brown lightly.
    7. Remove from oven and let cool on a wire rack until warm.


    *If you prefer these to not be gluten free, you can use organic whole wheat pastry flour in place of the GF all purpose flour, the same amount.

  • Vegan Pumpkin Spice Latte Mix 

    Vegan Pumpkin Spice Latte Mix 

    I am not much of a coffee drinker, but since it is pumpkin spice latte season, I have had a few in the past couple of weeks when we go out for coffee on weekends instead of my usual matcha latte as a seasonal treat.  I know some people hate these things, and they get a bad rap (probably because a lot of places use overly sweetened flavor syrup for them), but when you get one that is made well, they are truly delicious. The ones I like to get are from local smaller coffee shops that use really good quality coffee and oat milk, and make their own pumpkin spice mix or flavors. It makes all the difference!  Anyways, they are not cheap (at least not to me, because I try to be thrifty) which is why they are a treat normally, so I thought I would try to make my own vegan pumpkin spice latte mix at home so I could enjoy a more cost effective version (and more often).

    Now like I said, I don’t normally drink much coffee so I didn’t have any on hand, but luckily Raw Guru sent me some of their Antioxidant Breakfast Blend Coffee to try so that was perfect timing!  It is a low acid coffee, so kinder on the tummy, which is good for me, since I am not used to drinking a lot of it.  It is a medium roast, but of course you could use whichever roast you like for your lattes! I tried some before I added the mix, and it was good on its own as well, which is important to me because I feel like if you can’t drink coffee plain, it won’t be good for mixed coffee drinks.

    For the mix, I started out with an oat milk base.  Why oat milk?  Well, I feel that it froths the best for a latte, and it is what I always prefer to order when I am at a coffee shop.  I also like oat milk because it has the most neutral flavor when it comes to plant based milk.  Planet Oat is what I usually buy because it has very few ingredients, and not things like added sunflower oil sugar.  I always buy unsweetened milk, as I prefer to add my own sweeteners that aren’t just sugar. To the oat milk base, I added plenty of pumpkin puree.  I wanted this to have actual pumpkin in it, unlike some drink mixes that are just all flavor.  This one has real pumpkin AND the spices!  I also added ginger, cinnamon, nutmeg, and cloves so it had the flavor of pumpkin pie, and a touch of maple syrup to sweeten it.  As you will notice in the recipe, I say 1-3 Tbsp depending on how sweet you like it, and I added 1 because I am one of those people who doesn’t like drinks super sweet.  If you have a sweet tooth go ahead and add more.

    I could not wait to try it!  I took in the delicious aroma of pumpkin spice, took a sip and it was heavenly!  I enjoyed it just as much as the lattes I have enjoyed at coffee shops, and I know it had far less sugar in it so that is a win.  If you are a fan of pumpkin spice lattes, definitely give this a try!  Also if you make something with pumpkin and have a partial can left, like I often do, this is the perfect thing to make with it!  I hope you are all having a wonderful fall!

    Vegan Pumpkin Spice Latte Mix 

    Makes 4 cups, enough for 4 16 oz lattes

    Ingredients:

    • 3 cups thick unsweetened oat milk (I like Planet Oat extra creamy original)
    • 1 cup canned pumpkin puree
    • 1/2 tsp cinnamon
    • 1/2 tsp ground ginger
    • 1/4 tsp cloves
    • 1/4 tsp nutmeg
    • 1-3 Tbsp maple syrup (depending on how sweet you like your coffee)
    • 1 tsp pure vanilla extract


    For Serving:


    Instructions:

    1. Add all ingredients to a blender and blend until smooth.
    2. Pour into a jar and keep in the refrigerator for up to 2 weeks (shaking well before each use).
    3. To make a latte, heat up 1 cup of the pumpkin spice latte mix in a saucepan (but don’t boil), add 1 cup hot fresh brewed strong coffee, and froth with an immersion blender.  Pour into a large (16 oz) mug and enjoy!


  • Vegan Pumpkin Spice Latte Caramels

    Vegan Pumpkin Spice Latte Caramels

    Halloween just a few short weeks away, and up until a few days ago I hadn’t made any candy this year yet! I always make peanut butter cups, and I need to get around to those, but this week, the first thing I made was some pumpkin spice latte caramels.  I am not usually a coffee drinker, but I have had a couple of pumpkin spice lattes this year just because I wanted to see what all of the hype was about, and because I wanted something a little different than my usual tea and I ended up loving them.  These were not your standard chain coffee shop fake pumpkin spice flavor in your coffee lattes though, we got them from a local shop that makes their own pumpkin spice syrup, and they made mine with oat milk which froths really well.  It has inspired me to make my own at home, which I will do soon, but until then, I made these truffles.

    I made caramel the other day for caramel rolls, and decided that it would be wonderful with pumpkin and spices in it.  Drizzled over cake, or on its own covered in chocolate.  I chose to make the latter this time.  I made my usual caramel recipe but with pumpkin and all of the spices I add to my pumpkin pie.  To thicken it enough to shape, I added in some coconut butter as well and it worked perfect!  Of course since it was a supposed to taste like a pumpkin spice latte, I added in a bit of espresso powder as well.

    It was divine just like that.  Like I could eat it with a spoon on its own good.  And I did,  a little because I had to make sure it was good about three times *wink* *wink*.  Once covered in chocolate though, it was delicious! The caramel is sweet, with just the right amount of pumpkin and spice, a hint of coffee and perfect when paired with the dark chocolate shell.  I debated whether or not I should share it, and I think I am going to save most of them for myself lol.  These would be perfect to enjoy with a pumpkin spice latte, just sayin.

    The classic Halloween candy is good, and of course I have my old standbys like the peanut butter cup, and I do plan on making a few more varieties, but if you are looking for something a little different, and you are a caramel fan like me, test out these babies!  What is your favorite Halloween candy?

    Vegan Pumpkin Spice Latte Caramels

    Makes 12  truffles

    Caramel:

    • 1 1/4 cups packed soft medjool dates, pitted
    • 1/2 cup pumpkin puree (canned is fine)
    • 1/4 cup coconut butter, warmed to liquid
    • 2 tsp espresso powder
    • 1 tsp ginger
    • 1 tsp cinnamon
    • 1/4 tsp nutmeg
    • 1/4 tsp cloves
    • 1/4 tsp sea salt
    • 2 tsp pure vanilla extract


    Chocolate:

    • 1 1/2 cups chopped vegan dark chocolate or chocolate chips


    Instructions:

    1. To make the caramel, combine all ingredients in a food processor and process until smooth. Pour into a bowl, and place in the freezer for about 15-20 minutes or until it has thickened up enough to roll into balls.  Roll into 12 balls, place on a parchment lined tray, and place back in the freezer for at least 30 minutes until more firm.
    2. Melt the chocolate in the top of a double boiler, stirring until it is all melted.  Dip each chocolate into the chocolate (I like to place mine on a fork) and let the excess drain off, then place back on the tray. Place in the freezer to harden for about 15 minutes, and enjoy!

    *Store in the fridge in an airtight container for up to 1 month.


  • Vegan Pumpkin Chocolate Chip Cookies

    Vegan Pumpkin Chocolate Chip Cookies

    Ever since we rolled into fall earlier this week, I feel like the trees and nature have gotten the memo because the leaves are starting to change and there is a bit of the chill in the air.  I am kind of sad because I have a strained hamstring and can’t run through the crunchy leaves at the moment (one of my all time favorite parts of fall). But I can bike and walk to get out and enjoy nature and the outdoors.  The aroma of dried leaves and bonfires hangs in the air and makes me want to pull out all of my cozy sweaters and fall clothes, drink hot cider and bake spiced desserts. Especially of the pumpkin and apple variety.

    I have been on a pumpkin kick this week.  Because I am craving pumpkin spice desserts, and because I opened up a can of pumpkin and wanted to use it all and most recipes only call for about 1/2 cup.  I could have of course frozen it but that’s no fun.  We make pumpkin cookies at my work, and they were looking really good the other day, but sadly they are not vegan.  So, I decided that I needed to make some vegan ones of my own at home.  I wanted to make them a bit less cakey though, and add in chocolate chips instead of a glaze on top.  Because chocolate is actually amazing with pumpkin spice!

    These cookies are actually pretty simple to make, no complicated instructions or anything fancy.  They have plenty of pumpkin in the dough, and just the right amount of pumpkin spices. I also add in maple sugar and maple extract and it gives them that something special that is really good but you don’t know quite what it is.  The dough for these by the way is downright addictive and super delicious.  I could not stop tasting it while making them.  Eating dough is one of my favorite parts of baking cookies after all, since I like dough even better than actual baked cookies sometimes.

    But don’t worry, these cookies are just as delicious as the dough! They smell amazing while baking, and are heavenly when you eat them while the chocolate chips are still warm and gooey!  If you are in the mood for something pumpkin too, give these a try!  They are amazing with a cup of tea or coffee for a mid-morning treat! Fall is definitely my favorite season!

    Vegan Pumpkin Chocolate Chip Cookies

    Makes 12 large cookies

    Ingredients:

    • 3/4 cup coconut oil, warmed to liquid
    • 1 1/2 cups maple sugar coconut sugar
    • 1/2 cup pumpkin puree or canned pumpkin
    • 2 tsp pure vanilla extract
    • 1 tsp maple extract (optional)
    • 2 1/2 cups organic whole wheat pastry flour
    • 1 1/2 tsp ground ginger
    • 1 1/2 tsp ground cinnamon
    • 1/2 tsp cloves
    • 1/4 tsp nutmeg
    • 1/2 tsp sea salt
    • 1 tsp baking soda
    • 1/2 tsp baking powder
    • 1 cup vegan chocolate chips


    Instructions:

    1. Preheat the oven to 350F degrees, and line 2 sheet pans with parchment.
    2. In a large bowl, mix together the coconut oil, coconut sugar, pumpkin puree and vanilla until well combined.
    3. Mix in the flour, spices, sea salt, baking soda and powder, until smooth.
    4. Mix in chocolate chips until well combined.
    5. Put the dough in the refrigerator until it is a little more firm, about 30 minutes.
    6. Roll the dough into 12 balls (about 2 inches round), and place on the baking sheets, spread a few inches apart and flatten slightly.
    7. Place in the oven and bake until starting to brown at the edges, about 12 minutes.
    8. Remove from the oven and let cool on a rack.

    Cookies keep in an airtight container at room temperature for up to 1 week, or frozen for up to 4 months.

    *If you wish to make these gluten free, you can swap the whole wheat flour 1:1 for Bob’s Red Mill Gluten Free All Purpose Baking Flour.  I have tried this flour and know it works well.


  • Vegan Cinnamon Roll Cake

    Vegan Cinnamon Roll Cake

    At work in the deli last week, one of my coworkers decided to bake a cinnamon roll cake for our hot food bar.  We don’t usually make desserts for it but it is always nice to swap things up, and a lot of people have a sweet tooth.  Plus, who doesn’t like warm cinnamon scented cake? Anyways, the cake smelled amazing and sold well but sadly it wasn’t vegan so I could not try it.  So I decided that I was going to go home and make one of my own that was more suited to my tastes as well.  I prefer to make my desserts a bit less processed than traditional ones, so every time I veganize a recipe it becomes less processed as well. I was super excited about this one!

    I already love cinnamon rolls, but they are kind of a lot of work.  Cake is so much easier! And if I can get the same sweet cinnamony flavor, why not?!  For the cake base I started off with what I would use for my plain vanilla cake.  Cinnamon rolls have a vanilla base after all.  It was really quite simple to make, just whisked all together in a bowl!  Back in the day before I went vegan and I would make those vanilla cakes that you had to whip the eggs separately and cream the sugar and whatnot and you know what?  Honestly the texture of my vegan cakes is just as good and they are easier to make.  I used maple sugar to sweeten this one, because it goes so well with cinnamon.  Also, you may notice there is not any oil in this cake.  It actually doesn’t need it, because the coconut oil I use in the batter is plenty rich!

    I gave the inside of the cake cinnamon swirls as well, because cinnamon rolls have to have plenty of cinnamon!  I did swirls instead of just dropping it in because I figured it would be more evenly distributed that way.  Once it was all put together I wanted to make a streusel for the top like the one that was made at work.  I am a sucker for streusel after all.  I love it on anything dessert related.  I kept this one simple, just flour, sugar and coconut butter (not to be confused with coconut oil) plus some cinnamon and was looking forward to how crunchy and delicious it would get once baked!

    It smelled amazing while baking by the way.  Cinnamon reminds me of fall, which is appropriate since we are almost there!  I could not wait to try it, but I had to wait for it to cool a bit before un-molding.  As if it wasn’t already amazing how it was, I added some glaze like the cake at work had.  Except instead of making a powdered sugar glaze, I used coconut butter sweetened with a bit of maple syrup.  It was time to dive in.  The cake was soooo good!  It had a soft, light texture, and it was just the right amount of sweetness, with the perfect amount of cinnamon and vanilla.  That crunchy struesel topping made it crave worthy!  So the next time you are craving cinnamon rolls but don’t want to deal with yeast and kneading and whatnot, make this instead!

    Vegan Cinnamon Roll Cake
    Makes one 6 inch cake

    Ingredients:

    one 6 inch cake pan

    Cake:

    • 3/4 cup organic whole wheat pastry flour
    • 3/4 tsp baking soda
    • 1/2 tsp baking powder
    • 1/4 tsp sea salt
    • 1/2 cup maple sugar
    • 1 cup full fat coconut milk (the thick kind, I prefer Thai Kitchen brand) at room temperature
    • 1 tsp pure vanilla extract
    • 1 Tbsp cider vinegar


    Swirl:

    • 2 Tbsp maple syrup at room temperature
    • 2 Tbsp maple sugar
    • 2 tsp cinnamon


    Topping:

    • 1/4 cup organic whole wheat pastry flour
    • 2 Tbsp maple sugar
    • 1/8 tsp sea salt
    • 1/4 tsp cinnamon
    • 3 Tbsp coconut butter, warmed to liquid


    Drizzle:

    • 1 Tbsp coconut butter
    • 1 tsp maple syrup
    • 1 Tbsp filtered water, or as needed


    Instructions:

    1. Preheat the oven to 350F degrees and position rack in center of oven.
    2. Oil a 6 inch round baking pan and line it with parchment at the bottom so it will not stick.
    3. Whisk flour, baking soda, sea salt, and sugar in a large bowl to blend well.
    4. Whisk coconut milk and vanilla extract together in small bowl to blend well, then whisk into the flour mixture until well blended.
    5. Whisk the cider vinegar into the batter.
    6. Mix together swirl ingredients in a small bowl.
    7. Transfer half the cake batter to prepared pan then place the swirl mixture in a ziplock bag with the corner cut off and pipe it into a swirl from the center out.  Pour the rest of the cake batter over it, then do the same with more of the swirl. marble the swirls with a knife.
    8. Mix together the streusel ingredients in a bowl with your hands until it starts to clump together, then sprinkle over the cake.
    9. Place in the oven, and bake cake until tester inserted into center comes out clean with just a few moist crumbs attached, about 25 minutes.
    10. Remove from the oven and let cool for at least 30 minutes, then un-mold, by cutting around the edges if they are stuck at all, then putting  plate over the top, then flipping it onto that plate then placing a plate on the bottom and flipping it upright onto that plate.
    11. Whisk together the coconut butter, maple syrup and water until smooth (adding a little more water if it is too thick to drizzle).
    12. Drizzle the coconut butter mixture over the cake, and serve!

    Cake keeps stored in a container on the counter for up to 1 week, or can be frozen for up to 4 months.

    Notes:

    If you would rather use coconut sugar or even just granulated sugar for this, either will work in place of the maple sugar.

    If you would like to make a 9 inch round cake, double the entire recipe, and bake it in a 9 inch round pan, increasing the baking time to 50 minutes to 1 hour (depending on your oven).

    This cake can be made gluten free by swapping out the whole wheat pastry flour for Bob’s Red Mill gluten free all purpose baking flour (this is a brand I have used before and have tested it in cakes with great results).

  • Vegan Spiced Peach Hand Pies 

    Vegan Spiced Peach Hand Pies 

    We are kind of in between summer and fall right now.  The weather can’t seem to decide since we have gone from cool and 50F degrees and raining to sunny and nearly 80 within a few days.  Don’t get me wrong, I love summer but I am really excited for fall and that chill in the air is kind of nice, especially for running or doing anything active outside.  I am one of those people who likes it a little cool, so I am not sweating my butt off. I like to go enjoy the outdoors in the cool air in the fall then head inside for a warm drink like apple cider or a matcha latte.

    Since we are between seasons right now though, I decided to make a recipe that sort of was too on my day off last weekend.  I had some very ripe peaches on my counter  that needed to be used right away, so I was going to make some pie, but then I decided to include warming fall spices in them because I am in a fall sort of mood.  Spice is lovely with peaches just like it is with apples, and I will have plenty of those soon so why not enjoy the peaches while I still can.  That pie turned into hand pies, because I just didn’t feel like making a whole giant pie for myself.

    With hand pies, they are easier to share or I can freeze them for later.  Also, they are pretty simple to make and it is kind of fun to assemble them! First, I cooked the peach filling.  I do this, because they take less time to bake this way, and the fruit will always come out nice and tender.  I added some cinnamon, nutmeg and ginger for the spices, and a little bit of maple syrup to sweeten and it was perfect!  It needed to cool though before I made the crust so it didn’t melt it.

    For the crust, I used a simple recipe with whole wheat pastry flour, coconut oil, maple sugar and sea salt.  I wanted it simple to allow the flavor of the peaches to shine.  You could of course use Bob’s Red Mill all purpose gluten free baking flour if you wanted it to be gluten free (I have tested this brand and know it works well).  They baked up beautifully and my house smelled amazing! I could not wait to try one!  I didn’t have to let them cool long, because I love warm fruit pie, especially with coconut milk ice cream (which sadly I didn’t have any of when I made these because I wasn’t thinking ahead).  They were super delicious!  Sweet, jammy peach filling with just the right amount of warming spices in a flakey tender crust!  Just the sort of thing that is perfect for in between summer and fall!

    Vegan Spiced Peach Hand Pies 
    Makes 8

    Filling:

    • 3 cups organic peaches, cut into small pieces (like 1/2 inch cubes)
    • 2 Tbsp maple syrup
    • 1/2 tsp cinnamon
    • 1/8 tsp nutmeg
    • 1/4 tsp ground ginger
    • 1 Tbsp organic whole wheat pastry flour
    • 1 tsp pure vanilla extract


    Crust:

    • 2 1/2 cups organic whole wheat pastry flour
    • 1/4 cup maple sugar or coconut sugar
    • 1/2 tsp sea salt
    • 3/4 cup coconut oil in its solid state
    • about 6-7 Tbsp cold water (or as needed)


    Topping:

    • 2 Tbsp maple sugar or coconut sugar
    • 1/4 tsp cinnamon


    Instructions:

    1. In a saucepan, combine the peaches, maple syrup, cinnamon, nutmeg, ginger and cook over medium heat for about 15 minutes stirring often until the fruit is soft and starting to fall apart. Mix in the vanilla and flour and cool completely.
    2. To make the crust, in a large bowl, mix together flour, sugar, and sea salt. Cut in coconut oil with a pastry blender or 2 knives until it is in pea sized pieces. Mix in just enough water to create a smooth dough that holds together but isn’t too sticky. Add more water if needed, and knead slightly until a smooth dough is created.
      Roll out into a large rectangle and cut into 16 identical rectangles.  Chill if too soft before assembling.  You want the dough a little pliable, but not so warm that it will break. Preheat oven to 375F degrees.
    3. To assemble, spoon about 2 heaping Tbsp of the peach filling over half of the dough rectangles (leaving a boarder so you can attach the dough at the sides). Cover with the remaining pieces of dough (I used a small spatula to carefully move them), pressing the edges and crimping with a fork or spoon or the edge of something with a flat edge, like a spatula.
    4. Mix together the 2 Tbsp maple sugar and cinnamon and sprinkle it over the pies.
    5. Bake for about 30 minutes until the crusts are starting to brown lightly.
    6. Remove from oven and let cool on a wire rack until warm.
  • Vegan Key Lime Curd Bars

    Vegan Key Lime Curd Bars

    Key lime pie and all things tart citrus have always been favorites in my family. When I was little, my Mom and I would often buy truffles at a counter in a department store in the Mall, and it was usually the key lime flavored ones. One time the clerk said that she didn’t know why we liked them so much, because she thought they were too tart, but on the contrary we thought they were perfect! Often times I feel like citrus desserts have way too much sweet to counteract the tart but what I like is a balance of the two. When I make my key lime pies I often times use a little less sweetener for that reason. I love tart lime!

    So last week when I had a bag of limes on hand and was trying to decide what to make, lime curd bars came to mind. I have also always had a love for those lemon curd bars, so I figured why not make them in the fashion? I have never made lime curd bars before, so it was more exciting too. For the crust I made a shortbread cookie dough, and pre-baked it before adding the filling on top of it so it would be nice and crispy to contrast the filling. I used whole wheat pastry flour mixed with a little tapioca starch to lighten it but if you wanted to make these gluten free, you could swap it out for gluten free all purpose baking flour (I recommend Bob’s Red Mill).

    For the filling, I used plenty of lime juice and zest, with coconut cream to make it nice and rich since there would be no dairy or eggs in this, and combined it with a little maple syrup and vanilla to sweeten it. I thickened it with corn starch which worked out slick and you just pour the filling into the crust and let it before enjoying.

    Lastly since traditional citrus bars are topped off with a powdered sugar topping I wanted these to look just as pretty so I made a coconut “powdered sugar” dust. It isn’t super sweet like actual powdered sugar but it is pretty and goes well with the lime. If you area fan of citrus curd bars, definitely give these a try!

    Vegan Key Lime Curd Bars
    Makes 16

    Crust:

    • 1 1/2 cups organic whole wheat pastry flour*
    • 1/2 cup tapioca flour (or cornstarch would work as well)
    • 1/2 cup maple sugar
    • 1/4 tsp sea salt
    • 1/4 cup melted coconut oil
    • 1/4 cup plus 2 Tbsp avocado oil (or other neutral oil liquid at cool temperatures)

    Filling:

    • 3/4 cup lime juice
    • 2 Tbsp lime zest
    • 1/2 cup cornstarch
    • 1 3/4 cups canned coconut cream
    • 1/4 cup plus 2 Tbsp maple syrup
    • 1/4 tsp spinach powder (for color, optional)
    • 1/4 tsp sea salt
    • 1 tsp pure vanilla extract

    For Topping:

    • 1/4 cup finely shredded, dried unsweetened coconut

    Instructions:

    1. Preheat the oven to 350F degrees, and line an 8×8 inch square pan with parchment paper (so that it goes up the sides too).
    2. To make the crust, mix all ingredients together in a bowl until combined, then press into the bottom of the prepared pan.
    3. Place the pan in the oven and bake for 20 minutes or until set and lightly browned. Remove from oven.
    4. To make the filling, combine all ingredients in a sauce pan, except the vanilla extract, and whisk to dissolve the cornstarch. Place on the stove over medium heat, whisking constantly until it is starting to thicken. When it starts to thicken cook for a minute or two, until it is thickened to the consistency of pudding, then whisk in the vanilla extract.
    5. Pour the filling over the prepared crust, and let cool completely, then refrigerate for a few hours until completely chilled.
    6. Buzz the coconut in a blender until it is fine like flour, then dust the tops of the bars with it by putting it in a fine meshed strainer and tapping it over them.
    7. Cut into 16 bars.

    Store any extra bars in the refrigerator in an airtight container.

    *If you wanted to make these gluten free, you could use Bob’s Red Mill gluten free all purpose baking flour instead of the pastry flour.

  • CBD Dark Chocolate Mint Bark

    CBD Dark Chocolate Mint Bark

    I take CBD oil every day to fight inflammation and stress, usually in oil form, but it is so much more fun being able to enjoy it in dessert form, specifically in chocolate form. I enjoy dark chocolate just about every day, so I figure, why not add my CBD oil to my treats sometimes? Raw Guru recently sent me some lovely CBD products from Veggimins, including some of their dark chocolate bars and 500 mg peppermint CBD oil so that gave me an idea. Chocolate bark! I haven’t made any in ages, but I used to love making and eating chocolate bark back in the day as a kid, so why not?!

    I love that it doesn’t require any fancy chocolate molds, and it not fussy. I did not used to own chocolate molds, so it was one of the first things I made. I was picturing a dark chocolate bark swirled with green and white to make it pretty. Luckily it turned out just as I had planned. I hate it when things don’t turn out. They usually still taste good even if they don’t look pretty but I am somewhat of a perfectionist most of the time when it comes to the appearance of my desserts.

    I just melted some of that Veggimins dark chocolate, along with some other dark chocolate I had to create the base for the bark and added a little peppermint extract, along with the peppermint CBD oil to give it just enough peppermint flavor. I love peppermint things in the summer for their cooling affect!

    I then tinted some coconut butter green with matcha, which by the way also goes good with peppermint and chocolate and swirled that into the bark along with some coconut butter to create a tricolor affect. It was lovely, and so easy! If you are a peppermint fan, and would like to get your daily dose of CBD in chocolate form, give this a try!

    CBD Dark Chocolate Mint Bark

    Makes about 20 pieces of bark

    Ingredients:

    • 2 cups chopped vegan dark chocolate or vegan dark chocolate chips
    • 2 tsp Veggimins CBD oil
    • 1/2 tsp peppermint extract
    • 1/3 cup melted coconut butter plus 2 Tbsp
    • 1/2 tsp matcha powder

    Instructions:

    1. Line an 8×8 inch square pan with parchment.
    2. Heat the dark chocolate in the top of a double boiler until melted, then stir in the CBD oil, and peppermint extract.
    3. Whisk the matcha powder into 1/3 cup of the coconut butter.
    4. Pour the dark chocolate into the prepared pan, then drop the coconut butter with the matcha over it by the teaspoon randomly. Drizzle the remaining 2 Tbsp of coconut butter over that, then swirl it all with a knife to create a pretty pattern.
    5. Place in the refrigerator until it is hard, about an hour.
    6. Remove from the pan and break into pieces.
    7. Enjoy!

    Keeps in a container in the refrigerator for up to 2 months.

  • Vegan Raspberry Lavender Pie Cookies

    Vegan Raspberry Lavender Pie Cookies

    Raspberries are my all time favorite fruit. Maybe because they are somewhat abundant here in Minnesota and I ate a lot of them as a kid. Or because they have a season limited to a couple of months here so they also seem somewhat special. Yes, you can buy them year round shipped in from other places, but they are definitely best this time of the year when they are local. So, I have been making a lot of things with raspberries lately.

    Last week I thought some raspberry pie sounded good but I didn’t want to make a giant pie so I decided on mini pies instead. When I say mini, I mean really mini as in pie cookies. I have made them before in other flavors so I figured why not raspberry?! Plus they are all cute and shareable and perfectly portioned for a few bites!

    I also decided to make them a little fancier and add a touch of lavender to them. Berries and lavender are so heavenly together! These were easy to make. You just make a simple pie crust dough (the trick is not to completely over-mix it), then roll it out and have fun cutting it into cute little circles that you then fill with jam and another piece of dough. I felt kind of like a kid playing with play dough.

    They baked up beautifully and in much less time than an actual pie would have. Also most importantly they turned out super delicious! The pie crust was buttery and rich and the raspberry filling sweet and gooey! If you love fruit pies, and have raspberries on hand, give this recipe a go!

    Vegan Raspberry Lavender Pie Cookies
    Makes 18

    Crust:

    Filling:

    • 1/2 cup mashed raspberries mixed with 1 Tbsp maple sugar and 1 tsp cornstarch or 1/2 cup vegan raspberry jam
    • 1/2 tsp dried lavender flowers

    Topping:

    • coconut milk or aquafaba for brushing tops
    • maple sugar or coconut sugar for sprinkling

    Instructions:

    1. Preheat oven to 375F degrees.
    2. To make the crust, in a large bowl, mix together flour, sugar, sea salt, and spices.
    3. Cut in coconut oil with a pastry blender or 2 knives until it is in pea sized pieces. Mix in  just enough water to create a smooth dough that holds together but isn’t too sticky. Add more water if needed, and knead slightly until a smooth dough is created.
    4. Roll out into a large rectangle 1/8 inch thick using parchment underneath and floured rolling pin, and cut into 36 circles with a cookie cutter.
    5. Mix the jam with the lavender.
    6. Spoon the raspberries or jam by the tsp onto half of the prepared little crust circles, and cover with the top pieces of dough (I used a small spatula to carefully move them), pressing the edges and crimping with a fork.
    7. Brush very lightly with a little coconut milk, then sprinkle with a little maple sugar.  Place the pan in the oven.
    8. Bake for about 30 minutes until the crusts are starting to brown lightly. Remove from oven and let cool on a wire rack until warm.
  • Vegan Black Raspberry Blondies

    Vegan Black Raspberry Blondies

    Sometimes on my runs I am in the zone and sorting out my own thoughts, and other times I pay more attention to the beautiful things in nature around me. There sure is a lot of beautiful things to enjoy lately. Like a yard full of different colors of lilies, or the animals that all seem to be out. The best discovery I have made lately though were the wild black raspberries. I have been watching them ripen for the past week and they were finally starting to be ready last weekend.

    I decided I would go back later and pick some since I don’t usually stop during my run. It seems like the raspberries are going crazy this year! There are more than I have ever seen, usually it is a few patches, but this year they are everywhere! Maybe it was the weird weather we had last Winter and the late Spring, but whatever the case, I am happy there are so many. Eric and I picked a bunch, and snacked on a few but I decided that I should make some recipes with them as well. Because why not?! They are super delicious.

    So I made some black raspberry blondies. It was between that and brownies, but I am a vanilla girl after all, and I hadn’t made blondies in a long time so they won. I love that they are so easy to make, and so shareable too. I made my classic blondies with good quality vegan dark chocolate chips, and stirred in the raspberries. The dough was amazing. Just saying. Dough is my favorite part of the baking process so I had to try some.

    They smelled amazing while baking, and I could not wait to try them. Once they had cooled down and were all ready to go, I was all over them. They turned out super delicious with the rich vanilla cookie dough, dark chocolate chips and jammy black raspberries! I think using them in blondies was definitely the right choice!

    Vegan Black Raspberry Blondies

    Makes 16

    Ingredients:

    • 1/2 cup coconut oil
    • 1 cup maple sugar or coconut sugar
    • 1 Tbsp ground golden flax seed mixed with 3 Tbsp filtered water
    • 1 tsp pure vanilla extract
    • 1 1/4 cups organic whole wheat pastry flour
    • 1/2 tsp baking soda
    • 1/8 tsp sea salt
    • 3/4 cup vegan dark chocolate chips
    • 3/4 cup black raspberries

    Instructions:

    1. Preheat the oven to 350F degrees, and line an 8×8 inch square pan with parchment.
    2. To make the dough, mix together the coconut oil and coconut sugar until well blended with a wooden spoon.
    3. Add the flax and water mixture and vanilla and mix until well blended.
    4. Add the flour, soda, and salt and mix until smooth.
    5. Stir in the chocolate chips and black raspberries (they will get crushed a bit and that’s ok).
    6. Press into the bottom of the 8×8 inch pan, and place in the oven.
    7. Bake for 25-30 minutes or until done in the center and lightly brown.
    8. Remove from the oven and let cool before cutting into bars. When ready to cut, just lift them out with the parchment onto a cutting board and cut into 16 bars.
    9. Enjoy!
  • Stuffed Roasted Peaches

    Stuffed Roasted Peaches

    In the fall, I like to make baked stuffed apples, roasted to perfection until tender and stuffed with a crunchy sweet streusel. So I figured baked peaches would be amazing that way in the Summer when they are in season. I had a few peaches on hand and decided to give it a try! They happened to be on sale that week so I had picked up a few. It always makes me happy when I can get organic fruit for a good price!

    The reason I had thought to make them in the first place was because I was dreaming about how good a warm slice of peach pie with cool coconut milk ice cream would be, but I didn’t have enough time to make that so I came up with the peaches. They were quick and easy to make, had the same flavors as pie would have but were a bit lighter and I had a delicious dessert ready in no time!

    I cooked the peaches a little bit before I added the streusel because I wanted them to get tender and not have the streusel burn or get too dark. I wanted the streusel also to be nice and crunchy so I added plenty of texture in the form of oats and large flake coconut. The streusel was even delicious before I sprinkled it over the peaches!

    They smelled so good while they were baking, just like a peach pie! Of course I had to serve them while still warm with a little bit of coconut milk ice cream! They were heavenly! All baked to jammy sweet perfection with the crunchy streusel! If you are looking for a simple but really good Summer dessert, give these a try!

    Stuffed Roasted Peaches

    Makes 4

    Ingredients:

    • 4 larger just ripe (but not mushy organic peaches, cut in half, and pits removed carefully
    • 2 Tbsp plus 1 tsp coconut sugar, divided
    • 1/4 cup organic rolled oats
    • 2 Tbsp whole wheat pastry flour
    • 2 Tbsp large flake dried coconut (unsweetened)
    • 1 Tbsp coconut oil
    • pinch sea salt

    Instructions:

    1. Preheat the oven to 400F degrees.
    2. Place the peaches cut side up in a pie plate or smaller baking dish. Sprinkle each with a teaspoon of coconut sugar, and cover with a lid or foil. Place in the oven and bake for 20 minutes when the peaches have began to soften.
    3. Meanwhile, while you are waiting for the peaches, combine 1 Tbsp coconut sugar, the oats, the flour, the coconut, coconut oil and the sea salt in a small dish and scrunch together with your fingers until it starts to form clumps. Set aside.
    4. When the peaches have baked 20 minutes, remove the plate with the peaches from the oven and sprinkle each with the streusel. Place back into the oven uncovered.
    5. Bake until the streusel is starting to brown and the peaches are tender, about 15 minutes more.
  • Vegan Strawberries and Cream Mini Loaf Cakes

    Vegan Strawberries and Cream Mini Loaf Cakes

    I was planning on making something strawberry rhubarb last weekend but I wasn’t able to get rhubarb, so I just went with the strawberry instead! I wanted to make something I hadn’t made before, so I decided on a loaf cake. I don’t usually make them, since a lot of times I want cakes with frosting, but a strawberries and cream cake with a sweet glaze sounded just as good plus a whole heck of a lot easier!

    I already had strawberries on hand, so that was an added bonus! I love it when I have all of the ingredients for a recipe that I randomly think up, and I don’t have to spend extra money to buy more. It is just a good feeling! Anyways, these cakes were really easy to make. I use smaller loaf pans, because I like to be able to share them, they bake up a lot faster and they are so cute! I mean, who doesn’t love having their own whole little mini cake?

    No fancy tools required to make this cake either, you just whisk them all together in a bowl, pour into the pans and bake! Your kitchen will smell heavenly while they are baking too, like strawberry shortcake. Unfortunately they have to cool before you un-mold them if you want them to look nice so you will have to wait until they cool to take them out unless you don’t mind messy cake. Which by the way would totally be ok if you didn’t have to photograph them like me, because I can dig messy cake with the glaze poured on in the pan and eating it out of there.

    For the glaze I kept it simple. I am not a fan of refined sugar so no powdered sugar here, just a simple glaze made from Dastony coconut butter from Raw Guru, a little lemon juice, maple syrup and strawberry powder. Once the glaze was poured over the cake, it was totally heavenly! Soft and sweet, packed with strawberry and vanilla flavor and just the pick me up I wanted on the weekend to go with my tea!

    Vegan Strawberries and Cream Mini Loaf Cakes
    Makes 4 mini loaf cakes

    4 mini (5×3 inch) loaf cake pans

    Cake:

    • 1 1/2 cups Bob’s Red Mill All Purpose Gluten Free Flour
    • 1 1/2 tsp baking soda
    • 1 tsp baking powder
    • 1/2 tsp sea salt
    • 1 cup coconut sugar
    • 1/2 cup virgin coconut oil, warmed to liquid
    • 1 cup coconut milk (at room temperature)
    • 1 Tbsp pure vanilla extract
    • 2 Tbsp lemon juice
    • 1 cup sliced strawberries

    Glaze:

    • 3 Tbsp Raw Guru coconut butter, warmed to liquid
    • 1 Tbsp lemon juice
    • 1 Tbsp maple syrup
    • 2 tsp strawberry powder (I took freeze dried strawberries and ground them to powder for this)
    • filtered water as needed

    Instructions:

    1. Preheat the oven to 350F degrees and position rack in center of oven.
    2. Oil 2 mini loaf pans lightly so that the cake doesn’t stick.
    3. Whisk flour, baking soda, sea salt, and sugar in a large bowl to blend well.
    4. Whisk oil , coconut milk, vanilla extract together in small bowl to blend well, then whisk into the flour mixture until well blended.
    5. Transfer cake batter to prepared pans and bake cakes until tester inserted into center comes out clean, about 25-30 minutes.
    6. Cool cakes completely in pans on rack, about 1 hour. Let cool completely, then un-mold.
    7. To make the glaze, whisk together all ingredients, adding a little more water if it is too thick (you want to be able to drizzle it over the cakes).
    8. Drizzle the glaze over the cakes, and enjoy!

    *My mini loaf pans are 5×3 inches and 2 1/2 inches tall.  If yours are smaller, you will get 8 loaves, and decrease the baking time by half.

  • Roasted Spring Vegetable Buddha Bowl

    Roasted Spring Vegetable Buddha Bowl

    I tend to eat the same 4 things every week for dinner. Unless I am creating a new recipe then I will vary what I make. But the rest of the time when I make the same things it is mostly just because I know what I like, and because it ends up being a no brainer to make those recipes once I do it so many times. One of those items I make all the time is buddha bowls. I sometimes use different vegetable ingredients based off of what time of the year it is and what is in season or what I have on hand. I switch off quinoa and brown rice for the grain usually. But my current favorite is this one involving Spring vegetables.

    I get kind of excited about the different types of produce that can be found in the store in the Spring, Summer and Fall. But in the Spring I feel like I have been kind of deprived for a while of all of the super fresh vegetable type stuff since here in Minnesota we can’t really grow anything unless it is indoors. So it is awesome to see things like asparagus and radishes. I like to eat radishes raw but the other day when I made this bowl I thought to myself, how would they be roasted? The answer to that is super delicious. They kind of lose that peppery bite that they have and become a bit sweeter, kind of similar to roasting turnips.

    I combined them with asparagus, which I could not resist buying since it is so springy. As well as carrots, chickpeas and avocado in my bowl over brown rice and it was sooo good! But the part that made it really all come together was the creamy pumpkin seed butter sauce that I put over it all. I made it with Dastony Pumpkin Seed Butter from Raw Guru and you would swear it had dairy or cream or something in it it is nice and rich tasting.

    I added a little cumin, chipotle, lemon garlic and salt to it so that it was similar to a classic tahini dressing, but it was even more delicious since the pumpkin seeds don’t have that bitterness that tahini sometimes has. This bowl was so good I will probably be making it for the rest of Spring. If you are in need of a hearty healthy dinner that tastes like comfort food, give this a try!

    Roasted Spring Vegetable Buddha Bowl
    Serves 2-3

    • 2/3 cup brown jasmine rice
    • 1 1/3 cups filtered water
    • 2 cups sliced carrots
    • 2 cups asparagus, cut into 2 inch pieces
    • 2 cups radishes, quartered
    • avocado oil
    • sea salt

    Sauce:

    • 1/2 cup Dastony pumpkin seed butter
    • 1/4 cup lemon juice
    • 1/4 cup filtered water (or as needed)
    • 1 garlic clove, minced
    • 1 tsp ground cumin
    • 1/8 tsp dried chipotle pepper
    • 1/4 tsp sea salt or to taste

    To assemble:

    • organic greens, such as arugula, spinach or spring mix
    • 1 1/2 cups cooked chickpeas
    • 1 avocado, diced

    Instructions:

    1. Place rice and water in a medium saucepan and bring to a simmer. Reduce to a low simmer, cover and cook until all the water is absorbed about 25-30 minutes, or when the rice is tender.
    2. Meanwhile, to cook the veggies, preheat the oven to 400F degrees. Toss the veggies with just enough oil to coat them lightly, then spread out on a sheet pan and sprinkle with sea salt Place in the over and roast until they are tender and starting to brown, about 25-30 minutes. Remove from the oven.
    3. Whisk together the sauce ingredients, adding water to achieve your desired consistency.
    4. To assemble, put some greens into the bottom of each bowl, then top with the rice, the chickpeas, the veggies, and avocado. Drizzle the sauce over the contents of the bowl. Serve!
  • Vegan Raspberry Pop-Tarts

    Vegan Raspberry Pop-Tarts

    It was hard for my Mom to get me to eat breakfast when I was little. I just wanted to go to school or daycare and hated cereal so I would either eat Nutrigrain bars or Pop-Tarts so I didn’t have to sit down and take a lot of time to eat. The Raspberry Pop-Tarts were my favorite. But looking back on it, now that I have had plenty of pastries and real fruit they really didn’t taste like real pastries or raspberry at all even if they were amazing at the time. They had sort of a weird raspberry paste inside. I did however like the fact that they were iced and had sprinkles.

    I probably haven’t eaten an actual Pop-Tart since high school, but I have made my own at home with some success. No raspberry ones though until last weekend surprisingly. I had some raspberries on hand and was thinking that it would be awesome to make home made raspberry pop-tarts that were way better than those store bought ones I grew up eating. I am all for veganizing things and making them better.

    I was excited about these! I made a gluten free classic pie crust and used some home made raspberry jam as the filling. But of course you could use store bought if you have a favorite brand. These are actually pretty simple to make, although they do involve some mixing dough correctly and rolling it out and cutting it. But that is the fun part! Besides eating the finished ones of course. I wanted to put a glaze on them too, like the ones I ate as a kid.

    So, I used some Dastony coconut butter from Raw Guru to make a simple but delicious glaze. The finished product was super delicious! Jammy, gooey raspberry filling and a flakey buttery crust with a sweet glaze! They were waaayyyy better than any of the Pop-Tarts I grew up eating! I definitely recommend you try these next time you are craving the Pop-Tarts of your childhood.

    Vegan Raspberry Pop-Tarts
    Makes 8

    Crust:

    Filling:

    • about 1/2 cup raspberry jam

    Glaze:

    • 3 Tbsp coconut butter, warmed to liquid
    • 1 Tbsp raspberry powder (I ground up freeze dried raspberries with a mortar and pestle)
    • 1 Tbsp maple syrup
    • pinch sea salt
    • 3-4 Tbsp filtered water or as needed

    Instructions:

    1. To make the crust, in a large bowl, mix together flour, sugar, sea salt, and spices. Cut in coconut oil with a pastry blender or 2 knives until it is in pea sized pieces. Mix in just enough water to create a smooth dough that holds together but isn’t too sticky. Add more water if needed, and knead slightly until a smooth dough is created.
    2. Roll out into a large rectangle and cut into 16 identical rectangles.  Chill if too soft before assembling.  You want the dough a little pliable, but not so warm that it will break. Preheat oven to 375F degrees.
    3. To assemble, spread about 2 Tbsp jam over half of the dough rectangles (leaving a boarder so you can attach the dough at the sides). Cover with the remaining pieces of dough (I used a small spatula to carefully move them), pressing the edges and crimping with a fork or the edge of something with a flat edge, like a spatula. Bake for about 30 minutes until the crusts are starting to brown lightly. Remove from oven and let cool on a wire rack until warm.
    4. Whisk glaze ingredients together until smooth (adding more water if too thick, you want it to be pour-able). Spoon some of the glaze over each pop tart, and smooth it out to cover the top. Let set before serving.

    *If you would rather not make these gluten free, just use the same amount of organic whole wheat pastry flour.

  • Vegan Chocolate Dipped Raspberry Lavender Ice Cream Pops

    Vegan Chocolate Dipped Raspberry Lavender Ice Cream Pops

    Warmer weather is approaching and they said it was supposed to be nice last weekend so I figured I would make some ice cream. Not the scoop-able kind though, some ice cream popsicles! I love that they are portable, and easily shareable and it is always nice to be able to take them along on a walk outside when it is warm. I made some chocolate dipped cherry ones a few years back and they were pretty bomb, so I decided to make some raspberry lavender ice cream ones dipped in chocolate this time.

    Raspberries have always been my favorite fruit. We always had raspberry jam at my Mom’s house when I was little, and my Mom used to make these really good cheesecake tart things topped with raspberries, and I feel like we bought them the most often just to snack on. I think what I love about them is the balance of tart and sweet that they have. It is perfect for my tastes. In the Summer here, there are woods close to where I live where you can pick wild black raspberries and they are amazing! We are not quite to that season yet, but I am still craving them! Hence using them in the popsicles.

    I decided to add the lavender because I am also loving that lately in desserts and drinks. It is so calming and heavenly. Also it pairs perfect with berries. The base for this ice cream was pretty simple, but tasted so good. Just coconut milk, maple syrup, vanilla, a touch of bright lemon, fragrant lavender and of course the sweet berries. I could not wait to try it in its finished form.

    Unfortunately I had to wait overnight because I was making these after work, but it was so worth the wait. I dipped them in good quality vegan dark chocolate, and they were so heavenly! They were rich and creamy thanks to the coconut milk, and the sweet raspberries and fragrant lavender were so good together! The dark chocolate put them over the top to crave worthy status! You can’t go wrong with berries, chocolate and ice cream. If you are looking for a cooling treat to make when the warm weather hits, give these a try!

    Vegan Chocolate Dipped Raspberry Lavender Ice Cream Pops

    Makes 8

    Ingredients:

    • 2 cups full fat coconut milk
    • 1/4 cup maple syrup
    • 1 tsp pure vanilla extract
    • pinch sea salt
    • 2 Tbsp lemon juice
    • 2 tsp dried lavender flowers
    • 2 cups organic raspberries
    • 3/4 cup chopped vegan dark chocolate

    Instructions:

    1. Combine the full fat coconut milk, syrup, vanilla, sea salt, lemon juice lavender, and berries in a blender and blend until smooth. 
    2. Pour into popsicle molds (I got 8 popsicles, but you may get more or less depending on the size of your molds.
    3. Place sticks into the molds, leaving about 1 inch at the top, then place in the freezer until completely hard, about 4-6 hours (or overnight).
    4. Remove from the molds then place back in the freezer on a parchment lined tray until completely hard (you don’t want them melty when you put the chocolate on).
    5. Meanwhile, melt the chocolate in the top of a double boiler, then quickly dip each popsicle into it, then place back onto the tray and put back in the freezer until hard.
    6. Enjoy!  Store any leftover pops in a sealed container in the freezer. 
  • Mocha Dark Chocolate CBD Truffles

    Mocha Dark Chocolate CBD Truffles

    Back when I was in high school, my Mom and I would go to this tiny local coffee shop after church every week and get coffee. She would always get a white mocha, and for a while I would get a dark chocolate mocha before my tastes changed and I went to the less sweet coffees in college. Those dark chocolate mochas were bomb. Like drinking a dark chocolate coffee truffle! Even though I don’t drink coffee now, I still have that memory of how delicious they were and I do like coffee in my desserts, like the Mocha Dark Chocolate CBD truffles I made last weekend.

    I was thinking about those mochas I used to drink recently and imagining them as delicious truffles. That is how it all started. Well, that and receiving some Veggimins 500 mg Coffee CBD Oil from Raw Guru and being inspired to use it in something delicious. Because why not get your daily dose of CBD while enjoying yummy chocolate! If you have not heard of or tried CBD, it is great for managing inflammation in the body, helping with anxiety and energy levels, and general well being. I take it every day anyhow, so I am all for getting some with my chocolates!

    These are super easy to make, you just melt down vegan dark chocolate, I used some chopped Veggimins CBD Dark Chocolate and Rawmio Dark Chocolate (but you could use whatever you have on hand of course). And combine it with full fat coconut cream, and the CBD oil for a really rich chocolate ganache perfect for rolling into truffles.

    Then you melt some more dark chocolate, dip them and you have something super delicious (and more impressive looking than the time they actually take to make). If you are a lover of chocolate and coffee you will love these babies! I love them and I am not even a coffee drinker anymore. I hope you are all having a wonderful week!

    Mocha Dark Chocolate CBD Truffles

    Makes 12 truffles


    Instructions:

    1. Combine the chopped chocolate and coconut cream in the top of a double boiler and whisk every so often until it is all melted together smoothly. Add the CBD oil and whisk until well incorporated.
    2. Pour into a bowl, and place in the freezer until firm enough to scoop and roll, about 30 minutes or so.
    3. Roll the filling mixture into balls, and place on a parchment lined tray. Place in the freezer until they are firm, about 30 minutes.
    4. Meanwhile, melt the other cup of dark chocolate in the top of a double boiler until smooth.
    5. Dip each of the chocolate filling balls into the melted chocolate one by one letting the excess drain off (I like to use a fork to set them on to dip them). Set on the parchment lined tray.
    6. When the chocolates are all dipped, place the tray in the freezer until the coating has firmed up.
    7. Store chocolates in the refrigerator in an airtight container.

    *If you don’t want to use CBD, just use 1 tsp coffee extract instead.

  • Lavender Lemonade

    Lavender Lemonade

    It was a sort of gloomy day Wednesday, so when I got home I decided to make myself a fancy drink fit for a hot Summer day and pretend like it was nice outside even though it wasn’t. You would think I would go for hot tea or cocoa or something because it was chilly but I wasn’t in the mood for that I have been having that for months. You may be thinking I whipped up a martini or something, but nope! I went for lemonade. I have been kind of missing it since last Summer, and I had organic lemons on hand so why not?!

    Since this was going to be special lemonade I decided to make a lavender lemonade. I have made it before usually with berries or something else added but I just wanted lavender this time. It is super relaxing to drink and take in the lovely aroma. I often use lavender essential oils in my body care items like my deodorant and lotion to relax, or in my diffuser at home, and even in the diffuser in my car so I stay more calm while driving. It really works, plus it smells so good! So lavender infused lemonade is amazing!

    I didn’t mix essential oils into it though, I brewed a sort of lavender tea to make it. I also added butterfly pea flowers to it to give it a lovely color since I have a big bag of them on hand in my pantry. They start out blue when you brew them, then turn more purple if you add an acid like lemon juice, so they were perfect for this lemonade!

    It was really simple to make, just the lavender butterfly pea tea, a little more filtered water, fresh squeezed organic lemon juice and a little stevia. If you are not a fan of stevia, of course you could use maple syrup instead as I note in the ingredients list. This lemonade is super refreshing, calming and delicious! I will have to make it again on a day when it is actually hot and sunny this Summer! In the meantime, I think it would be perfect for Mother’s Day especially if your Mom happens to be a lavender fan!

    Lovely Lavender Lemonade

    Serves 2

    Ingredients:

    • 4 cups filtered water, divided
    • 1 Tbsp plus 1 tsp dried lavender flowers
    • 2 tsp dried butterfly pea flowers
    • 2/3 cup fresh organic lemon juice
    • 1 1/2 tsp liquid stevia (or to taste) or 2 Tbsp maple syrup if you don’t prefer stevia
    • ice and lemon slices for garnish

    Instructions:

    1. Bring 2 cups of the water to a boil on the stove, then remove from heat and add the lavender flowers and butterfly pea flowers. Let sit 5 minutes, then strain through a coffee filter into a large glass measuring cup.
    2. Add 2 more cups filtered water, the lemon juice and the stevia (or maple syrup) and stir until well blended.
    3. Add desired amount of ice and lemon slices to two tall glasses, and pour the lemonade into them. Serve!
  • Vegan Matcha Waffles

    Vegan Matcha Waffles

    I am obsessed with matcha tea. I drink it every day at work in chilled form unadorned, and on the weekends I like to enjoy a matcha latte at a coffee shop. It is my treat lately since I usually make stuff like that at home, but I do enjoy when someone else makes it sometimes. It has to be made in a nice mug though, there is something more special about that experience and sitting there sipping it slowly than drinking it out of a paper one. It was so nice last weekend that after Eric and I went to Art In Bloom at the Minneapolis Institute of Art, we stopped and enjoyed a latte sitting outside on the patio. Let me just say what a difference a few days make in terms of weather here in Minnesota. It was literally snowing for 3 days last week and now it is lovely and feels like spring.

    Back to the matcha though, every time I have one of those lattes I then feel like going home and creating something with matcha. I have been wanting to make matcha waffles for a while, since I got my new waffle maker for Christmas, and I finally got around to it last weekend. I mentioned to Eric that I had the idea to make some matcha waffles and he said he was really hungry they sounded good and so I went for it.

    I made my classic gluten free vegan waffle recipe, but added in a good amount of matcha, as well as some vanilla and almond extracts, because that combination of flavors is simply heavenly! They smelled amazing while cooking, the heavenly aroma of waffles filling my kitchen! Once they were all done and ready to enjoy, I decided to top them off with a pumpkin seed butter maple drizzle, made with Dastony Pumpkin Seed Butter from Raw Guru because I thought the green color would look lovely with the green waffles. I am that weird person who loves to match things, and I love monochromatic color schemes sometimes.

    The waffles were sooo good! Crispy on the outside and tender in the middle with the scents of matcha, vanilla and almond and the maple pumpkin seed butter drizzle tasted almost like a maple caramel on top of them! If you haven’t tried Dastony pumpkin seed butter it is actually pretty amazing. I like it in savory things like dressing but it worked perfect to create a caramel drizzle for the waffles! If you are a matcha lover or if you are just craving waffles, give these a try!


    Vegan Matcha Waffles 

    Makes 8

    Waffles:

    • 2 cups Bob’s Red Mill gluten free all purpose baking flour*
    • 1/4 cup maple sugar or coconut sugar
    • 1 Tbsp matcha powder
    • 1/2 tsp baking soda
    • 1 tsp baking powder
    • 1/2 tsp sea salt
    • 1 tsp pure vanilla extract
    • 1/2 tsp almond extract
    • 3 Tbsp ground flax seed, whisked together with 1/2 cup filtered water
    • 2 Tbsp avocado oil or another neutral oil
    • 2 cups light coconut milk

    Pumpkin Seed Butter Maple Drizzle

    Instructions:

    1. To make the waffles, whisk together the flour, sugar, matcha, baking soda, baking powder, and sea salt in a large bowl.
    2. Then whisk the flax mixture, oil, and coconut milk together until smooth.
    3. Heat your oven to 150F degrees and oil, and pre-heat waffle iron. Once it is heated, pour about 1/3 cup batter onto the waffle iron or until the iron is just covered (but not so much that it will ooze out) and close it.  Cook according to waffle iron package directions.  Remove from the waffle maker and keep warm in the oven while you make the others.  If you have a waffle maker the size of mine (regular belgian waffles), you may have more than 8 waffles. 
    4. To make the pumpkin seed maple drizzle, whisk together all ingredients until smooth (adding a little more maple syrup if necessary to create a pour-able consistency.
    5. Serve the waffles with the syrup!

    *If you want to make these not gluten free, you can swap in organic whole wheat pastry flour or regular AP flour 1:1 for the gluten free. 

  • Vegan Key Lime Sugar Cookies

    Vegan Key Lime Sugar Cookies

    I have always loved anything key lime. Key lime pie was one of my favorite desserts growing up, because I loved the balance of tart and sweet in the creamy filling, and just the heavenly aroma of the limes. I still feel the same way, and the scent of lime reminds me of summer and warm weather. Although it isn’t Summer, we have just barely gotten into Spring, I decided to make some key lime sugar cookies last weekend. I am so ready for warm weather and it was making me a little sad that we were supposed to get snow later in the week, so I figured I would enjoy Summer in the form of cookies.

    I used my classic sugar cookie base, one that turns out tender, buttery and melt in your mouth delicious. It is based off of my Grandma’s sugar cookie recipe actually, the one I used to make before I went vegan that always impressed everyone and they were going back for seconds. Some sugar cookies are just like “meh this is ok but nothing special” but these are crave worthy. I actually made this batch gluten free, because I had some Bob’s Red Mill all purpose gluten free baking flour on hand.

    I wanted them to have plenty of lime flavor so I added it in both zest and juice form. I sweetened these with xylitol because I don’t buy refined white sugar and it is what I use when I don’t want my baked goods to turn brown or have a flavor like when I use coconut sugar. The dough smelled amazing thanks to the fresh limes, and it tasted even better.

    The cookies baked up beautifully and although I could have enjoyed them just as they were I figured they would be even better and prettier with a tart lime glaze. They were sooo good! Rich and buttery, with the aroma of lime and a just the right amount of tartness to balance out the sweet. If you are a key lime fan like me, give these a try!

    Vegan Key Lime Sugar Cookies

    Makes 24 cookies  

    Ingredients:  

    Cookies:

    • 2 Tbsp ground golden flax seed
    • 1/4 cup filtered water
    • 2 Tbsp lime juice
    • 2 Tbsp lime zest
    • 1 cup virgin coconut oil, warmed to liquid
    • 1 1/2 cups xylitol* (coconut sugar may be used but keep in mind the cookies will not be the same pretty yellow color)
    • 1 teaspoon vanilla extract
    • 1 teaspoon baking soda
    • 1/2 teaspoon sea salt
    • 1/8 tsp spinach powder (optional for color)
    • 3 1/2 cups all purpose gluten free flour

    Glaze:

    • 1/4 cup plus 2 Tbsp coconut butter, warmed to liquid
    • 3 Tbsp lime juice
    • 1 Tbsp maple syrup

    Instructions:

    1. In a small bowl, whisk together the flax seed, filtered water and lime juice and zest.  Set aside in the refrigerator for 15 minutes.
    2. In a large bowl, mix coconut oil with xylitol and mix until well combined.
    3. Mix in the vanilla extract and flax mixture until well combined.
    4. Add the baking soda, salt, spinach powder then the flour, a cup at a time, mixing between each addition, until well combined.
    5. To bake, Preheat your oven to 350F degrees. Line 2 large baking sheets with parchment paper. Roll balls into about 1 1/2 inch balls, and place on prepared cookie sheets a couple inches apart.
    6. Place in the oven, and bake for about 15-18 minutes, until puffed and just starting to brown slightly.  Remove from the oven and let cool on the pan a few minutes, then remove to a wire rack to cool.  Repeat with remaining cookies and let cool completely.
    7. To make the glaze, whisk all of the ingredients together (if it seems too thick to drizzle, add a little more lemon juice to it).
    8. Drizzle the glaze over the cookies.
    9. Place the cookies in the freezer until the glaze is set.
    10. Enjoy!

    *Do not feed these cookies to dogs, xylitol is toxic to dogs similar to how chocolate is.

  • Vegan Thin Mint Cookies

    Vegan Thin Mint Cookies

    I was never a Girl Scout, but I did love Girl Scout cookies when I was little. We always bought the classics, like the Thin Mints, Samoas, and Tag Alongs and those three were my favorites. Now as an adult, I like to make my own versions of them at home. I know you can get some of the Girl Scout cookies in vegan versions, but I prefer my own non-processed no preservatives added versions. There is just nothing like home made cookies, the store bought ones are just not the same. I like to use good quality more whole ingredients in mine.

    So last weekend I decided to make some home made thin mints. I had made a raw version in the past, but I wanted to try and make a baked version. It was really cold last Monday on my day off and it was a good day to do a baking project. I have been seeing everyone posting their Girl Scout cookie pictures online too and I suddenly was craving some of my own.

    I used a chocolate mint short bread cookie base for these, because I knew it would bake up thin and crispy and it turned out perfect! They do require some rolling and cutting, which takes a little more time than drop cookies, but it is so worth it in the end! The dough tasted amazing and they smelled even more amazing as they baked. Like really good chocolate mint brownies. Except these weren’t brownies, they were tender crispy cookies!

    Raw Guru recently sent me some Rawmio Mint Chocolate Hearts, so I thought that they would be perfect to melt down as the coating for these cookies. Because they had to have that chocolate coating! Of course the hearts are good for just snacking too if you have a chocolate craving so definitely check them out on their website. They also have orange, plain chocolate and even CBD infused chocolate ones!

    Once these cookies were all set and ready to go I could not wait to try them! They were sooo much better than the pre-made boxed ones! No offense Girl Scouts, but I like home made so much better. They were thin and crispy, with an intense chocolate flavor and cooling mint plus that rich dark chocolate coating! If you are a Thin Mint cookie fan give these a try!


    Vegan Thin Mint Cookies

    Makes about 24 medium sized cookies

    Ingredients:

    • 1 3/4 cups organic whole wheat pastry flour*
    • 1/4 cup Raw Guru cacao powder or unsweetened cocoa powder
    • 1/4 cup plus 2 Tbsp Raw Guru coconut sugar
    • 1/4 tsp sea salt
    • 1/4 cup melted coconut oil
    • 1/4 cup avocado oil (or other neutral oil liquid at cool temperatures)
    • 1 Tbsp filtered water
    • 1 tsp pure vanilla extract
    • 1 tsp peppermint extract
    • 1 1/2 cups Rawmio mint chocolate hearts or vegan chopped dark chocolate with 1/2 tsp peppermint extract added


    Instructions:

    1. Preheat the oven to 325F degrees, and line three baking sheets with parchment.
    2. To make the dough, mix all ingredients together in a bowl until combined and smooth (it may be slightly crumbly, and that is ok, just squeeze it back together), then place on a piece of parchment paper and roll out 1/4 inch thick.  Cut into circles with a medium sized cookie cutter and place them onto two of the prepared pans. Re-roll any scraps squeezing them back together and rolling them out, and cutting into more shapes until all of the dough is used. 
    3. Place the pans in the oven and bake for 15-20 minutes or until set and just barely beginning to brown at the edges.
    4. Remove the pans from the oven and let cool completely on wire racks.
    5. When the cookies have cooled completely, melt the chocolate in the top of a double boiler.
    6. Dip each cookie into the chocolate and set on a parchment lined tray.
    7. When you have finished dipping the cookies, place them in the freezer for about 15 minutes until the chocolate sets.
    8. Enjoy!  Store any leftover cookies in an airtight container in the refrigerator or freezer.

    *Note: If you wanted to make these gluten free, you could use Bob’s Red Mill AP baking flour instead of the whole wheat pastry flour subbed 1:1.

  • Vegan Triple Chocolate Cheesecake

    Vegan Triple Chocolate Cheesecake

    It’s my 9 year blogaversary! 10 years ago, I randomly decided to start a blog to share recipes with friends and family since I was always posting them on Facebook anyhow. Little did I know that I would still be doing it 10 years later, or be reaching this many people! I have had fun with it though, and it’s been a pleasure sharing with you all! So here’s to another year of new recipes! I figured I would make something good to celebrate my blogaversary, and I decided on something chocolate despite the name of my blog.

    I am in a chocolate sort of mood lately. I made some raspberry almond butter cups earlier this week, and some turmeric white chocolates, and some peanut butter cups, and I really enjoyed them all, but I wanted something a little more decadent and bigger like a cake for the weekend. I didn’t feel like baking though, so I went for a no bake cheesecake! To be honest, I have never baked a vegan cheesecake because all of the ones I make are no bake and it is so much easier! They turn out all perfect and creamy without the use of the oven. This one was going to be all chocolate.

    Not just dark chocolate though, even though it is my favorite when it comes to chocolate bars. I was envisioning 3 different layers of chocolate in the cake. I was recently asked if I could make a French silk cheesecake, and this was kind of that, only better because that would have only had 2 layers only one of which would have been chocolate. This one would have white chocolate, milk chocolate and dark chocolate layers.

    For the base of the whole thing, I used a combination of full fat coconut cream and chickpeas. Now you may be thinking that it sounds odd to put chickpeas in a cheesecake, but they are my equal swap for cashews (which are standard in a lot of vegan cheesecakes). The cake is already pretty rich thanks to the coconut milk, so the chickpeas taste the same as cashews in the cake when combined with it. Also, this makes the cake nut free for those who have allergies. I added in some melted cacao butter to give it a white chocolate flavor along with the coconut butter to thicken the cake and it was a heavenly cheesecake base. Just a touch of vanilla as well to give it that amazing white chocolate scent.

    For the chocolate layers I added in some cacao powder and dark chocolate chips, and they were amazing as well. I knew this was going to be good! It turned out beautiful! But it needed some decoration on top so I had some fun with some vegan dark chocolate I had on hand and made some shapes. OMG was the cheesecake ever good! It was silky smooth! The dark chocolate layer really rich and intense, the milk one more mellow, and the white chocolate more sweet with the aroma of vanilla! All together a heavenly combination! If you are in the mood for something of the chocolate variety, give this a try! It would be perfect for upcoming Valentine’s Day!

    Vegan Triple Chocolate Cheesecake
    Makes one 6 inch cake

    Crust:

    • 1/4 cup finely shredded coconut
    • 1/2 cup organic gluten free rolled oats, or quinoa flakes
    • 1/4 cup pitted medjool dates (if not soft, soak them in filtered water first and drain well)
    • 1/8 tsp sea salt

    Filling:

    • 1 1/2 cups full fat coconut cream (I used the thick part of a can of Thai Kitchen coconut cream, but their full organic full fat coconut milk will also work*)
    • 1 cup plus 2 Tbsp cooked chickpeas
    • 1/4 cup plus 2 Tbsp maple syrup
    • 1 1/2 tsp pure vanilla extract
    • 1/8 tsp sea salt (or to taste)
    • 1/2 cup plus 1 Tbp coconut butter (NOT OIL), warmed to liquid
    • 1/4 cup plus 2 Tbsp cacao butter warmed to liquid (or additional coconut butter if unavailable)
    • 4 Tbsp cacao powder or unsweetened cocoa powder (divided)
    • 2 Tbsp vegan dark chocolate chips or chocolate chunks

    Instructions:

    1. Oil a 6 inch spring form pan, and line the bottom with parchment paper.
    2. To make the crust, place all ingredients in a food processor, and process until crumbs and starting to hold together (if they are not holding together when squeezed, add a few tsp filtered water and blend). Press into the bottom of the prepared pan.
    3. Meanwhile, to make the filling, combine all ingredients but the cacao powder and chocolate chips in a high speed blender or food processor and blend until smooth.
    4. Divide the filling mixture between 3 bowls. Pour one back into the blender along with 1 Tbsp cacao powder and blend until smooth. Pour back into the bowl and set aside.
    5. Pour the next bowl into the blender and add the remaining 3 Tbsp cacao powder and the chocolate chips and blend until smooth. Pour this layer over the crust in the pan, and put in the freezer for 10 minutes to set the layer.
    6. Pour the second layer (the one with 1 Tbsp cacao powder) over the first layer in the pan, then set in the freezer for 10 minutes.
    7. Pour the remaining vanilla filling over the other layers in the pan, then place bac
    8. Place back in the freezer to set for about 4 hours (or overnight in the refrigerator if you are not in a hurry).
    9. Remove from the freezer, un-mold and enjoy!  Store any leftover cake in the refrigerator.

    *I use Thai Kitchen full fat coconut milk.  If you are using a different brand, just make sure it is the thick type, 2/3 of the can at least should be very thick when chilled.

  • Salted Caramel Tahini Fudge

    Salted Caramel Tahini Fudge

    Back in the day when I was in high school, my Mom used to take me to this natural foods restaurant (you know, the type that had oats milk ice cream, carob cookies, and fresh squeezed juices) which I wasn’t used to back then because there wasn’t a lot of at the time.  They had a famous tahini lemon salad dressing that my Mom used to always talk about. It was a really good dressing, but it made me think that the only way to use tahini was as a sauce or dressing.  Little did I know that there were so many other things you can do with tahini.  I thought it just made amazing dressing until I got more adventurous with food when I was in college and I discovered that it was an ingredient that made hummus amazing, and it could even be used in desserts like halva. 

    I now know that it is pretty versatile, and I actually love it in desserts.  I have made salted caramel tahini brownies and chocolate drizzled tahini cookies and those were amazing.  So when Raw Guru recently sent me some Dastony sesame tahini, I decided that some salted caramel tahini fudge sounded amazing. I have made many other nut butter based fudges before and they are always so easy and so good so I knew I could count on this turning out.  I was also having kind of a busy week where I felt like I wasn’t getting everything done that I needed to, so this sort of dessert was perfect!  I am sure you can relate, it is always nice to make something easy.

    I combined the Dastony sesame tahini with some soft, pitted medjool dates to make this caramel, since dates are nature’s caramel.  I mean seriously.  If you are craving caramel but want to not eat straight refined sugar eat a date, they are so satisfying and about as natural as it gets when it comes to sweeteners. The dates blended up with the tahini, some water, vanilla, sea salt, and coconut butter to allow this fudge to firm up, made it super delicious.  It tasted like caramel.  Simply heavenly.  I could not stop sampling it.

    It just needed to set in the freezer for about an hour before it was ready.  It turned out so good though!  Gooey, delicious healthy caramel with a slightly nutty flavor thanks to the tahini.  If you are a big caramel lover but are trying to stay away from the refined stuff, give this a try!

    Salted Caramel Tahini Fudge
    Makes 16 pieces

    Ingredients:

    • 1 cup Dastony sesame tahini
    • 1 cup Dastony coconut butter, warmed to liquid
    • ¾ cup filtered water
    • 3/4 cup soft, pitted medjool dates (soak in water for 30 minutes first if not soft and drain very well)
    • 1 tsp pure vanilla extract
    • 1/2 tsp sea salt plus more for sprinkling

    Instructions:

    1. In a high speed blender or food processor, combine the tahini, coconut butter, water, dates, vanilla, and sea salt and process until smooth. 
    2. Spread out into a 1/2 inch thick square on a piece of parchment on a board or sheet pan (to make moving it easier). 
    3. Sprinkle with a little sea salt.
    4. Place back in the freezer for about an hour or more until firm. 
    5. Cut into 16 squares and enjoy! 
    6. Store in the fridge in an airtight container up to 1 week, or in the freezer for up to a few months. 
  • Vegan Lemon Cheesecake

    Vegan Lemon Cheesecake

    I have always loved all things lemon when it comes to dessert. Growing up, I loved those tart lemon curd bars with the powdered sugar on top, and lemon poppy seed muffins, or a good lemon meringue pie.  I think I get it from my Mom, because she was the same way and tended to like to make desserts with lemon.  We definitely made those bars, although we made the ones from the box not from scratch.  But they were still good. There is just something so delicious about tart lemon in desserts.  And it has to actually be tart to be up to my current standards.  None of this so full of sugar that it is more sweet than tart stuff or just lemon flavor and no juice.  It has be real lemons and make me pucker a bit.  I hadn’t really made anything featuring lemon lately and it is the season when they are at their best so I picked up a bag of organic lemons at the store and hoped for inspiration.  Luckily it came fast. I decided that a lemon cheesecake with a lemon curd topping sounded perfect.

    About 10 years ago, before I went vegan I made a non-vegan lemon cheesecake with a vanilla lemon filling and tart lemon curd topping that was super delicious.  I wanted this cake to taste just like that one, only better.  I wanted the cheesecake filling to be creamy, rich and taste like traditional cheesecake, and the way I achieved that was a mixture of the cream from a can of full fat coconut milk, and chickpeas.  Now, you may be thinking I have gone crazy using chickpeas in my cheesecake filling but hear me out.  I used to use a mixture of coconut cream and cashews all of the time, and that was the perfect texture, but I have a hard time digesting cashews and they are expensive so I tried swapping the cashews with chickpeas last year to see if they would be a good substitute to make the cake nut free.  It worked perfect!  You end up with a cake that has the exact same consistency, and same flavor!  So now I just use the chickpeas.  I always have them on hand in my freezer portioned out anyhow for meals and soups because I make a huge batch every few weeks. Just trust me on this one, they make the filling perfect!

    It also had to have plenty of tart lemon, so I added both zest and juice to the filling plus maple syrup to sweeten it and some vanilla of course.  It was super delicious even before I poured it into the crust.  Once that set, I made a nice tart lemon curd to top it off.  It was a lovely hue of yellow.  I could not wait to taste this cake!  But I had to wait until the next day for it to set because I was making it at night after work.

    I knew this was going to be good, but it turned out even better than I imagined!  The filling was the perfect consistency, smooth, creamy and rich, the perfect balance of tart and sweet with plenty of lemon and a hint of vanilla.  The curd on top was nice and tart, and the perfect contrast to the filling.  It tastes like sunshine in cake form, which we could all use a bit of right now since we are smack dab in the middle of Winter (at least where I live).  If you are a fan of lemon, definitely give this a try!  I hope you are all having a wonderful January!

    Vegan Lemon Cheesecake
    Makes one 6 inch cake

    Crust:

    • 1/4 cup finely shredded coconut
    • 1/2 cup organic gluten free rolled oats, or quinoa flakes
    • 1/4 cup pitted medjool dates (if not soft, soak them in filtered water first and drain well)
    • 1/8 tsp sea salt


    Filling:


    Curd Topping:

    • 1/2 cup fresh lemon juice
    • 1 Tbsp filtered water
    • 1/2 Tbsp organic lemon zest
    • 3 Tbsp maple syrup
    • 2 Tbsp cornstarch
    • pinch of sea salt
    • pinch turmeric (optional, for color)
    • 1 Tbsp full fat coconut milk
    • 1/2 tsp pure vanilla extract
    • 1 1/2 Tbsp coconut oil


    Instructions:

    1. Oil a 6 inch spring form pan, and line the bottom with parchment paper.
    2. To make the crust, place all ingredients in a food processor, and process until crumbs and starting to hold together (if they are not holding together when squeezed, add a few tsp filtered water and blend). Press into the bottom of the prepared pan.
    3. Meanwhile, to make the filling, combine all ingredients in a high speed blender or food processor and blend until smooth.
    4. Pour the filling over the prepared crust, and place cheesecake in the freezer until the top starts to set, at least 30 minutes. Once the top has set, you can make the filling.
    5. To make curd topping, combine the lemon juice, water, zest, maple syrup, cornstarch, sea salt and coconut milk in a saucepan and cook over medium heat just until it thickens.  Remove from heat and whisk in vanilla and coconut oil.
    6. Pour the lemon curd over the filling, and place back in the freezer to set for about 4 hours (or overnight in the refrigerator if you are not in a hurry).
    7. Remove from the freezer, un-mold and enjoy!  Store any leftover cake in the refrigerator.


    *I use Thai Kitchen full fat coconut milk.  If you are using a different brand, just make sure it is the thick type, 2/3 of the can at least should be very thick.


  • Creamy Coconut Curried Split Pea Soup

    Creamy Coconut Curried Split Pea Soup

    We went from 40F degrees here at the beginning of the week to a cold snap of below zero temps in a matter of one day.  It is kind of a shock to the system, and sometimes I wonder how as a high schooler I spent every day in the Winter practically outside at nordic skiing practice.  Lots of layers I guess and moving around a lot.  But it feels so much colder now for some reason.  I shouldn’t complain though, we are having a warmer than average Winter over all and it is supposed to warm up again soon.  Either way, I have been making warming comfort food dishes to take the chill off after being outside.  One of which was a Creamy Coconut Curried Split Pea Soup!

    One of my coworkers in the deli I work at had recently made a split pea soup for the customers and I thought it sounded good.  I hadn’t made any in a really long time at home, and I had a bunch of split peas in the cupboard ( I bought way to many the last time I bought them) and I knew that use them up soon.  The reason I hadn’t made split pea in a while was because the last time I made it was kind of a disaster.  I am one of those people who tries to squeeze in too many things at once to multi task at because I want to get a lot done, and I had the split pea soup cooking on the stove while I did other things and I burned it on the bottom.  That is like the worst feeling in the world, when you have to throw a pot of soup away because it tastes burnt (I hate wasting things).  And, it happens quickly with split pea because it is thick.  So just so you all know, I have kitchen disasters too.  One time someone said to me she imagined me like I had a magic kitchen where everything goes perfect and I had spices dancing around and whatnot, but that is so far from the truth.  It is sometimes a disaster area and it is not usually neat until I am done cooking and clean up.  So never feel bad if you mess up once in a while when you are making things.  Anyways, back to my soup I made this week.

    I made it similar to a classic split pea, and included the carrots, onions and celery as well as hearty potatoes.  But for the flavor, I used mild curry powder to give it a nice warming spices quality. It was so good with the split peas!  I wanted to add a little richness too, since this recipe actually isn’t made with any oil, so I added in some full fat coconut milk at the end.  It made the texture smooth and silky.  This soup is so good!  Even though split peas take a while to cook, this really doesn’t require much hands on time or anything and is pretty simple to make.  So if you are a split pea soup fan or you just want some healthy warming comfort food because it is cold right now where you live too, give this a go!

    Creamy Coconut Curried Split Pea Soup
    Serves 2

    Ingredients:

    • 1 small onion, chopped
    • 2 stalks celery, sliced
    • 2 garlic cloves, minced
    • 1 cup dried split peas
    • 3 cups filtered water
    • 1 Tbsp mild curry powder
    • 1/2 tsp red pepper flakes (more or less depending on the spice level you want)
    • sea salt to taste
    • 2 medium organic carrots, sliced
    • 3 medium organic red potatoes, diced
    • 1/2 cup full fat coconut milk


    Instructions:

    1. In a pot, combine all ingredients but the carrots and potatoes, and bring to a boil.
    2. Lower to a simmer, and cook until the split peas are softened, about 40 minutes, then add the carrots and potatoes and cook until they are tender and the split peas are falling apart.
    3. Stir in the coconut milk until well combined and serve!
  • Vegan Lavender Vanilla Shortbread Cookies 

    Vegan Lavender Vanilla Shortbread Cookies 

    Lavender is one of my favorite scents.  Next to vanilla, it is something that I enjoy using the essential oil of fairly often for scenting my personal products (like lotions, deodorants, and shampoo), as well as putting in the diffuser in my home or car to keep me calm and relaxed.  Besides just enjoying the aroma of lavender though, I like to use the dried flowers in my desserts once and a while. It is heavenly when paired with citrus, chocolate or vanilla.  I used to make shortbread quite a lot before I went vegan, and one of the ones I made was a  lavender vanilla shortbread that was really delicious.  So I decided last weekend that I needed to recreate it. I hadn’t made any sort of shortbread in years as of last weekend and I don’t know why because shortbread is damn delicious.  It may be simple with few ingredients but I love the buttery texture.  So it was about time I got on making it again!

    I had all of the ingredients I wanted to use on hand so it was perfect!  For the dough, I used a combination of organic whole wheat pastry flour and tapoica flour.  Why tapoica flour?  Well it works similarly to cornstarch to lighten up the dough and make it more tender and I happened to have some on hand. But if you don’t have any on hand you could substitute cornstarch.  For the fat in the recipe, I used a combination of coconut oil and avocado oil.  They are both pretty neutral oils, and when combined they have a buttery flavor and give a rich texture to baked goods.  A little maple sugar, a dash of sea salt, some lavender and vanilla and the dough was delicious. Yes, I always have to eat some of my cookie dough before baking it!

    I could have just baked the shortbread in one big square in a pan and scored it, but I decided that it would be cuter and more fun to cut it out into little hearts instead. So I made little hearts, popped them in the oven at a low temperature (sine shortbread is delicate and you don’t want it too brown). They smelled heavenly while baking!

    They were lovely as they were, but since I like to dress up cookies, I dipped them in dark chocolate and sprinkled some with lavender and some with sprinkles. They turned out lovely, but more importantly they turned out delicious.  Melt in your mouth, rich and buttery with a hint of lavender and vanilla, the smooth dark chocolate the perfect partner for it all. These are the perfect thing to bake on a chilly Winter day when you don’t feel like going outside!

    Vegan Lavender Vanilla Shortbread Cookies 
    Makes about 16

    Ingredients:

    • 1 3/4 cups organic whole wheat pastry flour*
    • 1/4 cup tapioca flour**
    • 1/4 cup plus 2 Tbsp maple sugar
    • 1/4 tsp sea salt
    • 1/4 cup melted coconut oil
    • 1/4 cup plus 2 Tbsp avocado oil (or other neutral oil liquid at cool temperatures)
    • 1 Tbsp filtered water
    • 1 tsp pure vanilla extract
    • 1 Tbsp organic dried lavender flowers

    Decoration:

    • 1 cup vegan dark chocolate chips or vegan dark chocolate chunks
    • vegan sprinkles or dried lavender flowers


    Instructions:

    1. Preheat the oven to 300F degrees, and line a baking sheet with parchment.
    2. To make the dough, mix all ingredients together in a bowl until combined and smooth (it may be slightly crumbly, and that is ok, just squeeze it back together), then place on a piece of parchment paper and roll out 1/4 inch thick.  Cut into shapes with a medium sized cookie cutter (I used a heart shape) and place them onto the prepared pan. Re-roll any scraps squeezing them back together and rolling them out, and cutting into more shapes until all of the dough is used.  Place the cut shapes on the pan into the freezer to chill for 10 minutes before baking.
    3. Place the pan in the oven and bake for 20-25 minutes or until set and just barely beginning to brown at the edge.
    4. Remove the pan from the oven and let cool completely on a rack.
    5. Melt the dark chocolate in the top of a double boiler.
    6. Dip each cookie into the dark chocolate partially then set on a parchment lined tray.
    7. Sprinkle the dipped part of the cookies with dried lavender flowers or sprinkles.
    8. Let the chocolate set (or pop into the freezer for about 10 minutes until it sets).
    9. Enjoy!  Store any leftover cookies in an airtight container in the refrigerator or freezer.


    *If you wanted to make these gluten free, you could use Bob’s Red Mill gluten free all purpose baking flour instead of the pastry flour.

    **If you do not have tapioca flour you can substitute cornstarch.

  • Vegan Pfeffernusse Cookies

    Vegan Pfeffernusse Cookies

    One of my Mom’s all time favorite Christmas cookies is Pfeffernusse.  If you haven’t heard of them, the name means “pepper nut” but they don’t have nuts in them, they are just delicious little spice cookies rolled in powdered sugar.  And they are darn delicious!  Also, they are not too difficult to make.  No fancy piping or anything required!  Funny story though, when I was still in high school and college, my Mom and I used to go to the library and check out cook books and make recipes from them back in the days before everyone just googled recipes.  This included Christmas cookie recipes, and one time we chose to make a new recipe for pfeffernusse.  We were all excited for it, but it turned out to be a horrible flop.  The dough was way too dry and hard to roll and they baked up like rocks.  I think it was one of our worst cookie fails.  But that didn’t stop us from still loving the pfeffernusse, we just stuck to our other recipe from then on.

    I had never actually made a vegan version though.  Until last weekend that is.  I am surprised I haven’t, but I guess I was sort of afraid that they wouldn’t turn out the same as the originals.  Well, my Mom asked me if I could recreate them and I couldn’t say no.  I mean, what was the worst that could happen?  They couldn’t possibly be worse than the ones I made back in the day that were a fail.  So I went for it.  I looked at a many different recipes for them, then did my best to create a winning version.  Luckily it worked out the first time!  I love when that happens.

    The cookie base for these is filled with so many good aromatic spices, it smells wonderful when you are making them.  What keeps the dough soft is the molasses that they include in them.  Instead of the butter in the classic recipe, I used a mixture of coconut oil and avocado oil because I wanted them to stay soft at room temperature (coconut oil alone gets too hard sometimes in certain cookies).   It worked out just as I wanted!  The cookies baked up beautifully!

    They had to have the classic powdered sugar as well, but since that is not something I keep on hand since I try to stay away from refined sugars for the most part, I made my own powdered sugar concoction.  I used a mixture of finely shredded, dried coconut, xylitol (to keep it white), and cornstarch blended up really fine.  It worked out perfect and tasted so good on the cookies!  I think I actually like this version of the pfeffernusse better than the original, and my Mom loved them as well because of course I had to share them with her since they are one of her favorites! If you are a fan of any sort of molasses or spice cookies, you will love these!

    Vegan Pfeffernusse Cookies
    Makes about 18

    Ingredients:

    Cookies:

    • 2 1/2 cups gluten free all purpose flour
    • 1/2 tsp baking soda
    • 1 tsp cinnamon
    • 1 tsp ginger
    • 1/4 tsp ground cloves
    • 1/4 tsp ground cardamon
    • 1/4 tsp ground nutmeg
    • 1/2 tsp ground anise
    • 1/4 tsp ground black pepper
    • 1/4 tsp sea salt
    • 1/4 cup coconut oil (warmed to liquid)
    • 1/4 cup avocado oil
    • 3/4 cup xylitol or maple sugar or coconut sugar
    • 1/4 cup molasses
    • 1 Tbsp ground flax seed mixed with 3 Tbsp filtered water and allowed to sit for 15 minutes before using
    • 1 tsp pure vanilla extract


    Coating:

    • 1/2 cup finely shredded, dried unsweetened coconut
    • 1/4 cup xylitol or maple sugar or coconut sugar*
    • 1 1/2 Tbsp cornstarch or arrowroot starch


    Instructions:

    1. Preheat the oven to 350F degrees, and line a sheet pan with parchment.
    2. In a bowl, mix together the flour, baking soda, cinnamon, cloves, cardamom, nutmeg, anise, pepper, and sea salt.
    3. In a smaller bowl, whisk together the two oils, sugar, molasses, flax mixture, and vanilla.
    4. Mix the wet ingredients into the dry until well combined, and a uniform dough.
    5. Roll the dough into balls and set on a tray.  Place in the freezer for 20 minutes, until they are more firm.
    6. Remove from the freezer and place on the prepared baking sheet a few inches apart.
    7. Place the baking sheet in the oven and bake for about 15 minutes until the cookies are set.
    8. Meanwhile, while they are baking, to make the coating, combine the coconut, sugar, and cornstarch in a high speed blender and blend until smooth.  Put through the holes of a fine meshed strainer if there are any remaining lumps.  Place the coating in a bowl.
    9. When the cookies have finished baking, remove them from the oven, let cool a minute or two, then carefully roll each in the coating then place back on the tray.
    10. Let cool, and dust with a little more sugar if you wish (I just put it in a fine meshed strainer and tapped it to dust them).
    11. Enjoy!
  • Vegan Eggnog Creme Caramel

    Vegan Eggnog Creme Caramel

    For Eric’s Birthday I always ask him if he wants me to make him a cake or some sort of dessert.  Because he has the biggest sweet tooth I know, and I am always happy to make one!  In past years it has always been cake, but this year he said he wanted a creme caramel with cinnamon and bourbon.  I thought to myself, that kind of sounds like eggnog, so it would be perfect for this time of the year too!  I was totally game to try making some!  I have never actually made a creme caramel before.  Well, a non raw traditionally cooked one with thickening agents at least. I made a raw pumpkin one in the past but that was different because I just used coconut butter to thicken it.  I wanted these to taste as traditional as possible.  So, I looked at many recipes online to see how other people made them, and then made one with the best concepts combined.

    I wanted to make these without refined white sugar, so I made them with maple sugar.  The maple flavor is so delicious with the ingredients in this as well, so it was perfect! I will admit, I was a bit intimidated when I started this because I was concerned about the caramel not being the right texture and the custards not setting and whatnot, but I went for it.  The caramel part turned out good, and made my kitchen smell like a maple syrup factory!  So then it was time for the custards.  First off, I tried making them with coconut milk and a little cashew butter mixed in because I thought it would make them richer and less coconutty tasting.  Well, it worked…sort of.  They turned out a bit lumpy and cracked, with a little bit of an odd texture not smooth but ended up tasting good.  I did not consider that a win however even though they tasted good because I wanted them to be perfect for Eric’s Birthday (and because I am kind  of a perfectionist when it comes to making things for people), so I tried making the custard again, only with just coconut milk and no cashew butter this time.

    The second round came out perfect!  Nice and smooth, with a good flavor.  I had added a hint of cinnamon, nutmeg and bourbon and they tasted just like eggnog. You couldn’t really taste the coconut.  I crossed my fingers as I un-molded them because I was afraid that they might crack.  But they all came out really nicely and I was super happy with them!  But the most important thing was that Eric liked them!  These are an easy dessert to make, and it can be done ahead of time, so they would be the perfect dessert for a Holiday meal!

    Vegan Eggnog Creme Caramel
    Makes 4

    Ingredients:

    4 1 cup ramekins

    Caramel:

    • 1/4 cup of maple sugar
    • 2 Tbsp filtered water
    • 2 tsp bourbon


    Custard:

    • 1 3/4 cups full fat coconut milk
    • 3 Tbsp maple sugar
    • 1/4 tsp cinnamon
    • 1/8 tsp nutmeg
    • 1 Tbsp bourbon (make sure it is vegan on Barnivore)
    • 3/4 tsp agar powder
    • 1 Tbsp cornstarch


    Instructions:

    1. Set 4 one oz ramekins on a tray.
    2. In a small saucepan, combine the maple sugar, bourbon and water and bring to a boil.  Cook for about 3-4 minutes, stirring constantly until it begins to darken in color and all sugar is dissolved.  Remove from heat, and pour into  the bottoms of the ramekins.
    3. To make the cream, combine the coconut milk, maple sugar, cinnamon and nutmeg in a saucepan and bring to a simmer.
    4. Mix the bourbon with the vanilla, agar powder, and cornstarch in a small bowl, and then whisk into the hot coconut milk.  Whisk until just thickened, then pour into the prepared ramekins over the caramel.
    5. Place the tray of ramekins in the refrigerator until chilled completely.  For at least 2 hours, or overnight.
    6. Once the custards have set and you are ready to serve, place a plate on top of each one, then flip it over.  If they are sticking at all, run a knife along the sides to loosen being careful not to disturb the custard.
    7. Enjoy!  Refrigerate any leftovers.


  • Peppermint CBD Hot Chocolate

    Peppermint CBD Hot Chocolate

    I have been saying to myself for weeks now that hot chocolate sounds good.  I caught a whiff of someone’s chocolate creamer going into their coffee at my work and ever since then I have been craving it.  I really don’t make it often enough.  I used to make it quite a bit when I was younger and we had those packets that you just stirred water into.  I know, not the best stuff but I liked it back in the day because it had sugar. The best hot chocolate I ever had back then though was when we were traveling through Europe when I was in high school.  That hot chocolate tasted like it had real chocolate melted into it.  It was so rich and delicious.  So that is what I try to recreate when I make it now as an adult.  I think of hot chocolate as a dessert in and of itself.  Something perfect for sipping after a meal.

    So, I decided to make some just for that reason last weekend. I wanted something fancy, so I made it a peppermint hot chocolate.  And, I heard about a coffee shop opening around here recently that had CBD coffee, so I thought, why not make some CBD hot chocolate?!  Get my daily dose of CBD oil with my dessert.  Raw Guru recently sent me some 300 mg Veggimins CBD oil and I love it!  I have been taking CBD oil before bed and in the morning for a few months now, and it really helps me sleep better and calms my nerves.  CBD is also good for relieving inflammation, which I need help with sometimes since I work out a lot.  If you have never tried this oil, it does not contain THC the psychoactive part of cannabis, so you don’t get high, it just helps with things like decreasing anxiety, fighting inflammation, relieving nausea and decreasing depression among other things.  Definitely check it out, it is worth it!

    But back to the hot chocolate.  It is really simple to make, I just heated the coconut oil, and whisked some cacao powder AND chocolate into it for a double chocolate affect!  I of course had to add some peppermint and vanilla to to give it that delicious peppermint flavor, plus a little maple syrup for sweetness.  And of course I had to add the CBD oil.  I think that this hot chocolate might become a favorite this Winter.  It is rich, creamy, intensely chocolate flavored, aromatic with mint and vanilla and of course it has a calming affect.  This is the perfect thing to relax with all cozy in your PJs!

    Peppermint CBD Hot Chocolate
    Serves 2


    Instructions:

    1. To make the hot chocolate, heat the coconut milk in a saucepan until it comes to a boil.
    2. Once it has come to a boil, turn off the heat and add all other ingredients, whisking until smooth and uniform in color.
    3. Pour into mugs and serve!
  • Sweet and Spicy Roasted Brussels Sprouts

    Sweet and Spicy Roasted Brussels Sprouts

    One of my all time favorite items to make in the Fall is roasted brussels sprouts.  They are like savory candy honestly.  Tender on the inside, crispy and salty on the outside…sooo good!  I make them all the time at work with just a little olive oil and sea salt and they are amazing.  I could seriously eat a giant bowl of them and be happy.  Funny because as a kid I thought brussels sprouts were gross.  Probably because my Grandma steamed them for Thanksgiving and they were kind of mushy and stinky (they are a cruciferous vegetables after all).  I would take some just because I felt like I needed to take a little of everything but they were definitely not my favorite. It all depends on how you cook them though!  They are so delicious when roasted to crispy perfection!  So that is mainly how I make them.  Sometimes I will add them halved to a stir fry, but I don’t over-cook them.

    My Mom gave me a bag of them that she had picked up at Trader Joes and asked me to try making a side dish with Asian flavors that could be used for Thanksgiving with them.  Of course I was down for that, I do enjoy them after all!  So I created a simple dish that was easy to make, and I was enjoying delicious roasted brussels sprouts in about 45 minutes! I wanted them to be salty, sweet and have a little kick to them.  So I combined some home made chili oil, maple syrup, tamari, lime juice and garlic as a sort of marinade, tossed the brussels sprouts with that, and roasted them to flavorful perfection.

    They turned out so good!  Sweet, spicy, salty and tender. I think these would make a perfect Thanksgiving side dish!  I shared them with my Mom and she approved as well.  I think that if people served these instead of steamed brussels sprouts a whole lot more people would learn to love them!  I will definitely be making these again soon! Speaking of Thanksgiving side dishes, what is your favorite?  Mine were always mashed potatoes and stuffing, but of course now I can add brussels sprouts to the list!

    Sweet and Spicy Roasted Brussels Sprouts
    Serves 4

    • 2 Tbsp chili oil
    • 3 Tbsp maple syrup
    • 2 Tbsp tamari
    • 1 Tbsp lime juice
    • 2 garlic cloves, minced
    • 2 lbs fresh organic brussels sprouts, trimmed
    1. Preheat the oven to 350F degrees, and oil a sheet pan.
    2. Add all ingredients to a bowl, and toss the brussels sprouts until coated in the mixture.
    3. Spread out on the sheet pan, place in the oven and roast until the brussels sprouts are tender, about 45 minutes.
    4. Remove from the oven, and enjoy!


  • Vegan Pumpkin Spice Waffles

    Vegan Pumpkin Spice Waffles

    When I do recipe experiments, they don’t always turn out perfect. In fact sometimes they are fantastic flops.  Like when I tried to make pumpkin waffles about a month ago.  I was all excited to make them, and the batter looked good and all but turned out that it was way to sticky and it ended up just getting all stuck to the inside of my waffle iron and burning, and I had to throw the waffle batter and waffle maker away because it was so bad I couldn’t clean it.  I was so sad. I hate throwing things away and I hate when recipes don’t work out.  But I am not one to give up if something goes wrong the first time, so I decided to try making them again this week since I had some leftover pumpkin from another recipe. I think what happened last time is I was trying to make half the recipe (I often do this because I am only one person so I don’t want a giant batch if I am the only one eating them) but I forgot to use half the coconut milk and pumpkin so it was too wet.  It happens, sometimes I am just having one of those days where I get distracted and I measure wrong.  So never feel bad if you accidentally do the same, it happens.

    So this time I was sure to read my recipe carefully and it turned out perfect! I had to use my snowflake waffle maker though, because my other one had to get thrown out, but oh well.  It was kind of appropriate since it snowed here in Minnesota the day I made the waffles.  These are pretty easy to make, you just whisk together the ingredients, make them and voila!  Delicious waffles!  None of that whipping the egg whites and folding them in stuff that I used to have to do before I went vegan and wanted fluffy waffles.  I made sure these had plenty of spice because I wanted them to be aromatic and smell like pumpkin pie!

    These are the perfect Fall treat for a brunch, topped off with maple syrup and pecans, or maybe if you are feeling dessert like some coconut whipped cream or ice cream.  I wouldn’t limit them to brunch though, when I was little my Mom used to make waffles and pancakes for dinner and I thought it was awesome that I got to have something that tasted like dessert for dinner. Honestly when I make them now as an adult it is almost always in the evening because that is when I have the most time.  Also, I like to freeze them if I have extra and just pop them in the toaster!  The next time you have some leftover pumpkin I hope you give these a try!

    Vegan Pumpkin Spice Waffles
    makes 12 regular sized waffles

    Ingredients:

    Batter:

    • 2 cups gluten free all purpose flour
    • 1/4 cup coconut sugar
    • 1/2 tsp baking soda
    • 1 tsp baking powder
    • 1/2 tsp sea salt
    • 2 tsp cinnamon
    • 2 tsp ginger
    • 1/2 tsp cloves
    • 1/4 tsp nutmeg
    • 3 Tbsp ground flax seed, whisked together with 1/2 cup plus 1 Tbsp filtered water (and allowed to sit 15 min. before using)
    • 2 Tbsp melted coconut oil
    • 1 cup full fat coconut milk
    • 1 cup pumpkin puree


    Instructions:

    1. Whisk together the flour, sugar, baking soda, baking powder, sea salt and spices in a large bowl.
    2. Then whisk the flax mixture, coconut oil, coconut milk and pumpkin until smooth.
    3. Oil, and pre-heat waffle iron. Once it is heated, pour about 3/4 cup batter onto the iron (or until the iron is just covered but not so much that it will ooze out) and close it.  Cook according to waffle iron package directions.  Remove from the waffle maker and keep warm in an oven at low heat (150F degrees).
    4. Serve with topped with whatever suits you!


  • Vegan Snickerdoodle Crepes with Caramelized Apples 

    Vegan Snickerdoodle Crepes with Caramelized Apples 

    I had never tasted a snickerdoodle cookie until I was about 16 years old.  Surprising I know, I had tried most of the other classics, like chocolate chip, sugar, oatmeal, spice cookies, almond cookies etc.  But never the snickerdoodle. I tried one for the first time at a little coffee shop at a ski lodge up north I was at for a Nordic skiing training trip.  My friend  wanted to split one and I wasn’t about to say no to a cookie!  It was so delicious!  Like the sugar cookies that I grew up eating, but better thanks to the little sprinkle of cinnamon along with the sugar.  Perfect for Fall and Winter seasons when I am wanting cinnamon and spice.  After that I decided that I liked snickerdoodles and even made some of my own from time to time.  Cinnamon sugar is a great topping for things after all.  If you didn’t grow up with your Mom making you cinnamon sugar toast once in a while you have been deprived of something delicious.  Eric always asks me to make cinnamon sugar crepes, so I thought why not make some snickerdoodle crepes this week.  It is now Fall after all, and they just sounded good.   But me trying to always sneak fruits and veggies into everything decided that they needed an apple filling as well.

    I had bought 8 lbs of apples for some wine, but didn’t need them all, so I was looking for ways to use them in something delicious.  As excited as I was about the crepes, I was a little apprehensive because the last time I tried to make crepes about a month ago, they stuck to the pan, were all gummy and didn’t turn out.  I wasn’t sure why, and most likely it was because I forgot an ingredient or mis-measured or something but since I hate throwing things out, it made me sad.  So I prayed that these would turn out.  Lucky for me, they came out perfect this time!  This is a pretty simple crepe recipe that you just whisk all together and go for it, so it comes together fast!  I made them gluten free and nut free as well, because I know that is important to a lot of you and it was easy enough to make them that way.  They smelled amazing while cooking.  I didn’t just sprinkle the cinnamon on top, I put a little in the crepes as well, so the aromas of vanilla and cinnamon were in the air as they cooked.

    After they were done, I made some quick maple caramelized apples to fill them with. It was all super delicious once assembled and the cinnamon sugar was sprinkled on top!  If you wanted to go in more of a dessert direction with these, you could also serve them with coconut whipped cream warm with ice cream!  These would make the perfect weekend brunch treat, but of course don’t limit yourself to that, I won’t judge if you make them for dinner.

    Vegan Snickerdoodle Crepes with Caramelized Apples 

    Crepes:

    • 1/4 cup ground flax seed
    • 3/4 cup filtered water
    • 1 1/2 cups gluten free all purpose flour
    • 3 Tbsp maple sugar or coconut sugar
    • 1/4 tsp cinnamon
    • pinch sea salt
    • 1/4 cup melted coconut oil
    • 1 1/2 cups light coconut milk
    • 1 tsp pure vanilla extract


    Apples:

    • 2 medium organic sweet tart apples (honeycrisp or pink lady are good options), sliced
    • 1/4 cup maple syrup
    • 1/2 tsp cinnamon


    Topping:

    • 2 Tbsp coconut sugar mixed with 1/4 tsp cinnamon


    Instructions:

    1. To make the crepes, mix together the flax seed and water in a bowl, and set aside in the refrigerator for 15 minutes until it is the consistency of egg whites.
    2. Meanwhile, whisk together the coconut sugar, flour, and sea salt in a bowl, then whisk in the coconut oil. Slowly whisk in the milk little by little to make sure the mixture stays free of lumps. Next, whisk in the vanilla, followed by the flax mixture you had set aside.
    3. Heat a non-stick ceramic 6 inch pan over medium heat, then pour in 1/3 cup batter, and swirl the pan so that it spreads out to the edges.  Cook for about 3 minutes on the first side, then flip over and cook the second side. Once the crepe is done, set aside on a plate.  Repeat with the remaining batter, separating the crepes with parchment paper on the plate so that they don’t stick together.
    4. To make the apples, place them in the same pan you cooked the crepes in (wipe it out if necessary), and add the apples, maple syrup and cinnamon.  Cook over medium heat until the apples are soft, and the maple syrup has thickened.  Remove from heat.
    5. To serve the crepes, spoon some of the apples into the middle of each, fold them up, and sprinkle with the cinnamon sugar topping mixture.
    6. Enjoy!
  • Vegan Maple Brandy Apple Hand Pies 

    Vegan Maple Brandy Apple Hand Pies 

    I am so ready for Fall.  It was still 90F degrees here this weekend, and it still feels like Summer, but you can tell that Fall is starting to creep in.  Some of the trees are just starting to change color or drop their leaves and it has been cooler at night.  There is nothing like waking up to a cool morning and going for a run with the crunchy leaves on the ground and aroma of Fall in the air.  I can’t wait for that. Also, wearing cozy clothes like flannels and sweaters and drinking hot toddies and baking apple pies.  It is my favorite season in case you can’t tell.  Just one more week and it will technically be here.  But I am getting started early with the baking.  The apples are already really amazing right now, so I decided that apple pie was in order.  I haven’t made it out to the apple orchard to get my bag of Haralson apples, my favorite for baking, but I had some delicious honeycrisps on hand so that is what I went with. They are the perfect balance of tart and sweet, and hold up well, so they are perfect for using in pies.

    I love a good mile high apple pie loaded up with filling, but I decided to go with cute little hand pies this time so I could easily share them.  Also, I like to switch up flavors in my desserts, so I decided to give these a little brandy and maple to make them extra good instead of just classic apple pie. I didn’t think that the difference would be all that noticeable, but it totally was!  The brandy is so good with the apples, and of course you probably already know that maple is amazing with them too so it was all together a heavenly combination! I made these a little different than most people make hand pies, and cooked the filling first before stuffing it into the dough.  That way you don’t have to bake them as long (it is only about 30 minutes baking time), and you know that the inside is done when the crust is browned.  I find that sometimes it gets way too dark by the time the filling is cooked so this eliminates that.

    They smelled so incredibly good while baking!  I love the heavenly aroma of apple pie, it reminds me of when my Mom used to make apple pie or crisp when I was little.  She always made the best pies!  Now I share my pies with her, because I know they are one of her favorites too. These hand pies turned out so good!  The filling was gooey, sweet and that scent of brandy and maple just put it over the top!  The crusts were tender and rich, and I had drizzled a maple brandy glaze over them that made them extra good.  If you have apples on hand, give these a try!  If you don’t wish to make them gluten free, just swap out the gluten free AP flour for organic whole wheat pastry flour.

    Vegan Maple Brandy Apple Hand Pies 
    Makes 6

    Crust:


    Filling:

    • 4 cups organic sweet apples (such as honeycrisp) cut into small 1/2 inch cubes
    • 3 Tbsp maple syrup
    • 2 Tbsp brandy (make sure it is vegan on Barnivore)
    • 1/2 tsp cinnamon
    • 1 tsp pure vanilla extract
    • 2 tsp cornstarch (dissolved in 1/2 Tbsp lemon juice)


    Glaze:

    • 3 Tbsp coconut butter, warmed to liquid
    • 1 Tbsp maple syrup
    • 1 Tbsp brandy
    • pinch sea salt
    • 3-4 Tbsp filtered water or as needed


    Instructions:

    1. To make filling, heat the apples, maple syrup, brandy and cinnamon in a small saucepan over medium heat, and cook them until they are very soft, about 10 minutes.  Add the vanilla, and cornstarch and lemon juice mixture and cook until thickened.  Remove from heat, and set aside and let cool completely before using with the pastry (you don’t want it too warm or it will make the crusts melt too much).
    2. To make the crust, in a large bowl, mix together flour, sugar, sea salt, and spices. Cut in coconut oil with a pastry blender or 2 knives until it is in pea sized pieces. Mix in just enough water to create a smooth dough that holds together but isn’t too sticky. Add more water if needed, and knead slightly until a smooth dough is created.
    3. Roll out into a large rectangle and cut into 12 squares or rectangles.  Chill briefly in the refrigerator if too soft before assembling.  You want the dough a little pliable so you don’t want to chill it more than a few minutes, but not so warm that it will break (temperature is key to the success of this dough). Preheat oven to 375F degrees.
    4. To assemble, place about 3 Tbsp apple filling mixture in the middle of half of the dough rectangles (leaving a boarder so you can attach the dough at the sides). Cover with the remaining pieces of dough (I used a small spatula to carefully move them), pressing the edges and crimping with a fork or the edge of something with a flat edge, like a spatula. Bake for about 30 minutes until the crusts are starting to brown lightly. Remove from oven and let cool on a wire rack until warm.
    5. Whisk glaze ingredients together until smooth (adding more water if too thick, you want it to be pour-able). Spoon some of the glaze over each pie, and smooth it out to cover the top. Let set before serving.
  • Vegan Marble Cake Waffles

    Vegan Marble Cake Waffles

    I have recipe fails sometimes.  Like once I made a mac and cheese (before I went vegan, back in college) and it was supposed to be souffle like and baked and it ended up tasting so horrible with a bad texture I just threw it away because I couldn’t bear to eat it let alone have it for leftovers.  Or, when I tried to make some raw brownies one time that were lower fat than normal and they just did not taste good or have good texture, so they ended up in the garbage too.  Sometimes I have a really good idea (well what I think is a good idea) and I am certain that it will turn out, but then it just doesn’t and I end up wasting ingredients.  I really hate that.  Wasting food, time and money.  Well, luckily it doesn’t happen often.  But one of the last times it did, I was making Belgian waffles.  I had used the waffle maker many times, and it had never failed me, but I tried to make some mocha waffles and for some reason they were all sticking to the waffle maker despite it being oiled and ripping instead of staying together.  It was a fail, and I hadn’t touched that waffle maker since.  That was a couple of years ago. I have a different smaller waffle maker that I had been using since then instead but they aren’t the big Belgian waffles.  Well, I decided that it was about time I try the Belgian waffle maker again, partly because someone requested that I make some, so I had to go for it.

    I decided that vegan marble cake waffles sounded good, vanilla waffle batter, and chocolate waffle batter both in the waffles.  It sounded like a good idea, and I crossed my fingers and prayed that they would turn out this time. The batter is really pretty simple compared to the non-vegan waffles I made back in the day that required whipping of egg whites and folding them into the batter.  This is just a whisk and go thing.  They smelled amazing while cooking.  That is part of what I love about waffles.  The delicious aroma that reminds me of sleeping in and having a delicious brunch of a weekend.  Or my Mom making Belgian waffles for dinner, because she did that sometimes when I was little and I loved it!   The first waffle turned out perfect and I was super happy!  The next four were successes too!  So, it wasn’t my Belgian waffle maker that was the problem the last time apparently it was my recipe experiment that was too sticky.

    These turned out so good!  I was a marble cake fan growing up because I figured I was getting the best of both worlds with chocolate and vanilla, and these remind me of that so much!  But of course they have the perfect crispy on the outside and soft in the middle texture that Belgian waffles should.  None of that soggy waffle business going on that I can’t stand.  I topped them off with some vanilla coconut whipped cream and sprinkles because it seemed appropriate being that they were marble cake waffles, and it was perfect. So the next time you are in a waffle making mood, give these a try!

    Vegan Marble Cake Waffles
    makes 4 Belgian (large) waffles

    Ingredients:

    Batter:

    • 2 cups gluten free all purpose flour
    • 1/4 cup coconut sugar
    • 1/2 tsp baking soda
    • 1 tsp baking powder
    • 1/2 tsp sea salt
    • 1/2 cup plus 1 Tbsp aquafaba*
    • 2 Tbsp melted coconut oil
    • 2 cups full fat coconut milk
    • 2 Tbsp unsweetened cocoa powder


    Possible Toppings (pick your favorite):

    • coconut whipped cream
    • ice cream
    • fruit
    • sprinkles
    • chocolate chips
    • maple syrup


    Instructions:

    1. Whisk together the flour, sugar, baking soda, baking powder, and sea salt in a large bowl.
    2. Then whisk the aquafaba, coconut oil, and coconut milk until smooth.
    3. Divide the batter between 2 bowls, and whisk the cocoa powder into one of them.
    4. Oil, and pre-heat waffle iron. Once it is heated, drop each of the waffle batters to the iron, alternating between the vanilla and chocolate until the iron is just covered (but not so much that it will ooze out) and close it.  Cook according to waffle iron package directions.  Remove from the waffle maker and keep warm in an oven at low heat (150F degrees).
    5. Serve with topped with whatever suits you!  I topped mine with coconut whipped cream (but if you use this option, be aware that it melts quickly if the waffles are hot).   Other good options are ice cream, fruit, sprinkles, chocolate chips, maple syrup, etc. But feel free to be creative!


    *Aquafaba is chickpea liquid.  You may used canned, or if you are using the liquid from home cooked chickpeas, reduce it to the consistency of egg whites.  Alternatively, you may use 3 flax eggs for the recipe (3 Tbsp ground flax seed, whisked together with 1/2 cup plus 1 Tbsp filtered water).

  • Strawberry Peach Avocado Quinoa Salad 

    Strawberry Peach Avocado Quinoa Salad 

    We have a quinoa salad in the deli I work in that has Summer fruits in it and it is pretty popular.  You wouldn’t think that quinoa and fruit would be a pair unless it was a breakfast quinoa or something but it actually really works as a savory salad!  I actually have made quite a few quinoa salads with fruit at home too, and they are always delicious.  The fruit has to be ripe and flavorful though. Buying fruit that is in season and ripe is the key to success when making dishes that include it.  Especially if it is going to be raw.  I decided to make one last weekend because I had extra peaches and strawberries from making a crisp, and didn’t feel like using them for dessert.  They were perfectly ripe, the peaches had that delicious aroma and the strawberries were packed with flavor.  So I thought that a simple salad would be best to let the flavors shine through.

    I love that quinoa is quick to make, contains protein and is a neutral flavor so it can be combined with pretty much anything.  I make it several times a week for those reasons.  I had made some ahead of time for a different meal, so this salad came together fast!  In addition to the fruit I felt like the salad needed something rich.  I usually pair a home made vegan chevre (goat cheese) with fruit in quinoa and it is delicious but I don’t always have it on hand, so sometimes I use avocado instead.  Trust me, it is just as satisfying as the cheese, and I always have some on hand because I buy a bag of avocados every week since I love them so much. You may be thinking avocado and fruit sounds weird together but they totally pair with each other!

    I also added some greens in the form of arugula to the salad, because I always try to get a serving of greens in every day.  I stir them into soups, toss them into salads like this or use them as a base for a salad, but they are something that I always have in my refrigerator and work into my diet every day.  Lastly, I made a simple lemon dressing with a hint of thyme and it was so good once it was all mixed together!  It is satisfying, balanced, and you will feel great after eating it!  If you are looking for a more substantial Summer salad, give this a try!  Only a few weeks of Summer left, so might as well enjoy it while you can!

    Strawberry Peach Avocado Quinoa Salad 
    Serves 2-4

    Ingredients:

    • 1 cup quinoa, rinsed
    • 2 cups filtered water
    • 1/4 cup lemon juice
    • 1 Tbsp organic lemon zest
    • 2 Tbsp avocado oil or olive oil
    • sea salt to taste
    • 2 tsp fresh thyme leaves
    • 1 cup organic peaches, cut into 1 inch pieces
    • 1 cup organic strawberries, quartered
    • 1 good handful arugula
    • 1 large avocado, cut into large dice


    Instructions:

    1. To prepare the quinoa, place quinoa and water in a medium saucepan and bring to a boil. Reduce to a simmer, cover and cook until all the water is absorbed about 15 minutes, or when all the grains have turned from white to transparent, and the spiral-like germ has separated. Drain, and set aside.
    2. Whisk together the lemon juice, avocado oil, sea salt and thyme in a small bowl.
    3. To assemble the salad, combine all remaining ingredients in a bowl  and the dressing, and toss together until well combined.
    4. Enjoy!
  • Vegan Strawberry Peach Crisp

    Vegan Strawberry Peach Crisp

    There was a time a few years back (well more like 10 years back) that I made fruit crisps every weekend.  I mean, they are healthy, delicious and really easy to make.  Yes, I love things like cheesecake and pie but they are a little more work to make, and crisp is a little lighter with its higher fruit content.  So it was my weekend treat for a while.   It was always satisfying and I made sure that I was able to enjoy it soon after it was made while it was still warm.  Also, it had to have cool coconut milk ice cream too.   I love that contrast of warm and cool, the jammy fruit and the creamy rich ice cream.  Maybe I get my love of fruit crisps from my Mom.  I can remember back when I was in high school, when I would get home from my cross country or ski practice and she would have made some apple crisp that had scented the house with the most delicious aroma.  She always used oats in the topping for extra crunch (and fiber, but I didn’t care about fiber at that point in my life) instead of just the flour and butter most people used.   It was always so good!  I love a good apple crisp in the Fall, but nothing compares to sweet berry crisps in the Summer.  Not that I would ever turn down any fruit crisp.

    I realized this week when I was talking to my Mom and she mentioned how much she loves crisp, that I haven’t made one at all this Summer!  Now, that is just absurd, because it is not like I haven’t had fruit on hand.  I also realized how much I missed it suddenly and wanted to make some!  So on Friday, I picked up some organic peaches and strawberries and thought that they would make an amazing crisp flavor combination.  The peaches were just perfectly ripe and juicy, none of that woody dry stuff going on (like when they pick them too early sometimes), and the strawberries were sweet and flavorful.  That is why it is important to buy fruit when it is in season, so that you get the most delicious end result with your recipes.  Plus, if they are sweet, you don’t need to add as much sweetener to your recipe.

    These didn’t need much.  This recipe is very easy to make, you just mix the fruit together, bake it covered for a while, sprinkle it with the topping, bake it a little longer and it is done!  That is what I love about crisp, it is like pie just no bottom crust and a lot less work to make.  My kitchen smelled amazing while it was baking! I add a little coconut to the topping and it gives it a little something extra and just adds to the heavenly aroma!  I could not wait to dive in!  It had to be served with ice cream of course. I had some Bourbon Peach Ice Cream on hand, which was perfect with it!  The crisp was sweet, the fruit baked to jammy perfection, and the crisp topping the perfect contrast with it.  It is kind of like really good oatmeal cookies but more crunchy.  If you are looking for an easy but delicious dessert, give this a try!  Summer is almost over so get on it!

    Vegan Strawberry Peach Crisp
    Serves 2

    6 inch wide ovenproof bowl or pie plate

    Fruit:

    • 1 1/2 cups organic peaches, sliced
    • 1 1/2 cups organic strawberries, quartered
    • 2 Tbsp maple syrup
    • 1 tsp pure vanilla extract
    • pinch sea salt
    • 2 Tbsp gluten free all purpose flour


    Topping:
    • 3 Tbsp gluten free all purpose flour
    • 3 Tbsp large flake dried unsweetened coconut
    • 1/2 cup gluten free rolled oats
    • 3 Tbsp coconut sugar
    • 1/8 tsp sea salt
    • 3 Tbsp coconut oil


    Instructions:

    1. Preheat oven to 400F degrees with the rack at the center position. Place a baking sheet lined with parchment paper on the rack. Oil a 6 inch wide pie plate or bowl with coconut oil. In a large bowl, toss together the fruit, maple syrup, vanilla, sea salt, and flour. Spoon into prepared bowl or pie plate, and cover with foil. Place plate on baking sheet and bake for 30-45 minutes until fruit is cooked through and bubbling.
    2. Meanwhile, when the fruit in the oven is almost at 45 min, to make the topping, combine all ingredients in a bowl and mix together with your hands scrunching together to form small clumps until there are no floury spots left.
    3. Remove baking fruit from oven. Top with the crumble topping, spreading it out evenly over the fruit. Bake for about 15 minutes until lightly brown and toasted on top (keep a close eye on it could burn very quickly). Remove from oven and let cool until warm, and top with some ice cream or coconut vanilla whipped cream and…enjoy!
  • Strawberry Jalapeno Jam

    Strawberry Jalapeno Jam

    My Grandma did lots of preserving fruits and vegetables through canning. My favorite was the strawberry jam it was so good!  I mean, I don’t think anything can compare to home made berry jam. Maybe that is why my Dad always bought strawberry jam when I was little, because his Mom made it for him growing up.  My Mom would buy raspberry which is my favorite now as an adult (strawberry a close second).  We never had grape jam at my house, so when I had it at a friend’s house I thought it was special.  I have always wanted to make my own home made jam, and I finally got around to it this week.  I guess it kind of intimidated me, the whole canning process.  But I read some recipes online and realized it isn’t that complicated at all!  So I went for it.  First I made a mixed berry jam.  Something simple to start off with.  My problem is sometimes when I am making something for the first time I try to make it too complicated or switch it up too much from the recipes I have read.  The first one turned out delicious!  I made a low sugar jam using maple syrup instead of the usual cane sugar or white sugar because I prefer to not use lots of processed sugar in things. So I was pleased that it tasted just as good as the jam I have grown up eating without all of the extra sugar.  I mean, if your fruit is flavorful and ripe, you should not need much sugar.

    I wanted to make another jam since the first one turned out so well, which is the recipe I am sharing with you all today!  I decided on a Strawberry Jalapeno Jam!  Strawberries were a good price, and I wanted something a little non-traditional so I decided to add the kick of jalapenos as well!  Eric is always telling me I should add chilies to things (like desserts not just savory stuff), so I figured he would appreciate me sharing the finished product with him as well!

    It wasn’t really that complicated to make.  Don’t let making jam intimidate you like it did me.  I don’t know why I didn’t just try making it 10 years ago!  My kitchen smelled amazing while the jam was cooking, like I was baking a strawberry pie or something.  I could not wait to try it.  But I had to wait until the next day once it cooled to taste the finished product.  I know the purpose of canning things isn’t to dig into them right away, but I am impatient.  It was super delicious!  Sweet intense strawberry flavor with just a hint of a kick of the jalapenos but not so much that they overwhelmed it. If you have fresh, ripe strawberries, make your self some of this so that you can enjoy it in the Winter when you are missing fresh berries!

    Strawberry Jalapeno Jam
    Makes about 4 cups (2 16 oz jars)


    • 2 clean 16 oz canning jars
    • 5 cups fresh organic strawberries, hulled
    • 1 large organic jalapeno, sliced (or diced if you don’t like big pieces)
    • 2/3 cup apple juice
    • 3 Tbsp lemon juice
    • 1/2 cup maple syrup
    • 1 1/2 Tbsp Pomona’s Universal Pectin (it works with low sugar jams)
    • 2 tsp calcium water*
    • 1/2 cup maple syrup


    Instructions:

    1. Bring a large pot of water with a canning rack at the bottom to a boil for sterilizing the jars.  Place the jars on the rack, bring to a boil, then lower to a simmer for 10 minutes.  Turn off the heat, add the lids to the pot, and let sit until you are ready to use.
    2. In another pot, combine the berries, jalapeno, apple juice, and lemon juice .  Bring to a hard boil, and stir constantly.
    3. Mix together the pectin, calcium water and maple syrup until pectin is fully dissolved and there are no lumps.  Add to the jam, and continue to boil for 2 minutes, still stirring to make sure it doesn’t stick to the bottom. remove from heat.
    4. Remove the jars from the water bath, and dry off the outside.
    5. Spoon the jam into the jars, leaving 1/4 inch of space at the top. Wipe the tops of the jars clean if any fruit spilled on them.
    6. Top with the lids, and screw on the bands until just tight (or fingertip tight, screwed on with light pressure from your fingers not cranked on to the tightest possible).
    7. Place jars back in the pot on the rack making sure they are covered by 1 inch of water and allow to simmer for 10 minutes. Turn off the heat and allow to sit for 5 minutes.
    8. Remove cans from water and let cool.  Let sit for 1 day, then check to make sure they sealed properly (you should not be able to push the lid up and down in the center it should stay put if sealed properly).
    9. Store jam in a cool place out of sunlight (like a basement shelf or cupboard).


    *If you buy the pectin I suggest in the recipe, the calcium comes with the pectin in the package.  All you need to do to make the water is mix 1/2 tsp white calcium powder with 1/2 cup of water to make the calcium water.  I mixed it in a jar and put it in the refrigerator for future batches (you only need 2 tsp for the recipe).


  • Vegan Blueberry Pie Cookies

    Vegan Blueberry Pie Cookies

    I made some apple pie cookies a while back and they were really good, so when I had some leftover blueberry jam, I thought it would be fabulous in some mini pie cookies!  It is Summer after all, the season of blueberries!  I love any type of fruit pie, but I don’t always want to make a giant one for just myself.  Plus these little guys are portion controlled.  You have a couple and you are good.  I am calling them cookies though instead of hand pies because they are the size of cookies.  Hand pies to me are more like pop tart sized.  I like to make a batch of cookies like these, then freeze the extra to enjoy later.  I always have a box of different types of cookies on hand in the freezer to enjoy when I feel like it.  Anyways, back to the blueberry pie cookies.  They were pretty simple to make.  Not fast to make because you have roll out the dough and assemble them, but at least the filling is already made if you have blueberry jam on hand.

    I like to use a fruit sweetened blueberry jam.  But you can use whichever one you want.  Just make sure the jam you use is vegan of course. For the dough I decided to use an organic whole wheat pastry flour, because I like the way it tastes in a pie crust. It is a basic vegan pie crust recipe, and I have been using it for over 10 years.  I used to use vegan margarine in pie crusts, but I don’t really like the ingredients in the commercial ones, so I now use coconut oil instead.  It gives the crust a slight sweetness and buttery flavor that I love!  It was kind of fun cutting out the little pie crusts.  Like when I was little and used to play with Playdough and roll it out and cut it into shapes.  I used to pretend I was making cookies and whatnot.  So I guess it is no wonder I love making desserts now!

    Once I had spooned the blueberries into the crusts, topped them, crimped them shut and they were all ready to go, I could not wait to try them!  But of course they had to bake first and they were completely aromatic while baking.  My whole house smelled like delicious blueberry pie. Once they had cooled enough to try them I was super excited.  Of course they had to still be warm.  They were so good!  Gooey sweet blueberry filling and a nice rich buttery crust!  If you have some jam on hand, you know what to make!  If you want to make these gluten free, you can substitute Bob’s Red Mill Gluten Free Baking Flour for the whole wheat 1:1.  They will just be lighter in color.

    Vegan Blueberry Pie Cookies
    Makes 18

    Crust:


    Filling:

    • 1/2 cup blueberry jam


    Topping:

    • coconut milk or aquafaba for brushing tops
    • maple sugar or coconut sugar for sprinkling


    Instructions:

    1. Preheat oven to 375 degrees.
    2. To make the crust, in a large bowl, mix together flour, sugar, sea salt, and spices.
    3. Cut in coconut oil with a pastry blender or 2 knives until it is in pea sized pieces. Mix in  just enough water to create a smooth dough that holds together but isn’t too sticky. Add more water if needed, and knead slightly until a smooth dough is created.
    4. Roll out into a large rectangle 1/8 inch thick using parchment underneath and floured rolling pin, and cut into 36 circles with a cookie cutter.
    5. Spoon the jam by the tsp onto half of the prepared little crust circles, and cover with the top pieces of dough (I used a small spatula to carefully move them), pressing the edges and crimping with a fork.
    6. Brush very lightly with a little coconut milk, then sprinkle with a little maple sugar.  Place the pan in the oven.
    7. Bake for about 30 minutes until the crusts are starting to brown lightly. Remove from oven and let cool on a wire rack until warm.
  • Raspberry Jalapeno Margarita

    Raspberry Jalapeno Margarita

    The first food item that I had made that I shared with my boyfriend Eric wasn’t a dessert, it was my habanero hot sauce.  One of the first things that we discovered about each other was our love for spicy food.  He is from Arizona, so that is understandable, but I am not the typical Minnesota mild black pepper is spicy type of person.  I love habaneros, and pretty much all hot peppers, and so does he. We both used to make hot sauces and see who’s could be the hottest and share them with each other.  I don’t always have time to make hot sauce now, but I still buy hot peppers and use them in recipes all the time.  They aren’t just for chili and tacos though, I found a recipe for a jalapeno infused tequila and decided to make some.  Why not?!  I knew it would be put to good use.  There used to be a drink at a restaurant I went to back in the day that is now closed that had a drink with a 7 pepper infused vodka that was amazing and spicy, so I thought this would be similar.

    When I go to restaurants now, I really do appreciate seeing specialty cocktails on the menu that are artfully crafted with flavors you wouldn’t expect together. Also, I get ideas for things to make at home.  I decided to use my jalapeno tequila to make a raspberry jalapeno margarita.  The sweetness with the spicy peppers sounded perfect!  I do love hot peppers with fruit!  This had a few more ingredients though than just the raspberries and jalapeno vodka. I decided to add some fresh mint that I had on hand, plenty of lime juice and a sweet vanilla syrup.

    It turned out so incredibly good!  Perfectly balanced tart and sweet with a slight kick and the fresh aroma of mint.  This is the perfect way to end a work week, which is why I made it.  Making your own fancy cocktails at home is so worth it!  If you are a fan of things with a little spice, give this recipe a try!  It would be perfect to serve with tacos!

    Raspberry Jalapeno Margarita
    Makes 1

    Ingredients:

    • 6 large ice cubes
    • 4 fresh mint leaves
    • 4 oz jalapeno infused tequila (recipe here)
    • 2 oz raspberry puree
    • 1 oz fresh lime juice
    • 1 1/2 oz vanilla syrup*
    • ice for serving


    Directions:

    1. To make drink, in a martini shaker add the ice and the mint and muddle the mint with the ice until fragrant and crushed up a bit.
    2. Next, add the tequila, berries, lime juice, vanilla syrup, and place top on shaker.
    3. Shake until well blended.
    4. Pour the drink through a strainer into the prepared glass (with some ice in it if you prefer your drink on the rocks), and serve!


    *Vanilla syrup

    • 1/4 cup maple syrup
    • 1/4 cup filtered water
    • 1 vanilla bean pod, split lengthwise


    Combine all ingredients in a jar, put the lid on and shake to dissolve syrup. Let sit at least a day to infuse, then strain to vanilla bean pod. Store in the fridge for up to a month.

  • Vegan Double Chocolate Zucchini Muffins 

    Vegan Double Chocolate Zucchini Muffins 

    The other day at work I was cutting up some zucchini for a recipe, and I thought to myself, chocolate zucchini bread or zucchini muffins sound really good.  I haven’t made any zucchini desserts for a really long time, I think since I was writing my cookbook “Just Vegan Cakes” and I made a chocolate zucchini cake.  That one is really good by the way, but I didn’t want a whole cake just for myself this week, so I made muffins instead.  Plus, who doesn’t like muffins?  Especially when they involve chocolate and you can have them while they are still warm and the chocolate chips are still gooey.  Plus they are super easy to make.  You just need a bowl, a whisk and muffin tins, no special equipment or complicated things.

    I already had a zucchini on hand just begging to be used in a recipe, so it was meant to be.  I love it when I don’t have to buy things for recipes, and I have them in my kitchen.  I veganized and tweaked a chocolate zucchini bread recipe from one of my Grandma’s old church cookbooks and turned it into muffins.  For the batter, I used coconut sugar to sweeten them, and avocado oil instead of the butter.  If you have never used avocado oil in baking, it is amazing.  It has a buttery mild flavor and it stays soft when it cools down unlike coconut oil.  I made these muffins gluten free as well, with Bob’s Red Mill gluten free all purpose baking flour.  If you don’t have that on hand though and you don’t care if they are not gluten free, you may use whole wheat pastry flour or regular all purpose flour instead swapped 1:1. The batter was rich and delicious.  Yes, I had to taste it of course.  The best part of the process of baking stuff like this besides the finished product is licking the batter from the bowl.  I know I sound like a little kid right now, but yeah I am not ashamed.

    As if they didn’t have enough chocolate goodness to them, I decided to add some vegan dark chocolate chips as well.  Because the gooey chocolate chips while they are still warm is one of my favorite things.  They smelled amazing while baking, like really good chocolate cake or brownies!  And once they were cool enough to try, they were sooo good!  They were moist, light and soft, with an intense rich chocolate flavor.  You can’t really tell that they have zucchini in them, but I love that it is in there.  I am one of those people who likes to hide veggies in things.  Why not?  If you can’t tell it is there, it is a good way to get some veggies.  If you are in the mood for something rich and chocolaty, make a batch of these!  You can enjoy them in less than an hour!


    Vegan Double Chocolate Zucchini Muffins
    Makes 12

    Ingredients:

    • 1 cup coconut sugar
    • 1/2 cup avocado oil
    • 1 1/2 Tbsp ground flax seed mixed with 4 1/2 Tbsp filtered water
    • 1 1/4 cups gluten free all purpose flour
    • 1/4 cup cacao powder or cocoa powder
    • 1/2 tsp sea salt
    • 1/2 tsp baking soda
    • 1/8 tsp baking powder
    • 1 cup peeled and shredded zucchini
    • 3/4 cup vegan chocolate chips


    Instructions:

    1. Preheat the oven to 350F degrees, and line 12 muffin tins with liners.
    2. Whisk together the coconut sugar, avocado oil and flax and water mixture in a large bowl.
    3. Add the flour, cacao powder, sea salt, baking soda and baking powder, and whisk until smooth.
    4. Add the zucchini and chocolate chips and mix until blended.
    5. Spoon the batter into the prepared muffin tins.
    6. Place in the oven, and bake for about 25 minutes until a toothpick inserted into the center comes out almost clean with a few moist crumbs attached.
    7. Let cool on a rack for at least 20 minutes before enjoying.
  • Lets get Fizzy with Sparkling ICE and my Strawberry Kiwi Sparkling Tonic!

    Lets get Fizzy with Sparkling ICE and my Strawberry Kiwi Sparkling Tonic!

    This post is sponsored by Sparkling ICE but the content and opinions expressed here are my own.

    I love sparkly things, especially in cocktails!  And I have been making quite a few lately!  It has been really steamy here in Minnesota this week!  We had a heat index of about 108F degrees a few days back, and it created some monster thunderstorms, but they didn’t do much to cool it off outside. I pretty much expect that July will be hot as it is the peak of Summer.  But you know what makes it better?  Those cocktails I mentioned earlier.  I don’t mind the 90F degree heat so much when I am sitting on the patio sipping something cool.  I love my Summer drinks, but what I don’t love is added sugar in them.  A lot of drink mixes come with loads of sugar so I avoid that stuff.  But you know what I just discovered that is perfect for using in cocktails?  Sparkling ICE !  It is a fruity sparkling water with zero sugar, zero calories, vitamins, antioxidants and loads of natural fruit flavor.  When I was younger I pretty much lived on sparkling water. I have never been one to drink pop, but I love the fizz of sparkling water, and the Sparkling ICE is some of the most delicious I have tasted! My boyfriend Eric has been drinking it for a while, because he decided that he wanted to drink less sugary soda, and he buys this instead. He was the one who first got me to try it, and it is super refreshing and delicious!  The Kiwi Strawberry and Lemon Lime flavors are my favorite.

    The Lemon Lime is good for when you want a citrus twist in your cocktail, and even just adding a shot of vodka or tequila to it is a simple cocktail that anyone can make!  But I made something a little more fancy yesterday, a Strawberry Kiwi Sparkling Tonic!  I have been craving a gin drink since I saw one in a restaurant on a cocktail menu, but I had decided not to order it because it had honey in it (which isn’t vegan), plus it had another sugary syrup too which was too much sugar, and I told myself, I should make one at home because I knew I could make one that was just as good.  So I bought myself a bottle of gin, and some Kiwi Strawberry Sparkling ICE as well as some fresh berries and lemons and I had the makings for a delicious cocktail! I muddled mint and strawberries in a shaker, then added the lemon juice, gin and Kiwi Strawberry Sparkling ICE and voila!  A delicious refreshing drink. It only took me a couple of minutes to make, and it was as good as something I would have ordered in a restaurant.  If you want to impress your friends at your next gathering make them one of these cocktails, recipe is at the bottom of the post.

    Drinks with no added sugar and only natural ingredients are important to me, which is why I often choose Sparkling ICE as my mixer! Most of us are wanting to look good in our Summer clothes and be confident, and making drinks that are low in calories, and don’t make us feel yucky or give us a sugar buzz is a good way to keep us feeling that way!  You can find all 16 flavors of Sparkling ICE on Amazon HERE!

    Strawberry Kiwi Sparkling Tonic
    Makes 1 drink

    Ingredients:


    Instructions:

    1. In a cocktail shaker, combine the ice, strawberries, mint leaves, and muddle (smash) it all together with a muddler, or the end of a wooden spoon if you do not have one.
    2. Add the lemon juice, put the top of the shaker on, and shake it briefly, then pour in the Sparkling ICE and stir it a few times to blend.
    3. Pour into a tall serving glass over ice, and enjoy!
  • Raspberry Rosé Slushie

    Raspberry Rosé Slushie

    People think of Minnesota as being the land of snow and ice, but what they don’t realize is that there is a part of the year when it gets pretty hot here.  It is not just hot either, it is the type of hot that also includes humid.  Like you walk outside and a few minutes later you start to sweat and pretty soon your clothes are clinging to you, your hair is a poofy frizzy mess, and your face starts dripping. It was like that earlier this week, and I work in a kitchen so I am hot at work, and hot when I get off work.  So with all of this heat and warmth, I decided that I needed to make something refreshing. A slushie seemed like the perfect solution.  I used to love them as a kid. I mean who didn’t love those giant big gulp slushies that you could get at the gas station that came in all sorts of pretty colors?  Well, now I don’t, because I know that they are made with fake ingredients and artificial colors, but back in the day I thought that they were bomb!  Also, I had a slushie maker when I was little that I thought was pretty cool, and we used to just use fruit juice with it, so it was healthier than the slushies at the store.  As an adult, I still occasionally make slushies, when the weather calls for it.

    This time, I made a raspberry rosé slushie.  I had been dreaming about this one for a while.  Wine in a slushie?  Heck yes!  I actually make my own wine so I have plenty of it stashed away, and I thought why not add it to a slushie along with some fruit? Of course, if you are making this, you can use whatever your favorite rosé wine is.  Just make sure it is a sweeter one so that the slushie will be balanced.  I had gotten some organic raspberries from my work, and I thought that they would be perfect for pairing with the rosé.  I also decided to add in some fresh mint, because I love it with berries.  If you are not a mint fan you can leave it out, but I like the freshness it adds.

    These are super easy to make if you have a blender, it only takes about 30 seconds or less!  So no excuses not to make these the next time you are in a slushie sort of mood. I kind of felt like a little kid again drinking it but of course these have an adult twist with the rosé.  I think it would be fun to make them for a party in the Summer!  I hope you are all staying cool where you live!

    Raspberry Rosé Slushie
    Serves 1

    Ingredients:

    • 1 1/2 cups fresh organic raspberries
    • 1 cup sweet rosé wine (make sure it is vegan on Barnivore)
    • 2 Tbsp fresh mint leaves
    • 3 cups ice cubes


    Directions:

    Combine all ingredients in a blender with the raspberries at the bottom, and blend (but not too long or it will be all liquid) until the ice is finely crushed.  Pour into a nice tall glass, and enjoy!

  • Tie Dye Lemon Berry Popsicles

    Tie Dye Lemon Berry Popsicles

    When I was little, I think we mostly lived on popsicles and freezees in the Summer.  We would play outside most of the day, doing things like building forts, riding our bikes, or running through the sprinkler.  But we would always come back and want something cold and refreshing.  My Dad always had a giant supply of freezees and popsicles in the freezer for us, and we loved them. They may have just been sugar water, but it was awesome to my 8 year old self and my friends. As I got older though, I realized that they were not good for me, and didn’t have much flavor or any real flavor at all and I began t prefer the popsicles made from real fruit.  They tasted so much better!  I now like to make my own popsicles instead of buying them from the store, and I share them with Eric.  We like to eat them while we go for a walk on a hot day, it helps for a little while at least to stay cool.  I recently made some lemon berry ones that were really simple, but so good, and the perfect thing to enjoy on a super hot day.  Which it totally was, because the day I made them it was heat indexed at 108F degrees. That’s the thing about Minnesota, people think it is just cold here, but it gets really hot and humid in the Summer, like the type of heat where you immediately start sweating after walking outside.  So the popsicles were needed.

    I admit when I made these I was going for more of a red, white and blue healthy Bomb Pop (those sugary red, white and blue ice pops everyone has around the 4th of July) sort of thing for the 4th of July, but they didn’t exactly turn out those colors.  Red and purple was more like it and it reminded me of tie dye, so that is what I named them.  They turned out really good though, which was what mattered, so I still wanted to share the recipe even though they look different than I wanted.

    These are super simple to make if you have a blender, and now is the time to make them when fresh berries are in season.  They can be made with frozen as well, if you don’t happen to have fresh on hand. I am all for using what you have at the time!  They are sweet from the berries, and a little tart from the lemon, like a really good lemonade when you get to the lemon layer. These are so much better than any of the popsicles I ate as a kid.  The flavors are real, bright and delicious!  You might just want to eat more than one, and you totally can because they are healthy! I hope you are all staying cool this Summer!

    Tie Dye Lemon Berry Popsicles
    Makes 6

    Ingredients:

    • 1 1/2 cups fresh organic strawberries and raspberries
    • maple syrup
    • 1 1/2 cups fresh organic blueberries
    • 1/4 cup lemon juice
    • 3/4 cup filtered water


    Instructions:

    1. To make the popsicles, blend up the fresh strawberries in the blender until smooth, and add about 1 tsp maple syrup. Pour into the bottoms of your popsicle molds.
    2. Next, blend up the blueberries and add about a tsp of maple syrup.  Pour into the popsicle molds over the strawberry raspberry layer.
    3. Mix together the lemon juice, water, and about 2 Tbsp maple syrup (or to taste).  Pour over the other layers in the popsicle molds.
    4. Place in the freezer for about 30 minutes or until the mixture is starting to harden, and add the popsicle sticks (you do this because otherwise they fall over if the mixture hasn’t started to freeze).
    5. Let freeze until firm (I left mine overnight), then un-mold and enjoy!  If they are stuck to the molds, run them briefly under warm water then try to remove them.


  • Moroccan Roasted Carrot Hummus

    Moroccan Roasted Carrot Hummus

    One of my favorite things to make at work (in a health food store deli) is hummus.  It is not my usual job, I am the one who makes salads, vegan soups and vegan hot bar, but when I have all of my stuff done, and they need help making hummus, I always volunteer.  We make really good hummus, red pepper and regular, and of course, we always have to taste test it to make sure it is fit for the customers.  Which is why I love to make it.  It has plenty of lemon juice, sea salt, and a little bit of a kick, which is the way I love it, and the way I usually make it at home.  A few days back my coworker was making it and I said to myself, you know what sounds good for dinner?  Hummus with a big plate of veggies.  So, that is exactly what I made when I got home.  I decided to make a new flavor of hummus though, because I like to keep it interesting.  Raw Guru had recently sent me some Dastony Sesame Tahini so, it was the perfect time to make hummus!  Their tahini is super smooth and creamy, not bitter like tahini sometimes is.  So, it made for some rich and delicious hummus!

    I decided to make a Moroccan roasted carrot hummus, because I was in the mood for something with plenty of spices and I had carrots on hand.  When deciding what to make, I almost always try to just use what I have on hand at home already.  This way I never waste food, and I save money which is a win all around.  I roasted the carrots until they were tender in the oven, bringing out their sweet flavor, and then combined them with cooked chickpeas for the bulk of the hummus.  I always have cooked chickpeas on hand for things like this, because I cook up a big batch, then freeze them in portions so that they are ready to use. It is more cost effective than using canned, plus I think they taste a little better.  I added  the smooth Dastony Sesame Tahini to the hummus, and it was so silky smooth!  All it needed were the aromatic spices.   I chose garlic, cumin, paprika, cinnamon, coriander and turmeric.  Also some cayenne for heat.  It smelled sooo good!

    I could not wait for dinner!  I just had to cut up all of my veggies.  It didn’t take long because I am a veggie chopping expert, and I was hungry for that hummus!  The flavor was delicious!  A little sweet from the carrots, and the blend of aromatic spices a bit warming with that rich tahini texture…it was sooo good!  I ate the whole plate of veggies and hummus.  This is one of my favorite Summer meals, and I always have to make it a few times.  But if I am not ambitious about cutting that many veggies, the hummus just makes the perfect afternoon snack with some cucumber slices after work.  I hope you are all having a fabulous Summer so far, if you are a hummus fan like me, give this one a try!

    Moroccan Roasted Carrot Hummus
    Makes about 2 1/2 cups

    Ingredients:

    • 2 large organic carrots, cut into 1 inch pieces
    • olive oil
    • 1 1/2 cups cooked chickpeas
    • 1/2 cup Dastony Sesame Tahini
    • juice of 2 large lemons (1/4 cup)
    • 1 garlic clove, minced
    • 1/2 tsp Raw Guru Himalayan salt or sea salt (or to taste)
    • 2 tsp ground cumin
    • 1 Tbsp smoked paprika
    • 1/8 tsp cayenne (or more if you like spicy)
    • 1/4 tsp cinnamon
    • 1/2 tsp coriander seed
    • 1/2 tsp turmeric
    • filtered water as needed


    1. To roast the carrots, preheat the oven to 400F degrees.
    2. Toss the carrots with just enough olive oil to lightly coat them, and spread out on an oiled sheet pan.  Place in the oven and roast until the carrots are tender, about 30-40 minutes.  Remove from oven and let cool.
    3. Place the carrots in a high speed blender or food processor, along with all of the other ingredients, and blend until smooth, adding filtered water as needed to create a smooth consistency.
    4. Enjoy!  Keeps in an airtight container in the refrigerator for up to 2 weeks.


  • Vegan Strawberry Rhubarb Pie

    Vegan Strawberry Rhubarb Pie

    When I was little, my Mom and I used to go to this local 50s style diner restaurant that had the best strawberry rhubarb pie.  It was amazing. The perfect balance of tart and sweet, with plenty of jammy filling and a flaky crust.  I have had plenty of other ones that were just sub par because whoever made it added too much sugar and it was too sweet, or the flavor was just meh.  I am super picky about strawberry rhubarb stuff, because my Grandma used to make a simple strawberry rhubarb sauce with the rhubarb that grew in her back yard and nothing could compare to it, except a good pie like that one at a diner.  They were both just the pure flavors of strawberry and rhubarb and not much else.  So now, when I try to make strawberry rhubarb desserts, I try to get that balance right too.  I have been craving strawberry rhubarb pie for a few weeks now, and I just got some rhubarb from my Dad’s garden and organic strawberries were on sale at the store so I finally made time to make one.  I do not consider myself a good double crust pie maker, in fact, most of the time they turn out wonky and whatnot, so I usually opt for a crumble topping which is hard to mess up.  But I wanted a pie like the diner one, because that was what I was craving so I went for it even with that in mind!

    For the crust, I went with an organic whole wheat pastry flour, because it is what tastes the best to me.  It is what I used before I went vegan even, because I didn’t want to go for the bleached white flour and I had grown to love it.  Yes, I have made gluten free pie crusts (since I know some of you might wonder why this isn’t gluten free because many of my other recipes are), but I don’t prefer them if the pie is just for me and my family because we are not gluten intolerant so it is not a big deal to use the whole wheat pastry flour. However, if you are gluten intolerant, you can still make this pie, just sub Bob’s Red Mill all purpose gluten free flour 1:1 and it will still turn out (I have used it before for crust).  The dough will just be a little more fragile so you will have to be a little more careful.   I use coconut oil instead of butter in this crust and it gives it a slight sweetness that I enjoy.  I admit I was snacking on the scraps of this pie crust like cookie dough it was that good.

    For the filling I kept it super simple, just strawberries, rhubarb and coconut sugar.  Because the fruit was super flavorful that was all it needed.  Now like I said earlier, I am not an expert double crust pie maker, so I didn’t do anything pretty or special with the crust, just poked the vent holes in it and popped it in the oven.  It didn’t come out the prettiest, but you know what?  It tasted so good I did not care.  My pie crusts always look a little ugly (this one cracked because I wasn’t careful with the dough), but they taste good!  The fruit was perfectly jammy and sweet with just enough tartness from the rhubarb, and the crust was rich and delicious just like I had imagined it being. It got a big thumbs up from my family as well, so I know it is a keeper.  This is perfect served a little warm with some coconut milk ice cream!  Anyone else a big strawberry rhubarb fan?

    Vegan Strawberry Rhubarb Pie

    Makes one 9 inch pie

    Crust:


    Filling:

    • 4 cups organic strawberries
    • 4 cups organic rhubarb
    • 1/2 cup coconut sugar
    • 1/4 cup cornstarch


    1. To make the crust, in a large bowl, mix together flour, sugar, sea salt, and spices. Cut in coconut oil with a pastry blender or 2 knives until it is in pea sized pieces. Mix in  just enough water to create a smooth dough that holds together but isn’t too sticky. Add more water if needed, and knead slightly until a smooth dough is created. Roll out into 2 10 inch circles on two sheets of slightly floured parchment paper, then use the paper to help you transfer one to an 9 inch pie dish.  Set them both aside in a cool place.
    2. Pre-heat the oven to 375F degrees.
    3. To make the filling, combine the berries, rhubarb, coconut sugar, and cornstarch in a bowl, and toss together.  Pour this mixture into the crust, then take the other crust, and place over the top of the pie, using the parchment to assist you.
    4. Place in the pre-heated oven and bake for about  50 minutes or until the pie juices are bubbling (check the pie half way through, and if it is getting too dark, then cover the top with foil).
    5. Remove from the oven to a wire rack.
    6. Allow to cool completely before serving.
  • Chocolate Dipped Key Lime Pie Stuffed Strawberries

    Chocolate Dipped Key Lime Pie Stuffed Strawberries

    Key lime pie has always been one of my favorite Summer desserts.  It has to be the good kind though, plenty of tart lime and not too sweet. When I was little, my Mom and I found the perfect recipe for it that was the perfect balance, and it always tasted amazing.  Especially on a hot Summer day.  But a lot of times when we would order key lime pie in a restaurant or buy it somewhere it was never as good and we were disappointed.  I remember one year at the Minnesota State fair they had a key lime pie on a stick.  Because at our state fair everything has to be on a stick in case any of you were wondering about that.  But anyways, I bought one to try, and I was disappointed because it was way too sweet and not tart enough.  I liked the concept though, because lime with chocolate is amazing.  I have since come up with vegan key lime pie recipes that I enjoy.  Like these Chocolate Covered Key Lime Pie Bars, or my Key Lime Pie Shooters, or this Key Lime Cheesecake.  I will never tire of key lime pie recipes.

    I was in the mood for some key lime pie a few days back, but I didn’t want to take a lot of time to make it, and thought strawberries  and chocolate would be amazing to add to it.  So, I came up with chocolate dipped key lime pie stuffed strawberries.  I mean, no they aren’t actual pie slices, but they are darn delicious and that filling is just like key lime pie.  I kept them pretty simple.  I trimmed a pound of organic strawberries (eating the insides, because why waste such deliciousness), then dipped them in a vegan dark chocolate.  I just melted down my favorite vegan dark chocolate chips and that did the trick.  I sometimes make my own chocolate but when I am in a hurry, it is nice to have some already on hand.

    For the filling I used a special secret ingredient I use in most of my key lime pie recipes, avocado.   It works perfect!  It is rich and creamy, neutral and lime, a bit of maple syrup and coconut butter to thicken it hides the fact that it is avocado and not some soft of dairy or egg filling like you would find in most classic key lime pies.  These little strawberries are super delicious!  I bet you can’t eat just a couple.  I needed quite a few.  I figure they are fairly healthy, you are getting your fruit and heart healthy avocado and dark chocolate all in one dessert!  I hope you will give them a try, I have a feeling you will love them!


    Chocolate Dipped Key Lime Pie Stuffed Strawberries
    Makes about 24

    Ingredients:


    Filling:

    • 1 ripe avocado (not so ripe that it is brown)
    • 1/4 cup lime juice
    • 2 Tbsp maple syrup
    • 1 tsp pure vanilla extract
    • 3 Tbsp coconut butter, warmed to liquid


    Instructions:

    1. To prepare the strawberries, cut the tops off, and cut a v shaped hole into the middle from the top so that you have room for the filling.
    2. Melt the chocolate in the top of a double boiler.
    3. Line a baking sheet with parchment paper.  Dip each strawberry bottom into the chocolate by about 3/4 of an inch to an inch depending on the size of the berry.  Place on the parchment paper.  When they are all dipped, place the sheet pan in the freezer until the chocolate is firm.
    4. To make the filling, put all of the ingredients in a food processor and process until smooth.
    5. Place the filling in a pastry bag, or a ziplock bag with the tip cut off, and pipe into each strawberry.
    6. Serve!  These are best enjoyed the day that they are made, but keep any leftovers refrigerated.
  • Avocado Hemp Butter

    Avocado Hemp Butter

    Have you ever gone to the store and wanted a vegan spreadable butter, and looked at the ones that were available, only to find out that they contained processed ingredients, or unhealthy oils?  Well, I have.  It has been the only thing that has stopped me from buying them.  About 10 years ago I actually tried some (because I cared less what was in my food then), but I didn’t really care for it because it had a weird flavor.  Most of them are made with canola oil, soy bean oil or palm oil, all of which I try to avoid so I have just avoided the spreadable butters all together. But I recently said to myself, I bet I can make one at home with ingredients that I have on hand that would actually be better for me.  I told my Mom I would share it with her too and get her opinion on it, because she is a fan of spreadable butters, and she gave me the idea to try making one.  Now when I say butter of course it is not real butter like with dairy in it.  I am talking totally plant based!

    I wanted this butter to have some heart healthy oils in it, so I went for the avocado oil.  It already has a buttery but neutral flavor to it, which is why I love to use it on popcorn or for baking.  It blends in beautifully.  Next, I wanted to add some hemp seed oil.  I had a big bottle on hand, and I know it contains heart healthy omega 3 fatty acids, so why not add some of that too?  I try to have a little every day anyhow.  These two oils are both liquid even when refrigerated, which is important for making the butter spreadable.  I figured mix them with one fat that is solid when chilled and the butter would be the prefect consistency.  I chose coconut oil. I like the slightly sweet flavor of coconut oil, and I figured it would mimic the sweetness in some sweet cream butter. But of course if you are making this and want it more neutral, use a refined coconut oil instead of the unrefined I use in the recipe.  That is just what I happen to like.  I added a touch of sea salt and apple cider vinegar (to make it taste more like dairy), and it was perfect!  So how do you make this into buttery perfection?  well, the process is a little fun.

    You don’t just pop it in the refrigerator to chill, that would result in a less spreadable butter. It gets whipped up like frosting!  You just chill it until it starts to get a little cloudy, then whip it with a hand mixer. This is actually the process I use for making body butter, so I knew it would work beautifully for this.  It turned out so good!  It spreads onto toast perfectly like real butter, and it tastes good too, it has a slightly sweet nutty flavor I love!  I shared it with my Mom and she said it was better than the store bought vegan butter she had been buying.  So, if you are a butter person, skip the store bought vegan butter and give this a try!  It is easy to make and worth it!

    Avocado Hemp Butter
    Makes about 2 cups

    Ingredients:

    • 1/2 cup raw unrefined coconut oil*
    • 1/4 cup hemp seed oil*
    • 1/4 cup avocado oil
    • 1/4 tsp sea salt
    • 1/4 tsp apple cider vinegar


    Instructions:

    1. In a medium glass bowl, whisk together all ingredients until combined.
    2. Place in the freezer until the mixture starts to solidify at the edges, and becomes cloudy, about 20 minutes or so.
    3. Remove from the freezer, and whip with an electric mixer on high speed until light, fluffy and the consistency of creamy frosting (you may have to scrape the bowl sides half way through).
    4. Spoon into a jar, and let sit in the refrigerator until more firm, about an hour at least.
    5. Keeps in the refrigerator for a few months.


    *Note: if you want less of a coconut flavor, use refined coconut oil instead. I just prefer the unrefined.


  • Vegan Strawberries and Cream Brownies 

    Vegan Strawberries and Cream Brownies 

    I spent most of last weekend outside, going for long bike rides and walks, because I feel like we haven’t seen the sun or warmth like this in forever.  I mean, Winter lasted an extra 2 months, and now I feel like Summer has arrived and we have skipped Spring weather wise.  It is ok though, it feels nice and now we just have to wait for the plants to catch up.  When I did take a break from the outdoors stuff,I made some really delicious food. On Sunday, after Eric and I took a 27 mile bike ride, I made some vegan ramen from a recipe by Cilantro and Citronella.  You can find it HERE.  Man was it ever delicious!  I don’t usually follow recipes when I make stuff, but her recipe sounded amazing.  I was craving that type of ramen because it is the type I like to order at a local restaurant and I wanted to make it at home.  It turned out sooo good! It has a creamy sesame broth that makes it like comfort food.  I know, not really 80 degree weather type food but I was hungry for it.  The second thing I made is what this post is all about, some Vegan Strawberries and Cream Brownies.

    I am in a strawberry type of mood now that it feels like Summer, and I thought to myself, why not pair them with chocolate in some fudgy brownies?!  Yes, my brownies have to be fudgy, I am not a cakey brownie person at all.  I used my gluten free brownie base for these, and they turned out perfect!  It has a mixture of apple sauce and avocado oil to keep it moist but you would never know.  If you don’t have access to avocado oil, olive oil would work too (you can’t taste it because of the strong chocolate flavor).  For the strawberries and cream part, I used a mixture of coconut milk and cashew butter with freeze dried strawberries and it turned out like strawberry cheesecake swirls.  Why freeze dried strawberries?  Well, they are packed with strawberry flavor, but don’t add a lot of moisture to the recipe.  Lastly, I dropped some strawberry jam over the brownies as well.  I swirled it together, and could not wait to try them!

    Sadly I had to wait until they cooled but it was so worth it!  They were so good!  Super fudgy texture, rich chocolate flavor and sweet strawberry cheesecake like filling with flavorful jam throughout.  They taste like Summer brownies!  I mean, these are so much better than chocolate dipped strawberries!  If you are in the mood for something chocolaty, give these a try!  I hope you are all having a wonderful week!

    Vegan Strawberries and Cream Brownies 
    Makes 16

    Cheesecake swirl:

    • 1 cup freeze dried strawberries
    • 3/4 cup thick coconut milk (from the top of a chilled can)
    • 1/2 cup raw cashew butter
    • 2 Tbsp maple syrup
    • 1/8 tsp sea salt
    • 1 tsp pure vanilla extract


    Brownies:

    • 1/4 cup avocado oil
    • 1/2 cup applesauce
    • 1 cup coconut sugar
    • 2 Tbsp ground flax seed mixed with 1/4 cup plus 2 Tbsp filtered water
    • 2 teaspoon vanilla extract
    • 1 cup gluten free all-purpose flour
    • 1/2 cup cacao powder or unsweetened cocoa powder
    • 1/4 teaspoon sea salt
    • 1/2 cup strawberry rhubarb jam


    Ingredients:

    1. To make the swirl, combine all ingredients in a blender and blend until smooth.  Pour into a bowl and set aside.
    2. To make the brownies, pre-heat the oven to 375F degrees. Whisk together the sugar, avocado oil and applesauce until well combined and the sugar is starting to break down.
    3. Add the flax water mixture, and vanilla and beat until smooth.
    4. Add the flour, cacao powder and sea salt and beat until smooth.
    5. Scrape the batter into a greased 8×8 inch pan, then pour the swirl over it, then drop the jam by the tsp over that.
    6. Place in the oven, and Bake for about 30 minutes or until set (but do not over bake).
    7. Let cool completely before cutting into bars.


  • Vegan Chocolate Drizzled Tahini Cookies 

    Vegan Chocolate Drizzled Tahini Cookies 

    You may think of tahini as something that you add to hummus, or make dressing out of.  But did you know it is really good in desserts too?  I am not just talking about halva (a tahini candy popular in the Middle East). I mean adding it to actual desserts for richness in place of nut butters.  Like in delicious cookies.  My Mom gave me a jar of tahini from Trader Joes, and asked me to make some cookies with it. Heck yes!  I was excited about making them, because I like working with ingredients I don’t normally use all the time.  You know me, I tend to get obsessed with peanut butter and almond butter and don’t venture outside of those boxes, but tahini is a great ingredient too!  Especially if you happen to be allergic to nuts or peanuts, it is a life saver if you are craving rich nut butter cookies.  Which is exactly what I ended up making.  I modified my peanut butter cookie recipe, and added in creamy tahini instead of the peanut butter.

    The dough came together perfect! Honestly it tasted like peanut butter cookie dough, with the same texture just not as strong.  Sometimes tahini can be a tad bitter, but the stuff from Trader Joes is not, and it tasted good in this recipe.   Not only that, it has a nice smooth runny texture not too stiff.  Be sure that the tahini you are using for this recipe is the runny type that has been mixed well. I could not stop sampling the dough, but what else is new?!  I love cookie dough.  Most importantly though, these baked up beautifully!  I wasn’t sure if they would come out as nice as the peanut butter cookies, but they came out perfect!  They smelled amazing, like peanut butter cookies, with that hint of caramel from the coconut sugar.  I decided to drizzle them with dark chocolate, because I like to adorn cookies with something if they don’t have a lot of add ins.

    They tasted wonderful!  Rich peanut butter like flavor and a buttery texture.  Soft in the center, crispy at the edges, the dark chocolate the perfect touch!  If you are allergic to peanut butter or nuts,  but are wanting some delicious peanut butter cookies definitely give these a try!   Or, even if you aren’t allergic, still give them a try because I am sure you will love them!

    Vegan Chocolate Drizzled Tahini Cookies 
    Makes 12 cookies

    Ingredients:

    Cookies:

    • 1 Tbsp ground flax seed
    • 1/4 cup plus 1 Tbsp filtered water
    • 1 cup coconut sugar
    • 1 1/4 cups organic tahini*
    • 1/4 cup coconut oil, warmed to liquid
    • 1 tsp pure vanilla extract
    • 1 1/4 cups gluten free all purpose flour
    • 3/4 tsp baking soda
    • 1/2 tsp baking powder
    • 1/2 tsp sea salt

    Chocolate Drizzle:

    Instructions:

    1. In a small bowl, whisk together the flax seed and water.  Place the bowl in the fridge for 15 minutes, this is your flax egg.
    2. In a large bowl, with a wooden spoon, mix together the sugar, tahini, coconut oil, vanilla and flax egg, until smooth.  Then mix in the flour, soda, baking powder, and sea salt in until the mixture is smooth.
    3. Preheat the oven to 375F degrees.  Line a sheet pan with parchment.
    4. Shape the cookie dough into 2 inch balls, place on your baking sheet a few inches apart and flatten with a fork, like you would with peanut butter cookies.
    5. Place in the oven and bake at 375F for 12 minutes or so, until lightly browned and set.  Allow to cool completely on a rack.
    6. Melt the dark chocolate in the top of a double boiler.
    7. Drizzle the dark chocolate over the cookies, then set in the freezer until it has hardened.
    8. Enjoy!
  • Vegan Chocolate Chip Cookie Dough Pie

    Vegan Chocolate Chip Cookie Dough Pie

    I am one of those types of people that would make a batch of cookies just to eat the dough and not actually bake it.  Because the dough is my favorite part!  Usually when I make cookies, I do eat more dough than the baked cookies (I share them), just because there is just something irresistible to me about the texture and flavor of it that is better than the baked cookies. When I was a kid in my Grandma’s kitchen, I was always stealing dough.  She would tell me not to eat too much, or I would get a tummy ache, but I never got one.  I love the dough just as much now, and of course it is vegan dough so no dealing with that raw egg stuff.  I have even made a few cookie dough desserts (besides actual real dough), like my Vegan Chocolate Chip Cookie Dough Cake , Vegan Chocolate Chip Cookie Dough Truffles, Vegan Cookie Dough Ice Cream, and Vegan Cookie Dough Popcorn, and they were all amazing.  But I hadn’t made a pie yet.  The idea was in my head, I thought about making one a while back, but it got pushed to the back burner.  My brain is like a snowstorm of different ideas sometimes, with the snowflakes being ideas, so something has to wait to be made since I can’t make them all at once.  Well, it sounded really good to me last weekend so I finally made a chocolate chip cookie dough pie!

    I was super excited.  I had all of the ingredients on hand, which is always a plus.  I love it when I don’t have to buy anything extra.  I decided to make this gluten free and nut free as well, since I know a lot of you will appreciate that.  For the crust, I usually use oats, but I wanted to try quinoa flakes as a completely gluten free option.  It worked perfect! They blend up more fine than the oats, and are pretty neutral in flavor.  If you prefer oats though and don’t mind it not being gluten free, you can feel free to use them if you can’t get the quinoa flakes.  I blended them with dates and a few other things to make a sort of cookie dough crust and it was the perfect base for my cookie dough filling!  The filling has a somewhat unusual dessert ingredient, chickpeas.  I like to use them in things like this because they are neutral in flavor, and work like nuts in a recipe like this.  I wanted to keep it nut free, so they are a perfect substitute for cashews.

    I also added coconut milk, as the bulk of the filling to give it a creamy luscious texture like a cookie dough mousse. I added in a little vanilla and it was perfect!  It did taste like cookie dough mousse.  I could have eaten it with a spoon like that, but a pie is prettier and even better with the crust. This is a cookie dough lover’s dream!  If you agree that cookie dough is better than actual baked cookies most of the time, give this pie a try!

    Vegan Chocolate Chip Cookie Dough Pie
    Makes one 8 inch pie

    1 8 inch removable bottom tart pan

    Crust:

    • 1/2 cup finely shredded dried coconut
    • 1 1/4 cups quinoa flakes
    • 1 cup soft pitted medjool dates (if they are not soft, soak them 30 minutes and drain well before using)
    • 1/4 tsp sea salt
    • 2 Tbsp coconut butter
    • 1/4 cup vegan chocolate chips

    Filling:

    • 1 1 15 oz can full fat organic coconut milk, chilled
    • 1 cup soft, pitted medjool dates (if they are not soft, soak them 30 minutes and drain well before using)
    • 3/4 cup cooked chickpeas
    • 1/4 tsp sea salt
    • 2 tsp pure vanilla extract
    • 3/4 cup coconut butter warmed to liquid
    • 3/4 cup vegan chocolate chips


    Instructions:

    1. For the crust, combine all ingredients but the chocolate chips in the food processor until finely chopped and starting to hold together when squeezed.  Mix in the chocolate chips by hand.
    2. Press the mixture into an 8 inch removable bottom tart pan greased with avocado oil (or other oil that doesn’t harden when chilled).
    3. For the filling, combine all ingredients but the coconut butter and chocolate chips in a high speed blender and blend until smooth.
    4. Pour in the coconut butter and blend until smooth. Stir in the chocolate chips.
    5. Pour the filling over the crust, and sprinkle with more chocolate chips.
    6. Pie keeps refrigerated for 1 week in a container.


  • Italian Pasta and Chickpea Soup 

    Italian Pasta and Chickpea Soup 

    So apparently Winter is never going away here.  They are predicting even more snow, even though it is mid April and the tulips should be blooming by now.  I am so over it.  Last year the first week of April I was wearing shorts outside.  So, I am not quite into the light Spring food yet, I am in comfort food mode until it warms up.  Which will probably be another month from the looks of it.  The soups are flying out of  the deli I work in, and I feel like soup making and serving is non-stop.  I can’t blame people, I feel the same way about soup right now.  So a few nights back I made myself a big pot of warming comforting soup.  I was in the mood for something with Italian flavor because I had made one at work and it just tasted and smelled so good I wanted my own. I had all of the ingredients on hand as well, so it was perfect!  I love it when I don’t have to go shopping for things to make dinner.

    It was really pretty simple to make as far as soups go. I have made my own soup ever since my Mom taught me how to make soup when I was in high school.  She had gotten this soup book and we would pick different recipes and make them together.  I thought that was pretty exciting, and it taught me a lot. It was useful knowledge when I decided I wanted to cook for a living.  My favorite soups out of that book were the Italian ones, so that is what we made most often, and those memories are what I based my Italian soup I made this week off of.  One called pasta e fagioli, or beans with pasta.  It had plenty of vegetables in the base, it was flavorful thanks to the herbs and alliums, and it was definitely comfort food. This one came together in about 45 minutes and it was just as delicious!

    The only things I changed were I swapped the usual white beans we used to use for chickpeas, and used elbow pasta instead of little alphabet shaped pasta I loved so much when I was younger, just because that is what I had on hand.  If you are making this for yourself, feel free to add in your favorite vegetables, or pastas or use a different bean.  Because that is what cooking at home is all about, making it work for you, and using what you like and have on hand!

    Italian Pasta and Chickpea Soup 

    Serves 3

    Ingredients:

    • 1 tsp olive oil
    • 1/4 cup diced red onion
    • 2 stalks celery, sliced
    • 2 carrots, cut in half and sliced
    • 2 garlic cloves, minced
    • 1 tsp dried basil
    • 1/2 tsp fennel seed
    • 1 tsp dried oregano
    • 1/4 tsp red pepper flakes
    • 1/2 tsp sea salt
    • 3 cups crushed canned tomatoes or fresh roasted*
    • 2 cups filtered water
    • 1 Tbsp balsamic vinegar
    • sea salt
    • 4 oz gluten free elbow pasta
    • 1 1/2 cups cooked chickpeas
    • 1/4 cup chopped fresh parsley


    Instructions:

    1. Heat the olive oil in a medium pan.
    2. Add onions, carrots and celery and sauté until tender.
    3. Add the garlic, tomatoes, herbs, sea salt, pepper, vinegar, and filtered water.
    4. Bring to a simmer, and allow to cook until the tomatoes are very soft and the flavor has melded, about 30 minutes.
    5. Add the pasta to the pot, and let cook for about 5 minutes.
    6. When the pasta is cooked, stir in the chickpeas and fresh parsley.
    7. Serve!


    *To roast the tomatoes, cut them into 2 inch wedges, and spread them out on a parchment lined baking sheet.  Place in a 400F degree oven and roast for about 30-45 minutes until tender and starting to brown at the edges. Remove from oven and you are ready to use them in this recipe.

  • Vegan Avocado Brownies

    Vegan Avocado Brownies

    Brownie baking is the perfect activity for your day off.  Especially if it has been a particularly stressful, or the weather outside is crappy.  I mean, one can not possibly be in a bad mood while baking brownies.  The whole process is enjoyable.  Eating the last bit of batter leftover in the bowl, taking in the heavenly aroma of the baking brownies, and of course devouring them when it is all over.  Makes me happy!  So, that is just what I decided to do last weekend.  I have been wanting to make avocado brownies for a while now, so that is what I made!  I have made a chocolate avocado cake before and it turned out awesome, so why not brownies?!  And I figure they will be perfect for people who are oil free as well, since the avocado is the healthy fat in these.  Plus, Raw Guru was kind enough to send me a lovely care package including some raw cacao powder and Rawmio Essentials dark chocolate so I couldn’t wait to use them in something.  If you have never heard of them, definitely check out their website, it is filled with good things like superfoods, chocolate, nuts, nut butters etc.  I have loved everything I have tried from them, especially their nut butters (since I am obsessed with nut butter).

    Anyways, back to those brownies.  In the event that you have some over ripe avocados laying around, these would be the perfect solution to use them up.  Not that it happens often, because they are usually devoured in my house, but I ended up with 2 bags last week so I had a lot.  The brownies are pretty simple to make, you just need to blend up some ripe avocados and whisk in all of the other ingredients.  That is the thing I like about brownies, they are easy.  The batter is like rich chocolate cake batter, I should know I sampled enough of it!  I used coconut sugar to sweeten them, and these actually happen to be gluten free so they are better for you than regular brownies.  Not to mention the heart healthy fats that they contain.  They bake up in about 35 minutes and you are on your way to chocolate heaven!

    I chopped up the Rawmio Essentials chocolate and scattered it on top of the brownies, because why not have gooey chocolate chunks?!  I like my brownies to be extra chocolaty. They baked up nice and fudgy just how I like them and I couldn’t wait to give them a try!  They were rich and delicious thanks to the avocado, none of that dry cakey stuff going on.  I am definitely a center brownie piece person, the fudgiest part the better.  If you are in search of healthier brownies, or just an avocado lover like me that is always finding new ways to use them, give these a try!

    Vegan Avocado Brownies
    Makes 16

    Ingredients:

    8×8 inch Pan

    Brownies:


    Directions:


    1. To make the brownies, pre-heat the oven to 350F degrees.
    2. Whisk together the sugar and avocado puree until well combined and the sugar is starting to break down. Add the flax mixture and and beat until smooth. Add the flour, cacao powder and sea salt and beat until smooth.
    3. Scrape the batter into a greased 8×8 inch pan. 
    4. Sprinkle with chocolate chunks. Place in the oven, and Bake for about 30-35 minutes or until set (but do not over bake).
    5. Let cool before cutting into bars.


  • Vegan Lemon Sugar Cookies

    Vegan Lemon Sugar Cookies

    I have always loved all things lemon.  Most likely it is inherited, because my Grandma loved lemon desserts, and my Mom does too.  None of that weak artificially lemon stuff either, it had to be real tart lemon, and plenty of it.  The fake stuff just isn’t the same.  I still feel that way.  I like my lemon meringue pie and lemon bars to have loads of flavor.  Lemon also makes me think of Spring.  I know citrus is in season mid Winter here, but I feel like that extends into Spring, and right now we have 8 inches of snow on the ground and it was in the single digits (Fahrenheit) this morning.  I am so ready for the snow to leave and green grass.  But in the mean time, I decided to stay inside and bake some lemon cookies. I had a bag of lemons on hand, so it was perfect!  I have been wanting to make some lemon sugar cookies for a while now, because the deli I work in makes some and they always smell amazing but they are not vegan, so I always tell myself I need to make my own.

    They are actually pretty simple to make, I just used my classic vegan sugar cookie dough.  I use xylitol, because it gives the cookies the same pale color that regular sugar would.  I like them to look like my Grandma’s sugar cookies.  But if you don’t care for xylitol, and would rather use coconut sugar or maple sugar go right ahead. Just keep in mind the cookies will turn brown.  The dough for these tastes amazing by the way, which is important to me, because I love cookie dough!  This dough is fragrant with lemon thanks to the large amount of zest I include in them.  My kitchen smelled amazing while they were baking and I could not wait to try them.

    But first, they had to cool, and I wanted to give them a glaze to make them pretty, and give them even more lemon flavor. So, I made a simple glaze of coconut butter, lemon juice, and maple syrup and it was perfect!  They turned out even better than I imagined.  A nice buttery rich texture, plenty of lemon aroma and flavor and a hint of sweet vanilla. Maybe it is snowing where you live and you need a little sunshine too.  If so, give these a try! They taste like sunshine!

    Vegan Lemon Sugar Cookies

    Makes 24 cookies
    Ingredients:
    Cookies:
    • 2 Tbsp ground golden flax seed
    • 1/4 cup plus 1 Tbsp filtered water
    • 1 Tbsp lemon juice
    • 2 Tbsp lemon zest
    • 1 cup virgin coconut oil, warmed to liquid
    • 1 1/2 cups xylitol* (coconut sugar may be used but keep in mind the cookies will not be the same pretty yellow color)
    • 1 teaspoon vanilla extract
    • 1 teaspoon baking soda
    • 1/2 teaspoon sea salt
    • 1/8 tsp turmeric powder (optional for color)
    • 3 1/2 cups all purpose gluten free flour


    Glaze:

    • 1/4 cup plus 2 Tbsp coconut butter, warmed to liquid
    • 3 Tbsp lemon juice
    • 1 Tbsp maple syrup


    Instructions:

    1. In a small bowl, whisk together the flax seed, filtered water and lemon juice and zest.  Set aside in the refrigerator for 15 minutes.
    2. In a large bowl, mix coconut oil with xylitol and mix until well combined.
    3. Mix in the vanilla extract and flax mixture until well combined.
    4. Add the baking soda, salt, turmeric then the flour, a cup at a time, mixing between each addition, until well combined.
    5. To bake, Preheat your oven to 350 degrees. Line 2 large baking sheets with parchment paper. Roll balls into about 1 1/2 inch balls, and place on prepared cookie sheets a couple inches apart.
    6. Place in the oven, and bake for about 15-18 minutes, until puffed and just starting to brown slightly.  Remove from the oven and let cool on the pan a few minutes, then remove to a wire rack to cool.  Repeat with remaining cookies and let cool completely.
    7. To make the glaze, whisk all of the ingredients together (if it seems too thick to drizzle, add a little more lemon juice to it).
    8. Drizzle the glaze over the cookies.
    9. Place the cookies in the freezer until the glaze is set.
    10. Enjoy!


    *Do not feed these cookies to dogs, xylitol is toxic to dogs similar to how chocolate is.

  • Vegan Banana Chocolate Chip Scones

    Vegan Banana Chocolate Chip Scones

    In the deli I work in, they make a lot of baked goods.  My work station is right next to the cooling rack, so I get to enjoy the aroma of freshly baked sweets all day long, and I admit it is certainly a mood booster.  Happy smells.  That is why I love baking so much at home too!  Yes, I know it is surprising that I don’t bake at work. I am actually the one who prepares all of the salads for our case and vegetarian and vegan soups and hot bar.  Plus, we don’t have any vegan baked goods prepared in house at the time, so I don’t eat them anyway.  I am hoping some day we do.  But in the mean time, I can still enjoy the baked goods delicious aroma at work.  Not only that, I am often times inspired to veganize them at home, and then share the recipes with you all!  One of my coworkers makes the most amazing scones. A long time ago I had tried them (before I went vegan, I have worked there 12 years), and they were the most delicious scones ever.  Perfect flaky texture, perfect amount of sweetness and super tender. And, I was lucky enough to have her teach me how to make scones, because she was making a big batch for a party and needed help.  So I learned how to properly mix the dough so that they turn out perfect.  The key is to leave clumps and not over-mix them.  I started making my own at home and they were just as delicious, and later I came up with the perfect vegan recipe.  It really wasn’t hard to veganize, swapping the butter for coconut oil, heavy cream for coconut cream, and leaving out the eggs made them even better in my opinion.

    So, the other day, she made banana chocolate chip scones, and there they sat, smelling amazing on the rack next to me.  I had to make a veganized version.  Surprisingly I have never made any banana scones before.  So it was a good time to try it!  I actually ended up making these twice, because the first attempt got over-mixed and slightly over baked.  And, I wanted them to be perfect to make sure they would be good if you all made them.  I make mistakes too sometimes, so don’t ever feel bad if you do!  Anyways, back to the scone recipe.  For the base, I used gluten free flour, coconut sugar to sweeten, and a touch of cinnamon and nutmeg.  Once I added in the coconut oil and full fat coconut milk, it was perfect!  Yes, I enjoy eating scone dough too.  Be sure to use full fat coconut milk for these by the way, you want the thick creamy part from the top of the can.  Because this is what replaces the heavy cream in classic scones.  No, these are not fat free, but hey, we all need a little fat sometimes in our diets and these are a treat.

    I mixed in the bananas and chocolate chips, and shaped them into little triangles and they looked so good even before I baked them!  They smelled amazing while baking, and I could not wait to try them.  But of course they needed to cool so I had to wait a bit.  But it was so worth the wait!  The scone was tender and flaky, with sweet bits of jammy banana and gooey rich chocolate chips (I had it warm).  I love veganizing recipes!  If you are looking for the perfect thing to bake on a lazy weekend morning, this is it!  After all, the smell of fresh baked goods in the morning will make you feel happy all day.

    Vegan Banana Chocolate Chip Scones
    Makes 8

    Ingredients:


    Instructions:

    1. Preheat oven to 425F degrees with the rack set at the middle position.
    2. Line a baking sheet with parchment.
    3. In a large bowl, combine the flour, sugar, cinnamon, nutmeg, baking powder, and salt. Cut in the coconut oil with a pastry blender or 2 knives until the mixture starts to clump into pea sized pieces. In a small bowl, stir the vanilla into the coconut milk. Add the coconut milk to the dough, and stir a few times, but do not over-mix. The dough should hold together when squeezed, but still be clumpy.
    4. Fold in bananas and chocolate chips until evenly distributed.
    5. Place dough on a floured work surface, and shape into a 4 inch wide log. Use a bench scraper to cut into 8 triangles.
    6. Place scones on the prepared baking sheet, reshaping slightly if necessary.
    7. Brush the tops lightly with the coconut milk (only if they seem dry, you want the sugar to stick), and sprinkle with coconut sugar.
    8. Place in the oven and bake for about 20 minutes or until golden brown (after about 15 minutes you may need to reshape with 2 bench scrapers if the scones are spreading, then place back in the oven).
    9. Cool on a wire rack.


    *If you prefer to make these not gluten free, you can swap the gluten free flour for organic whole wheat pastry flour.

  • Tofu Vegetable Noodle Soup

    Tofu Vegetable Noodle Soup

    I feel like everyone around me (including myself a few weeks ago) has been sick lately.  The cold and flu are going around like no other.  At least I just had a cold and it went away fairly quickly.  But others around me are not over it yet, and so I thought I would make some soup to share.  Because warm brothy soup and netti pots are your friend when you have a cold.  Of course the classic that my Grandma always made is chicken noodle, and I think that is the most popular thing that people buy at the store.  But this girl is vegan, and I think you can be just as healthy without chicken in your soup!  So, I made the classic, but my way.  Tofu vegetable noodle soup!  I was never a fan of chicken growing up anyhow, but I would have gladly eaten a bowl of tofu noodle.  To start off, I used a bunch of veggie scraps to make a flavorful stock for the soup.  It is important to start out with a flavorful base when your soup is going to be brothy.  Plus home made vegetable stock is healthier than store bought.  Many store bought brands have artificial flavors or sugar in them.  So, I make my own.  It is really easy and a good way to use veggie scraps.

    If you would like to make your own, you need about a cup of onion ends (or just 1 onion), about 2 cups of celery (or 3 stalks), about 1 cup green onion trimmings (or 1 bunch), and about 5 cloves of garlic, crushed.   Throw it all into a pot, cover with water, bring to a boil, then lower to a simmer and cook it slowly for at least 4 hours.  I make this at work a lot from scraps from my other dishes, which is why I say use onion butts etc.  But I know not everyone has that many left over if they have not been saving them in a bag in the freezer, so you can just use veggies that are not scraps if you wish.  Anyways, it made a great base for my soup.  I went with the classic carrots, celery, garlic and onions for my veggies, and my favorite Winter herb, thyme. It smelled amazing while it cooked on the stove!

    I added in some gluten free chickpea pasta for the noodles.  I know it is not traditional, but I love to add extra protein, and so gluten free bean noodles are a life saver!  I cooked my tofu in the oven and it was ready by the time the soup was ready.  Once it was added in and the soup came together, I could not wait to try it!  It was way better than any chicken noodle soup I ate as a child.  Rich with flavor, loaded with veggies and packed with protein.  So it was a win all around!  If you are feeling under the weather, give this soup a try!  The warm flavorful broth will definitely make you feel better!


    Tofu Vegetable Noodle Soup
    Serves 2-3

    Ingredients:

    Tofu:

    • 16 oz organic extra firm tofu, cut into cubes
    • 3 Tbsp sesame oil
    • 3 Tbsp tamari


    Soup:

    • 1 16 oz block 4 cups vegetable stock
    • 3 celery stalks, sliced
    • 1 small onion, diced
    • 2 carrots, sliced
    • 2 garlic cloves, minced
    • 1/3 tsp sea salt or to taste
    • 1/2 tsp dried thyme
    • 4 oz Explore Asian chickpea fusilli or other bean based pasta


    Directions:

    1. Preheat the oven to 400F degrees.
    2. Toss the tofu with 3 Tbsp sesame oil, and 3 Tbsp tamari in a bowl until the tofu is coated, and spread out on an oiled sheet pan.  Place in the oven, and bake until the tofu is starting to brown, and get crisp at the edges, about 45 minutes.  Set aside.
    3. Meanwhile, to make the soup, combine the stalk, celery, onion, carrots, garlic, sea salt, and thyme in a pot and bring to a boil.  Lower to a simmer and cook for about 20 minutes until the veggies have softened, then add the pasta and continue to cook until it is tender, about 10 minutes more.
    4. Add the tofu.  Remove from heat, and serve!


  • Vegan Double Chocolate Cheesecake (Nut Free)

    Vegan Double Chocolate Cheesecake (Nut Free)

    Since that nut free Vanilla Raspberry Swirl Cheesecake I made last weekend turned out so good, I decided that this weekend I needed to make a chocolate one for all of you chocolate lovers out there.  You know who you are, the people who can never resist anything chocolate, and always choose it over vanilla.  Eric (my boyfriend) is like that.  In fact, the first dessert I ever made for his Birthday was a raw Mexican chocolate cheesecake. I don’t hate on chocolate just because I usually have a thing for vanilla.  In fact this week I have been craving something decadent and chocolaty so it is a win for everyone me making the chocolate cheesecake this weekend.  I didn’t want to make anything that was too difficult either, and vegan cheesecakes are usually pretty straight forward.  What mattered to me here was that the cheesecake be rich, decadent and still be healthier than traditional cheesecake.  I think I achieved all of that.

    For the crust, I my usual go to crust of oats, coconut and dates but with cacao powder this time to make it rich and sort of raw brownie like.  It was the perfect base for the richness to come.  The filling is a little unusual.  Like the other nut free cheesecake I made last weekend, I included chickpeas in this one for the creamy filling instead of my usual go-to cashews.  And you know what?  You can not even tell the difference once it is all blended up.  Once you add in the cacao powder you would never even know that they are in there!  Also, this cheesecake is completely fruit sweetened as well as an added bonus, because I used dates this time instead of maple syrup.  Dates are nature’s candy, and I love using them in desserts.  Anyways, back to that cheesecake filling…it was delicious even before I poured it into the crust.  Like a dreamy chocolate mousse that I could eat out of a bowl.  I decided to stir vegan chocolate chips into it to make it even more delicious!

    Since I made the cheesecake at night, I had to wait until the next day for it to set, but it was well worth the wait!  I topped it off with a gooey chocolate ganache, and I could not wait to dive in!  It was rich, delicious and everything I imagined it to be!  Perfect for all of you chocolate lovers out there.  I think this might be the perfect Valentine’s dessert if you and your significant other love chocolate.  So if you are going out to dinner, skip the dessert and make your own, because it is much more fun to make your own, and then you will have leftovers for later too!  And, nothing beats cheesecake leftovers!

    Vegan Double Chocolate Cheesecake (Nut Free)
    Makes one 8 inch cake

    One 8 inch spring form pan 

    Crust:

    • 1/2 cup finely shredded coconut
    • 1/2 cup gluten free organic rolled oats
    • 1/2 cup pitted medjool dates (if not soft, soak them in filtered water first and drain well)
    • 1/4 cup raw cacao powder or unsweetened cocoa powder
    • 1/4 tsp sea salt


    Filling:


    Ganache:


    Instructions:

    1. Oil an 8 inch spring form pan, and line the bottom with parchment paper.
    2. To make the crust, place all ingredients in a food processor, and process until crumbs and starting to hold together (if they are not holding together when squeezed, add a few tsp filtered water and blend). Press into the bottom of the prepared pan.
    3. Meanwhile, to make the filling, combine all ingredients but the chocolate chips in a high speed blender or food processor and blend until smooth.  Stir in the chocolate chips.
    4. Pour the filling over the prepared crust.
    5. Place cheesecake in the freezer to set for about 4-5 hours (or overnight in the refrigerator if you are not in a hurry).
    6. Remove from the freezer, un-mold and set in the refrigerator while you make the ganache.
    7. In the top of a double boiler, melt the dark chocolate and whisk in the coconut milk until smooth.  Pour over the top of the cake, and let it drip down the sides. Place in the refrigerator until it is more set, about 30 minutes.  Enjoy!
    8. Store any leftover cake in the refrigerator.


    *I use Thai Kitchen full fat coconut milk.  If you are using a different brand, just make sure it is the thick type, 2/3 of the can at least should be very thick.

  • Vegan Raspberry Swirled Vanilla Cheesecake (Nut Free)

    Vegan Raspberry Swirled Vanilla Cheesecake (Nut Free)

    I have probably made over 200 cheesecakes since I started to love them at a young age.  I enjoyed them as a kid, but I never ate them very often because they were for special occasions in my family.  Then by the time I was in college, I was buying a slice at a local co-op bakery every weekend as a treat after my cross country races as a treat because they were so good.  I was hooked.  But then I thought to  myself, I like to bake.  Why not make my own?  So I did, and the weekend tradition was baking a cheesecake.  My cheesecakes were the best I had ever had too and I loved that I could make whatever flavor I felt like at the time.  Then I decided to go vegan and I thought I would never enjoy it again.   Boy was I wrong though.  One of my friends asked me to make him a raw cheesecake, and I was skeptical that it would be as good as the dairy ones I was used to in the past.  But it turned out amazing!  I started making cheesecakes again, and I was in love with vegan cheesecake.  In fact I have over 150 recipes for cheesecake in various forms on my blog, all of which are vegan.  So that just tells you how much I have to have it  in my life.  I don’t make it every weekend now, because I try to branch out and make other fabulous things like regular cakes and pies.  But when I do make it, I get pretty excited.  I have been wanting to make a nut free cheesecake for a while now, since before the Holidays and I finally got a chance last weekend.

    I do have some other nut free cheesecakes on my blog, and they are super delicious but they are raw cheesecakes and require the cracking open of coconuts.  Which I know not all of you want to do, and those darn coconuts can get spendy.  You need about 4 per cake and it is a lot of work.  So, I wanted to come up with a different nut free cheesecake base.  I came up with chickpeas and canned coconut milk.  Ok, I know it sounds like a weird and disgusting combination but trust me on this one.  Chickpeas work wonders in creating a silky smooth texture if you have a high speed blender.  I actually got the idea when I was making dessert hummus.  And, I have used chickpeas in an ice cream cake before so I knew it would work.  You can not taste them at all, and in fact, when mixed with the coconut milk, coconut butter, maple syrup and vanilla it tastes just like delicious vanilla cream.  I thought about making a plain vanilla cheesecake and just topping it off with berries, but instead I decided to swirl the berries in.

    Because then you get delicious hidden bites of berries throughout the cake.  I used a raspberry jam this time, because it is Winter here and fresh berries are super expensive.  Plus, Eric’s Dad gave us some of the best tasting raspberry jam ever and I wanted to use it in something special like this cake.  I just made a simple oat coconut date crust as a base for the cake and it was perfect!  The cheesecake turned out so good you would not even know it was vegan or had chickpeas in it.  The tart raspberry was the perfect partner for the sweet luscious vanilla scented creamy cheesecake!  The best part about this cake is it doesn’t require baking and it is relatively easy if you have a high speed blender.  So, if you are in the mood for cheesecake, give this baby a try!

    Vegan Raspberry Swirled Vanilla Cheesecake (Nut Free)
    Makes one 8 inch cake

    Crust:

    • 1/2 cup finely shredded coconut
    • 1/2 cup gluten free organic rolled oats
    • 1/2 cup pitted medjool dates (if not soft, soak them in filtered water first and drain well)
    • 1/4 tsp sea salt


    Filling:


    Instructions:

    1. Oil an 8 inch spring form pan, and line the bottom with parchment paper.
    2. To make the crust, place all ingredients in a food processor, and process until crumbs and starting to hold together (if they are not holding together when squeezed, add a few tsp filtered water and blend). Press into the bottom of the prepared pan.
    3. Meanwhile, to make the filling, combine all ingredients but the jam in a high speed blender or food processor and blend until smooth.
    4. Pour the 1/3 of filling over the prepared crust, then drop 1/4 cup of the jam over that by the tsp spreading it out so you have even little circles of it.  Swirl with a knife. Pour half the remaining filling over that, then another 1/4 cup of jam, dropping it in the same manor you did with the last 1/4 cup.  Pour the last 1/3 of the filling over that, and repeat with the jam, swirling it to make the top pretty.
    5. Place cheesecake in the freezer to set for about 4-5 hours (or overnight in the refrigerator if you are not in a hurry).
    6. Remove from the freezer, un-mold, and enjoy!  Store any leftover cake in the refrigerator.


    *I use Thai Kitchen full fat coconut milk.  If you are using a different brand, just make sure it is the thick type, 2/3 of the can at least should be very thick.

    **Make sure your jam is vegan and does not contain gelatin.  If your jam is too thick to be swirled into the cake with a knife, add a little water to it until it is.  Alternatively, if you do not want to use jam, you can make your own raspberry puree with 1 1/2 cups fresh or frozen (thawed and drained) raspberries, and 1 Tbsp maple syrup, blended in the blender.

  • Vegan Southwest Shepherd’s Pie Chili

    Vegan Southwest Shepherd’s Pie Chili

    I made my Sweet Potato lasagna the other day, but I have had another sweet potato recipe floating around in my head for a while that I wanted to try out. It is definitely comfort food type weather here, so warming food is needed so badly.  I have been wanting to make a sweet potato topped shepherd’s pie for a while.  I usually just make the classic shepherd’s pie with gravy, loads of veggies, lentils instead of the meat and mashed potatoes on top, very Minnesotan and not spicy at all.  But I have been dreaming of a version with a spicy chili on the bottom and mashed sweet potatoes on top.  I figured I would make a batch and share it with Eric because he loves chili, beans, and anything spicy.  I actually was going to make this for New Years eve, because we are staying in and staying warm this year.  So, I thought it would be a good test run.

    I made a simple chili for the bottom portion, it cooked up quickly, and I added plenty of spice in the form of chili powder, cumin, cinnamon, chipotle powder and smoked Spanish paprika. It smelled wonderful while cooking.  It cooked up quickly as well, because I already had some cooked black beans on hand.  I don’t buy canned beans because it is more wasteful and I like the texture of my own home cooked ones better plus they are cheaper when I buy dried.  I them in the bulk section at the store, then I just cook up a big batch, then freeze them in containers, pulling them out when I need them. Which works perfect for things like this.  The chili tasted delicious, and of course you could eat it just like that if you didn’t want to mess with the topping, but this was to be a beautiful shepherd’s pie.  So I baked up some sweet potatoes to top it off.  Although you could steam them if you were in a hurry, they taste so much better roasted, all of the flavor intensified and caramelized into them.

    I like to add a little lime juice and sea salt, a trick I learned from a vegetarian cookbook a long time ago when I was learning to cook.  It is sooo good, even just as a side dish.  But even better when topping spicy chili like this!  It turned out so good!  The perfect savory dinner for a chilly night!  The best part is, this was easier and faster to make then the usual shepherd’s pie and that is always a win!  I hope you are all staying warm this Winter!

    Vegan Southwest Shepherd’s Pie Chili
    Serves 2-4


    Ingredients:

    • 2 large sweet potatoes or yams, cut in half lengthwise
    • 2 Tbsp lime juice
    • 1/4 tsp sea salt or to taste


    Chili:

    • 1 small onion, diced
    • 1 carrot, cut in half  lengthwise and sliced
    • 1 stalk celery, sliced
    • 2 garlic cloves, minced
    • 3 cups diced tomatoes (canned are fine)
    • 1 Tbsp chili powder
    • 2 tsp ground cumin
    • 1/4 tsp chipotle powder (or 1/2 if you really want it spicy)
    • 1/2 tsp cinnamon
    • 1 Tbsp Spanish paprika
    • 1/2 tsp sea salt or to taste
    • 1 1/2 cups cooked black beans


    Instructions:

    1. Preheat the oven to 400F degrees, and place the sweet potatoes cut side down on an baking sheet lined with parchment.  Bake until tender, about 45 minutes to 1 hour. Let cool until you can handle them to take the skin off. Place the flesh in a bowl, and add the lime and sea salt.  Mash together until smooth.  Set aside.
    2. Meanwhile, in a pot, combine all ingredients but the beans.  Bring to a boil, and lower to a simmer.  Cook on low heat for about 20 minutes or until the veggies are getting tender. Add the beans, and cook for about 10 minutes more until they soak up the flavor.  Once everything is cooked, remove from heat, and spoon into a casserole dish, or two smaller ones.
    3. Spoon the sweet potatoes over the top of the chili, place in the oven and bake for about 10-15 minutes at 400F degrees until bubbling.
    4. Remove from the oven, let cool for about 10 minutes, and enjoy!


  • Mini Vegan Swedish Rice Rings with Raspberry Sauce

    Mini Vegan Swedish Rice Rings with Raspberry Sauce

    When I was little, my Mom used to make one of the most delicious desserts for the Holidays, a Swedish rice ring. No, we are not Swedish, my Mom’s side of the family is German in fact, but she got the recipe from a coworker back in the day and it was a keeper. It was like the most delicious rice pudding, scented with vanilla and almond, shaped into a beautiful ring with a bundt pan. It was topped off with sweet raspberry sauce, which made it even better.  Both me and my Mom’s favorite fruit is raspberries.  So, I would beg her to make it every year.  She made it from the time I was little, until at least high school.  I never actually watched her make it, I just enjoyed the results.  It kind of went by the wayside, being replaced with other things, like cookies I wanted to make and whatnot, but last week I thought about it, and how good a vegan version of it might be.  Funny I haven’t thought to veganize it until now, because it was fairly easy to do so.

    I am not sure what kind of rice my Mom used, but I went for the jasmine rice I had in the cupboard.  It has a sweet aromatic aroma and it was perfect for the rice pudding.  Bonus, it cooks up way faster than brown rice, and this had to have a white rice in it as was tradition.  I combined it with a coconut cream mixture I usually use for “whipped cream”, thickened it with coconut butter, and it was perfect!  It was so delicious with the almond extract and vanilla, and it smelled amazing!  I could have eaten it just like that, all fluid and whatnot like a bowl of sweet risotto, but I poured it into mini molds.  Mini molds because I don’t have a lot of people to feed it to, so they were perfect for sharing.  The longest part of this recipe is simply waiting for it to firm up in the refrigerator. But it is so worth the wait!

    I made a simple raspberry sauce to top it off with and it was lovely once drizzled with it! It was sweet and delicious just like my Mom’s rice ring but without all of the animal products.  The original one had milk, butter, gelatin and whipping cream. But I did not even miss it, the vegan version was so good!  I had to share it with my Mom of course, and she loved it as well.  If you are looking for a Holiday dessert that is a little different, give these a try!

    Mini Vegan Swedish Rice Rings with Raspberry Sauce
    Makes 6

    Ingredients:

    Rice ring:

    • 1 1/4 cups jasmine rice
    • 1 3/4 cup filtered water
    • 1 15 oz can full fat organic coconut milk
    • 3 Tbsp maple syrup
    • pinch sea salt
    • 1 tsp pure vanilla extract
    • 1 tsp almond extract
    • 3/4 cup plus 2 Tbsp coconut butter, warmed to liquid


    Raspberry Sauce:

    • 1 1/2 cups fresh or frozen (and thawed) organic raspberries
    • 2 Tbsp maple syrup


    Instructions:

    1. To cook the rice, combine it with the water in a pot, and bring to a simmer.  Cover, and cook until all of the water is absorbed and the rice is really soft, about 15-20 minutes or so.
    2. Stir in the coconut milk, maple syrup, sea salt, vanilla and almond extracts, and coconut butter, and stir until very well blended.  Remove from heat.
    3. Grease 6 mini bundt pans (mine are silicone, and I recommend it), and pour the rice mixture into it.  Place in the freezer for a few hours until they are set up completely.
    4. Meanwhile, to make the raspberry sauce, mash the berries with the maple syrup in a bowl until the consistency of jam.
    5. Unmold the rice rings from the pans, and arrange them on plates, flat side down.
    6. Pour the raspberry sauce over them, and enjoy!
    7. Store any extras in the refrigerator, covered.
  • Vegan Blueberry Pop-Tarts

    Vegan Blueberry Pop-Tarts

    Pop-tarts were all the rage when I was little.  I remember a few of my friends bringing them to school for a snack every morning, and begging my Mom to get some.  My Mom let me get some, but I wasn’t allowed to have too many, because she tried to get me to eat healthier.  The Pop-tarts were ok, I think I liked the cinnamon sugar ones more as opposed to the fruit ones because they tasted artificial to me. But what I ended up really liking were toaster streudels.  Those greasy little frozen fruit toaster pastries that you squeeze cream cheese glaze on after they come out of the toaster. I would have eaten a whole box if my Mom let me.  Anyways, I like the concept of Pop-tarts, they are portable and cute, and I have made some as an adult that were way better than any I had as a kid.  The latest of which was blueberry.

    I just randomly decided to make some after work on Wednesday.  It was a hectic day with lots of stress at work, and I wanted nothing more than to relax and bake something.  Pop-tarts are fun and delicious, so they were perfect.  I figured I could share some with Eric too since he always needs snacks to bring to work.  My pop-tarts are more like mini pies though than those flavorless ones I had as a kid.  They actually are made with my classic pie crust so the crust even tastes delicious and not just the filling.  For the filling though, I made a quick sort of simple cooked blueberry jam and it was perfect!

    It is kind of relaxing to sit and cut shapes out of dough that you have rolled out as long as you have the time.  Like at Christmas when you are making fun cookies.  These were free form cutting, but sometimes I find meticulous things that I have to rely on myself for accuracy relaxing.  Don’t worry, these are not complicated, just straight edges, and if you don’t trust yourself, you can always use a ruler to help.  They turned out super cute and more uniform than I expected.  I even glazed them with a purple blueberry coconut butter glaze to make them more pretty and sprinkled some crushed up dried blueberries over them as sort of natural “sprinkles”.  These are 100 times better than real Pop-tarts, just sayin’.  You can even freeze them in a bag for enjoyment later if you wish, or if they last that long.  Did you eat Pop-tarts as a kid?  If so, what was your favorite flavor?

    Vegan Blueberry Pop-Tarts
    Makes 6

    Crust:


    Filling:

    • 1 cup fresh organic blueberries
    • 1 Tbsp maple syrup
    • 1/2 Tbsp arrowroot powder (or cornstarch) dissolved in 1/2 tsp lemon juice


    Glaze:

    • 3 Tbsp coconut butter, warmed to liquid
    • 1 Tbsp blueberry juice
    • 1 Tbsp maple syrup
    • pinch sea salt
    • 3-4 Tbsp filtered water or as needed


    Instructions:

    1. To make the crust, in a large bowl, mix together flour, sugar, and sea salt. Cut in coconut oil with a pastry blender or 2 knives until it is in pea sized pieces. Mix in just enough water to create a smooth dough that holds together but isn’t too sticky. Add more water if needed, and knead slightly until a smooth dough is created.
    2. Roll out into a large rectangle and cut into 12 identical rectangles.  Chill if too soft before assembling.  You want the dough a little pliable, but not so warm that it will break. Preheat oven to 375 degrees.
    3. To make filling, heat the berries and maple syrup in a small saucepan over medium heat, and cook them until they start to burst, about 10 minutes.  Add the arrowroot and lemon juice and cook until thickened.  Remove from heat, and set aside.
    4. To assemble, spread about 2 Tbsp jam over half of the dough rectangles (leaving a boarder so you can attach the dough at the sides). Cover with the remaining pieces of dough (I used a small spatula to carefully move them), pressing the edges and crimping with a fork or the edge of something with a flat edge, like a spatula. Bake for about 30 minutes until the crusts are starting to brown lightly. Remove from oven and let cool on a wire rack until warm.
    5. Whisk glaze ingredients together until smooth (adding more water if too thick, you want it to be pour-able). Spoon some of the glaze over each pop tart, and smooth it out to cover the top. Let set before serving.
  • Creamy Garam Masala Noodles

    Creamy Garam Masala Noodles

    I am a big fan of Thai peanut noodles.  They are simple, savory easy to make comfort food.  We make them at my work and they sell like hotcakes!  But I feel sorry for people who can not experience them because they are allergic to peanut butter.  So, I thought why not create something similar with out the peanuts or nuts?  I had been gifted a jar of Sunbutter, and I thought this would be the perfect opportunity to use it.  Not only are sunflower seeds nut and peanut free, they are rich in healthy fats and vitamin E so you are getting those benefits from eating them as well.  The Sunbutter has a little different flavor than other nut butters, but once you add the spices to it, it tastes delicious.

    I thought about making these Thai noodles, but I went with curry instead.  It was sort of inspired by an African groundnut stew recipe I used to make from one of the Moosewood cookbooks back in the day.  Or the flavors at least, with the Sunbutter instead of peanut butter.  It contained garam masala spice blend, which is really delicious paired with a silky sauce like nut butter.  I kept it simple for this since garam masala is already so aromatic and flavorful adding just a touch of garlic and red pepper flakes for heat.  This sauce is super easy to make, just whisk together, and toss with the cooked noodles and veggies.  I wasn’t sure if it would be as good as Thai peanut sauce, but once I tasted it I knew it would be wonderful combined with the rest of the ingredients.

    This was a quick and delicious dinner, and it was just as good as the peanut noodles.  Not to bash sunflower seed butter or anything, but using it in an application like this tastes so much better than simply spreading it on toast because it needs a little something if you know what I mean.  But it is awesome in a silky sauce like this.  If you are allergic to peanuts and want something similar to Thai peanut noodles or you just want something other than the usual give this a try!  It is also good cold the next day, so it is good for lunches.

    Creamy Garam Masala Noodles
    Serves 2

    Ingredients:

    • 4 oz organic edamame spaghetti
    • 2 small organic carrots, cut julienne
    • 1 small bell bell pepper, sliced
    • 2 scallions, sliced
    • 1 handful arugula or spinach

    Sauce:

    • 1/2 cup Organic Sunbutter (be sure to buy the kind with only sunflower seeds)
    • 3/4 cup filtered water (or as needed)
    • 1 garlic clove, minced
    • 1 Tbsp garam masala
    • 2 tsp cider vinegar
    • 1/4 tsp sea salt or to taste
    • 1/4 tsp red pepper flakes

    Instructions:

    1. Cook the pasta according to package directions.
    2. Meanwhile, in a bowl combine the veggies, and when the pasta is done cooking add that as well.
    3. Whisk together the sauce ingredients (if you want it thinner add a little more water), then toss with the pasta and veggies.
    4. Enjoy!
  • Vegan Citrus Margarita Pancakes with So Delicious and Kitchen I.Q.

    Vegan Citrus Margarita Pancakes with So Delicious and Kitchen I.Q.

    This is a sponsored post.  All opinions are my own.

    Pancakes are always good, no matter what meal you decide to make them for.  When I was younger my Mom used to make them for dinner sometimes, and I loved it!  Because I was never going to turn down pancakes.  Especially when fresh fruit was included.  Pancakes also remind me of lazy Saturdays, and brunches on Sundays after church. They are sort of a treat, or at least that is what I thought as  kid when I had them.  I had hit the jackpot!  When I make them now as an adult, they are usually not the standard plain with maple syrup.  I like to give them a little imagination and seasonal ingredients.  The ones I made last weekend were super delicious, they were Margarita Citrus Pancakes!  Just in time for patio brunch season.  I just had to share them with you all.  Not only were they good, I got to try out some new products while making them, which was exciting!

    So Delicious Dairy Free and Kitchen IQ were kind enough to send me some things to use for my recipe.  If you are vegan, no doubt you have heard of So Delicious Dairy Free products.  They carry yogurts, ice creams, milk, creamer and desserts among other things, and they are all darn delicious.  I was excited to try their culinary coconut milk, since I had never had it before, and let me tell you, I ended up liking it better than the previous brand I had been using.  It was super creamy and rich, perfectly emulsified and ready to use.  It worked perfect in my pancakes, and I can’t wait to try it in other things!  The Kitchen IQ products were really fun to use as well! They come in fun colors, mine were lime green which is perfect for Spring! I got a 3 in 1 mini prep multi tool, which worked well for cleaning the citrus since it has a brush on one side.  If you are using the zest in recipes you want to make sure it is clean.  It also has a peeler and chopper to be used for another recipe.  I was also sent the 3 in 1 prep and measure tool, which was perfect for juicing the citrus and measuring it out, and a V etched grater, which worked awesome for the zest in the recipe.  Zest is essential for citrus recipes because it gives them more flavor and fragrance, and this one is perfect because it catches the zest, and measures it out!  Their V etched spice grater worked wonderfully with some nutmeg, and lastly, the compact digital scale they sent was a great way to get accurately measured flour.  This is probably one of the coolest scales I have seen.  It folds up, and it works just as well as larger scales.  There is no better way to have accurate measurements than using a scale, so I was excited about this! The recipe came together fast, and was easy to make which is always a win!

    For the pancakes, I included plenty of citrus flavor since these were margarita pancakes, and they have to have lime and orange.  The grater came in handy because it supplied lots of super fragrant zest.  The grater that I used to have before this one kind of was a piece of junk (and it is in the garbage now since it was super dull), and I did not know what I was missing until I tried this new one by Kitchen IQ.  It works so much better.  I used the super creamy coconut milk from So Delicious Dairy Free in the batter and it gave them a delicious rich texture.  The pancake batter smelled wonderful, and they cooked up nicely and filled my kitchen with a wonderful aroma.  These were margarita pancakes…so they HAD to include some tequila as well.

    Not so much that it was overwhelming, but I thought a tequila citrus maple syrup would be perfect.  So, I reduced some citrus juice, and maple syrup, and added in some tequila, zest, and sea salt.  These pancakes were sooo good! Like a margarita in breakfast form. This would be a super fun brunch recipe for say…Mother’s Day!  I know my Mom would love them.  You could even serve them with margaritas if you wanted.  Why not?! So, if you are looking for a good brand of coconut milk, check out So Delicious Dairy Free Culinary!  I think it may just be my new go-to coconut milk!  Also, if you want to make cooking easier, and are looking for some new kitchen tools and toys, check out Kitchen IQ! Because, I don’t know about you, but I love trying new vegan products and kitchen tools!

    Vegan Citrus Margarita Pancakes
    Makes 12

    Pancakes:

    • 9.20 oz (about 1 1/2 cups) gluten free all purpose flour
    • 2 Tbsp organic lime zest
    • 1 Tbsp organic orange zest
    • 2 tsp baking powder
    • 1/8 tsp freshly grated nutmeg
    • 2 Tbsp lime juice
    • 1 Tbsp orange juice
    • 1/2 cup avocado oil
    • 1 1/4 cups So Delicious Original Culinary coconut milk
    • 2 tsp pure vanilla extract
    • 1/4 tsp sea salt
    • 3 Tbsp maple syrup


    Citrus Tequila syrup:

    • 1 cup orange juice
    • 1/2 cup lime juice
    • 1/4 cup maple syrup
    • 2 Tbsp silver tequila
    • 2 tsp lime zest
    • pinch sea salt


    Instructions:

    1. To make the pancakes, in a food processor, combine all pancake ingredients and process until just blended, pour into a bowl and set aside.
    2. To cook pancakes, preheat oven to 110 degrees. Heat a large non-stick pan over medium heat. Once hot, add the batter in 1/4 cup amounts (I did 3 at a time, but it depends on your pan), and let cook for about 2-3 minutes on the first side until set and starting to brown, then flip with a spatula, and cook another 2-3 minutes. When cooked, place on a plate and keep warm in the oven while you repeat the process with the remaining pancakes.
    3. To make the syrup, heat the orange juice, lime juice, and maple syrup in a saucepan, and bring to a boil.  Simmer for about 15 minutes or until the syrup has reduced to 1/3 of its original volume.  Stir in the tequila, lime zest and sea salt.
    4. Serve the pancakes with fresh fruit, and top the pancakes with the syrup!

    *Note: If you do not have a non-stick pan, go ahead and use a little oil when cooking the pancakes to prevent sticking.

  • Gluten Free Vegan Poppy Seed Pretzels

    Gluten Free Vegan Poppy Seed Pretzels

    Eric asked me a couple weeks back if I had ever thought about making pretzels.  The truth is, yes but I was kind of intimidated by them.  I used to love big giant soft pretzels when I was in school.  In middle school I would get them for lunch with that fake nacho cheese stuff, and I thought they were pretty bomb.  But the truth is looking back on it, I am sure they were not as good as I thought they were.  Being all processed and all.  Then I got to high school, and discovered Auntie Anne’s Pretzels at the mall, and they were way better. They were all warm and fresh and whether I ordered the original with cheese or the cinnamon sugar I was happy.  I don’t eat that sort of stuff anymore though, and I have considered making soft pretzels at home, but I kind of always shoved it aside, because I thought that they wouldn’t turn out.  Especially since I now eat mostly gluten free.  But I was willing to accept the challenge because Eric wanted some.

    I did my research on how to make pretzels, and kind of combined all of it into this recipe.  Because there wasn’t any one recipe that suited my needs, or that I wanted to follow.  These contained yeast like regular pretzels, but I used gluten free flour instead of the usual bread or all purpose.  I was worried that they might not hold together properly, but luckily I was successful!  What really scared me was the baking soda bath prior to baking, I thought that they might not hold together well since they did not contain eggs like regular pretzels, but I solved that by not submerging them too long.

    I decided to top them off with coconut oil in place of the usual egg wash or butter, and poppy seeds and sea salt.  Just because I love the look and texture of poppy seeds, and pretzels must be salty if they are to be savory.  I was pretty pleased with how well they came out, considering they were gluten free and vegan.  If you have a hankering for pretzels and don’t want to go the unhealthy route, give these a go!  Also feel free to experiment with toppings!

    Gluten Free Vegan Poppy Seed Pretzels
    Makes 4

    Makes

    • 1 package rapid rise yeast
    • 1 tsp plus 1 Tbsp maple syrup divided
    • 1/3 cup warm water (not above 110° F)
    • 1/2 tsp. salt
    • 1 flax egg (1 Tbsp ground flax seed plus 3 Tbsp filtered water)
    • 1 1/3 cups plus 2-3 Tbsp All Purpose gluten free flour
    • 1/3 cup baking soda for soda bath
    • coarse sea salt, poppy seeds, or other toppings of choice

    Instructions:

    1. In a small bowl, dissolve the yeast in the warm water with 1 tsp maple syrup.  Let sit for a few minutes.
    2. In a larger bowl, whisk together the 1 Tbsp maple syrup with the sea salt, flax egg, and yeast.
    3. Mix in 3/4 cup of the flour, then the rest (as needed) until you form a soft, but not too sticky dough.
    4. Knead for about a minute, then divide the dough into 4 balls.
    5. Roll each ball into a log about 3/4 inch thick and shape into pretzels.
    6. Place them on a parchment lined tray, and place in a warm area to rise for 30 minutes.
    7. Preheat the oven to 375F degrees, and bring about 5 cups filtered water to a boil along with the baking soda in a pot on the stove.
    8. Once the water on the stove has come to a boil, add each pretzel to it, and allow to stay in the water submerged for about 10 seconds on top of a slotted spoon (any longer and they might fall apart because they are gluten free and more fragile). Remove from the water allowing to drain, and place back on the tray.  Repeat with other 3 pretzels.
    9. Brush the pretzels with coconut oil, sprinkle with sea salt, and poppy seeds, and place in the oven.  Bake for about 10-12 minutes until golden brown.  Remove from the oven, allow to cool slightly and enjoy!


  • Vegan Strawberry Sugar Cookies with Dark Chocolate and Lavender

    Vegan Strawberry Sugar Cookies with Dark Chocolate and Lavender

    The first day of Spring here in Minnesota was glorious!  The sun was shining, the birds were starting to arrive from their Winter vacations and were chirping, and it was warm.  Just the perfect weather for being outside and running actually, 50 degrees is my favorite temperature for that.  You can wear shorts and a t-shirt and not get super sweaty or get cold.  I can’t wait for the tulips and daffodils to burst out of the ground and start blooming.  I think we are a couple weeks away from that, but I did many see pussy willows and buds on the trees.  Spring just makes me happy.  So, I am in a Spring baking sort of mood.  I made a Strawberries and Cream Layer Cake over the weekend (which I will be sharing tomorrow on the blog), and I decided to make some Strawberry Sugar Cookies yesterday.  Strawberries make me think of Spring.  Even if they aren’t technically ready to eat here in Minnesota until May.  Although, this year it might be earlier since it has been warmer.

    For the sugar cookies, I wanted them to have some pink color, so I ground up some freeze dried strawberries and both mixed them into the batter, and dusted the tops of the cookies with them.  They add some serious concentrated berry flavor to things, which is why I love to use them in baking and desserts.  I sweetened these cookies with granulated sugar to keep them from turning so brown, but if you are more of a fan of coconut sugar, or another type of sugar by all means use it.  Just keep in mind you will have darker cookies.  The dough tasted wonderful with the strawberry flavor and touch of vanilla I had added.  Cookie dough must taste really good in order to have really good cookies in my opinion, which is why I always have to taste it.  It is my favorite part of the cookie baking process actually!  These cookies baked up beautifully, and my kitchen smelled amazing.

    I could have just left them as they were with the vibrant strawberry dusting being the only adornment, but I decided that they needed some dark chocolate drizzle as well.  I love it on sugar cookies, and it has been my go to topper for them over frosting lately.  I also sprinkled them with a few dried lavender flowers because I love lavender with strawberries and chocolate.  The light aroma you get with the flowers only adds to the sweet experience of biting into one.  They are super delicious, and if you are in the mood for sugar cookies, you need to put these on your to-do list. I hope you are all having a lovely Spring!

    Vegan Strawberry Sugar Cookies with Dark Chocolate and Lavender
    Makes 28 cookies

    Ingredients:
    • 2 Tbsp ground flax seed
    • 1/4 cup plus 2 Tbsp filtered water
    • 1 cup virgin coconut oil, warmed to liquid
    • 1 1/2 cups granulated sugar (coconut sugar may be used but keep in mind the cookies will not be the same pretty pink color)
    • 1 teaspoon vanilla extract
    • 1 teaspoon baking soda
    • 1/2 teaspoon sea salt
    • 1/4 cup freeze dried strawberry powder*
    • 3 1/2 cups organic all purpose flour
    • Freeze dried strawberry powder for decorating
    • 3/4 cup chopped vegan dark chocolate
    • dried lavender flowers


    Instructions:

    1.  In a small bowl, whisk together the flax seed and filtered water.  Set aside in the refrigerator for 15 minutes.
    2. In a large bowl, mix coconut oil with sugar and mix until well combined.
    3. Mix in the vanilla extract and flax mixture until well combined.
    4. Add the baking soda, salt, berry powder, then the flour, a cup at a time, mixing between each addition, until well combined.
    5. To bake, Preheat your oven to 350 degrees. Line 2 large baking sheets with parchment paper. Roll balls into about 1 1/2 inch balls, and place on prepared cookie sheets a couple inches apart.
    6. Place in the oven and bake for about 15-18 minutes, until puffed and just starting to brown slightly.
    7. Remove from the oven, dust with some strawberry powder (I put it in a fine meshed strainer and tapped it over them) and let cool on the pan a few minutes, then remove to a wire rack to cool.  Repeat with remaining cookies and let cool completely.
    8. Melt the chocolate in the top of a double boiler (or your preferred method), and drizzle it over the tops of the  cookies.  Set on a parchment lined tray, and sprinkle the chocolate with some lavender flowers.  Place in the freezer to set the chocolate, about 5 minutes.  Enjoy!

    *To make the strawberry powder, place about 1 cup of dried berries into a blender and blend until they are fine powder.

  • Sunflower “Nutella”

    Sunflower “Nutella”

    I used to love Nutella when I was little.  It was considered a treat, since it was so sweet and sugary and my Mom didn’t let me eat too many unhealthy things, just once in a while.  I used to just spread it on toast, or eat it plain.  I remember when I went to Europe in high school with my French class, many of the mornings there we had it for breakfast on baguettes.  I thought it was pretty awesome I could eat that for breakfast, but I was on vacation and I could enjoy whatever I wanted.  It is way too sweet for me now, and it is sad to me that the main ingredient is sugar followed by vegetable oil meaning those are the two main ingredients and not hazelnuts.  Also it contains milk making it not vegan so I would not be able to eat it anyhow.  Luckily, if I want some nutella, all I have to do is make my own.  I have made it with hazelnuts, and I have made it with other nuts like pecans (which is really luscious), but I thought why not include those who can not eat nuts and make a Sunflower Nutella.  I suppose it isn’t really a “nut-tella” but instead a seed-tella but that sounds weird so I am calling it Sunflower Nutella.

    Sunflower seeds are cheaper than nuts also, and have lots of health benefits as well!  They are a good source of vitamin E which acts as an antioxidant to your body and lowers inflammation.  They also help to lower cholesterol, and they are a rich source of magnesium which is good for muscles and nerves. So even if you are not allergic to nuts, they are good for you to eat.  So, why not combine them with chocolate and make a delicious “nutella” so you can enjoy your dessert and get your health benefits too?! If you have a high speed blender, this is really actually pretty easy to make. It only had 5 ingredients, and the first one is the seeds, as it should be unlike the regular Nutalla.  I blended them up with some coconut sugar because I did not want to add excess moisture with a liquid sweetener.  That way it is more shelf stable.  Some good quality cacao powder of course too, because this has to taste like chocolaty goodness! A little salt (because it always balances things out and makes them extra good) and some avocado oil.  Why avocado oil?  Well, I find that sunflower seeds can be a little too dry on their own and don’t make a super silky butter because of their lower fat content, so I needed to add some neutral oil.  Avocado oil stays liquid when refrigerated so it was perfect!

    It tasted like delicious chocolate nut butter, but of course no nuts!  I like the texture better than the original Nutella too, because it is more like peanut butter. It would be delicious on toast, with fruit, or of course straight out of the jar.  This is way cheaper to make than a jar of nut butter, but it tastes just as good, and that is one of the best parts about it!  This would even make a great frosting for brownies!  The possibilities are endless!

    Sunflower “Nutella”
    Makes about 2 cups

    Ingredients:

    • 3 cups sunflower seeds
    • 1/2 cup coconut sugar
    • 1/2 cup cacao powder
    • 3 Tbsp avocado oil
    • 1/2 tsp sea salt


    Directions:

    1. Place the sunflower seeds a high speed blender and blend until smooth (using the tamper to press the seeds down into the blades).
    2. Add the coconut sugar, cacao powder, avocado oil, and sea salt and blend until well combined.
    3. Scrape into a jar and enjoy!  Keeps stored in the refrigerator for a few months.


  • Vegan Chocolate Quinoa Pancakes

    Vegan Chocolate Quinoa Pancakes

    I always think it is funny listening to people try to pronounce the word quinoa for the first time.  “Qhinwah?  Keenohah? Keen-way?  I am not sure how to say it…”  We have all been there honestly, and it is hard to pronounce for first timers. I first started making it when I started working at the health food store 11 years ago.  It became part of my diet because it is high in protein, and fiber and I am not a huge rice eater. I make quinoa a lot for dinner with things like quinoa bowls or quinoa salad, but I don’t often venture much beyond that in the realm of quinoa. So, I decided to make something a little different with it a few nights back.  Something sort of sweet, pancakes!  I was just in a pancake making mood, and I was going to make chocolate pancakes anyway (I had decided at work in the middle of the day when I was really hungry), so I thought why not add some quinoa for extra protein?  I was always a fan of whole grain pancakes, and although quinoa isn’t a grain (it is a seed), it has the same affect in pancakes, adding heft and deliciousness.

    For the pancake base, I used gluten free flour because it is what I always have on hand.  I like Bob’s Red Mill All Purpose Gluten Free, because I find that it works well, and it is made with bean flours which I appreciate.  I added a little apple sauce in place of the eggs and oil, so these were pretty light pancakes.  I have a really nice ceramic pan which worked beautifully for cooking them without having to oil.  I added in chocolate chips, because the little kid in me wanted to.  I mean, nothing was better than chocolate chip studded pancakes as a kid, right?  The quinoa kind of blended in and added texture and protein.  They smelled wonderful while cooking, like brownies. I decided to make a chocolate syrup to go over them, and it was the perfect addition because I wanted something really chocolaty.  These were just that.  Chocolate in 3 forms!  Dessert for dinner, sometimes you just have to do it.  Yes, I made these in the evening.  I usually don’t have time in the morning or the patience to make pancakes.  My mornings consist of going for a run, and heading off to work after showering and eating with little time in between.  But breakfast for dinner is awesome!

    If you wanted to be a little more healthy and less sweet with these, you could use a fruit puree instead of the syrup.  I think mashed raspberries would be awesome!  I love raspberries and chocolate together.  But anything goes!  Taylor these to your taste buds, maybe some just sliced fruit on top, or if you wanted to go the other direction and be more decadent, some coconut whipped cream!  The possibilities are endless!

    Vegan Chocolate Quinoa Pancakes
    Makes 12

    Ingredients:

    Pancakes:

    • 1 1/2 cups gluten free all purpose flour
    • 1/4 cup unsweetened cocoa powder
    • 2 tsp baking powder
    • 1/2 cup applesauce or mashed banana
    • 1 1/3 cups thin coconut milk
    • 2 tsp pure vanilla extract
    • 1/4 tsp sea salt
    • 1/4 cup maple syrup
    • 1 cup cooked quinoa
    • 3/4 cup vegan chocolate chips (optional)


    Chocolate Syrup:

    • 1/4 cup maple syrup
    • 1/4 cup unsweetened cacao powder
    • pinch sea salt


    Instructions:

    1. In a food processor, combine all pancake ingredients except quinoa and chocolate chips and process until just blended.  Pour into a bowl, stir in the quinoa and chocolate chips, and set aside.
    2. To cook pancakes, preheat oven to 110 degrees. Heat a large non-stick pan over medium heat. Once hot, add the batter in 1/4 cup amounts (I did 3 at a time, but it depends on your pan), and let cook for about 2-3 minutes on the first side until set and starting to brown, then flip with a spatula, and cook another 2-3 minutes. When cooked, place on a plate and keep warm in the oven while you repeat the process with the remaining pancakes.
    3. To make the topping, whisk together the syrup and cacao powder and sea salt until smooth (adding a little water if too thick, or more cacao powder if too thin).   Top the pancakes with it!

    *Note: If you do not have a non-stick pan, and don’t mind these not being oil free, go ahead and use a little coconut oil when cooking them to prevent sticking.

  • Raw Seed and Fruit Energy Bars

    Raw Seed and Fruit Energy Bars

    At the deli I work in, we make birdseed bars, and they always smell so good to me while baking, and the ingredients smell good, but they are not vegan.  They have honey in them, and that may not seem like a big deal to some, but it is to me, because once you learn about how the bees are treated in most commercial farms, it is not so appealing, even if it tastes good. You can read about it HERE. Bees are little creatures too, and even if they are insects, they still deserve to be treated with respect and kindness.  After all, they are important for the pollination of many of the crops that we eat!  Anyways, back to those bars.  They always sound good to me, so finally I decided that I needed to make a vegan version at home with my own twists on it.

    Nut and Seed Bars

    The ones at work have just nuts and seeds in them along with some coconut, but I decided to make these nut free, and add seeds, dried fruit and coconut.  Specifically sunflower seeds and hemp seeds.  Sunflower seeds are high in vitamin E and hemp seeds (which I put in a lot of my meals) are high in healthy omega 3 oils and protein.  For the fruit I added dried cherries and blueberries, because it happened   to be what I had on hand, but they both are high in antioxidants so that is a win! These bars are actually pretty healthy!  For the binder, I used a sunflower butter and coconut oil mixture.  The ones are work use peanut butter, but I wanted these to be nut free.  You can use a nut butter if you prefer though if you do not mind them not being nut free.  The coconut oil served to firm them up, because I wanted these to be no-bake unlike the other ones.

    Nut and Seed Bars 3

    They turned out perfect!  They are sweet, a little salty, crunchy and satisfying.  They are perfect for when you want an unprocessed snack. I am going to give some to Eric to bring along to work, because he likes to bring bars and such, and some of the store bought ones have too many not so good ingredients in them.  If you make these, feel free to play around and add your own favorite dried fruits (just make sure you chop them up small) and nuts, just be sure to use the same proportions.

    Nut and Seed Bars 2

    Raw Seed and Fruit Energy Bars
    Makes 16

    Ingredients:

    • 1 cup raw sunflower seeds
    • 1/2 cup raw shelled hemp seeds
    • 1/2 cup finely shredded unsweetened dried coconut
    • 1/4 cup dried blueberries
    • 1/4 cup dried cherries
    • 1/2 cup raw sunflower seed butter (if not nut free, almond butter can be used)
    • 1/2 cup raw coconut butter or coconut oil, warmed to liquid
    • 1/4 cup maple syrup
    • 1 tsp sea salt
    1. Line an 8×8 pan with parchment.
    2. In a bowl, combine the seeds, coconut, berries, and cherries.
    3. In another bowl, mix together the sunflower seed butter, maple syrup and sea salt until smooth.
    4. Pour the mixture over the other ingredients in the first bowl, and mix until well combined.
    5. Pour into the mixture into the prepared pan, and with oiled hands press into the bottom so that the top is smooth.  Place in the freezer until set, about an hour.  Cut into bars.


  • Vegan Mini Lemon Tarts

    Vegan Mini Lemon Tarts

    Lemon Tart 2

    My Mom taught me to love lemon and all things citrus and tart.  I think it originally came from my Grandma, who loved lemon as well, and so did her Mom.  At least, my Mom told me that my Great Grandma used to always make lemon desserts that were amazing, like lemon meringue pie and cookies when she came to visit.   My Mom and I used to go to a candy counter when I was younger that sold these amazing key lime truffles.  They were really tart, and the sales lady warned us, but we thought they were just perfect!  Citrus desserts should be tart, not covered up with sweet.  We used to make lemon bars and key lime pies when I was younger, and they were always good because we didn’t overdo it on the sugar and allowed the citrus flavors to shine.  I still like my citrus desserts like that, and every Winter I like to make them when we are all lacking in sunshine here in Minnesota.  My Mom asked me a few weeks back if I could make her some sort of lemon tart, and of course I said yes!

    Lemon Tart 4

    I decided to make mini lemon tarts because she is a fan of individual desserts.  For the crust, I used just a classic gluten free pie crust so that the lemon curd could be the star.  I figured out how to make vegan lemon curd a while back, because it was one of the things I used to love before going vegan.  So, I used that recipe and tweaked it slightly for the tarts.  It is mostly lemon juice as it should be, I sweeten it with some maple syrup in place of the usual sugar, and thicken it with arrowroot starch instead of the classic eggs. It is bright, tart, sweet and delicious!  Just as lemon curd should be in my opinion, and it tastes like sunshine!  It worked out perfectly in the tart shells, and firmed up just enough while remaining silky and delicious thanks to the coconut oil I added in place of the classic butter.

    Lemon Tart 3

    Once they were chilled and ready to go I topped them off with raspberries.  They were super delicious!  I will never get tired of lemon desserts, they make me happy!  My Mom loved them as well, saying she enjoyed them even better than tarts with classic lemon curd because she is not a fan of the egg flavor they sometimes have.  I would have to agree.  If you are a lemon fan, give these a try!  Tis the season for lemon!

    Lemon Tart

    Vegan Mini Lemon Tarts

    Makes 8

    Crust:

    • 1 1/4cups all purpose gluten free flour
    • 2 Tbsp coconut sugar or maple sugar
    • 1/4 tsp sea salt
    • 1/4 cup plus 2 Tbsp coconut oil in its solid state
    • about 3-4 Tbsp cold water


    Curd Filling:
    • 1 cup fresh lemon juice
    • 2 Tbsp filtered water
    • 1 Tbsp organic lemon zest
    • 1/4 cup plus 2 Tbsp maple syrup
    • 1/4 cup cornstarch
    • pinch of sea salt
    • 1/8 tsp turmeric (optional, for color)
    • 2 Tbsp full fat coconut milk
    • 2 tsp pure vanilla extract
    • 3 Tbsp coconut oil

    Fresh organic raspberries for serving


    1. To make the crust, in a large bowl, mix together flour, sugar, and sea salt. Cut in coconut oil with a pastry blender or 2 knives until it is in pea sized pieces. Mix in  just enough water to create a smooth dough that holds together but isn’t too sticky. Add more water if needed, and knead slightly until a smooth dough is created.
    2. Roll out into a rectangle using floured parchment underneath and floured rolling pin. Cut into 8 five inch circles.  Oil 8 four inch mini tart pans well with coconut oil and fit the circles into them. Shape to fit the pans, don’t worry if they tear, just press them back together. Set aside in the refrigerator.
    3. Preheat oven to 375F degrees, then place the tart shells in the oven and bake for about 20 minutes until lightly brown.  Remove from the oven and let cool.
    4. To make filling, combine the lemon juice, water, zest, maple syrup, cornstarch, sea salt and coconut milk in a saucepan and cook over medium heat just until it thickens.  Remove from heat and whisk in vanilla and coconut oil.
    5. Pour the filling into the crusts, and place in the refrigerator to firm up for a few hours.  Once chilled, garnish with berries and serve!
  • Vegan Milk Recipes

    Vegan Milk Recipes

    Hemp Milk

    Non-dairy milks are becoming more popular than ever.  Not only because they are better for your body, but because they are preventing harm to animals as well.  Many people think that milk is cruelty free, but they couldn’t be further from the truth.  The cows are not allowed to roam free as they please all the time as the dairy industry would like us to believe, instead they are kept in small crates, and impregnated over and over again (basically raped, they even call the apparatus that holds them while it happens “rape racks”) so that they are always producing milk.  But this milk that they produce for the baby that they just gave birth to doesn’t go to the baby, it instead is sold for human consumption.  If the baby happens to be a female, the cycle starts over.  If it is a male, it is killed and sold for veal (pretty sad they don’t even get a chance to live, even though it is not much of a life).  At around 4 years old, female dairy cows are sent to slaughter.  If cows are allowed to live out their natural life and roam free they can live up to 25 years.  Pretty sad isn’t it?  Makes the idea of milk not taste so good anymore. Humans aren’t even meant to drink dairy milk, our bodies have a hard time digesting it because it was meant for cows, not us.  If you are a milk lover and don’t want to support the dairy industry, I have good news for you.  There are plenty of wonderful substitutes for it!  Now, you can buy it at the store if you wish, but if you do so I recommend reading ingredients.  The milk should preferably only have things that you can pronounce, and not a bunch of added refined sugar.  Personally though, I like to make my own non-dairy milk.  It is really easy, and I think it tastes better than the stuff at the store.

    Strawberry Almond Milk FV

    There are many different types of milk you can make, and they each have different purposes or things that they work the best for.  I like to use coconut milk for my dessert recipes because it is rich, fairly neutral, and if you buy the full fat canned variety, it whips up beautifully for whipped coconut cream.  I also feel that it works the best for using in coffee or matcha lattes (my hot drink of choice over coffee) in place of cream.  You can make your own coconut milk if you are going to be using it on cereal by blending 1 cup fresh young coconut meat with 2 cups coconut water until smooth.  Another type of milk that I enjoy is nut milks.  As a general rule, any nut can be made into milk.  As far as proportions for making it go, 1 cup nuts (soaked for 4-8 hours) and 3-4 cups filtered water (depending on how thick you like it).  If you don’t have time to soak nuts, and are in a hurry a really quick way to make nut milk is to blend 1/4 cup nut butter with 2 cups filtered water until smooth (you can play around with the proportions if you want it thicker or thinner).  I have done this with cashew butter, almond butter, and pecan butter with great results!

    Mexican Chocolate Pumpkin Seed Milk 1

    I know not everyone can tolerate nuts though, and in that case, seeds make delicious milk too!  I have two recipes below, one for sunflower seed milk, and one for a Mexican chocolate pumpkin seed milk that are delicious!  Making your own milk is so easy and so worth it!  The best part is you can flavor the milks however you like.  Sometimes I add fruit to them as well for a summery treat reminiscent of that strawberry milk I used to drink in elementary school as a child.  That milk was probably artificially flavored though.  I have actually always preferred non-dairy milk to the real thing though despite the school lunches. My Mom never kept dairy milk in the house, it was always soymilk because she couldn’t tolerate the dairy.  I am not a huge fan of soymilk now, but if I were to buy it I would make sure it was organic, non-GMO and no sugar added.  I hope this post has been helpful to you if you were on the fence about whether to eliminate dairy from your diet, here are some recipe links, and the recipes I mentioned above in case you would like to make your own vegan milk!

    Raw Chocolate Hazelnut Milk

    Brazil Nut Milk (by The Full Helping)

    Raw Pumpkin Spice Coconut Milk

    Raw Strawberry Almond Milk

    Raw Mocha Almond Milk

    Vanilla Hemp Milk

    Macadamia Nut Milk (by Plant Over Processed)

    Sunflower Seed Milk 1

    Sunflower Seed Mylk
    Makes about 4 cups

    3 1/2-4 cups filtered water
    1 cup raw sunflower seeds
    pinch sea salt
    4 pitted medjool dates
    1 tsp pure vanilla extract

    Place all ingredients in a blender, and blend until smooth.  Pour into a glass container and store in the refrigerator.

    Sunflower Seed Milk 2

    Mexican Chocolate Pumpkin Seed Mylk
    Makes about 4 cups

    3 1/2-4 cups filtered water
    1 cup raw pumpkin seeds
    pinch sea salt
    1/4 cup pitted medjool dates
    1/4 cup unsweetened cocoa powder
    1 tsp cinnamon
    1/8 tsp chipotle powder

    Place all ingredients in a blender, and blend until smooth.  Pour into a glass container and store in the refrigerator.

    Mexican Chocolate Pumpkin Seed Milk


  • Vegan Florentine Pizza

    Vegan Florentine Pizza

    Florentine Pizza 3

    Do you ever accidentally buy too much of something, and realize that you need to use it up fast before it starts to go bad?  Well, I have.  I sometimes buy things like large containers of greens thinking I will eat more than I end up eating in a week, or I just don’t use them up fast enough.  Well, I am not one to waste things.  So I find ways to use them. I had bought a big thing of spinach, and at the end of the week, I said to myself, this needs to be eaten.  Like now.  So, I came up with a delicious recipe to use that large amount of spinach, a vegan Florentine pizza!  Because pizza is always good, especially on a cold Winter day.  It was 8F degrees, I think that qualifies as cold.  I was excited about this pizza, I had some vegan mozzarella in my freezer that I had already made, and ingredients to make a ricotta cheese for the spinach portion, so it was perfect.

    Florentine Pizza 2

    I had this huge bag of sunflower seeds, and I decided to make a nut free ricotta cheese with some of them.  Because I know there are a few nut free peeps that read this blog, and I want them to be able to enjoy recipes too.  I blended up the sunflower seeds like I would cashews with my other typical cheese ingredients in the blender and it turned out yummy!  I knew it would be good mixed with the spinach and spread over the pizza.  I have made creamed spinach before, and this was sort of like that only with cheese instead of the cream.  I sautéed the spinach with little garlic and olive oil before I mixed it into the cheese, and the combination was delicious!  Once it was spread over the crust, sprinkled with mozzarella and ready to bake, I thought, this is going to be good!  What’s not to like about cheese, greens and pizza?!

    Florentine Pizza 1

    It turned out super tasty, and decided to be nice and save some for Eric, who was at work at the time.  I may have eaten whole large pizzas by myself when I was in high school, but now I practice a bit more restraint.  At least this one comes with healthy greens!  Who says vegans can’t have delicious pizza with gooey cheese?!  This is way better than the traditional chain takeout pizza I had as a teenager, and way healthier!

    Florentine Pizza

    Vegan Florentine Pizza

    Makes one 14 inch pizza

    Vegan mozzarella Cheese:

    • 1 15 oz can full fat organic coconut milk
    • 2 Tbsp arrowroot starch
    • 1/4 cup plus 1 Tbsp filtered water
    • 3 Tbsp agar flakes or 1 Tbsp agar powder
    • 2 tsp lemon juice
    • 1 tsp sea salt or Himalayan salt
    • 1 Tbsp virgin coconut oil
    • 1 tsp guar gum


    1. To make the mozzarella cheese, heat the coconut milk in a saucepan until it comes to a simmer.
    2. Meanwhile, dissolve the arrowroot starch in the water and set aside.
    3. Once the coconut milk has come to a simmer, add the agar flakes, and heat until they are dissolved (mine took about 8 minutes, if you are using the powder, it should dissolve within one minute).
    4. Next, add the lemon juice and sea salt to the coconut milk.
    5. Mix the coconut oil with the guar gum so that the guar gum does not clump up.
    6. Turn off the heat and add the arrowroot mixture, guar gum and coconut oil. Whisk for about 30 seconds, then pour into a silicone mold (I used a loaf pan, but if you had another shape you would like to use go ahead). Refrigerate for a few hours until firm, then pop out of the mold. You will need half the cheese for this recipe, reserve the other half for another use in the fridge, wrapped in an airtight container.  Shred the half you will be using into a bowl, and keep in the refrigerator until ready to use.


    Pizza Dough:

    • 1 1/2 cups gluten free all purpose flour
    • 1 Tbsp olive oil
    • 1/2 tsp sea salt
    • 1/2 tsp xanthan gum
    • 1/2 cup plus 1 Tbsp filtered water


    1. To make the pizza crust, combine the flour, xanthan gum and sea salt in a bowl, and whisk until well blended. Add the oil and water, and mix in until you have a soft dough.
    2. Turn out onto a sheet of parchment paper with a light dusting of flour, and roll out into a 14 inch circle.  Set aside.


    Sunflower Seed Ricotta:

    • 1 cup raw sunflower seeds, soaked in filtered water 1 hour and drained*
    • 1/2 cup filtered water
    • 1/4 tsp sea salt
    • 1/2 Tbsp lemon juice
    • 2 tsp white miso (optional)
    • 2 Tbsp nutritional yeast (optional)

    To make the ricotta, combine all ingredients in a blender and blend until smooth.  Set aside.


    Spinach:

    • 1 Tbsp olive oil
    • 8 cups of spinach
    • 2 garlic cloves, minced
    • sea salt to taste


    1. To make the spinach, heat the olive oil in the bottom of a pot, add the spinach, garlic and salt and cook until the spinach is just wilted.
    2. Add the ricotta, and stir until blended.


    Pizza Assembly:

    1. Pre-heat the oven to 400F degrees.  Set a pan on the center rack with an upside down sheet pan, or a pizza stone set on it. Brush the crust with olive oil, sprinkle with sea salt, and slide the parchment with the crust on it onto the stone.
    2. Bake crust for 10 minutes, then remove the crust from the oven (still on the parchment). Top the crust with the ricotta spinach mixture spreading around evenly. Then top with the cheese, making sure it is all evenly distributed.
    3. Place the pizza in the oven, turn up the temperature to 475F and bake for 20-25 minutes until the cheese is bubbling and starting to brown (keep an eye on it after 15 as some ovens cook faster than others). Remove the pizza and parchment from the oven, slide pizza onto a cutting board or plate, slice and enjoy!

    *If you are not a sunflower seed fan, you may use raw soaked cashews instead.

  • Vegan Cinnamon Roll Cookies

    Vegan Cinnamon Roll Cookies

    cinnamon-roll-cookies

    I can’t believe it is 2017!  Last year flew by so fast, I feel like it just turned 2016.  The Holidays were fun, but I am ready to get back into everything being on a regular schedule.  Since I had extra days off last weekend, due to New Years, I thought I would do some baking.  I made a really good White Chocolate Grapefruit Cake to celebrate New Years, and also some delicious cookies, which I will be sharing with you in this post.  Now I know people are on their diets, and new years resolutions to give up sweets and what not…but I am not.  I am of the mindset that I eat healthy most of the time, and indulge every once in a while (like 80% healthy, 20% naughty).  That way the majority of what I am eating is good for me.  I have to say though, when it comes to naughty food it is pretty much all home made, and refined sugar and flour free so I don’t get that icky feeling that comes from eating processed stuff.  I feel good and that is what counts!  Anyways, back to these cookies I mentioned earlier, I had seen some cinnamon roll cookies on Pinterest and said to myself, “I need to veganize those!”  So that was my Monday project.

    cinnamon-roll-cookies-5

    I used my classic go to sugar cookie recipe for the base and it worked out perfect!  These are actually pretty easy to make.  Yes, they involve rolling out and rolling up but they are essentially a slice and bake cookie. I used the most fragrant cinnamon in these, Vietnamese cinnamon.  In case you have never noticed, there are several types of cinnamon.  Vietnamese I find to be the most sweet, aromatic lovely smelling flavorful cinnamon.  Don’t believe me?  Go into Penzey’s Spices (or even the bulk spice section of your health food store where they often have several different types), and open up the different cinnamon jars and smell them.  These cookies smelled amazing while baking.  With that aromatic cinnamon and fragrant vanilla.  This is a smell that makes me happy.  It reminds me of being in my Grandma’s kitchen while she baked.

    cinnamon-roll-cookies-4

    cinnamon-roll-cookies-3

    Once the cookies were all cooled (well, mostly cooled, because I like warm cookies), I glazed them with a sweet coconut vanilla frosting.  Because proper cinnamon rolls need a frosting right?!  Well I think so.  They were super delicious!  A cinnamon roll cookie hybrid, with all of the best qualities of both.  If you are not on a New Years diet, you need to give these a try next time you have a cookie craving.  So delicious!

    cinnamon-roll-cookies-1

    Vegan Cinnamon Roll Cookies
    Makes 28 cookies

    Ingredients:
    Cookies:
    • 2 Tbsp ground flax seed
    • 1/4 cup plus 2 Tbsp filtered water
    • 1 cup virgin coconut oil, warmed to liquid
    • 1 1/2 cups xylitol (coconut sugar may be used but keep in mind the cookies will not be light in color)
    • 1 teaspoon vanilla extract
    • 1 teaspoon baking soda
    • 1/2 teaspoon sea salt
    • 3 1/2 cups Bob’s Red Mill Gluten Free All Purpose Flour
    • 2 Tbsp cinnamon


    Glaze:

    • 1/4 cup plus 2 Tbsp coconut butter
    • 1 tsp pure vanilla exract
    • 3 Tbsp maple syrup
    • 1/3 cup filtered water or as needed


     Directions:
    1. In a small bowl, whisk together the flax seed and filtered water.  Set aside in the refrigerator for 15 minutes.
    2. In a large bowl, mix coconut oil with xylitol and mix until well combined.
    3. Mix in the vanilla extract and flax mixture until well combined.
    4. Add the baking soda, salt, then the flour, a cup at a time, mixing between each addition, until well combined.  Refrigerate for 5-10 minutes until the dough is a little less soft and more manageable.
    5. To bake, Preheat your oven to 350 degrees. Line 2 large baking sheets with parchment paper.
    6. On a piece of parchment dusted with a little flour, roll out the dough int0 2 10×13 inch rectangles.  Sprinkle each with cinnamon, and roll up from the top down.  Cut into 28 rounds, and place on prepared cookie sheets a couple inches apart, pressing down just ever so slightly. Bake for about 15-18 minutes, until puffed and just starting to brown slightly.  Remove from the oven and let cool on the pan a few minutes, then remove to a wire rack to cool.
    7. To make the glaze, whisk together all ingredients until smooth, adding water a little at a time until it is pourable (but not too thin).  Drizzle over the cookies, then place them in the freezer until the glaze is set, about 15 minutes.


  • Mini Vegan Coconut Orange Sweet Rolls

    Mini Vegan Coconut Orange Sweet Rolls

    coconut-orange-sweet-rolls-4

    When I was little, sometimes my Mom would buy take and bake sweet rolls.  I know everyone’s favorite is the caramel or cinnamon variety usually, but she would buy the orange, and add coconut to them to jazz them up a bit.  Now they may have been store bought rolls, but they were super delicious to my 8 year old self.  They remind me of lazy Saturday mornings when I would get up and watch cartoons with the cat in my princess outfit (I was lucky enough to have a Grandma that was very good at sewing and I would beg her to make me costumes), while I waited for the rolls to bake.  I was quite excited when they were cool enough to dive into.  The fact that they were not home made never dawned on me, I just thought they were a special treat.  One that I have not forgotten.  Now, I have made many varieties of sweet rolls as an adult, but for some reason never any with coconut and orange. Well, I decided that needed to change.

    coconut-orange-sweet-rolls-3

    I told my Mom I was going to make some, and she was excited too!  These would be home made, and just as good if not better than those ones we used to eat.  I used a quick sweet roll dough for these, because I don’t usually keep yeast on hand, plus I don’t like waiting around for dough to rise etc.  These come together and are served in less than 45 minutes, which is almost unheard of for sweet rolls.  I made them mini rolls, because I love cute little desserts, and they bake up faster.  I scented the dough with orange, and made a sweet coconut orange filling which got rolled up and baked into the soft dough.  These actually only take 10 minutes to bake!  And let me tell you, in those 10 minutes your kitchen will smell amazing!

    coconut-orange-sweet-rolls-1

    I topped them off with an orange coconut glaze, and they were just as I imagined they would be!  Sweet soft dough, fragrant with orange and coconut plus a hint of vanilla.   Just as good as those childhood rolls, but way healthier!  My Mom much approved as well telling me, “Since they are small, I can have 4 at a time right?”  Totally yes.  That is my mentality too.  These are perfect for making this time of the year when citrus is at its best and most flavorful, if you have a craving for something sweet and orange scented, give these a try!

    coconut-orange-sweet-rolls

    Mini Vegan Coconut Orange Sweet Rolls
    Makes 9

    Dough:

    Filling:

    • 2 Tbsp coconut butter, warmed to liquid
    • 2 Tbsp maple syrup
    • 1 Tbsp orange zest
    • 1/2 tsp pure vanilla extract
    • 1/4 cup finely shredded, dried unsweetened coconut

    Glaze:

    • 3 Tbsp coconut butter, warmed to liquid
    • 1 Tbsp maple syrup
    • 1/2 tsp pure vanilla extract
    • 3 Tbsp orange juice (or as needed)

    finely shredded, dried unsweetened coconut for topping

    Directions:

    1. Preheat the oven to 375F degrees.
    2. To make the dough, combine the flour, guar gum, baking powder, baking soda and salt in a bowl, and mix together. Mix in the orange juice, vinegar, and coconut oil until blended, then knead the dough lightly and place it on a sheet of parchment (dust it lightly with flour). Roll out 1/4 inch thick in a rectangle on the parchment in a rectangle 6 inches wide top to bottom.
    3. Mix together the filling ingredients, and spread over the dough (leaving a 1/2 inch boarder at the top and bottom). Roll up from the top down jelly roll style. Cut into 9 pieces, and place cut side up in a non-stick mini muffin tin.
    4. Place in the oven and bake for 10 minutes until puffed up and starting to brown a little (but do not overbake). Remove from the oven and let cool until warm.
    5. Whisk together glaze ingredients until smooth (adding a little more orange juice if you think it is too thick to spoon over nicely), and spoon over the tops of the rolls, sprinkle with coconut. Enjoy!


  • Vegan Roasted Sweet Potato Pizza

    Vegan Roasted Sweet Potato Pizza

    sweet-potato-pizza-5

    There was a point in my life at which I made pizza every week on a certain day. It became a tradition and something I looked forward too. I would choose different veggies (or sometimes fruits) and cheeses to experiment with every week so it was quite exciting! Some of the combinations were things like lemon fennel and gruyere cheese with thyme and walnuts or strawberry basil with blue cheese and caramelized onions. I liked some better than others, but they were all good. That tradition has since died out however since I don’t make pizza weekly, it is more like every few months. But I still appreciate it, and I like the vegan pizzas I make now just as much (if not better) than the ones I used to make. There is no lack of melty cheese on my vegan pizzas like some people’s who either don’t like the store bought or refuse to make their own. But making your own is actually pretty easy! I just go for the vegan mozzarella most of the time.

    sweet-potato-pizza-2

    I decided to make a pizza a few days back with some ingredients I had on hand. Mainly featuring sweet potatoes. My Mom has been telling me about this pizza at Trader Joes that she buys a lot for a while and how good it is so it was kind of my inspiration. It has sweet potato puree as the sauce, kale, and actually butternut squash too, but I skipped that and just did the sweet potatoes for the sauce and to top it. I roasted them in the oven to bring out their sweet flavor and they were delicious even before topping the pizza, so I knew this was going to be good!  I also topped the pizza with arugula, jalapenos, and pomegranate seeds, which might sound like an odd combo but it was wonderful!

    sweet-potato-pizza-1

    Once the cheese was all gooey and melty and the pizza was cooked to perfection, I could not wait to try it! The flavorful sweet yams paired perfectly with the spicy jalapeno, tart pomegranate and peppery arugula! This is a festive looking pizza as well as being delicious!  I love experimenting with not so common ingredients on my pizza, it is a great way to find new favorite combinations!  If you have a hankering for pizza over Winter break, give this a try!

    sweet-potato-pizza

    Vegan Roasted Sweet Potato Pizza
    Makes one 14 inch pizza

    Vegan Mozzarella Cheese:

    • 1 15 oz can full fat organic coconut milk
    • 2 Tbsp arrowroot starch
    • 1/4 plus 1 Tbsp filtered water
    • 3 Tbsp agar flakes or 1 Tbsp agar powder
    • 2 tsp lemon juice
    • 1 tsp sea salt or Himalayan salt
    • 1 Tbsp virgin coconut oil
    • 1 tsp guar gum

    To make the cheese, heat the coconut milk in a saucepan until it comes to a simmer.  Meanwhile, dissolve the arrowroot starch in the water and set aside. Once the coconut milk has come to a simmer, add the agar flakes, and heat until they are dissolved (mine took about 8 minutes, if you are using the powder, it should dissolve within one minute).Next, add the lemon juice and sea salt to the coconut milk.  Mix the coconut oil with the guar gum so that the guar gum does not clump up.  Turn off the heat and add the arrowroot mixture, guar gum and coconut oil. Whisk for about 30 seconds, then pour into a silicone mold (I used a loaf pan, but if you had another shape you would like to use go ahead). Refrigerate for a few hours until firm, then pop out of the mold. You will need half the cheese for this recipe, reserve the other half for another use in the fridge, wrapped in an airtight container.  Shred the half you will be using into a bowl, and keep in the refrigerator until ready to use.

    Roasted Sweet Potatoes:

    • 2 medium sweet potatoes, cut into cubes
    • olive oil
    • sea salt
    • 1 garlic clove
    • 1/8 tsp ground chipotle powder or cayenne

    Preheat the oven to 450F degrees.  Toss the sweet potatoes with just enough oil to coat and a little sea salt, and spread out on a sheet pan.  Place in the oven and roast for about 45 minutes until starting to brown at the edges and softened.  Remove from oven and set aside until cool enough to handle. Place about 1 1/2 cups of them in a food processor, and process until smooth along with 1/4 tsp sea salt, a garlic clove, and 1/8 tsp ground chipotle powder. Set the puree and remaining diced potatoes aside.

    Pizza Dough:

    • 1 1/2 cups gluten free all purpose flour
    • 1 Tbsp olive oil
    • 1/2 tsp sea salt
    • 1/2 tsp xanthan gum
    • 1/2 cup plus 1 Tbsp filtered water

    To make the pizza crust, combine the flour, xanthan gum and sea salt in a bowl, and whisk until well blended. Add the oil and water, and mix in until you have a soft dough.  Turn out onto a sheet of parchment paper with a light dusting of flour, and roll out into a 14 inch circle.  Set aside.

    For Pizza Assembly:

    • olive oil
    • handful fresh arugula
    • 1 jalapeno, sliced
    • 1/2 cup pomegranate seeds

    Pre-heat the oven to 400F degrees.  Set a pan on the center rack with an upside down sheet pan, or a pizza stone set on it. Brush the crust with olive oil, sprinkle with sea salt, and slide the parchment with the crust on it onto the stone.  Bake crust for 10 minutes, then remove the crust from the oven (still on the parchment). Top with the roasted sweet potato puree, the arugula, the diced roasted potatoes, jalapenos, then the cheese, making sure it is all evenly distributed.  Place the pizza in the oven, turn up the temperature to 475F and bake for 20-25 minutes until the cheese is bubbling and starting to brown (keep an eye on it after 15 as some ovens cook faster than others). Remove the pizza and parchment from the oven, slide pizza onto a cutting board or plate, scatter pomegranate seeds over the top, slice and enjoy!

  • Vegan Gingerbread Waffles

    Vegan Gingerbread Waffles

    It was below zero yesterday, and all I could think about all day at work was getting warm when I got home. I work in a kitchen, so you would think it would be warm there, but not so much when the drafts come in from the front of the store. I even used my treadmill that morning instead of running outside, because I didn’t feel like dressing like the kid in “A Christmas Story”. One of my coworkers had baked some molasses cookies, and I thought to myself. Mmm warm gingerbread something sounds good! So I decided that I would make something of the gingerbread variety when I got home. I decided on waffles. I have never made gingerbread waffles before, and I hadn’t made waffles in a while. The funny thing about me and waffles is they rarely get made for breakfast, always in the evening for dinner.

    gingerbread-waffles

    My Mom made breakfast for dinner sometimes, and I liked that idea. But you can make these whenever your little heart desires. Make them at midnight if you have a craving for waffles and feel like it! My boyfriend Eric works an overnight shift, so he is eating his lunch at midnight. He isn’t picky what time of the day he eats his waffles. Anyways, these are really simple to make. Just whisk together the batter, cook them (I like to keep mine warm in the oven while I cook the others until they are all done), and enjoy! I made these on my cute little Frozen (as in the Disney movie) waffle maker I got from my Dad last year. He knows I love anything cute that has to do with food prep. It makes the most adorable little snowflake waffles. I think it is meant for kids, since they are smaller, but I am one big kid.

    gingerbread-waffles-2

    They smelled amazing while cooking, like gingerbread cookies! You can serve these with whatever you prefer, like the classic maple syrup, or drizzle them with chocolate fudge syrup like I did! I hope you are all staying warm this winter!

    gingerbread-waffles-3

    Vegan Gingerbread Waffles

    makes 10-12 depending on your waffle maker

    Batter:
    2 cups gluten free all purpose flour
    1/4 cup coconut sugar
    1/2 tsp baking soda
    1 tsp baking powder
    2 tsp cinnamon
    2 tsp ginger
    1/4 tsp nutmeg
    1/4 tsp cloves
    1 tsp sea salt
    1/2 cup plus 1 Tbsp aquafaba*
    1 1/2 Tbsp molassess
    2 Tbsp melted coconut oil
    2 cups thin coconut milk

    Whisk together all of the dry ingredients, then whisk in the wet ingredients.  Pre-heat waffle iron. Once it is heated, add about 1/3 cup waffle batter to the iron and close it (the size of the scoop of batter you need may change if you have a larger iron, mine is smaller).  Cook according to waffle iron package directions.  Keep warm in an oven at low heat (150F degrees) until serving.

    *Aquafaba is chickpea liquid.  You may used canned, or if you are using the liquid from home cooked chickpeas, reduce it to the consistency of egg whites.  Alternatively, you may use 3 flax eggs for the recipe (3 Tbsp ground flaxseed, whisked together with 1/2 cup plus 1 Tbsp filtered water).

    *For the chocolate fudge syrup I served them with, whisk together unsweetened cocoa powder, a pinch of sea salt, and maple syrup until smooth, (I start with equal parts, about 3 Tbsp each) adding more syrup if too thick, more cocoa powder if too thin until you get a consistency you like.

  • Vegan Matcha Mint Sugar Cookies

    Vegan Matcha Mint Sugar Cookies

    matcha-mint-sugar-cookies-1

    My Grandma had this amazing sugar cookie recipe, and I used to like to make it for every Holiday, and just switch up the sugar color on top or frost them with colored buttercream frosting. They were the most melt in your mouth delicious things, not surprising since they had loads of butter, eggs and powdered sugar.  I used to make these for people a lot, and on a few occasions people told me they ate the whole plate in one day.  It was usually the frosted ones, they were pretty addictive and irresistible.  I still like to make sugar cookies, but I have since revamped the recipe so that it fits in with my being vegan.

    matcha-mint-sugar-cookies-3

    I had to make some for Christmas, it being the cookie baking time of the year, but instead of just plain ones, I decided to make some matcha mint ones!  Mint is an essential flavor of the Holidays, and I love matcha!  I have always been a big green tea fan, but matcha is even more vibrant!  Matcha lattes are amazing!  So anyways, back to the cookies. I used granulated xylitol in these instead of regular sugar because I don’t use plain old regular sugar ever (unless I am making kombucha or sugar scrub), and I wanted the cookies to be a pretty green color and not brown.  Which they would have been had I used coconut sugar, which is usually my granulated sugar of choice.  The dough tasted wonderful!  I am a big cookie dough sampler…I like it more than baked cookies sometimes.  Once baked they filled my kitchen with the aroma of cheerful peppermint and sweet vanilla.

    matcha-mint-sugar-cookies-4

    They would have been good just as is, but I couldn’t resist drizzling them with dark chocolate.  White chocolate would have been good too, but I am in a dark chocolate sort of mood lately.  They turned out festive and delicious!  Melt in your mouth buttery (thanks to the coconut oil), and sweet!  Just what I look for in a Christmas cookie!  Definitely add them to your Holiday baking to make list!

    matcha-mint-sugar-cookies-2

    Vegan Matcha Mint Sugar Cookies

    Makes 28 cookies
    2 Tbsp ground flax seed
    1/4 cup plus 2 Tbsp filtered water
    1 cup virgin coconut oil, warmed to liquid
    1 1/2 cups xylitol (coconut sugar may be used but keep in mind the cookies will not be the same pretty green color)
    1 teaspoon vanilla extract
    1 tsp peppermint extract
    1 teaspoon baking soda
    1/2 teaspoon sea salt
    3 1/2 cups all purpose gluten free flour
    In a small bowl, whisk together the flax seed and filtered water.  Set aside in the refrigerator for 15 minutes.
    In a large bowl, mix coconut oil with xylitol and mix until well combined.
    Mix in the vanilla extract and flax mixture until well combined.
    Add the baking soda, salt, matcha, then the flour, a cup at a time, mixing between each addition, until well combined.
    To bake, Preheat your oven to 350 degrees. Line 2 large baking sheets with parchment paper. Roll balls into about 1 1/2 inch balls, and place on prepared cookie sheets a couple inches apart. Bake for about 15-18 minutes, until puffed and just starting to brown slightly.  Remove from the oven and let cool on the pan a few minutes, then remove to a wire rack to cool.  Repeat with remaining cookies and let cool completely.
    Melt the chocolate in the top of a double boiler (or your preferred method), and drizzle it over the tops of the  cookies.  Set on a parchment lined tray to set the chocolate (it will set faster if you pop them in the freezer for about 5 minutes).