Author: Amy Lyons O’Neil

  • Raw Rocky Road Mousse Cake

    Raw Rocky Road Mousse Cake

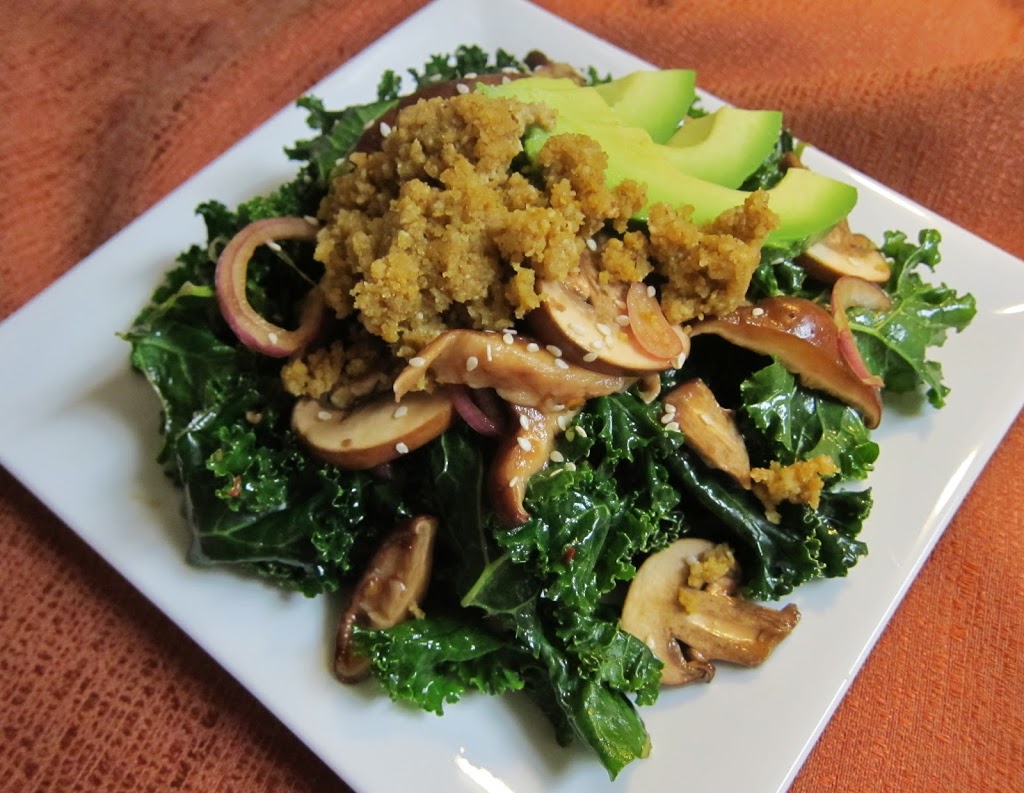
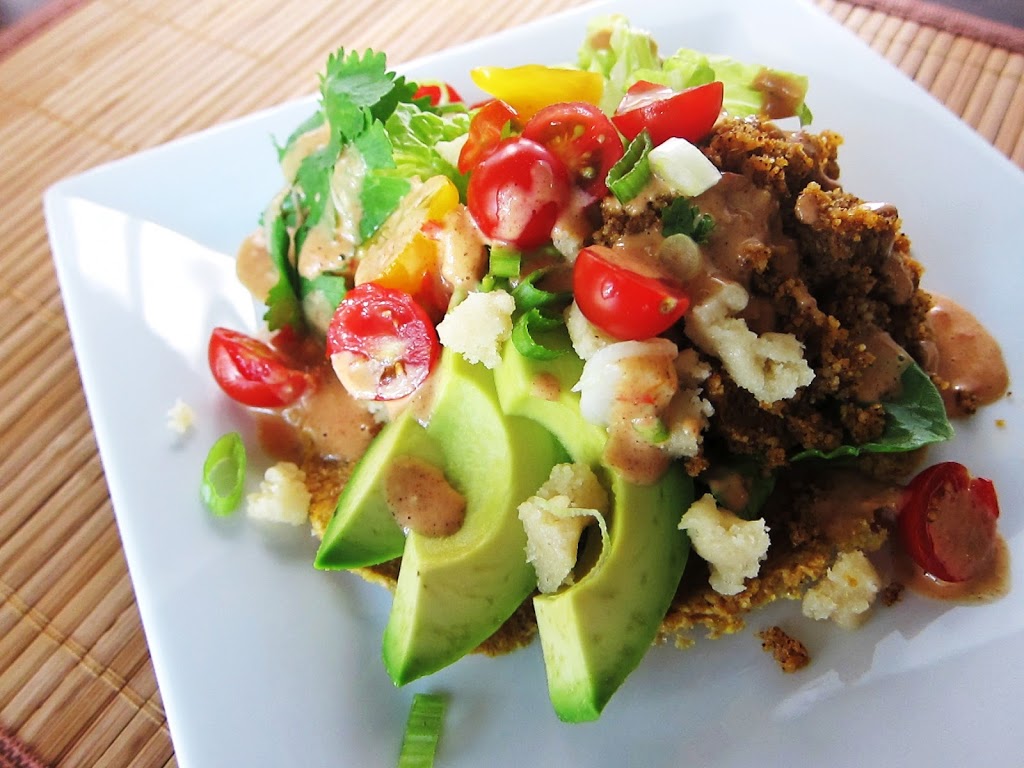
    I have never understood those people who feel the need to cast their negativity into other people’s lives.  You know, the ones…they are so unhappy with their own lives or insecure that they feel the need to try and make others just as miserable.   I am actually shocked about how much negativity gets posted on Facebook.  I mean, do they really have to post negative comments on other people’s stuff?  Does it really make them feel better about themselves?  I think not.  It is unfortunate, and even on my own Facebook page I see it.  I do not tolerate rude un-necessary comments however and I delete them.  If someone thinks my cake is ugly or they do not like the ingredients, that is fine, I am not for everyone to love it (you are entitled to your opinion), but I am asking that people show a little respect for my feelings and keep the negative thoughts to themselves.  I may not agree with what other people post, but I respect their feelings.  I much prefer to only post things when I am going to make someone feel good about themselves and boost their mood. Many of you boost my mood with your beautiful complements and to all of you who are so positive I am grateful.
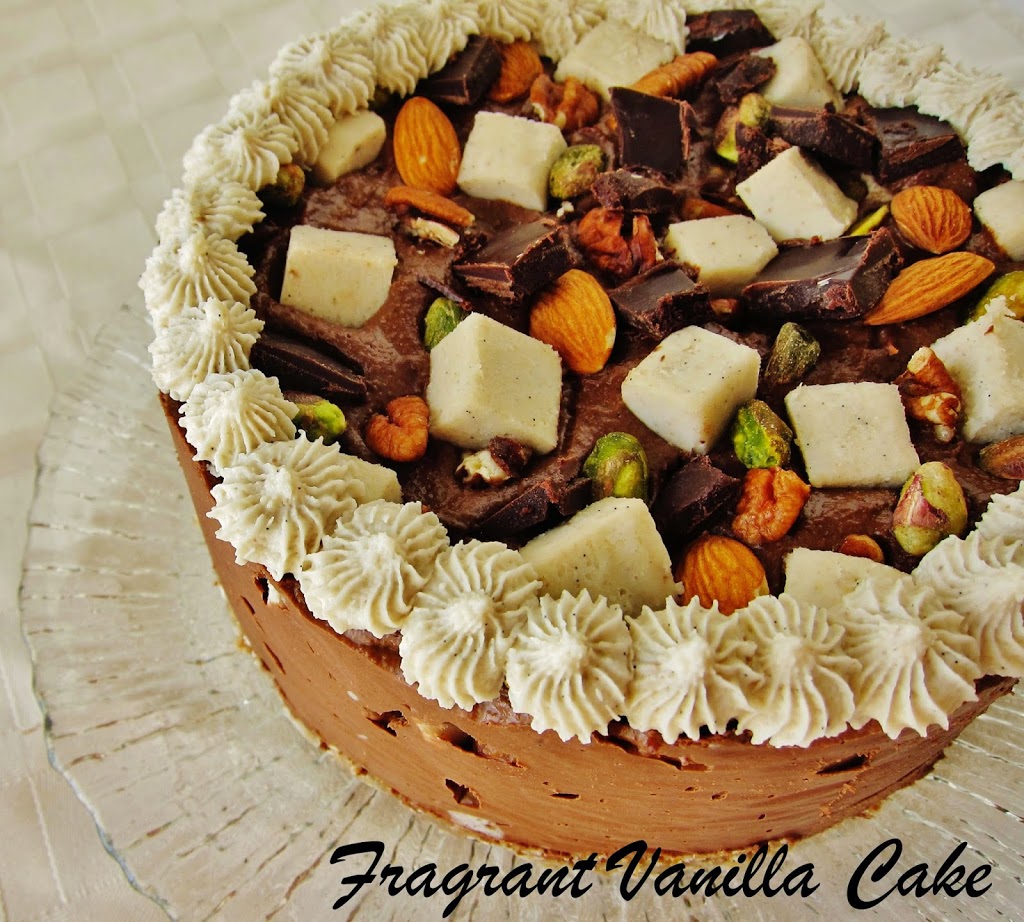
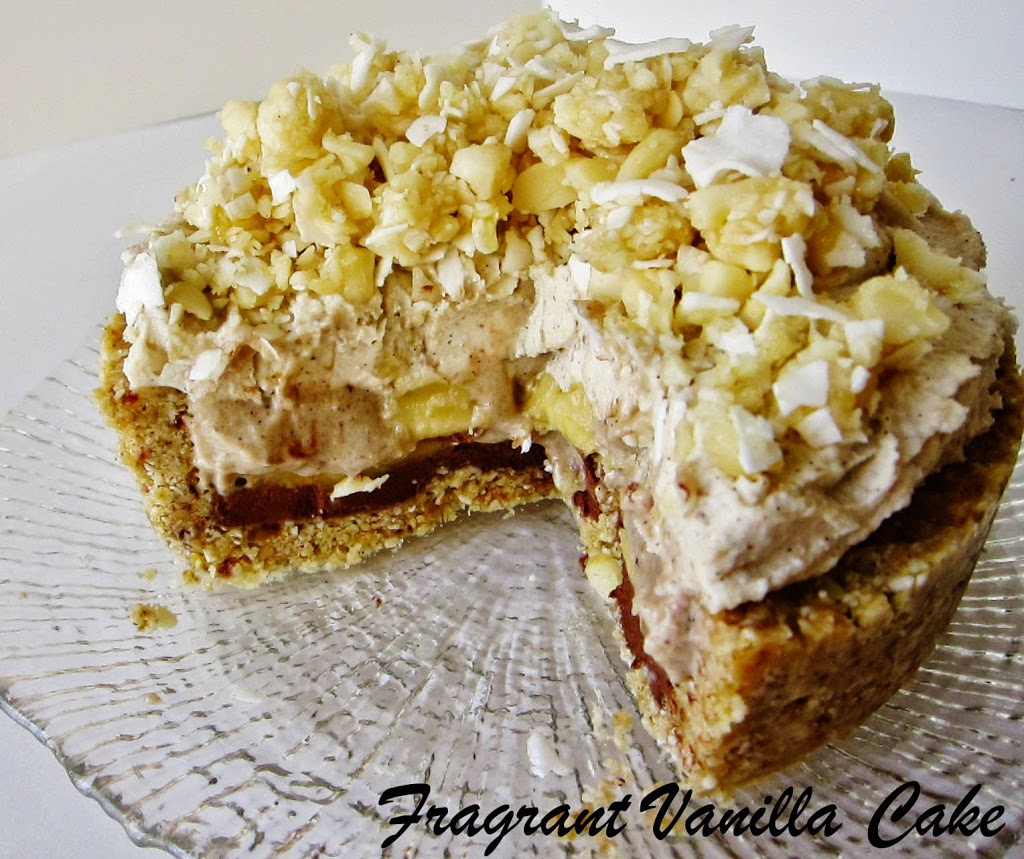
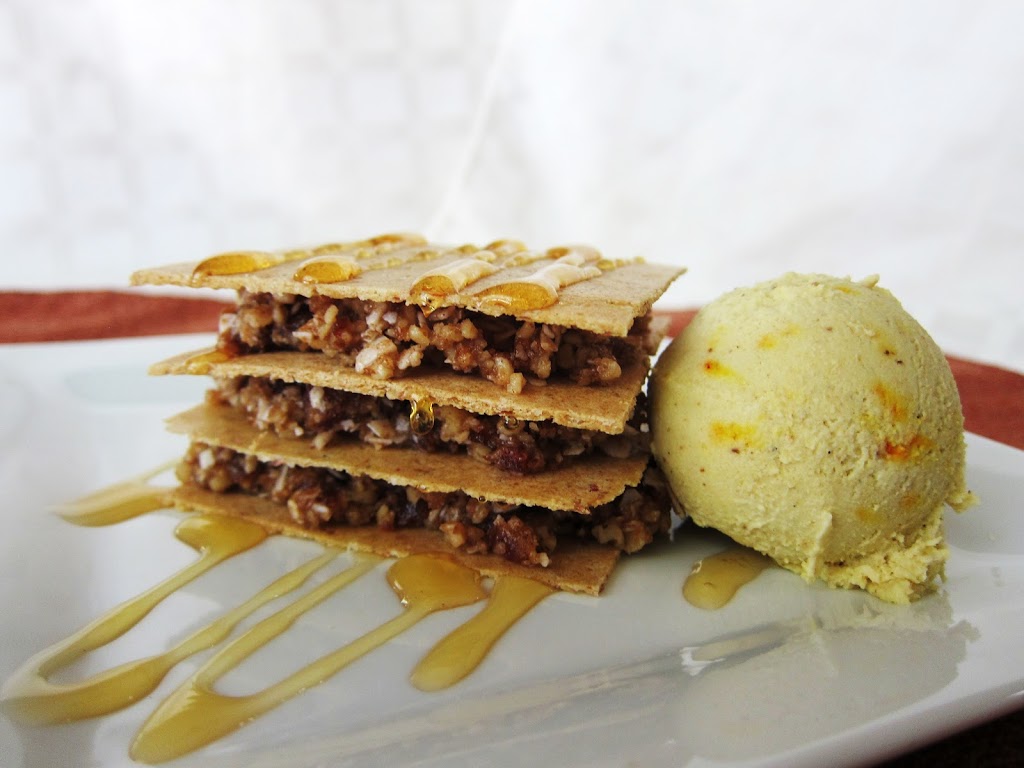
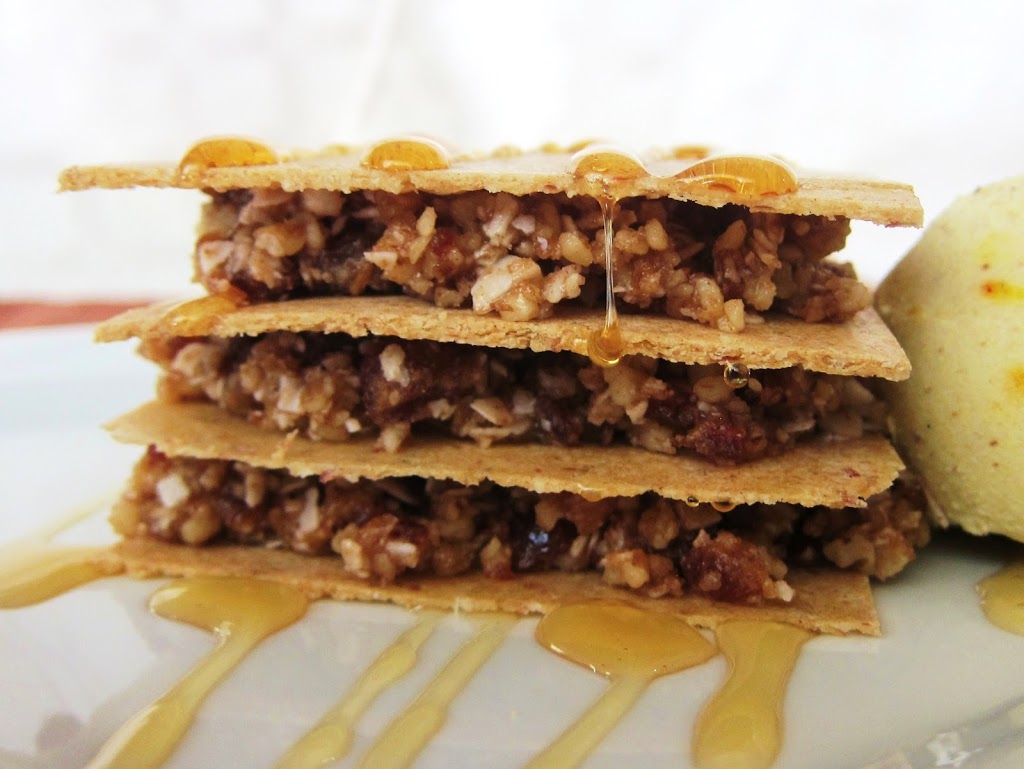
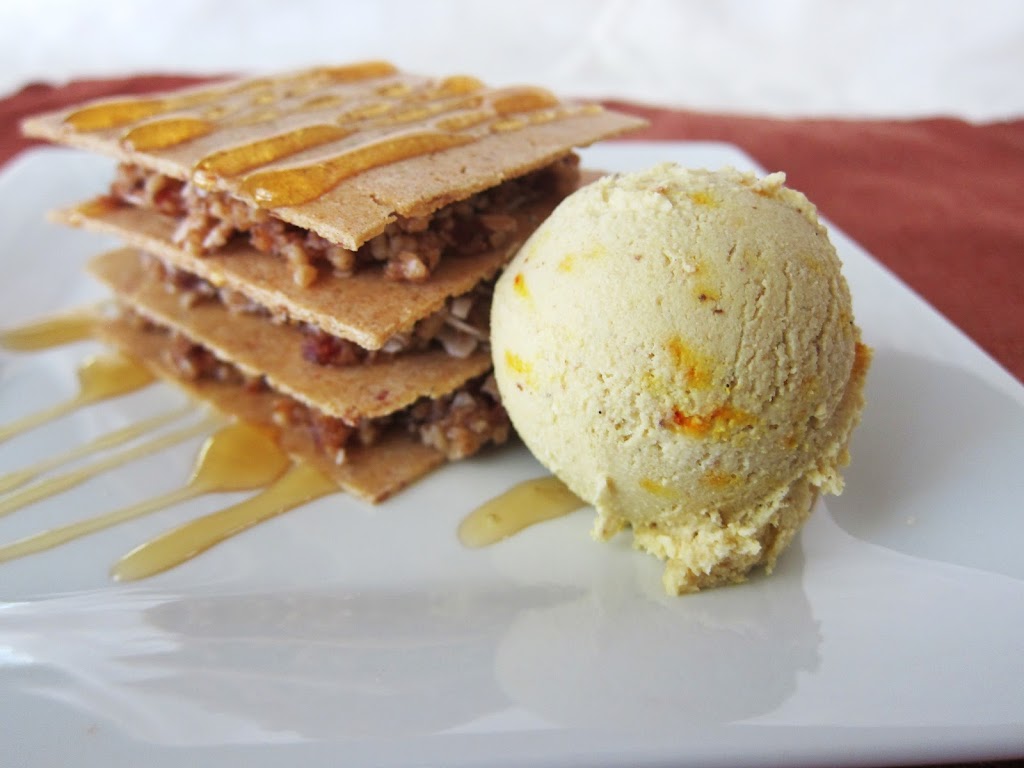
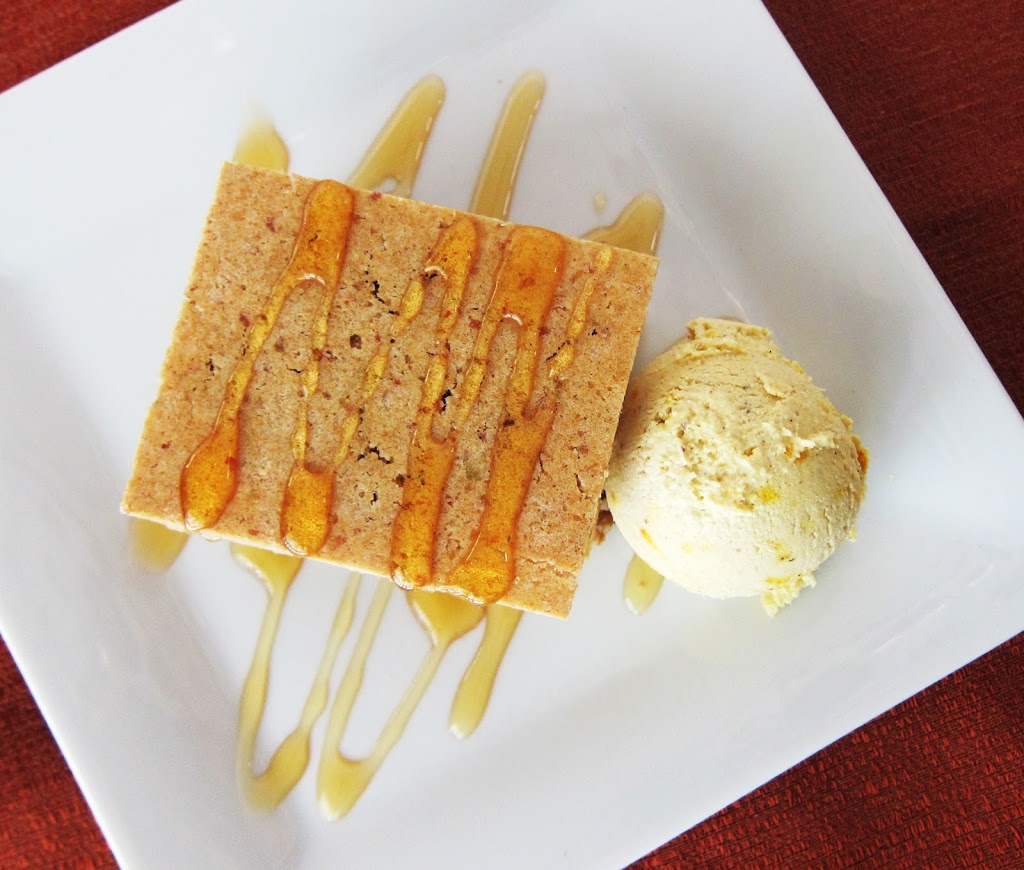
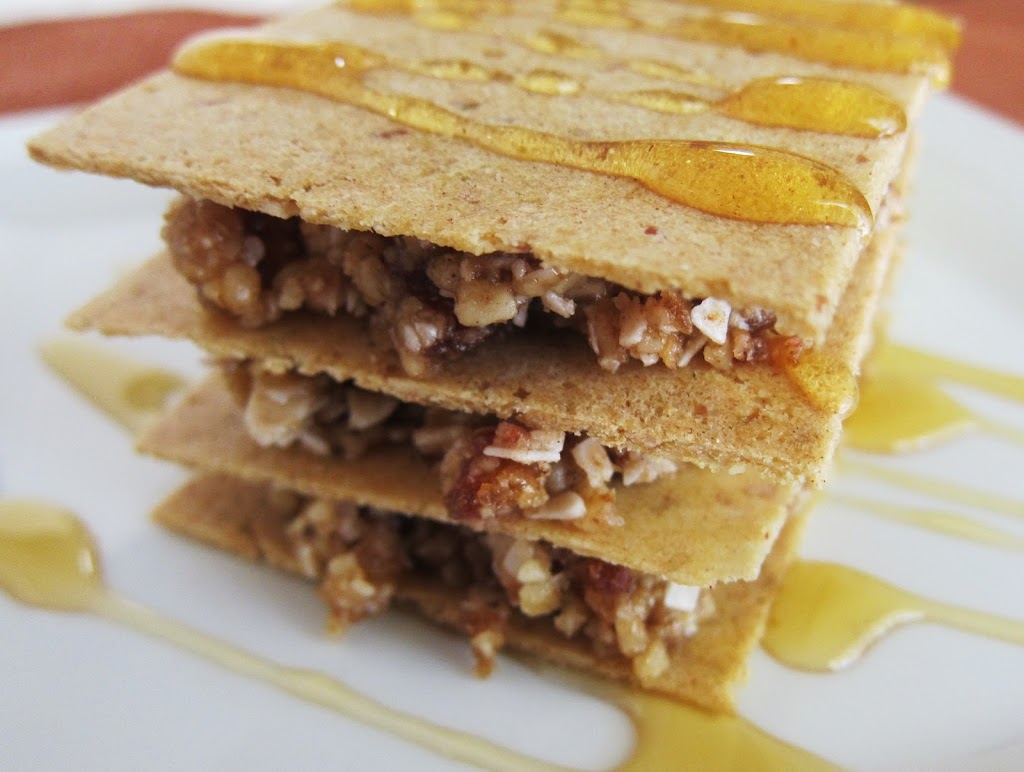
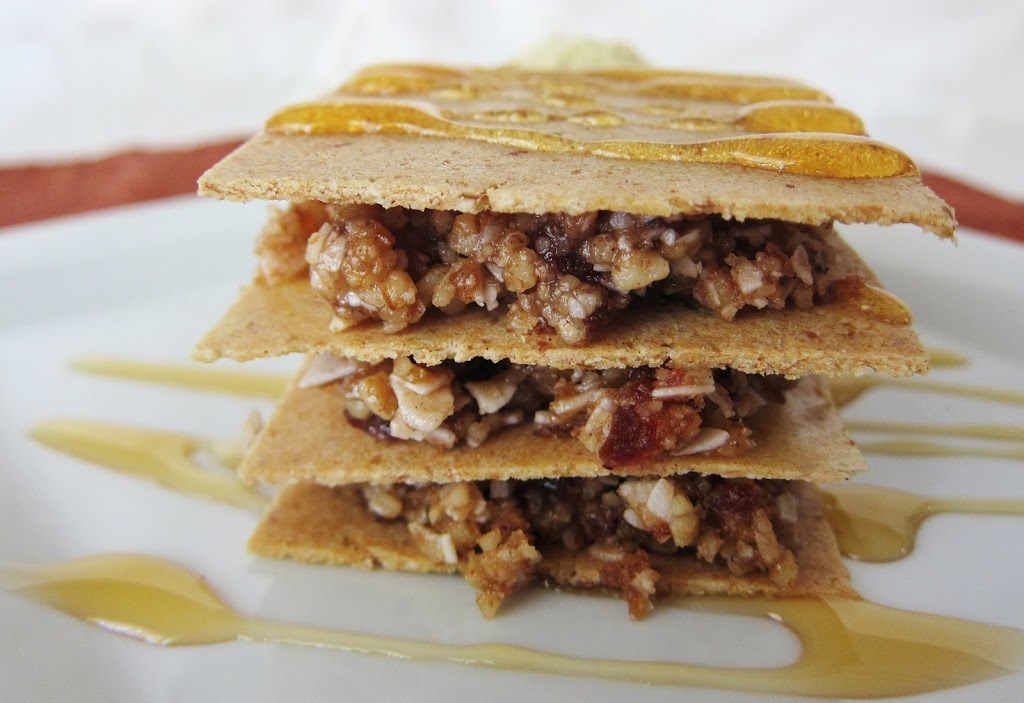
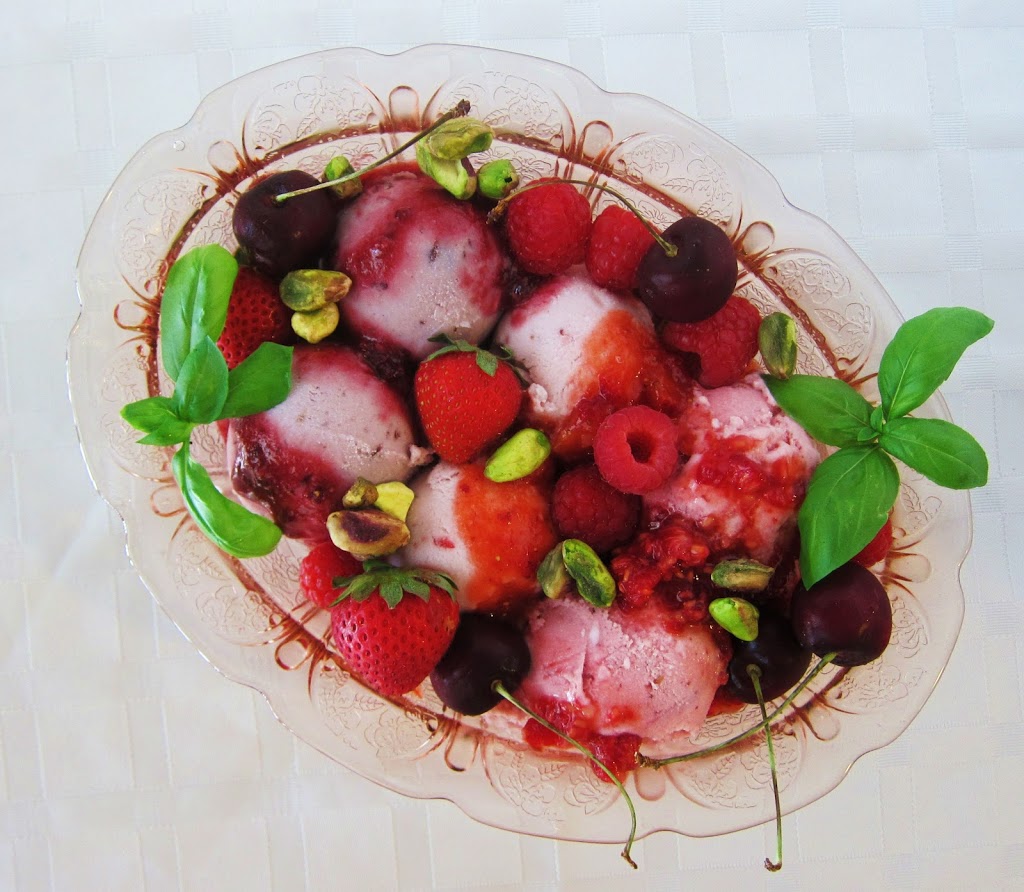
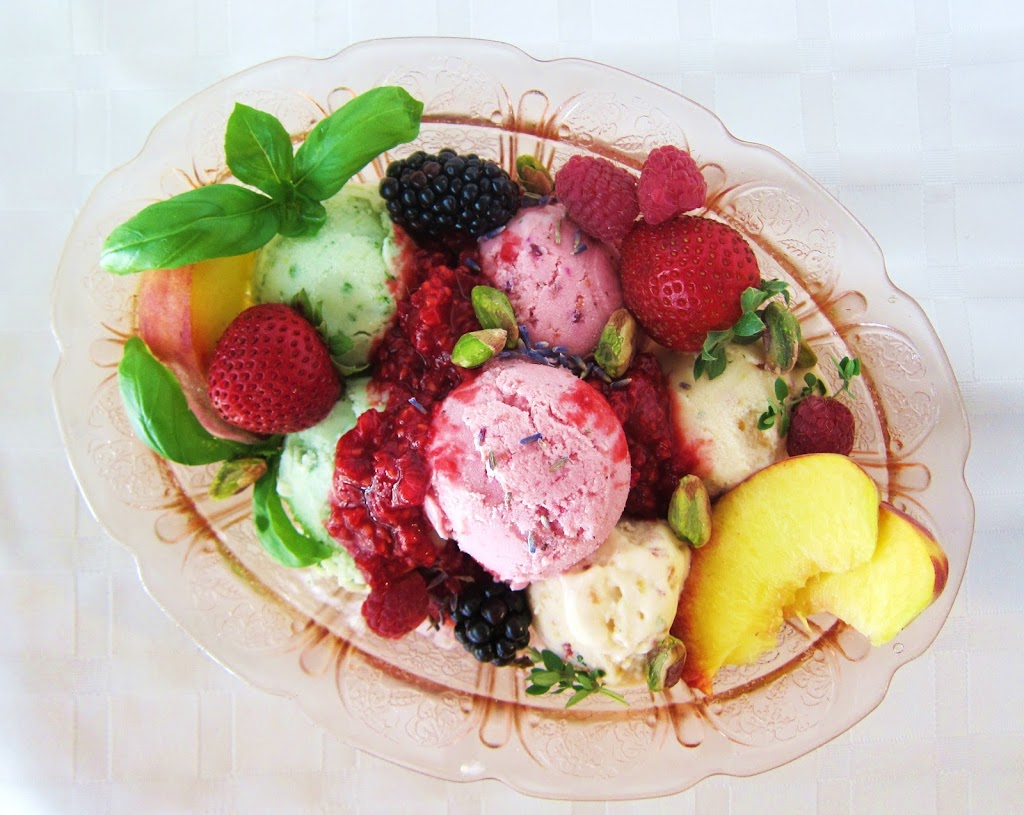
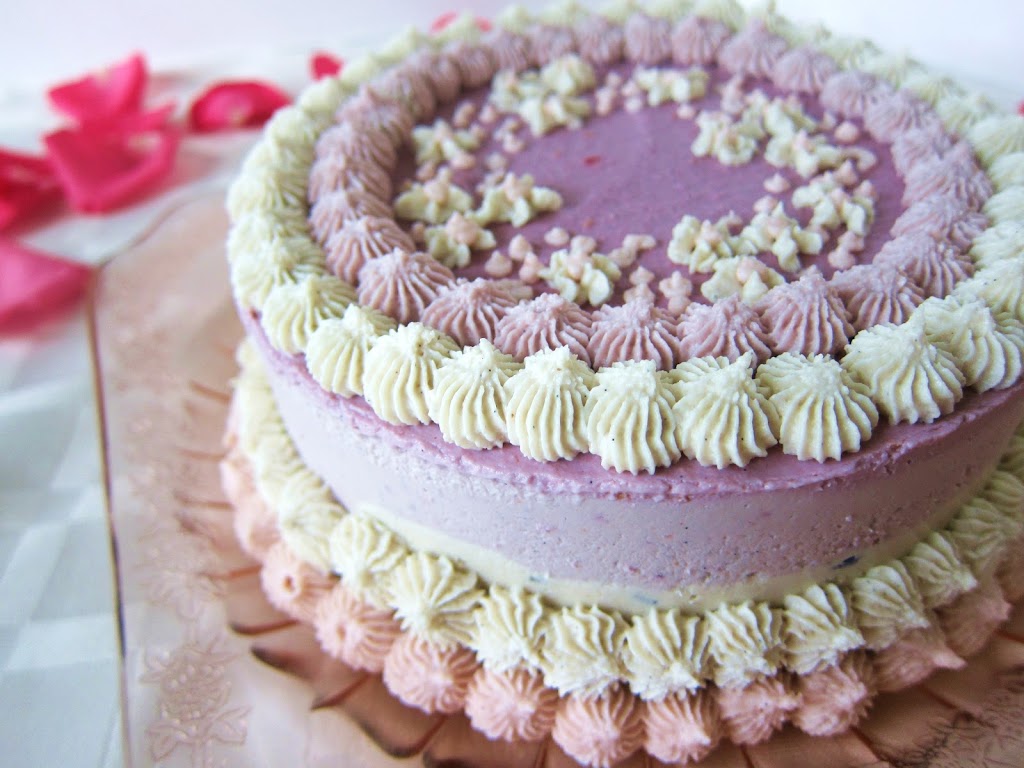
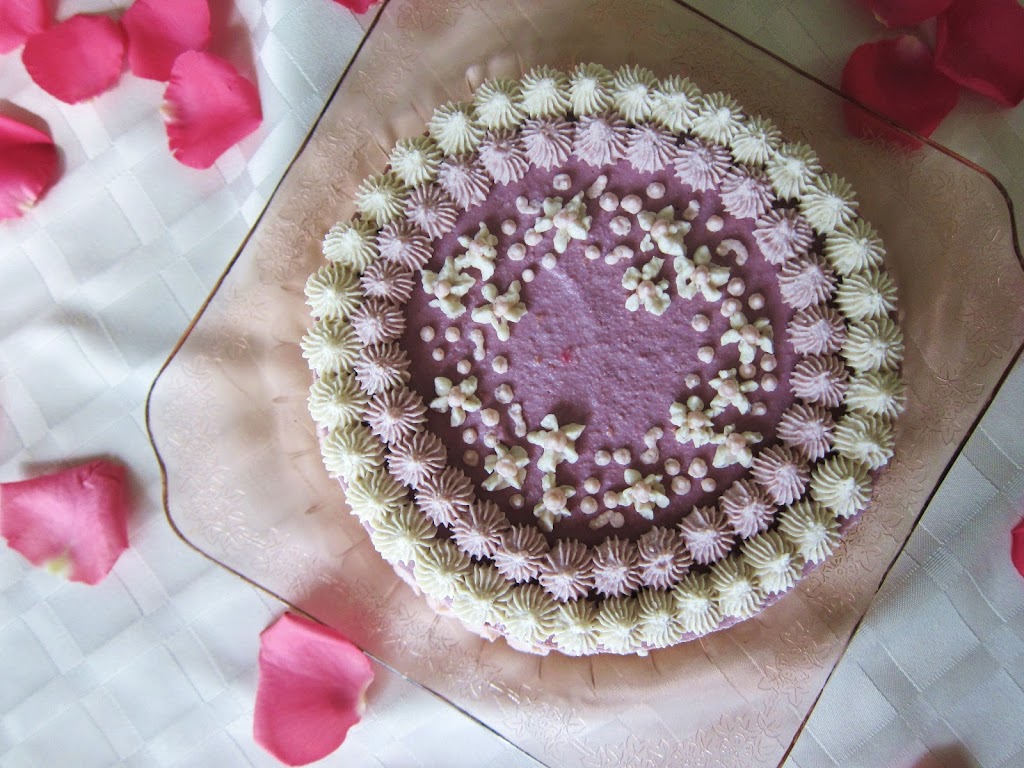
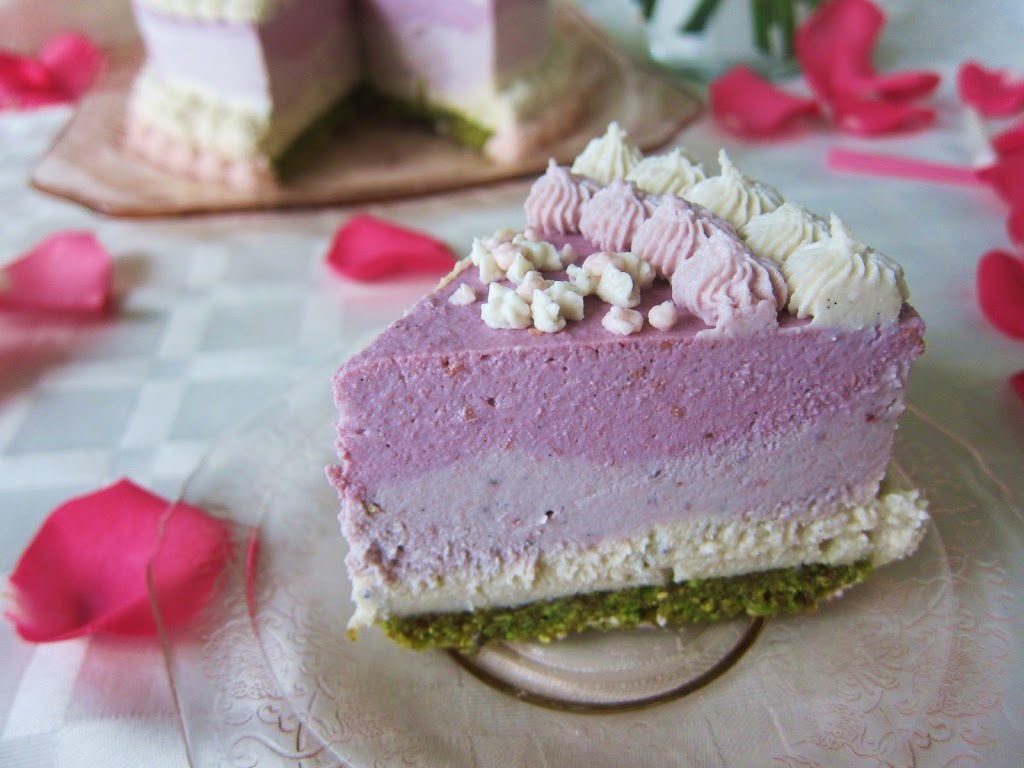
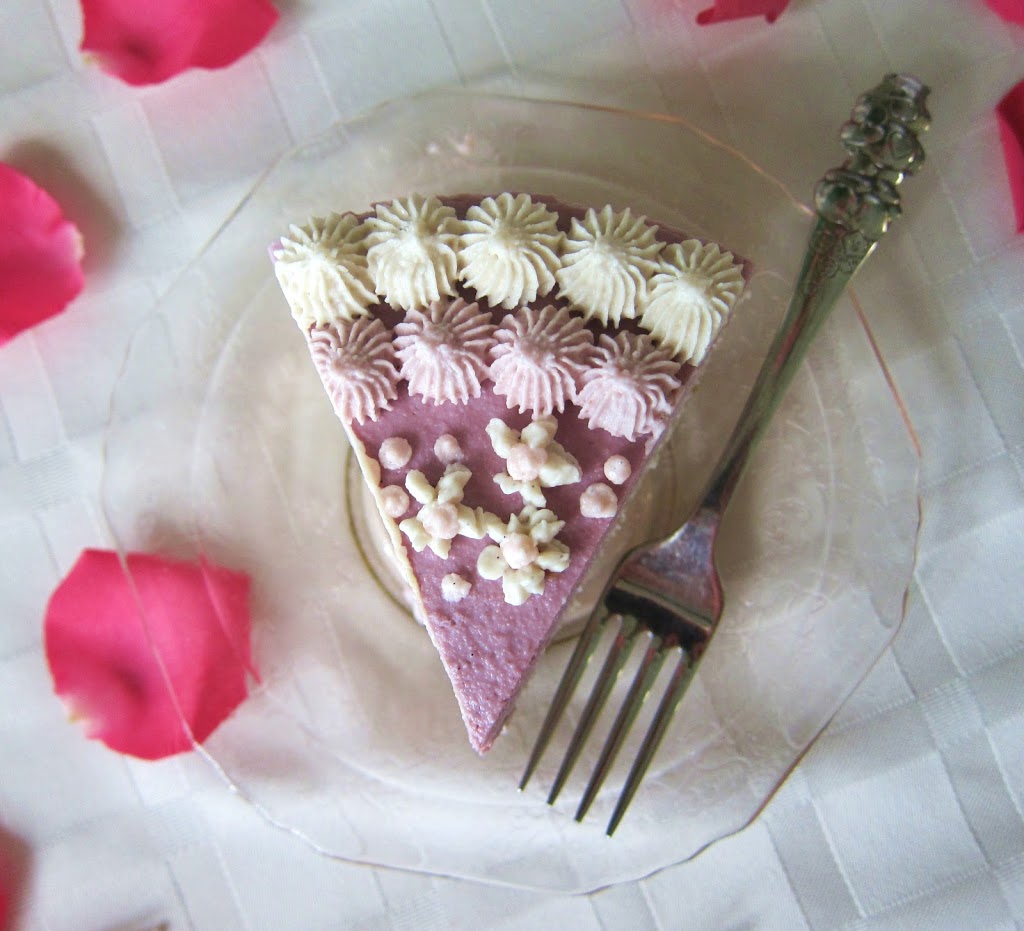
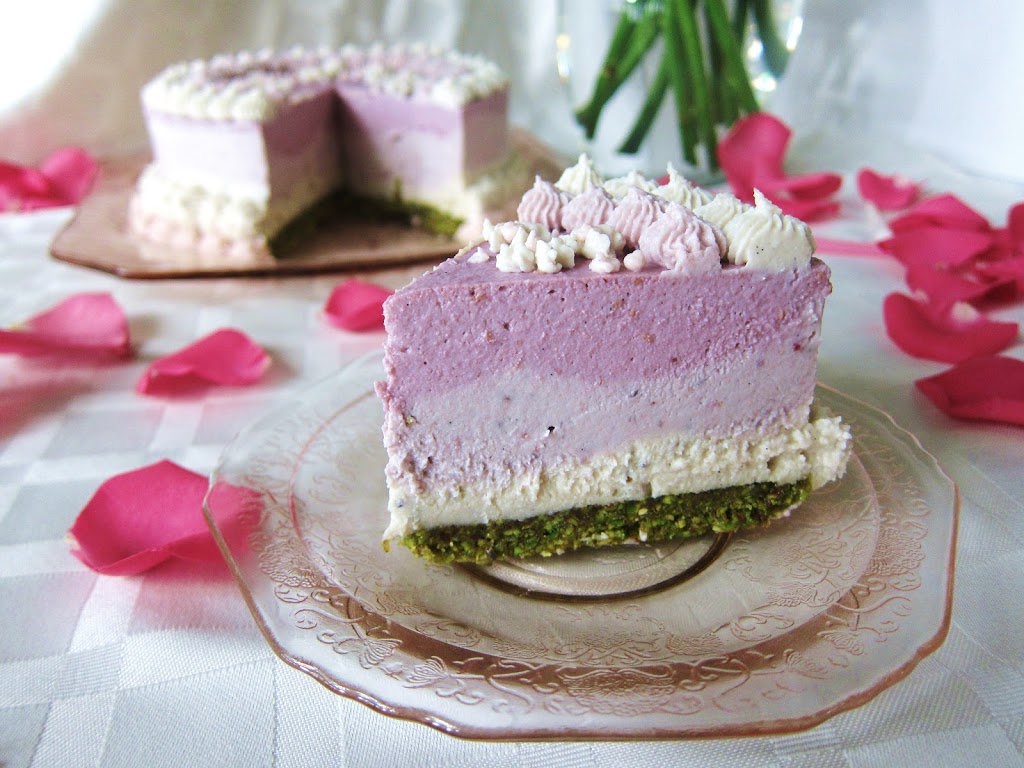
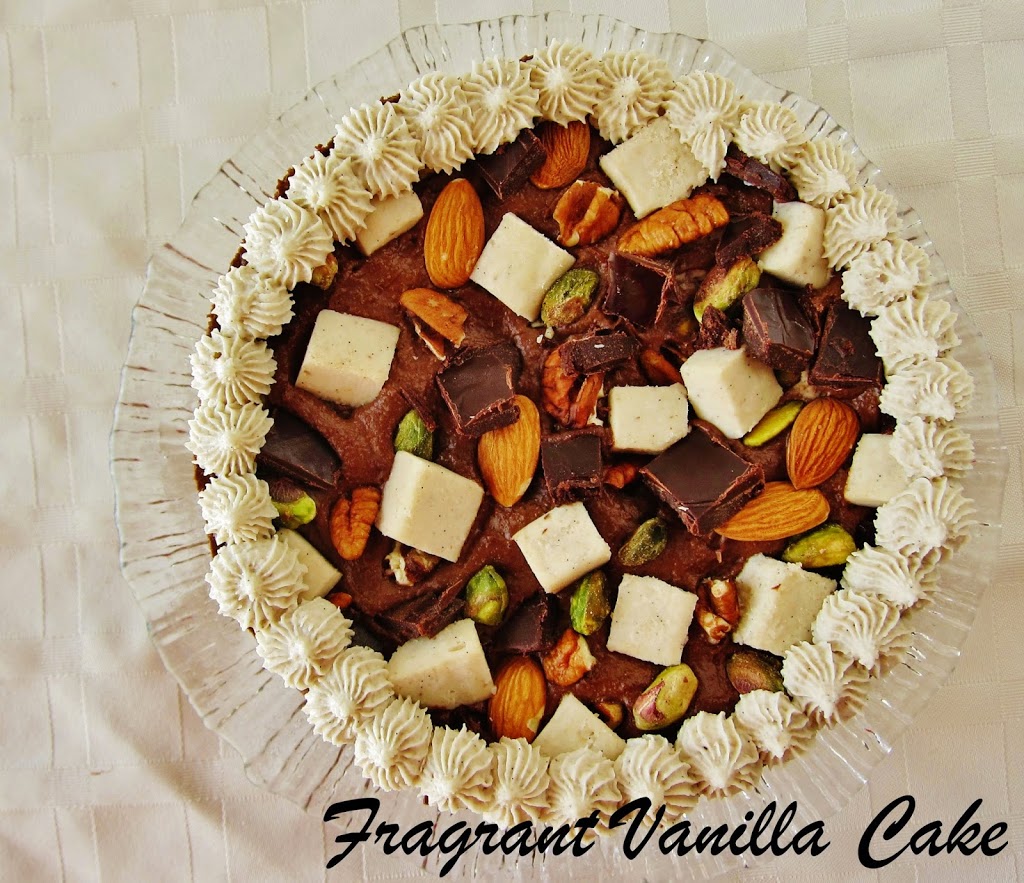
    If everyone had a slice of delicious cake shared with them, maybe they would be in a good mood.  Like this Rocky Road Mousse Cake I made yesterday!  It would make anyone happy, especially a chocolate lover.  Studies have shown, chocolate is a mood booster.
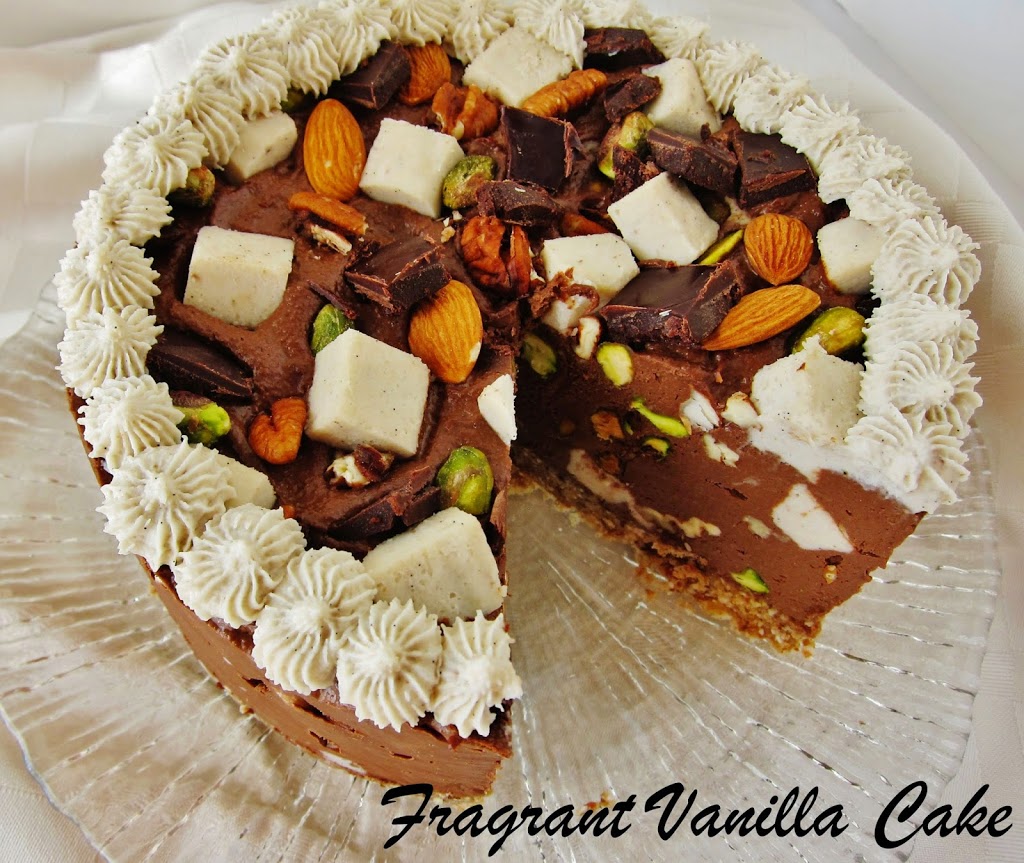
    I had made a vegan rocky road tart last year and I thought that a rawified chocolate rocky road cake would be just as wonderful!  I gave it a chocolate mousse base made rich with avocado and coconut, and folded in plenty of nuts, plus raw “marshmallows”. Now, I know that they are not real marshmallows, but they worked in this cake perfectly and tasted wonderful, little bites of vanilla surrounded by decadent chocolate.  This was way better than the tart I made last year.

    I shared some with my boyfriend Eric, who is a chocolate addict and he much enjoyed it.  This cake and sharing it with someone I love put me in such a good mood.  Honestly, it tastes like bites of heaven. I hope I have boosted your mood and made you happy by sharing the recipe with you!  Hope you all have a wonderful week!

    Raw Rocky Road Mousse Cake
    Makes one 6 inch cake

    Cream topping and marshmallows:
    3/4 cup raw cashew pieces (preferably soaked overnight)
    1/4 cup coconut water
    1 cups fresh young coconut meat (or additional soaked cashews if not available)
    3 Tbsp raw coconut nectar
    1/4 tsp sea salt
    1 teaspoons vanilla and seeds of half a vanilla bean
    1/4 cup raw coconut oil (warmed to liquid)
    2 Tbsp coconut butter

    Crust:
    1 cup raw almonds, soaked, skinned and dried
    1 cups shredded, dried coconut

    1/2 cup sprouted, dried buckwheat (or additional coconut
    1/8 teaspoon sea salt
    8 soft medjool dates, pitted and chopped

    Filling:

    1 cup raw cashews (soaked 4 hours at least, drained)
    1 cup ripe avocado
    1 cup young coconut meat or soaked cashews (drained)
    1/4 cup coconut water
    1/3 cup plus 1 Tbsp raw coconut nectar
    1/4 tsp sea salt
    2 tsp pure vanilla extract and seeds from half a vanilla bean (other half reserved for topping)
    3/4 cup raw cacao powder
    1/4 cup raw coconut oil (warmed to liquid)
    1/2 cup chopped raw almonds (soaked and dried)
    1/2 cup raw pistachios
    1/2 cup raw pecans (soaked and dried)
    1/2  cup chopped raw chocolate

    To make the topping and “marshmallows”, combine the cashews, coconut, coconut water, sea salt, coconut nectar, and vanilla and process until smooth. Add the coconut oil slowly with the motor running (If the mixture starts to separate and clump, the filling is too cold to emulsify the oil, so warm some of it and process again). Divide in half, placing half in a bowl keep half  in the processor.  To the half in the processor, add the coconut butter and process until well combined.  Spread the half with the coconut butter out on a piece of foil about 1/2 inch thick.  Place the bowl and foil in the freezer, the frosting for about 30-45 minutes until it firms up to frosting consistency and the “marshmallows” on the foil until they are hard enough to cut into marshmallows (about an hour). Once the frosting is frosting consistency, move to the fridge until ready to use.  Once the marshmallows have hardened enough to cut, cut into small marshmallow sized pieced with a knife, and keep in the freezer until ready to use.
     Meanwhile, for the crust, combine the almonds, coconut, and buckwheat in a food processor and process until crumbs. Add the sea salt and dates and process until the mixture starts to come together when squeezed. Press into the bottom and up the sides of a 6 inch springform pan, sprayed with non-stick coconut oil spray. Place in the freezer while you prepare the filling.
    For the filling, combine cashews, coconut,  avocado, coconut nectar, sea salt, vanilla and cacao powder in a food processor and process until smooth. With the motor running, slowly add the coconut oil and process for a minute. Stir in marshmallows, nuts and coconut.  Pour into the prepared crust, and place in the freezer to firm up, about 2-3 hours or so.
    Once the filling has set, place the topping in a pastry bag and pipe decoratively around the edges of  the cake. Serve! Store extra in the fridge.

  • Raw Banana Macadamia Coconut Dream Pie

    Raw Banana Macadamia Coconut Dream Pie

    When I started to get serious about making desserts back in college, one of my favorite things to make was banana cream pie.  I thought my recipe was the best…deep dish banana bourbon cream pie, piled high with billowy, clouds of whipped cream and topped off with toasted coconut.  It was pretty amazing, and I made it many times, never thinking it could be trumped.
    That is, until this weekend.  I made the most amazing banana cream pie I have ever tasted, and it by far kicked that other banana cream pie’s butt.  It needed no dairy, eggs, and refined sugar, it was veganlicious, and way more amazing!
    I had two large bunches of bananas on my counter last week, so a banana something or other was in order.  I made a cake, which will be posted soon, but I also made this Raw Banana Macadamia Coconut Dream Pie.  I call it a dream pie because it was.  When I started to make it, there were three things I was sure of.  It needed a coconut macadamia crust, plenty of sweet, creamy filling, and coconut cream on top.
    Once I got to making the filling, however, I decided that it would be even more amazing with a layer of chocolate and vanilla cream frosting.  The best of both worlds to accompany the bananas in the sweet pie!
    Once it was set, I topped it off with coconut cream, but then decided that something crunchy on top would be even better so I topped it off with a sort of macadamia and coconut streusel.  This pie ended up being a fufillment of all of my cravings.  Crunchy and a little salty from the crust and topping, creamy, sweet and dreamy in the middle, plus chocolate and fruity bananas…pure heaven!  You simply must make this if you love banana cream pie so you can try it for yourself!

    Raw Banana Macadamia Coconut Dream Pie
    Makes 1 6 inch tart

    Crust:
    1 cup macadamia nuts
    1 cups shredded, dried coconut
    1/2 cup sprouted, dried buckwheat (or additional coconut
    1/8 teaspoon sea salt
    8 soft medjool dates, pitted and chopped

    Filling
    2 cups sliced bananas
    1/2 cup raw cashews (soaked for at least 4 hours in filtered water and drained)
    1/3 cup coconut water
    1 1/2 cups young coconut meat or soaked raw soaked cashews (drained)
    1/3 cup plus 1 Tbsp raw coconut nectar or maple syrup
    1/4 tsp sea salt
    2 tsp pure vanilla extract and seeds from half a vanilla bean (other half reserved for topping)
    1/3 cup raw coconut butter or oil (warmed to liquid)
    2 sliced bananas
    3 Tbsp raw cacao powder

    Cream topping:
    3/4 cup raw cashew pieces (preferably soaked overnight)
    1/4 cup coconut water
    1 cups fresh young coconut meat (or additional soaked cashews if not available)
    3 Tbsp raw coconut nectar or maple syrup
    1/4 tsp sea salt
    1 teaspoons vanilla and seeds of half a vanilla bean
    1/4 cup raw coconut butter or oil (warmed to liquid)
    1/2 cup raw macadamia nuts
    1/2 cup large flake coconut
    large pinch of sea salt
    1 Tbsp coconut nectar or maple syrup

    For the crust, combine the nuts, coconut, and buckwheat in a food processor and process until crumbs. Add the sea salt and dates and process until the mixture starts to come together when squeezed. Press into the bottom and up the sides of a 6 inch springform pan, sprayed with non-stick coconut oil spray. Place in the freezer while you prepare the filling.

    For the filling, combine 2 cups bananas, coconut, cashews, coconut water, nectar, sea salt, and vanilla in a food processor and process until smooth. With the motor running, slowly add the coconut oil and process for a minute. Divide the mixture into 2 bowls, then place one back in the food processor and add cacao powder.  Process until combined. Pour the chocolate filling mixture over the prepared crust, then top with sliced bananas, then the plain filling, then more bananas.  Place in the freezer to set for about an hour.

    Meanwhile, to make the topping, combine the cashews, coconut, coconut water, sea salt, nectar, and vanilla anc process until smooth. Add the coconut oil slowly with the motor running (If the mixture starts to separate and clump, the filling is too cold to emulsify the oil, so warm some of it and process again). Place the topping in the freezer for about 30-45 minutes until it firms up to whipped cream  consistency. Once frosting consistency, move to the fridge until ready to use.
    Once the filling has set,spread over the tart.
    In a food processor, place macadamia nuts, coconut, sea salt, and nectar and pulse until chopped.  Sprinkle over tart, and serve! Store extra in the fridge.

  • Two Winter Salads…

    Two Winter Salads…

    On the contrary to popular belief, I do eat things besides desserts.  Lots of raw salads are a staple for dinner or accompanying a main dish.  I recently made two that I thought were worthy of sharing with you, one very savory and one a little sweet!
    The first was a raw kale salad with a little bit of an Asian twist.  The truth is enjoyed this one as a main dish (and have made it a few times since then) because I had tried to make a savory loaf and had to throw it out because I didn’t care for it and this salad was what I made with the ingredients I had on hand.  The kale part was delicious in a flavorful Asian dressing and sesame seeds with mushrooms and shallots, but the walnut topping and avocado I added made it more substantial for a my dinner. I was happy that my first dinner was ruined because if it hadn’t been I may not have made this deliciousness!  I know you can’t always get what you want…but sometimes the alternative is better.
    The second salad was created because I had a bag of brussels sprouts I wasn’t sure what to do with and extra pomegranate seeds from my cheesecake I had made.  So I thought, why not shave the brussels sprouts thin and combine them with the seeds in a delicious winter slaw!  I dressed it with citrus, and added chopped pecans and it was quite tasty!  It would be wonderful on a Holiday table with the ruby red pomegranate seeds.  So there it is…proof that I eat more than just desserts. I hope you enjoy the recipes!

    Kale Mushroom Salad with Walnut Crumble and Avocado
    Serves 2-4

    4-6 cups kale, chopped
    6 shiitake mushrooms, thinly sliced
    6 crimini mushrooms, sliced
    1 raw shallot, sliced
    1 tablespoon olive oil
    1 Tbsp sesame oil
    2 Tbsp rice vinegar
    1 Tbsp tamari
    2 tsp raw coconut nectar
    1/4 tsp red pepper flakes
    1 tsp thyme
    1 garlic clove, minced
    2 tablespoons sesame seeds, toasted

    1 cup walnuts
    1/4 cup nutritional yeast
    1/4 tsp sea salt
    1 clove garlic
    1 tsp thyme
    2 Tbsp water

    1 avocado, sliced

    In a large bowl, combine kale, mushrooms, and shallot.  In a small bowl, whisk together olive oil, sesame oil, rice vinegar, tamari, agave nectar, red pepper flakes, thyme, garlic, and sesame seeds.  Pour dressing over kale mixture and toss to combine.  Set aside.
    For the walnuts, combine walnuts, nutritional yeast, sea salt, garlic and thyme in a food processor and process until finely chopped.  Add a couple Tbsp of water and pulse until it holds together in clumps.
    To assemble, place kale on a large plate, top with avocadoes and walnuts and serve!

    Shaved Brussels Sprout and Pomegranate Salad
    Serves 4

    2 cups thinly sliced organic brussels sprouts
    1 cup pomegranate seeds
    1/2 cup toasted pecans

    Dressing:
    2 Tbsp walnut oil
    1 Tbsp cider vinegar
    2 tsp raw coconut nectar
    2 Tbsp orange juice
    1 Tbsp organic orange zest
    sea salt to taste
    1 tsp dried thyme

    In a large bowl, combine brussels sprouts, pomegranate seeds, and pecans.  In a small bowl whisk together dressing then pour over salad and toss to coat. Place in a serving bowl, and enjoy!

  • Raw Baklava with Saffron Ice Cream

    Raw Baklava with Saffron Ice Cream

    I can remember the first time I had baklava.  I was at a Middle Eastern restaurant and I decided to try some.    After all, walnuts in crispy paper thin pastry with sweet honey sounded awfully delicious!  The mad behind the counter dished out a large piece just oozing with honey.  I sat down at a table and was salivating.  I couldn’t wait to dive in.  It was amazing…the sweet honey, the crunchy nuts, the crispy filo and scent of rosewater.  How had I never tried this heavenly creation before?

    That was back in high school, and since then I have always thought that baklava was delicious.  Well, most of it.  I have had some at times that has so much honey that it is far too gooey and the filo gets weighed down.  But a good Middle Eastern restaurant will serve perfect balanced baklava.

    I hadn’t had any baklava in a while, because I am trying to stay away from refined sugars and flours and I know the traditional version has plenty of sugar…which is what makes it so sweet.  Although I have made a few versions at home in the past using only maple syrup or coconut nectar and they were wonderful, I decided that I wanted to create a raw vegan version last weekend.

    I made crispy “filo” layers that were more like tuiles or abstract versions of the filo, but still delicious out of apples and almonds laced with cinnamon. They went perfectly with the sweet walnut filling I created, adding in some coconut and dates for extra deliciousness.

    The baklava had it all, crunchy, sweet and nutty…well, almost all.  It needed to be served with a creamy element I decided, and what better than ice cream?  So I made a raw saffron ice cream to accompany it.  As a whole, it was wonderful and I couldn’t help but be in my happy place while enjoying it.  It was so good I didn’t even share this time.

    Raw Baklava with Saffron Ice Cream
    Serves 2

    “Filo” sheets:
    1 large organic apple
    1/2 cup almond meal
    a pinch of sea salt
    1 tsp raw coconut nectar or maple syrup
    1/4 tsp ground cinnamon

    Filling:
    1 cup walnuts
    6 dates
    1 cup large flake coconut
    1/4 tsp cinnamon
    1/4 tsp rosewater
    2 Tbsp raw coconut nectar or maple syrup plus additional for serving

    For the “filo sheets”, combine the apple, almond meal, sea salt, nectar, and cinnamon in a food processor and process until smooth.  Spread out thinly onto a teflex lined dehydrator sheet in a large square.  Dry for a few hours, or until not tacky anymore, then score into 9 squares.  Place back in the dehydrator for about another 6-8 hours or until very crispy.  Remove squares (you will have one extra to snack on).
    For the filling, combine walnuts, dates, coconut, and cinnamon and rosewater in a food processor and pulse until well combined but not pureed.  You want to have chunks still.  Add 2 Tbsp nectar and pulse a few more times.  Remove from the food processor.
    To assemble, set out 2 plates.  Drizzle each with a bit of the nectar.  Place one filo square on each, and top with 1/3 of the walnut mixture (deviding evenly between the two).  Top each with another square, then half the remaining filling (deviding evenly between the two).  Then another square, then the rest of the filling then another square.  Drizzle each baklava with a bit more nectar, and scoop some saffron ice cream beside each (recipe follows).  Enjoy!

    Raw Saffron Ice Cream:
    a large pinch safforn
    1/2 cup coconut water
    1 cup raw cashews, soaked overnight and drained
    1 cup young coconut meat, chopped
    1/4 cup raw coconut nectar
    1 tsp rosewater
    seeds of one vanilla bean
    a pinch of sea salt
    1/4 cup coconut oil, warmed to liquid

    Warm the coconut water to 100 degrees or so, and place the saffron in it to steep.  Let sit until cooled.  Add to a food processor, along with cashews, coconut meat, nectar, rosewater, vanilla, and sea salt.  Process until smooth, then with the processor running, add the coconut oil slowly and process until well incorporated, about a minute. Pour the mixture into an ice cream maker and process according to directions.  Remove from ice cream maker, and pour into a freezer safe container.  Let chill in the freezer for a few hours until a little more firm before scooping.

  • Raw Tostadas

    Raw Tostadas

    I have been eating a lot of Mexican food lately.  Tacos, fajitas, and especially tostadas!  I love tostadas…loading them up with lots of flavorful, fresh goodness and a bit of spice in the form of home made delicious hot sauce!  I decided last weekend that it was about time I tried making raw tostadas, since I had some fresh sweet corn that I knew would make fabulous tortillas. 

    The best part was, the tortillas didn’t need to be fried or baked (I don’t usually fry them anyhow), simply dehydrated!  They were like crunchy chips, but better.  I opted not to go the bean route with toppings this time, as I did not have time to soak and sprout, but insted made raw taco “meat” from walnuts I had on hand. 

    There needed to be lots of veggies and produce on this as well, so I included tomatoes from my Dad’s garden, fresh romaine, bell pepper, scallions, cilantro, and rich avocado.  The avocado was a must, as it is something I crave! 

    Lastly, I made some almond queso fresco and some silky spicy chili almond sauce to drizzle over the whole thing.  Lets not forget the hot sauce as well!  They were lovely with the beautifully colored veg…almost too pretty to eat, but let’s be honest, I was starving and I dove right in!  They may not have been traditional, but they were so freaking good! 

    Raw Tostadas
    Makes 6

    Corn Tortillas:
    2 cups fresh corn kernals
    1 cup flax seed
    1 tsp sea salt
    juice of one lime
    coconut oil, warmed to liquid
    sea salt

    Taco “meat”:
    2 cups walnuts, soaked and dehydrated
    1 cup nutritional yeast
    2 garlic cloves
    1 Tbsp cumin
    1 Tbsp chili powder
    1/4 tsp chipotle powder
    1/2 tsp sea salt

    Almond “queso fresco”:
    1 1/2 cup almonds, soaked at least 6 hours and drained
    juice of 1 lemon
    1/2 tsp sea salt or to taste
    filtered water

    Chili almond sauce:
    1/2 cup almond butter
    1 small dried chipotle chili, soaked for 1/2 hour and drained, seeds removed
    1 date, pitted
    1 clove garlic
    1/3 cup filtered water
    2 Tbsp lime juice
    2 sundried tomatoes
    1/4 tsp sea salt or to taste

    Toppings:
    1 head romaine lettuce, chopped
    about 30 cherry tomatoes, halved
    1 bell pepper, diced small
    1/2 cup chopped cilantro
    1 bunch scallions, sliced
    2 avocadoes, sliced

    hot sauce* to serve

    To make tortillas, combine the corn, flaxseed, lime juice and sea salt in the food processor and process until smooth.  Add a little filtered water if needed (if not blending because it is too thick).  Divide the corn dough into 6 balls, and flatten each out into circles onto a teflex lined dehydrator sheet, about 1/8 inch thick.  Dehydrate for about 20-24 hours or until crunchy.  Brush with coconut oil, and sprinkle with sea salt. 

    For the taco meat, combine the walnuts, garlic, spices, yeast, and sea salt in a food processor and process until finely ground.  Add a little water (1 Tbsp at a time) and pulse until the mixture comes together and resembles ground beef but is not too wet.   Remove from the food procesor and set aside. 

    For the almond queso fresco, place the almonds, lemon juice and sea salt in the processor and process until smooth.  Add a little water (1 Tbsp at a time) as needed until it reaches the consistency of goat cheese.  Remove from the processor and set aside in the fridge. 

    To make the almond chili sauce, combine all ingredients in the food processor and process until smooth. 

    To assemble, place a tortilla on a plate.  Top with some lettuce, some taco meat, some cherry tomatoes, cilantro, scallions, and a few slices avocado.  Sprinkle with queso fresco, and drizzle with chili almond sauce.  Repeat with other 6 tortillas, and serve!

    *I used Bon Appetit’s hot sauce recipe, using half habanero, half anaheim chilies. You can find it here:

    http://www.bonappetit.com/recipes/2012/07/master-hot-sauce

  • Pretty In Pink Ice Cream Sundae

    Pretty In Pink Ice Cream Sundae

    Since I was a child, I have always been attracted to all things pink.  It is just a happy color!  Things have not changed now that I am 27.  I wanted a pink Birthday cake this year, and it was pink, inside and out!  So when I saw a challenge on Sweetly Raw to create a vegan ice cream sundae, I got to thinking, I need to enter this, and I thought a pink one would be lovely!  I could make 3 different pink flavors of ice cream and top them off with delicious things!  There would be no bubble gum or cotton candy flavored ice creams…I was thinking more along the lines of pink fruit flavors! 


    First off, raspberry lavender.  It is such a beautiful combination with the sweet tart berries, and the floral almost herbal lavender. I thought I could top it off with some fresh raspberry sauce as well to balance out the sweet ice cream. Second, a strawberry rosewater ice cream.  Since strawberries have a more delicate sweet flavor, I thought they would pair well with the delicately flavored rosewater.  It was the most beautiful light pink color, and I topped it off with a bit of red sweet strawberry sauce. Third, was a cherry almond ice cream.  I love this combination of flavors, as the sweet cherries and almonds work well with one another.  It was a little nutty and sweet, similar to a cherry nut ice cream I enjoyed as a child and ordered often at the local ice cream shop.  I topped it off with a bit of cherry almond sauce, keeping with the pattern of the sundae so far. 


    Although the sundae would be delicious with just the ice creams and their sauces, I thought it deserved to have a little crunch as well, so I added some pistachios.  The green color was beautiful against the pink ice creams.  Also, some fresh fruit was needed!  After all…what is a sundae without a cherry on top?  Or some strawberries and raspberries! I piled it all into one of my Grandmother’s antique rose bowls because I felt the lovely pink was appropriate for such a creation.  I couldn’t wait to dive in, and it was delicious!  All of the beautiful fragrant fruit flavored silky ice creams and sweet sauces!  I am not emabarassed to say I polished off the entire bowl! 


    Pretty In Pink Ice Cream Sundae

    cherry almond ice cream:
    makes 5 cups

    3 cups organic full fat coconut milk, chilled
    2 cups organic cherries, pitted
    3/4 cup agave nectar
    2 Tbsp almond butter
    1 Tbsp pure vanilla extract
    1 tsp pure almond extract
    1/4 tsp sea salt

    In a blender combine all ingredients, and process until well blended. Pour the mixture into an ice cream maker and process according to package directions (mine takes about an hour, and is still a little soupy like the consistency of a malt, but firms up in the freezer later). Once processed, pour into a freezable container with a lid, and place in the freezer for at least 8 hours, or overnight to firm up for best results.

    raspberry lavender ice cream:
    Makes 5 cups


    1 cup full fat coconut milk
    2 Tbsp dried lavender, divided
    2 cups organic full fat coconut milk, chilled
    3/4 cup agave nectar
    12 oz fresh organic raspberries or 12 oz bag frozen raspberries
    1 Tbsp pure vanilla extract
    1/4 tsp sea salt

    In a small saucepan, bring 1 cup lite coconut milk to a simmer and remove from heat. Add 1 Tbsp dried lavender flowers and stir in. Let cool, then chill in the fridge until very cold to let lavender infuse. Strain coconut milk, discarding lavender then add chilled milk to a blender, along with all other ingredients (except remaining 1 Tbsp dried lavender) in a blender, and process until well blended. Pour the mixture into an ice cream maker and process according to package directions (mine takes about an hour, and is still a little soupy like the consistency of a malt, but firms up in the freezer later). Once processed, stir in remaining Tbsp lavender and pour into a freezable container with a lid, and place in the freezer for at least 8 hours, or overnight to firm up for best results.


    strawberry rosewater ice cream:
    Makes 5 cups


    3 cups organic full fat coconut milk, chilled
    2 cups organic strawberries, hulled
    3/4 cup agave nectar
    1 Tbsp pure vanilla extract
    1 1/2 tsp rosewater
    1/2 tsp sea salt


    Combine all ingredients in a blender, and process until well blended. Pour the mixture into an ice cream maker and process according to package directions (mine takes about an hour, and is still a little soupy like the consistency of a malt, but firms up in the freezer later). Once processed, pour into freezable container with a lid, and place in the freezer for at least a few hours, or overnight to firm up for best results.


    Raspberry Sauce:
    2 cups fresh raspberries
    2 Tbsp agave nectar
    2 tsp pure vanilla extract


    Strawberry Sauce:
    2 cups fresh organic strawberries
    2 Tbsp agave nectar
    2 tsp pure vanilla extract


    Cherry Sauce:
    2 cups fresh organic cherries, pitted
    2 Tbsp agave nectar
    1 tsp almond extract

    For the raspberry sauce, puree all ingredients until nearly smooth, and set aside until ready to assemble. Repeat with remaining sauces.   


    For assembly:
    1/4 cup pistachios (each sundae)
    fresh organic raspberries, strawberries and cherries
    fresh basil leaves


    To assemble, scoop 2 scoops of each ice cream into an obling bowl. Top with a bit of each fruit puree, pistachios, fresh fruit, and basil. Enjoy!
  • Raw Chopped Taco Salad

    Raw Chopped Taco Salad

    I am still on a kick where I don’t care to use the oven or stove.  I mean it was over 100 degrees on Monday!  Plus, I work in a hot kitchen all day with a hot chefs coat, so cooking food is not appealing when I get home for dinner.  But, I still want to eat good food, and I don’t want to have to eat out all the time.  So…raw food is becoming more of a frequent thing in my kitchen. A few nights ago, I wanted taco salad.  However, I did not want to cook beans or turn on the oven to crisp tortillas.  So, I decided to make a salad plate with the flavors of a taco salad with fresh raw ingredients.  


    I had bought some local corn and zucchinis and I thought they would be delicious chopped up with a bell pepper, some shallots, and a chili lime dressing.  I also made some taco “meat” instead of having beans out of walnuts seasoned with nutritional yeast and taco spices. It was so delicious I could have eaten it on its own, but I knew it would be a perfect component to my salad. To finish it off I made some fresh salsa from some heirloom tomatoes I had bought as well and guacamole as they are both a must when Mexican food is served at my house!   Once I threw it all on top of a bed of greens, it was quite delicious!  As I was enjoying the last morsel, I was glad I hadn’t caved and turned my oven on or bought take out.

    Raw Chopped Taco Salad: 
    serves 3-4

    Salsa:
    1 jalapeno, minced (seeded if desired)
    2 medium organic heirloom tomatoes, diced
    1/4 cup packed fresh organic cilantro, chopped
    2 shallots, minced
    2 garlic cloves, minced
    juice of one lime
    sea salt to taste

    Guacamole:
    3 medium organic avocados
    1 garlic clove, minced
    1/4 cup chopped organic cilantro
    juice of one large lime
    sea salt to taste

    Taco “meat”:
    1 cup walnuts
    1/4 cup plus 2 Tbsp nutritional yeast
    2 tsp ground cumin
    2 tsp chili powder
    1/8 tsp chipotle powder, or to taste
    1 garlic clove
    sea salt to taste
    2-3 Tbsp filtered water (or as needed)

    Salad:
    2 ears of fresh organic corn
    1 organic yellow zucchini, cut into small dice
    1 organic green zucchini, cut into small dice
    1 yellow or red bell pepper, cut into small dice
    1 large shallot, minced
    2 garlic cloves, minced
    1 Tbsp ground cumin
    1 Tbsp chili powder
    1/8 tsp chipotle powder or to taste
    juice of 2 large limes
    1 Tbsp olive oil
    sea salt to taste

    Lettuce of your choice to serve
    hot sauce to serve (optional)

    To make salsa, combine all ingredients in a bowl and set aside. 
    To make guac, with an immersion blender in a tall measuring cup, puree until smooth (or if you like chunky, mash in a bowl).  Set aside.
    To make taco meat, combine all ingredients in a food processor (except water) and process until well chopped, but still chunky.  Add a little water at a time until the mixture starts to clump together.  Set aside. 
    To make salad, remove kernals of corn from the cobs and add to a large bowl, along with all other ingredients.  Toss until well combined. 
    To assemble, place some lettuce on each plate, then top each with some salad, salsa, taco meat, and guacamole.  Drizzle with hot sauce if desired, and serve!

  • Fruits of Summer Ice Cream Sundae

    Fruits of Summer Ice Cream Sundae

    Sitting out on picnic table in the sunshine, eating ice cream after running through the sprinkler.  This was an important part of summer to me when I was a kid.  I loved any kind of ice cream…peppermint bon bon, sherberts, cookie dough, strawberry, peach, chocolate…I ate them all!  I would even scoop them all into one bowl if I had the option to!  I loved to load them up with toppings as well.  I can remember being at my Dad’s house when I was about eight making myself an ice cream sundae.  I grabbed everything and anything ice cream related or that could be used as a topping and started crafting my masterpiece.  I scooped 3 different ice creams into a bowl.  Peppermint Bon Bon, Strawberry, and Moose Tracks. I then loaded it up with fudge, caramel and reddi whip.  Not to stop there however, I topped it off with M&Ms and chocolate chips.  It was a monster bowl of ice cream, and I ate it all!  Looking back on it, it sounds way too sweet and kind of disgusting to me now, but I was in heaven at the time!
     

    My tastes have drastically changed and I am no longer into that overly sweet stuff.  I much prefer things which are made sweet by fruit instead of just sugar, and I am in love with coconut milk based ice creams instead of the dairy I used to indulge in all the time.  And so recently when I was looking through photos of the ice cream on my blog, I thought, wouldn’t it be lovely to create a sundae featuring fruit and herbs? 
    I had recently made lemon basil ice cream and it was so refreshing that I knew it would be perfect among the other ice creams in the sundae.  I also whipped up a batch of raspberry lavender and peach thyme.  They were all wonderfully fragrant and just sweet enough, but not overly so. 
     

    I spooned them into one of my Grandmother’s antique dishes, and topped them off with a bit of fresh raspberry sauce, crunchy pistachios, and a mixture of fruits I happened to have on hand. 
     

    It was the most beautiful sundae I had ever layed eyes on…almost too pretty to eat!  You may be wondering if I ate this concoction myself or shared, as it was a rather large bowl.  I ate every last bite myself!  It was too good to share…that bowl at least.
     

    Luckilly I had enough ice cream leftover to share some.  Who says ice cream sundaes have to be overly sweet and dripping with gooey sauces?  Light and refreshing is so wonderful especially when it is near 100 degrees and you don’t want to be feeling heavy. 
     

    Fruits of Summer Ice Cream Sundae

    peach thyme ice cream:
    makes 5 cups
    2 Tbsp fresh thyme
    3 cups organic full fat coconut milk, chilled
    3/4 cup agave nectar
    2 medium fresh organic peaches, diced
    1 Tbsp pure vanilla extract
    1/4 tsp sea salt

    In a blender combine all ingredients, and process until well blended. Pour the mixture into an ice cream maker and process according to package directions (mine takes about an hour, and is still a little soupy like the consistency of a malt, but firms up in the freezer later). Once processed, pour into a freezable container with a lid, and place in the freezer for at least 8 hours, or overnight to firm up for best results.

    raspberry lavender ice cream:
    Makes 5 cups
    1 cup full fat coconut milk
    2 Tbsp dried lavender, divided
    2 cups organic full fat coconut milk, chilled
    3/4 cup agave nectar
    12 oz fresh organic raspberries or 12 oz bag frozen raspberries
    1 Tbsp pure vanilla extract
    1/4 tsp sea salt

    In a small saucepan, bring 1 cup lite coconut milk to a simmer and remove from heat. Add 1 Tbsp dried lavender flowers and stir in. Let cool, then chill in the fridge until very cold to let lavender infuse. Strain coconut milk, discarding lavender then add chilled milk to a blender, along with all other ingredients (except remaining 1 Tbsp dried lavender) in a blender, and process until well blended. Pour the mixture into an ice cream maker and process according to package directions (mine takes about an hour, and is still a little soupy like the consistency of a malt, but firms up in the freezer later). Once processed, stir in remaining Tbsp lavender and pour into a freezable container with a lid, and place in the freezer for at least 8 hours, or overnight to firm up for best results.


    lemon basil ice cream:
    Makes 4 cups

    3 cups organic full fat coconut milk, chilled
    1/4 cup fresh basil leaves, packed
    3 Tbsp organic lemon zest
    3 Tbsp lemon juice
    3/4 cup agave nectar
    1 Tbsp pure vanilla extract
    2 tsp lemon extract
    1/2 tsp sea salt

    Combine all ingredients in a blender, and process until well blended. Pour the mixture into an ice cream maker and process according to package directions (mine takes about an hour, and is still a little soupy like the consistency of a malt, but firms up in the freezer later). Once processed, pour into freezable container with a lid, and place in the freezer for at least a few hours, or overnight to firm up for best results.

    Raspberry Sauce:

    2 cups fresh raspberries
    2 Tbsp agave nectar
    2 tsp pure vanilla extract

    Puree all ingredients until smooth.

    For assembly:
    1/4 cup pistachios (each sundae)
    assorted fresh organic fruit (I used raspberries, blackberries, peaches, and strawberries)
    fresh basil and thyme leaves

    To assemble, scoop 2 scoops of each ice cream into an obling bowl.  Top with a bit of raspberry puree, pistachios, fresh fruit, and herbs.  Enjoy! 

  • Raw Pretty in Pink  Birthday Cheesecake

    Raw Pretty in Pink Birthday Cheesecake

    Yesterday, I turned 27.  However, I still feel as if I should be 21…as 27 is getting so close to 30!  This will not stop me however from acting younger than my age.  I never want to be boring, and I still like to do things like wear hello kitty kitty band-aids, run through sprinklers and have a pink birthday cake.

    Yes, I had to have a pink Birthday cake!  I have been asked by so many people in the last week, “Shouldn’t someone else make your cake?”  or “You shouldn’t have to bake on your Birthday!”  My answer to that was, no one I know would be able to create the cake I wanted the exact way I wanted it.  Plus, making cakes is something I enjoy and shouldn’t I enjoy myself on my birthday?  Plus…technically I wasn’t baking it because it was a raw cheesecake.
    I didn’t spend my entire day on it however, I also took the time to celebrate with family and a good friend going out to dinner at La Belle Vie, one of my favorite restaurants!

    Because although I made my cake, I didn’t want to cook dinner on my birthday, and their food is excellent!  It was a wonderful time, and we all had a lot of fun!

    Back to the birthday cheesecake…it had a pistachio crust, and the filling was vanilla rosewater scented with a layer of vanilla with lavender, then strawberry, and last raspberry.  It was beautiful naked, but since it was a birthday cake, I decided to pipe cashew coconut frosting around the cake to make it even more beautiful!

    It was delicious as well, fragrant and rich…just as cheesecake should be.  I much enjoyed it, and it made me happy just looking at it knowing it was exactly the birthday cake I had dreamed of creating, plus even better!  Since I am not the type of person who wants a boring white birthday cake full of bleached flour and white sugar.  Real ingredients are what I find truly delicious.
    Whoever made the rule that you can’t make your own birthday cake probably just didn’t feel like making one or didn’t know how to…making my own birthday cake is an experience I much enjoy, and will repeat for many years to come!

    Raw Pretty in Pink Birthday Cheesecake
    Makes one 6 inch cake

    Crust:
    3/4 cup shelled pistachios
    1/8 teaspoon sea salt
    3-4 soft medjool dates, pitted and chopped
    Filling:
    2 1/2 cups raw cashews (preferably soaked overnight and drained)
    1/2 cup young coconut meat (or additional soaked cashews)
    1/2 cup coconut water (or filtered water)
    1 tsp rosewater
    1 Tbsp lemon juice
    1/3 cup plus 3 Tbsp raw coconut nectar or maple syrup
    1/2 cup plus 1 Tbsp coconut oil (warmed to liquid)
    1/2 teaspoon sea salt
    1 Tbsp pure vanilla extract and seeds from half a vanilla bean (other half reserved for topping)
    1/2 cup fresh organic strawberries
    1/2 cup fresh organic red raspberries
    1 Tbsp organic lavender
    Cream Topping:
    3/4 cup raw cashew pieces (preferably soaked overnight)
    1/2 cup coconut water
    3/4 cup fresh young coconut meat (or additional soaked cashews if not available)
    2 tablespoons raw coconut nectar or maple syrup
    1 teaspoon pure vanilla extract and seeds of half a vanilla bean (reserved from filling)
    1/4 cup raw coconut oil (warmed to liquid)4-6 fresh organic raspberries

    Lightly coat a 6 inch spring form removable bottom pans with coconut oil. To prepare the crust, process pistachios and sea salt in a food processor until the pistachios are fine crumbs, then add the dates and process until the mixture holds together when squeezed between your fingers. Firmly press crust into the bottom of the prepared pan, and set aside.
    To make the filling, drain the cashews and combine them with coconut meat, coconut water, lemon juice, rosewater, nectar, coconut oil, sea salt and vanilla in a food processor and blend until smooth and creamy. Remove the filling from the food processor, and divide evenly between 3 bowls. Place 1/3 into the food processor and add 1/2 cup of strawberries. Puree until smooth and scrape back in the bowl. Add another 3rd of the filling to the food processor and add 1/2 cup raspberries, and puree until smooth. Add the lavender to the third bowl and stir in until combined.
    To assemble the cheesecake, pour the vanilla lavender filling over the crust, then smooth to the sides.  Then the strawberry, then the raspberry. Place in the freezer until it is set, 4 to 6 hours, then once set store in the fridge.
    To make topping, drain cashews and blend all ingredients until smooth in a food processor, then divide into 2 bowls.  Place one half back in the food processor and throw in about 4-6 raspberries, and blend (to tint pink).  Place back in the bowl and set bowls in the freezer about 30 minutes until a frosting consistency. Place the two frostings in pastry bags and pipe decoratively around the top and bottom of the cheesecake. Store leftover cake in the fridge.


  • Lemon Basil Ice Cream

    Lemon Basil Ice Cream

    It was 102 degrees yesterday.  It was a long week at work in a very hot kitchen.  Things didn’t all go as planned this week.  But I could have cared less yesterday, because I was in a sparkly mood!  Which is my way of saying I am in a really good mood.  It was Friday, and knew I would have the next ten days off to enjoy myself!  But, you know what put me in an even better mood yesterday, my Lemon Basil Ice Cream that I had made Thursday night!  It was in the freezer waiting for me when I got home and I was ready to dive in! 


    For those of you that think basil in ice cream sounds a little unusual, you are not alone, my own Mother told me it sounded very odd.  But seriously, it was delicious!  It was cooling and herby, sweet and a little tart with the lemon.  So fragrant, and it reminded me of sherbert in a way. 


    I had used my fresh basil from my herb pot and it could not have been a better match for the lemon coconut milk ice cream base.  It was the most lovely color of green, and I think it would be amazing in the center of a chilled summer soup but I enjoyed it unadorned yesterday, and it was perfect!  The perfect way to end my week that is!  I hope you all  have a wonderful weekend, are surviving the summer heat and staying cool! 


    Vegan Lemon Basil Ice Cream
    Makes 4 cups


    3 cups organic full fat coconut milk, chilled
    1/4 cup fresh basil leaves, packed
    3 Tbsp organic lemon zest
    3 Tbsp lemon juice
    3/4 cup agave nectar
    1 Tbsp pure vanilla extract
    2 tsp lemon extract
    1/2 tsp sea salt


    Combine all ingredients in a blender, and process until well blended. Pour the mixture into an ice cream maker and process according to package directions (mine takes about an hour, and is still a little soupy like the consistency of a malt, but firms up in the freezer later). Once processed, pour into freezable container with a lid, and place in the freezer for at least a few hours, or overnight to firm up for best results.