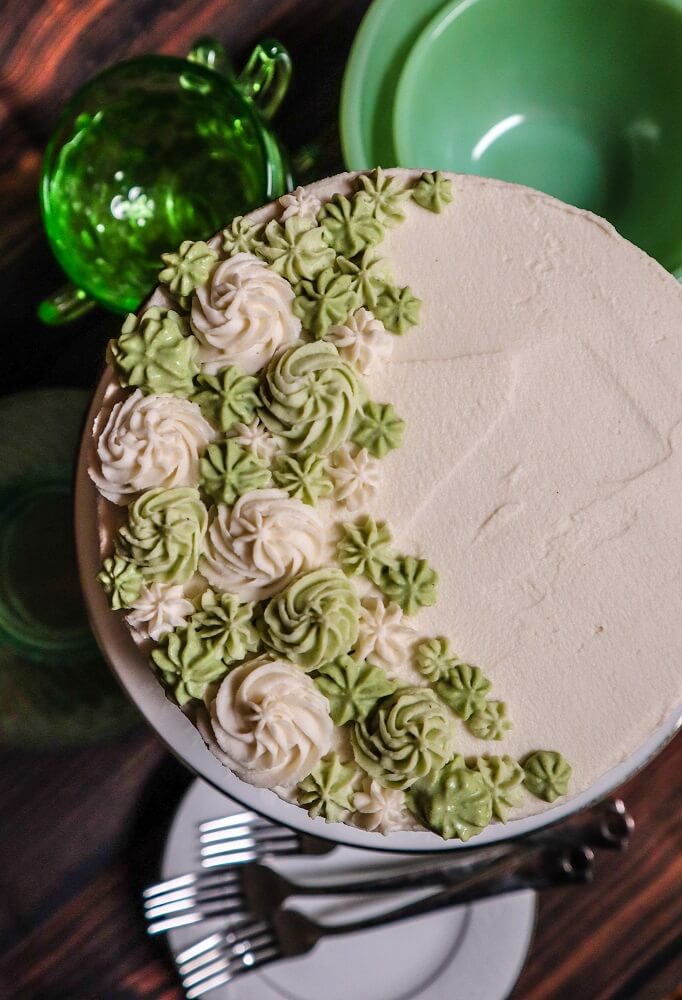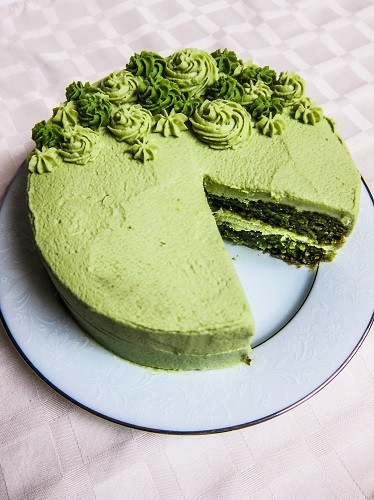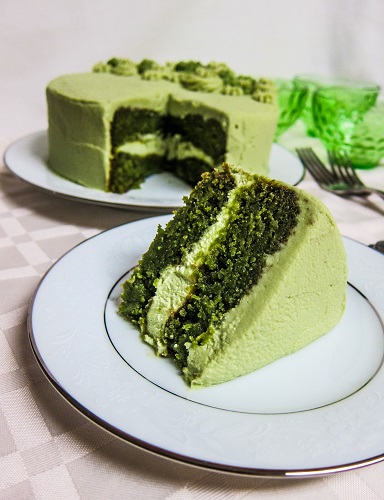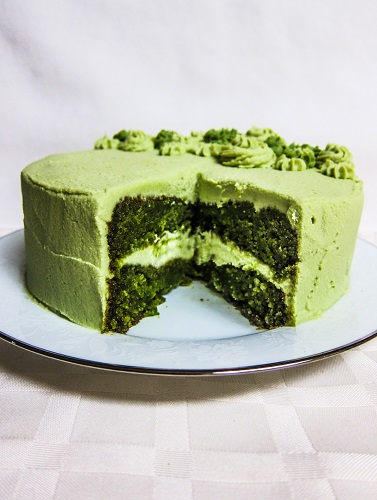
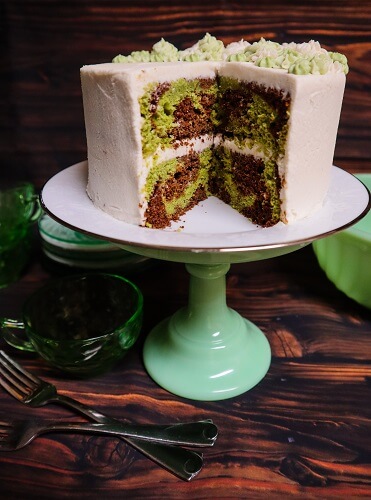
St. Patrick’s day is less than 2 weeks away, so it is the perfect time to make all things green. Especially fun desserts. Cakes are my favorite. So even though I made a green cheesecake last week, I decided to make another different green cake this week. Last year I made a peppermint vanilla cake and it was amazing but I thought it would be even better as a marble cake. As much as I love vanilla cake, marble was always my favorite growing up, because it was reserved for special occasions like birthdays. I had a few for my birthday celebrations over the years. Plus you get a nice mix of chocolate and vanilla cake if you are having a hard time deciding which you want. Since it is so good, I thought it would be delicious with peppermint added to the mix.
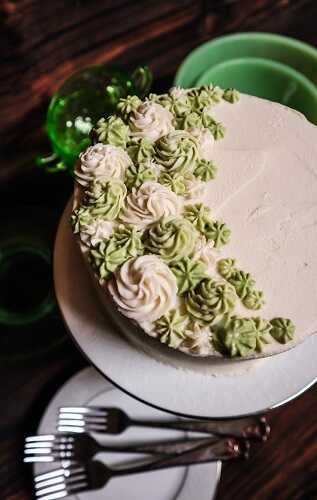
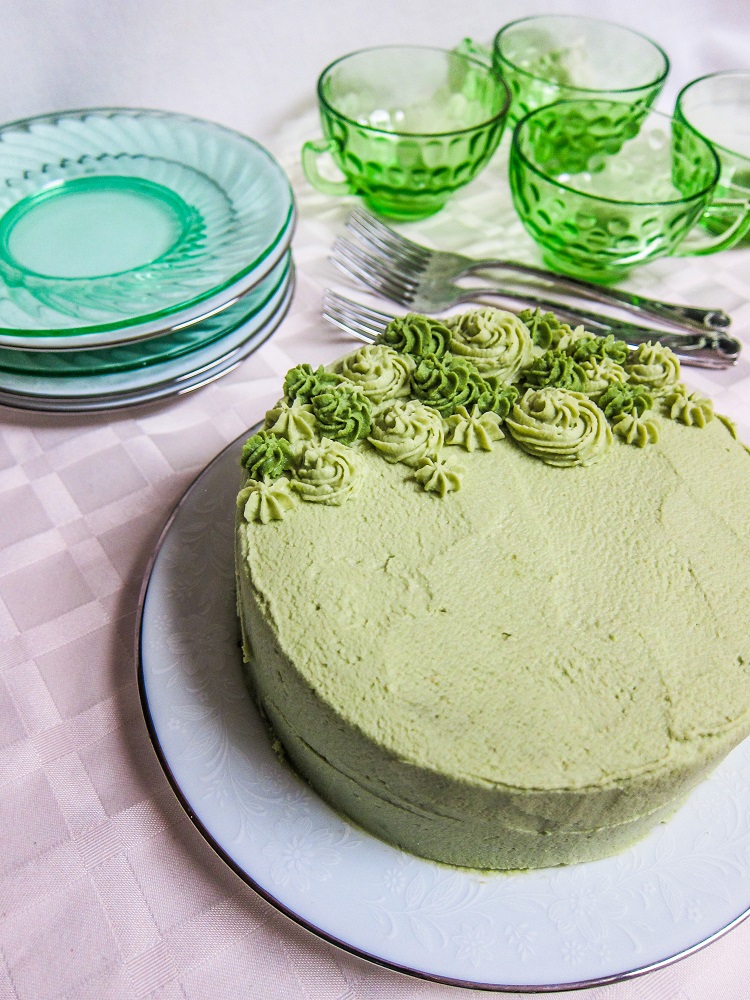
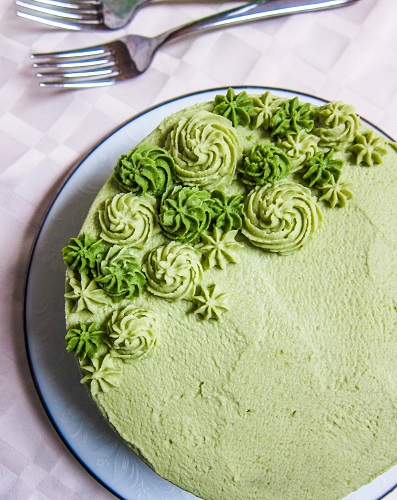
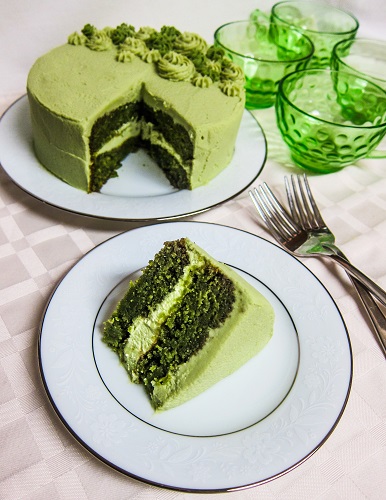
So, I made my vanilla cake base, and tinted it green for the mint. All natural color of course, I used spinach. I wanted it to retain its nice green color and not turn brown, so although I usually use maple sugar in my cakes (like my classic vanilla cake), I used xylitol in this to keep the lovely color. If you would prefer another granulated sweetener though, I listed a few that will work at the bottom. I mixed cacao powder into half the batter to create the chocolate mint batter and it was perfect!
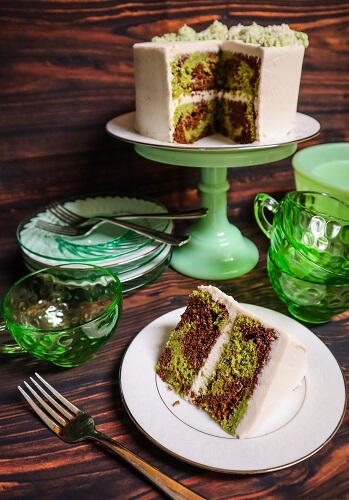
They both tasted so good even before baking! I was wondering if they would retain the lovely color while baking, and I was pleasantly surprised. It was an even more intense lovely green shade after. Sometimes with natural coloring it reacts with your rising agents and acids and creates a weird color or brown (I am looking at you beet powder), but the spinach powder I used worked perfect! I should note that matcha would work in this as well if you are a green tea fan like I am.
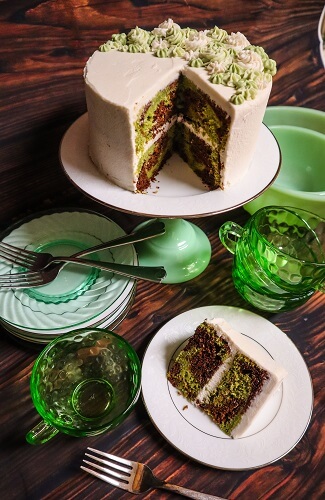
I topped it off with a fluffy white coconut cream based frosting flavored with mint and vanilla and it was heavenly! I could have just eaten the frosting plain like a vanilla peppermint mousse it was that good, but it was even better on the cake! Marble cake got a St. Patrick’s Day makeover and I loved it! The cake was soft, fluffy and moist, with a mellow peppermint flavor, rich chocolate cake and sweet vanilla, so good with the creamy frosting! If you are in the mood for cake, give this a try! If you are just a mint fan, this would be wonderful any time of the year, not just on St. Patrick’s Day!
Vegan Peppermint Marble Cake
Makes one 6 inch cake
Ingredients:
one 6 inch cake pan
Cake:
- 1 1/2 cups organic whole wheat pastry flour
- 1 1/2 tsp baking soda
- 1 tsp baking powder
- 1/2 tsp sea salt
- 3/4 cup xylitol* (see below for other sweetening options)
- 2 cups full fat coconut milk (the thick canned kind, I prefer Thai Kitchen brand) at room temperature
- 2 tsp pure vanilla extract
- 1 tsp peppermint extract
- 1 Tbsp spinach powder
- 2 Tbsp cacao powder
- 2 Tbsp cider vinegar
Frosting:
- 1 15 oz can full fat coconut milk (you want to use a brand that is at least 3/4 of the can thick cream or it will not work for this recipe, I like Thai Kitchen brand)
- 1/2 cup raw cashew butter
- 1/4 cup maple syrup
- 1 tsp pure vanilla extract
- 1/2 tsp peppermint extract
- 1/4 tsp sea salt
- 3/4 cup melted coconut butter (not coconut oil)
- spinach powder for coloring
Instructions:
- Preheat the oven to 350F degrees and position rack in center of oven.
- Oil two 6 inch round baking pans and line them with parchment at the bottom so it will not stick.
- Whisk flour, baking soda, sea salt, and sugar in a large bowl to blend well.
- Whisk coconut milk, peppermint and vanilla extract together in small bowl to blend well, then whisk into the flour mixture until well blended.
- Divide the batter between 2 bowls, and whisk the spinach powder into one, and the cacao powder into the other.
- Whisk 1 Tbsp of the the cider vinegar into the batter in each bowl.
- Transfer the cake batter to prepared pans, dropping each color randomly into both prepared cake pans, alternating so you get a nice pattern. Swirl a few times with a knife (but don’t overdo it, you want to still have different colors).
- Place in the oven, and bake cake until tester inserted into center comes out clean with just a few moist crumbs attached, about 25-30 minutes.
- Remove from the oven and let cool completely, then un-mold, by cutting around the edges if they are stuck at all, then putting plate over the top, then flipping it onto that plate then placing a plate on the bottom and flipping it upright onto that plate.
- To make the frosting, combine all ingredients in a high speed blender and blend until completely smooth. Pour into a bowl and place in the freezer until the consistency of stiffly whipped cream (about 30-45 minutes depending on how warm it has gotten). Once it is ready place in the refrigerator until ready to assemble.
- When ready to assemble, spread about 3/4 cup frosting over the first layer of the cake, then top with the other cake layer. Spread the remaining frosting over the top and down the sides of the cake.
- If you have extra, whisk a little spinach powder into it to decorate the top with the extra frosting like I did.
- Enjoy!
Cake keeps stored in the refrigerator, covered for up to 1 week.
Notes:
*Do not feed this cake to your cats or dogs, because xylitol is toxic to them the same way chocolate is. If you would rather use coconut sugar or maple sugar for this, either will work in place of the sugar, the cake may just be a little more brown than green and you will need to use 1 cup instead of the 3/4 cup xylitol (since the xylitol is sweeter). Or if you prefer 1 cup granulated sugar that would work as well.
If you would like to make a 9 inch round cake, double the entire recipe, and bake it in two 9 inch round pans, increasing the baking time to 50 minutes to 1 hour (depending on your oven).
This cake can be made gluten free by swapping out the whole wheat pastry flour for Bob’s Red Mill gluten free all purpose baking flour (this is a brand I have used before and have tested it in cakes with great results).
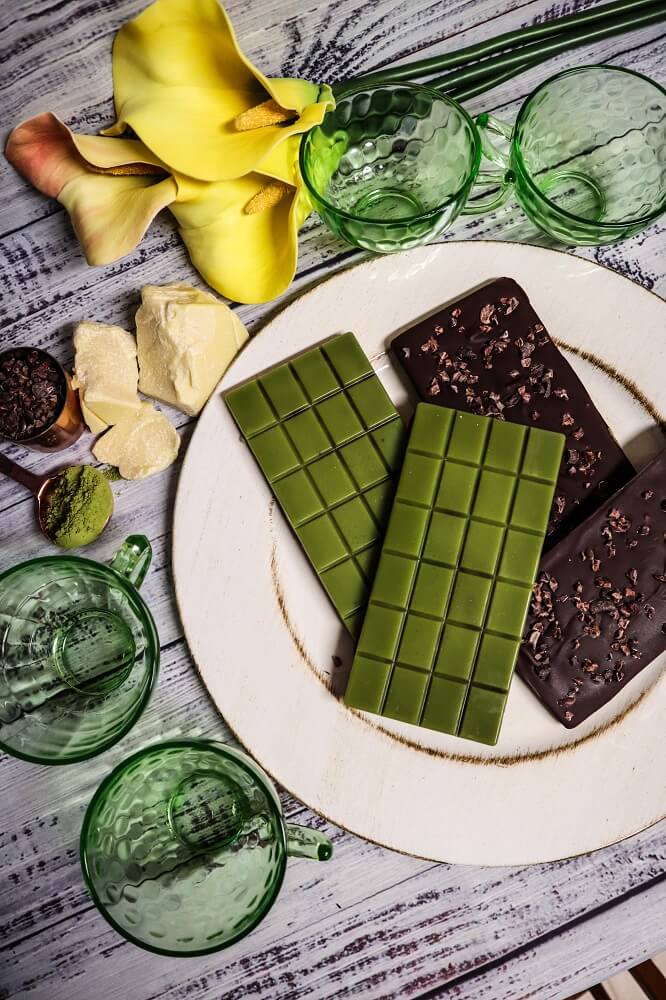
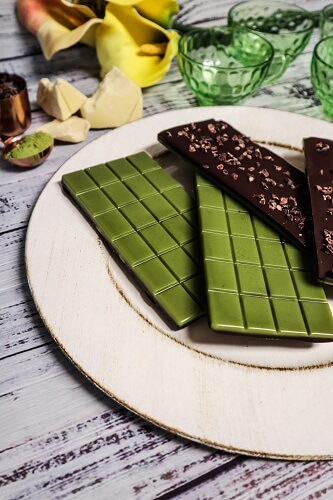
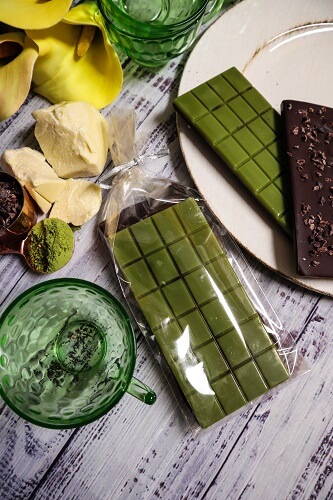
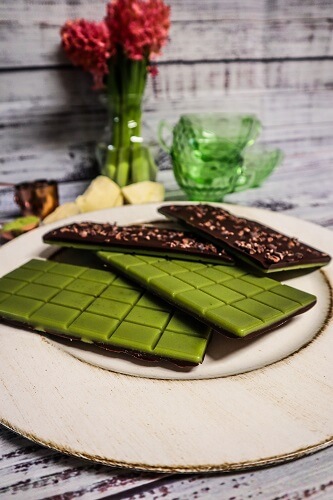 St. Patrick’s Day is tomorrow, and although it doesn’t feel so much like it this year due to the virus going around and events being cancelled, I still like to enjoy some festive stuff at home so I made some green chocolate bars! I like to try to stay positive. And even if we can’t all go out and do the things we usually do, or would like to do why now enjoy yourself at home? I was going to make some chocolate anyway because I had run out of my stash, and I wanted something cheery and fancy so I made some Matcha Chocolate Bars with crunchy cacao nibs. I have been making a lot of mint stuff for St. Patrick’s Day because it is festive and green, but matcha has that lovely green hue as well and I have been in love with it since I first tried it!
 I drink matcha tea every morning at work, and I like my matcha lattes on the weekends when I have more time, but I especially love matcha in sweet desserts. It is amazing in white chocolate. I have made some plain matcha white chocolate before but I wanted some dark chocolate in there as well, so I was thinking a two layer bar. Before I went vegan I thought that white chocolate would be a thing of the past, since milk seems like it is a big part of it, but luckily I was wrong. I have been able to make super delicious white chocolate! It may take a few more ingredients, but that’s alright. I like it even better than the stuff I ate growing up, which probably had some artificial stuff in it.
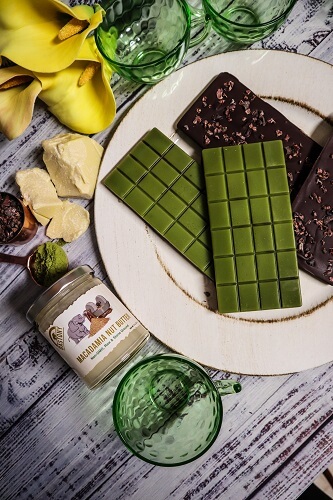 For mine, I use a cacao butter base, with a bit of coconut b\utter and macadamia nut butter sweetened with maple syrup and a bit of vanilla. Raw Guru recently sent me some Dastony coconut butter and macadamia nut butter so it was perfect! If you don’t have macadamia nut butter, no worries, raw cashew butter will work as well (and I know it is a bit easier to find). This white chocolate is seriously crave worthy! I added a bit of matcha to it for a lovely green hue and flavor!
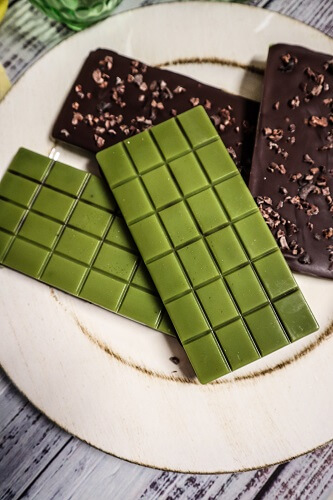 Once it was all hardened in the molds, I added a layer of dark chocolate over it and some cacao nibs for crunch! I could not wait to try them! I had to have a big chunk when they were finally ready. They were super delicious! That white chocolate mixed with the dark was almost a milk chocolate like flavor and it was so good with that earthy hint of matcha and crunchy cacao nibs. If you have to stay home, why not make a delicious treat for yourself like these?!
 Vegan Matcha Chocolate Bars with Cacao Nibs
Makes 4
Matcha White Chocolate:
Vegan Matcha Chocolate Bars with Cacao Nibs
Makes 4
Matcha White Chocolate: