Making the Perfect Raw Cheesecake
I often get many questions on raw cheesecake making, everything from blending to swirling to decorating, so I thought that I would do an entire blog post on the topic to help you all make perfect raw cheesecakes! It is really not as difficult as it seems, and I am hoping I can help you out so your cakes will turn out just as lovely as they taste!
To start, the pan should be greased with coconut oil and the bottom (and possibly even sides) lined with parchment if you really want the crust to come out well. I often have questions on why crusts break apart and stick and this is the answer to fixing that problem. If the pan is springform the crust and even cake can still stick to it so lining it and greasing it is essential. When making the crust, if it is a graham cracker sort, made with nuts, dates (and in my case often sprouted dried buckwheat groats), it might need different amounts of dates depending on the quality of the ones you have. If you have blended the mixture well and it is still not sticking together, you may need more dates, or you can add a little liquid sweetener to do the same job. I like to put my crust in the freezer while I prepare the filling so it is nice and chilled therefore allowing the filling to firm up faster.
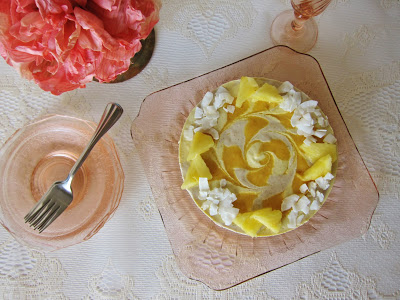
Next, when you are making the filling for a raw cheesecake, it is important that the ingredients are prepped properly. So, if using cashews, they should be soaked for at least 4 hours to soften them so that they can blend better. I like to get all my ingredients ready ahead of time and set them all out before I start. So, I open coconuts and measure out the meat if needed, have all of my cashews soaked and ready, and set out everything else so it is organized before I start. The ingredients should be at room temperature so that clumps do not form in the filling. I melt my coconut oil in the dehydrator in a glass measuring cup (which is really convenient because it can be done while you prep the other stuff). It is also important to use a high speed blender or powerful food processor to get the filling really smooth. A Vitamix works best, but I often use my Cuisinart food processor. Even with a powerful blender however, there may still be coconut bits left in the filling after blending so to get it really smooth, I always strain it through a fine meshed strainer so it is silky smooth. When using coconut for the filling in cheesecakes, it is best to use the thicker stuff because it leaves the filling less watery. However, since coconuts are expensive and there is no way of telling what it will be like when opening them, you may end up with some of the softer filling. In that case, you can reduce the liquid in the cheesecake by a couple Tbsp or if the filling seems to runny add a couple Tbsp liquefied coconut butter to help it firm up.
When adding the ingredients to the filling, always add the coconut oil or butter last with the motor running, slowly into the feed tube if using a food processor so it can emulsify (otherwise the oil will harden and create lumps, but should this happen, simply keep the processor running until it warms the mixture or let it warm up to room temp. and re-blend).
When adding the ingredients to the filling, always add the coconut oil or butter last with the motor running, slowly into the feed tube if using a food processor so it can emulsify (otherwise the oil will harden and create lumps, but should this happen, simply keep the processor running until it warms the mixture or let it warm up to room temp. and re-blend).
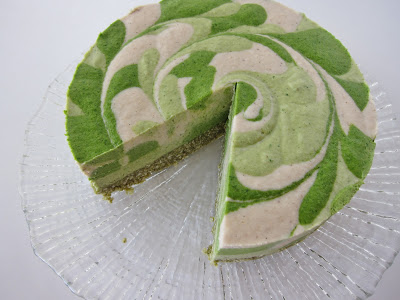
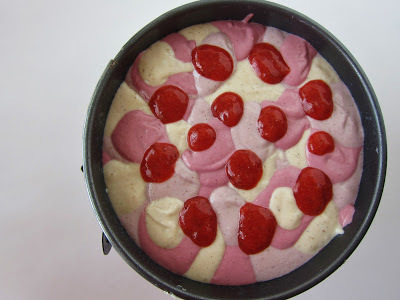
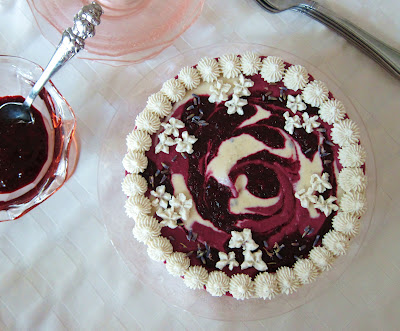
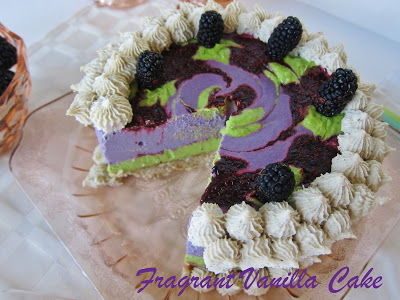
When doing multiple colors of filling, I always start with the lightest color then go to the darkest (such as in this raw Strawberries and Cream Dream Cake, which is pictured below in the swirling tutorial). If the flavors are similar such as in this one you may not need to rinse it in between.
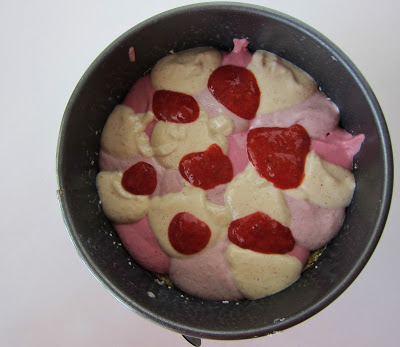
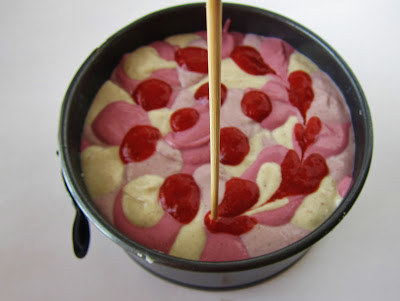
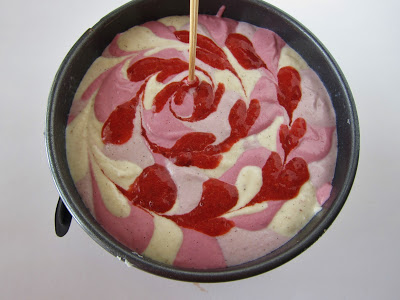
When swirling a cheesecake, if you have multiple colors and fillings, it is best to just drop them by the Tbsp into the crust for the prettiest cake. If it is fruit such as a strawberry jam, just a tsp is ideal (since it is more runny). Pictured above is the first layer. It usually ends up being about 3 by the end, and if the bottom 2 are a little messy it is ok, since it is the top that matters most. Once the fillings are all layered in, I tap the bottom of the pan on the counter to level the layers so it is all flat on top. I like to use a skewer to swirl the fillings as pictured below, starting from the outside in in a spiral.
4-6 hours is ideal to let the cake set in the freezer. When you go to unmold it, it should not crack, and if it starts to when you start to take off the spring form pan, it might not be ready yet, or you may need to use a knife to run around the side to release it (if you did not use parchment to line the sides).
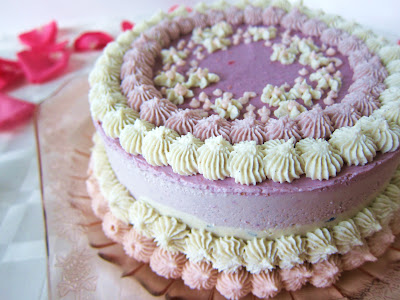
When making the cream for decorating the top and sides of the cake, the ingredients need to be room temperature just like the cheesecake filling so that the coconut oil can be emulsified into the cream and not cause lumps. I chill the cream in the freezer just until it is whipped cream consistency, not too long or it will be hard to pipe, not too short or it will be runny. If it becomes too firm, simply let it warm up at room temp, stirring often. I use a pastry bag to pipe it usually, but a plastic bag with a piping tip works just fine. Piping takes a little practice, but you will get the hang of it don't worry.
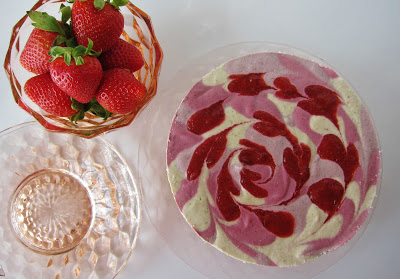
The cheesecakes should always be stored in the fridge, and keep for a week, but if you wish to store them longer many of them freeze very well. Your cakes can be just as beautiful as mine if you make a few, so just get in there and try the recipes. There is no need to worry about how they look, what matters is how they taste and you will get the hang of making them after a few. Remember I have made probably hundreds, so I have gotten a lot of practice. Happy raw cheesecake making!

(Visited 26 times, 1 visits today)